Corners play a bigger role in the interior than it might seem at first glance. It is enough to look at their uneven or “erased” surfaces to immediately become clear: no one would call such a finish neat. Decorative corners on the corners of walls, slopes of door and window openings began to be used everywhere during repairs only in recent years. Until then, the materials used to cover the joints simply changed more often than the rest of the finish.
You can appreciate the transformative effect of a decorative element even in an empty room without furniture. Based on the type of location, they are classified into two types:
| Exterior | They are used to decorate the exterior facades of houses. |
| Interior | Used in rooms of city apartments and private houses. |
Elements are also classified into those that are placed on the outer sides of the corners and those that are inserted into the internal ones. The latter can have semicircular shapes that “soften” the finish. You can make a corner with your own hands, or purchase it at a specialized store. Products are made mainly from plastic, MDF, but there are also more durable metal and stone options. Polyurethane effectively imitates various natural materials: wood, marble, sandstone, brick. Plastic corners are used not only as decoration, but also as a durable finishing element that will “outlast” wallpaper or other less durable wall surface coating. There is also a “mystical” component to the question. According to Feng Shui, the places where the “joints” of the walls are considered energy breaks, which create an imbalance and negatively affect the perception of the situation, so their edges are decorated with corners, “smoothing out” the sharpness.
- What are decorative corners for?
- When to apply
- Plastic corner size
- Types of decorative corners on walls Arched
- For ceramic tiles
- For external and internal corners
- Textured corners
- Wooden
- Corners for ceilings and baseboards
- Natural stone corners
- Artificial stone corners
- Finishing door and window slopes
How to fill the empty space in the room?
How to fill an empty corner: 16 ideas from designers
- Indoor flowers An excellent option for those apartments where there is no urgent need for additional storage or lack of functional areas. ...
- Book racks and shelves are a great way to occupy a corner and create additional space for storing books. ...
- Decor and accessories…
- Hanging chair…
- Work zone …
- Armchair …
- Poof...
- Floor lamp
Mar 5 2021
Leveling materials and coatings
If you plan to use the wall as a place to mount furniture, then any unevenness in this case will cause a lot of inconvenience. It will take time to fix this. But the modern building materials market offers the simplest, most convenient and practical options that will quickly and efficiently solve the problem without much expense.
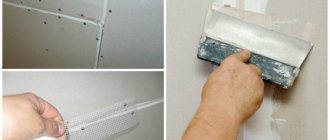
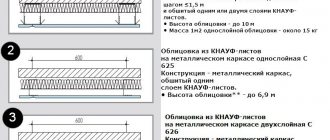
Drywall
This cladding material has an increased level of environmental friendliness and can be used in residential areas. With its help, the ideal level direction of the wall is created, which is especially important for the upcoming installation of furniture.
Special slats are attached to the wall, onto which sheets of drywall are mounted using self-tapping screws. Next comes plaster, and the final stage can be wallpaper.
Advantages:
- Inexpensive material.
- You can put sound insulation under it.
- Eco-friendly and practical.
- Quick to install.
- Ease of finishing alignment of joints.
Flaws:
- Drywall “steals” up to 10 cm of usable area of the room.
Drywall is the most convenient material for leveling walls, but its installation has some difficulties, so you will have to use the services of specialists.
Cork panels
Cork panels have won the love of many designers, since with their help it is possible not only to create a unique texture, but also to hide the imperfections of any wall. They are glued to a special solution, have no difficulties in operation, and are suitable for all types of interiors.
Advantages:
- Environmentally friendly product, does not cause allergies.
- Does not burn and does not provoke the formation of fungus and mold.
- Light weight and no load on the supporting structure.
- Not afraid of humidity.
Flaws:
- Relatively high cost of material.
Cork panels must be glued extremely carefully, since after gluing it will not be possible to move them even a millimeter.
Wooden lining
The installation principle is similar to plasterboard, but its distinctive feature is its minimal thickness. If various interior items are adjacent to the wall. There is a risk of dents forming on individual structural elements. Lining is more about “hiding”, but not about “durable and reliable”. It is easy to clean, there are a lot of colors and textures. As for environmental friendliness, it’s definitely not worth using for the bedroom, but in the kitchen such a coating will come in handy.
Advantages:
- Light weight, easy to cut and attach to base.
- Easy to use.
- No seams when installed correctly.
- Low cost.
Flaws:
- Not suitable for residential areas.
In conclusion, it is worth noting that crooked walls are not a reason for large-scale repairs. If the surface does not carry a functional load, it can be decorated in such a way that no one would even think of looking for the builders’ flaws. Use your imagination, create, but remember that any idea must be practical, because it is embodied not in a museum, but in a living space.
Where to start leveling the walls
Leveling walls with your own hands is a rather labor-intensive process. However, if you select the right materials and outline a clear plan of action, then as a result you will receive a perfectly flat wall surface that will serve you for a long time. With a perfectly flat surface, the wallpaper does not peel off, the tiles do not crumble or crack, and the paint does not peel off. If you start decorating the interior without first leveling the walls, then the renovation will look sloppy. Therefore, it is so important that the surface that you prepare for finishing is free of defects. Even if the walls visually seem smooth, you should still check them for the presence of chips, microcracks and bulges. The results of this check will determine how to level the walls in order to obtain a high-quality and durable result.
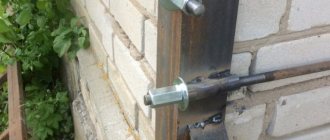
Displaying beacons
It is recommended to plaster walls using beacons. Their role is most often played by a metal profile with a T-shaped section. You can also use wooden slats. This is the simplest method that does not cause any particular difficulties even for beginners.
The beacons are mounted on the wall by pressing them into scattered “cakes” made of cement or gypsum mortar. Until it sets, level the profiles using a level so that they are in the same plane.
It is important to choose the right distance between the beacons: the rule should move freely in the vertical direction, resting its edges on two adjacent profiles.
For the convenience of leveling the mixture, the outer beacons are not attached to the corners of the room, but retreat from them at least 30 cm.
Cost and timing of plastering manually and mechanized
| Application method | Deadlines | Costs of materials, rub./sq.m | Application cost rub./sq. m |
| Manual | Low productivity - application can be applied to 10-30 m2 per day, drying - from 14 days | From 230 | From 600 |
| Mechanized | High productivity - application can be applied to 200-250 m2 per day, the mixture dries in a period of 7 to 14 days | From 200 | From 450 |
Adviсe
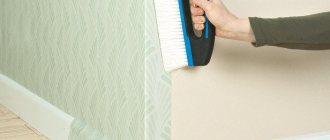
- Moistened wallpaper will easily come off the wall.
- To protect non-renovated rooms from dust , the passage to the room can be covered with a damp sheet.
- Goggles and a mask (you can use a medical one) will help protect your face from plaster dust.
- The wiring of all communications can be hidden behind sheets of drywall , and lighting can be installed there.
- Drywall can be easily cut with a regular utility knife.
- In case of large uneven walls , leveling them with plasterboard will cost much less.
- Both plastering and installation of drywall sheets are carried out from the bottom up.
- Plastering can be done not only manually , but also by machine. The mixture is poured into the device and sprayed onto the walls under pressure through nozzles; you only need to manually level the surface, removing excess plaster. This option will allow you to level the walls faster and easier, but requires special, rather expensive equipment.
- Sanding by hand is a long and dusty process. No matter how you defend yourself, the plaster particles are so small that they can get everywhere. You can use a grinding machine, which will make the process faster and less dusty, because... has a dust collection container.
Plastic corner size
The standard range of sizes for PVC corners starts with 10x10 mm and ends with 50x50 mm. Between them, gradations with a difference of 5 mm are used. Parts of non-traditional sizes are made to order. An angle of 90 degrees is maintained between the two guides of the decorative element, at which all planes of the apartment must intersect. If you have a home with “crooked” walls, then you need to take appropriate measurements and contact a specialist with a request to make individual parts.
Options for using corner profiles for finishing corners
The corner profile is used to decorate the following elements:
- “Natural” joints between walls that are in a vertical plane;
- Door and window slopes;
- Places of “convergence” of ceilings, floors and walls in horizontal planes with a concave shape;
- Corners of decorative partitions, including arched openings;
- Joints between shower cabins, fireplaces and other “monumental” (not involving movement) interior objects and walls and floors.
A decorative element can be used to “smooth out” any “seam” at the junction of finishing materials. If previously it was necessary to carefully process the cuts so that they retained a beautiful aesthetic appearance, now they are allowed to have irregularities and chips, which will be masked by the corner.
Finishing door and window slopes
Double-glazed windows usually come with special corners that complete the installation of the window. Door sets also often include trims and trims. If the corners are left without additional protection, then you will have to select and glue it yourself. The element will protect the slopes from damage and smooth out the junction of two different materials. For example, the end of the wallpaper will begin to wear off and peel off over time. No matter how smoothly you cut the finishing material on the slope, it will look untidy without additional coating. Slopes in doorways can be scratched by furniture carried through them.
The best option would be to use polyvinyl chloride corners. If necessary, it is easy to replace, and the surface texture can imitate any natural materials. By choosing a special shade, you can create an illusory transitional border between the color of the wallpaper and the window frame or doorway. Corners made of veneer or bamboo are less commonly used.
Arched doorways
Arched openings, as a rule, have one of the classic shapes: with a semicircle on top. Not every material can replicate its contours. For example, solid wood corners can only be used to decorate straight lines. Smooth transitions are decorated with elements made of flexible plastic, MDF, veneer or bamboo. All of the above options will easily follow the contours of the arch and complete the design of the doorway.
What are decorative corners for?
Corners are most often “touched” by people passing by with their shoulders, elbows and carried objects. Accordingly, it is this part of the wall that is erased and scratched more than the remaining ones. To protect the joint from mechanical stress, a decorative corner is attached to it - a special type of finishing materials, a special “overlay”. It is designed to perform two functions:
- Decorate the finish;
- Protect the sensitive area.
In addition, finishing using these elements looks neater and the interior seems complete. Using the material, color and size, you can emphasize the features of the style used in the design of the room.
What to choose: manual or mechanical application method?
The choice of manual or mechanized plastering method depends on many factors. But if we are talking about large areas in an extremely short time and with a limited number of workers, then only mechanical plastering makes sense. Mixtures for it provide lower consumption during operation, and you do not have to hire a large team of builders. At the same time, the time required to complete the work is much shorter: up to 250 m2 can be plastered in 1 working day.
Plastering small areas using a mechanized method is also beneficial. Just the fact that you don’t need to putty the surfaces before gluing wallpaper and ceramic tiles already provides additional cost savings. But it is also very fast.
When to apply
The corner part of the wall is covered with decorative elements in several cases:
- If the corner has visually noticeable defects: curvature, “dimples” or protrusions that were not corrected with plaster;
- When the protruding part obstructs the passage or is located next to the “pedestrian” area. Accordingly, it will constantly be touched, erased, scratched. Over time, mechanical damage will become noticeable and negatively affect the sensitive wall finish and its appearance;
- If without them the interior does not look complete;
- To prevent the destruction of the outer corner of the building and give the exterior a neat appearance.
The installation of elements usually completes the renovation: they literally become the finishing touch in the design.
How to glue a plastic corner yourself
In addition to decorative corners, you will also need a fastening compound. For narrow elements it is not recommended to use glue, the excess of which cannot be removed from the surface without leaving a trace. Before carrying out the procedure, the joint must first be cleaned of dirt and remnants of wallpaper or protruding pieces of finishing material. No corners will save an excessively uneven and bumpy surface. Then the wall is measured. The measurements are exactly transferred to a piece of corner. It is better to cut the material with a hacksaw with fine teeth. Do not forget about the joints between the corners themselves (in doorways, windows): two straight lines should end with cuts at an angle of 45 degrees. The “wrong” side of the prepared material is coated with glue and applied to the wall. Using your hands, firmly press the corner to the surface and hold it until the fastening composition “seizes”
New technologies
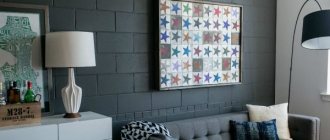
An excellent option to disguise uneven walls is to use liquid wallpaper. The material is a dry mixture that must be diluted with water before application. The liquid solution is applied with a spatula, and an original pattern is formed on the surface. You can replace liquid wallpaper with ordinary acrylic or oil paint. This technology will allow you to decorate any surface with the ability to choose the desired color or pattern.
Installing drywall using the frame method
It is advisable to install the lathing in case of significant curvature of the walls, and also if it is planned, along with leveling, to insulate the room or increase its sound insulation. Wires are hidden in the space under the plasterboard surface, enclosing them in fireproof corrugations or cable ducts.
The leveling technology is as follows:
- Minimal surface preparation is carried out: wallpaper and poorly adhering parts of the old coating are removed.
- A line is drawn on the ceiling indicating the outer edge of the future wall surface.
- Using a plumb line, it is transferred to the floor.
- The locations of vertical posts and attachment points for direct hangers, which serve to adjust their position, are marked on the surfaces. The racks are placed in increments of 60 cm: this way, each sheet of drywall will be fixed on three racks - two are located at the edges, and the third is in the middle. The suspension mounting step is 60 cm.
The frame is designed so that the joints of the plasterboard sheets are located on the surface of the profile.
- Damper tape is glued to the guides, after which they are attached to the ceiling and floor with dowel nails in increments of 30–40 cm.
- Holes are drilled in the wall and hangers are attached with dowels.
- Vertical racks are installed. They are cut 1–2 cm less than the distance between the floor and ceiling, inserted into the guides and fixed with metal screws. Some craftsmen prefer to use a cutter for this purpose.
- Controlling the position of each rack with a level, it is secured to straight hangers with self-tapping screws. The protruding parts of the suspensions are bent to the sides.
- If necessary, horizontal jumpers are installed. They are required in places of horizontal joints of sheathing elements. In addition, jumpers will add rigidity to the frame.
USEFUL INFORMATION: Is it necessary to prime the walls after puttying before wallpapering?
- GCR is cut into pieces of the desired shape and size. Holes for sockets and switches are drilled, and chamfers are made at the joints with a plane at an angle of 45˚.
- The drywall elements are screwed to the frame with self-tapping screws in increments of 25–30 cm. The heads of the screws are slightly recessed into the material.
For this operation, a special screwdriver bit designed for fastening drywall will be very useful. It will prevent you from turning the screw too deeply and denting the surface of the gypsum board.
Detailed instructions for assembling the frame, installing gypsum boards and pre-finishing are in this article.
Leveling walls with putty yourself
This method is used if it is necessary to smooth out minor irregularities and cracks. Putty is a fine-grained building material in the form of powder or paste, which is laid in a thin layer, creating a perfectly flat surface for finishing. Putty is used not only for leveling small cracks, but also for pre-finishing walls for painting and wallpapering. Before leveling the walls in the apartment using putty, you should select the correct composition of the mortar. Based on their composition, there are 8 types of putty:
- Based on cement. This type of putty is suitable for interior and exterior work, it is basic and universal for any type of room. Often used in rooms with high humidity: in the kitchen, in bathrooms, toilets. Suitable for leveling brick walls, masonry, concrete walls. Not suitable for wood.
- Gypsum putties are used for finishing and final leveling of walls and ceilings in dry rooms. They adhere well to the wood. When dry, a smooth surface is created, which is ideal as a base for wallpaper.
- Polymer putty. This putty is used for interior work on cement, concrete, gypsum or polyurethane surfaces.
- Maclean-glue. Used to prepare the surface for application of enamel, oil or water-dispersion paint. It is used mainly for leveling walls in non-residential premises, for example, garage, basement, storage room. The composition includes drying oil and may retain a specific odor. Suitable for wood restoration.
- Acrylic. This universal composition is used for leveling brick, concrete walls, cement, wood, plasterboard and metal surfaces. With the help of this putty you can get an almost mirror-like, perfectly flat surface. Suitable for both external and internal work.
- Latex. Used for leveling plasterboard walls and interior cosmetic work. You can choose almost any color.
- Facade acrylic. Usually used for finishing facades, it is moisture resistant, only for external work.
- Shpakpil. This is a special type of putty that is used for baseboards and final leveling of walls. Used to prepare the wall for tiles or whitewash.
We choose the basic putty based on the temperature and humidity conditions of the room. If the temperature in the room is constantly changing or there is high humidity, use waterproof putty. For rooms with constant temperatures and low humidity, it is recommended to use “breathable” putty, for example, gypsum. This will allow you to create a comfortable microclimate in the room. It is also important to choose the right putty for the wall material: stone, brick, concrete, metal, gypsum, polyurethane or wood. It is also important what kind of finishing the wall is prepared for: painting, wallpaper, decorative painting, tiles, and so on. The durability and beauty of the finish depends on the correct choice of putty.
Materials that you will need to carry out putty work: 2 spatulas, sandpaper, antifungal mixture, primer, putty, brush, paint roller. It is recommended to carry out all work wearing gloves and a mask.
Source
Plastering different types of walls
Plastering different types of surfaces has its own nuances.
Wooden walls
For plastering wooden walls, only cement, gypsum and sand-cement mixtures can be used. Work is carried out only at a humidity of no more than 60% and a temperature within 10-20°C. If the deviation is more than 5 cm, plastering will not be the right solution.
Concrete and brick walls
Plastering walls made of monolithic bases or brick is a mandatory stage of rough finishing, which gives the base additional strength and sound insulation. You can use gypsum, cement compositions, mixtures based on various mineral and polymer components.
Read more about this in the article “Plastering concrete walls” and “Plastering brick walls”.
Walls made of aerated block, foam block
Rice.
4. For leveling gas blocks and foam blocks, the best option is gypsum plaster. Porous walls made of foam blocks and gas blocks and similar building materials require the use of gypsum or cement plaster. But here it is important to maintain the correct ratio of the thickness of the outer and inner plaster layers (dew point). It should not be less than 2:1. This will ensure the proper microclimate in the room.
We described in detail about plastering such surfaces in the articles “Plastering of aerated concrete and gas silicate” and “Plastering of foam block”.
Internal and external walls
Almost any type of mixture is suitable for solving problems inside buildings, while only acrylic, mineral, and silicate plasters can be used for cladding external walls. However, for thin walls you should choose warm plaster, which will contain perlite, polystyrene foam, foam glass or sawdust.