/Repair/Floor/
Tiles and laminate are combined for greater practicality of the room and its zoning. For example, in kitchens, kitchen-living rooms, hallways, and also under doors. Here are the 5 main ways to design a joint (list by popularity):
- Using a threshold or connecting profile;
- Using sealant (silicone, acrylic, polyurethane);
- Using a cork compensator;
- Using tile grout between joints;
- Using a liquid plug.
In this material, we examined each of these solutions in detail and presented 40 photo examples.
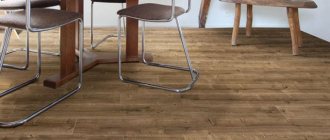
The junction of tiles and laminate without a threshold in the interior of a kitchen in Khrushchev
Joint WITHOUT a threshold - how to do it and why sometimes it’s better not to take risks
Let's start with a more preferable, but also more complex solution - the junction of tiles and laminate without a threshold.
How to make a joint between tiles and laminate WITHOUT a threshold?
You can join tiles and laminate flooring without a threshold only if ALL of these 5 conditions are met:
- Lay both coatings not in a floating manner, but with glue. If the laminate is laid in a floating manner (when the lamellas are laid on a substrate and are not glued to the base), then a threshold cannot be avoided.
- Achieve the same height of tiles and laminate by adjusting the thickness of the adhesive and screed. The maximum error is 1-2mm. This is the second reason why you need to plan the junction of tiles and laminate without a threshold in advance.
- Make an expansion joint of sufficient width. In order for the laminate to expand and contract naturally, there must be a gap of at least 5 mm between the tiles and the laminate (on average, 1 mm of compensation gap is required for every meter of laminate length). Otherwise, the laminate will swell, begin to creak, and the plug may even fly out of the joint.
- The joint should be no more than 3 m long, and the room should be no more than 25 sq. m. m. After all, the larger the area of the laminate, the larger the compensation gap it needs.
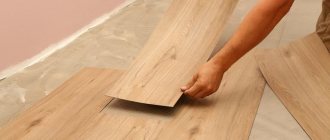
- Cut the laminate very carefully. This requires special equipment and a qualified craftsman, especially if the joint shape is complex.
If at least one of these requirements is not met, then the threshold will still have to be set. Do you doubt whether it’s worth bothering with a joint without a threshold or is it better to take the easy route? The advantages of the first solution are obvious: a neat appearance, no cracks that complicate cleaning, nothing interferes with walking.
The junction of tiles and laminate without threshold in the interior of a kitchen in Khrushchev
And the absence of a threshold is indicated if the joint has a complex configuration. For example, if it is too long, radius, wavy or curly (zigzag, with hex or octagonal tiles). Here are a couple of photo examples of complex joints.
On the other hand, when making a decision, keep in mind that no matter how perfectly the joint is made and no matter how high-quality the laminate is, there is still a risk of it swelling. In this sense, the threshold is a more reliable solution.
So, where to start planning a joint:
- If you want to connect tiles and laminate flooring without a threshold, then you need to choose specific materials and the method of designing the joint in advance - before the screed stage. Next, a little math: sum up the thickness of the tiles and tile adhesive, and then the thickness of the laminate and its backing/adhesive. Finally, we calculate the difference between the heights of the two coverings. The task of builders is to level out this difference due to the thickness of the substrate, screed and/or glue.
- However, if you have already laid tiles, but have not yet laid laminate, then there is still the opportunity to make a single-level floor. Since the tiles have a standard thickness, they are laid first, then the laminate can be adjusted under them.
Finally, we talk about 4 ways to design the joint between laminate and tile without a threshold.
Attention! Whichever of the following methods you choose, when laying the laminate for its thermal expansion, you should leave a 5-10 mm gap from the opposite wall (later it will be covered with a plinth).
Common mistakes during application
Novice craftsmen often make mistakes when working with liquid stopper. The most common mistake is neglecting to thoroughly clean surfaces and degrease them. As a result, the degree of adhesion of the sealant to the materials decreases. Also, some people do not immediately remove the excess product that has come out, leaving this work for the future. But after drying, the cork is quite difficult to clean, and there is a risk of damaging the finished seam.
It is a mistake to level the sealant on the base that is at a higher level. In this case, an unsightly gap will form, and the fit of the material will not be tight. Liquid cork is not used for laying carpets and their joints with other materials; special glue should be selected for this purpose.
Arrangement of joints between different types of flooring
Despite existing limitations, cork sealing compounds are considered universal and multifunctional products. They allow you to solve various problems - from sealing seams to decorating walls. Their popularity is due to their affordability, high quality and environmental friendliness, which is why sealants are so widely used in the renovation of apartments and houses.
Method 1. Sealing the joint with tile grout
Pros: Simple, inexpensive and working method. Suitable for complex joints.
Cons: The grout may crack as the building shrinks. Since the joint between the tiles and the laminate turns out to be rigid, the compensation gap for the laminate must be left under the baseboard.
Installation: You can fill the seam with grout both during the floor laying process and after its completion. The algorithm of actions is as follows:
- On the screed we draw the markings of the line of the future joint;
- We lay the tiles to the line, trim the unnecessary part and trim it with a grinder;
- We cut the laminate, lay it taking into account the compensation gap, and treat the edge with silicone;
- Fill the resulting seam halfway or a little more with sealant and let it dry;
- Place grout into the seam on top of the sealant and level it;
- To make the seam more durable, coat it with clear varnish.
Advice:
- Epoxy grout or polymer grout is especially suitable for porcelain stoneware;
- You can use the same grout that was used to grout the tile joints.
Method 2. Sealing the joint between tile and laminate with sealant (silicone, acrylic, polyurethane)
Pros: Due to their plasticity, sealants allow you to “walk” a little. For the same reason, the joint between dissimilar coatings does not deteriorate when the building shrinks.
The 1.5 mm seam is filled with silicone sealant
Cons: Silicone sealants sometimes harden over time. Only narrow seams about 5 mm wide can be sealed with sealant.
Advice:
- Acrylic sealant can be painted and varnished after drying (unlike silicone).
Installation: In this video you can see the process of bringing tiles and laminate into one plane and the process of sealing the joint with silicone sealant.
Application for construction projects
All reinforced concrete structures and SIP panels have one drawback - under the influence of seasonal changes in temperature and humidity, they are subject to linear fluctuations. Not every sealant is suitable for sealing joints in reinforced concrete structures, since the compounds break down quickly enough and do not have suitable elasticity.
Using polyurethane foam as a sealing agent does not give a positive result, since the foam cracks over time, turns yellow, and after a few years loses its characteristics. Cork sealing compounds are an excellent replacement for polyurethane foam and any specialized mastics. This product is suitable for filling all types of seams, including locking ones, effectively eliminates cold bridges, seals seams and areas adjacent to frame objects. Thanks to these compounds, you can seal joints and seams at home with your own hands; this possibility is relevant for any panel structures.
Method 3. Joint with cork expansion joint
The cork compensator is the most popular alternative to the threshold. They can be used to create a straight joint, and sometimes a radius one.
- Many designers prefer a cork expansion joint. And there are those who consider it as much a relic of the past as aluminum profiles.
Pros: Looks good, the joints are very neat. Pressed cork is soft and elastic, so it can provide natural expansion to laminate/parquet flooring. Due to its naturalness and plasticity, cork expansion joint is especially suitable for the joint between tiles and parquet/parquet boards/engineered boards.
Cons: higher price, not suitable for shaped joints, limited choice of shades, theoretically it could begin to crumble due to shrinkage of the house or even fly out of the seam (but, as practice shows, this is unlikely). Another significant drawback is that the elasticity of cork is not enough to compensate for the expansion of the laminate in spacious rooms (more than 25 sq. m).
Adviсe:
- When laying laminate flooring, you can buy a cork expansion joint to match it and already with varnish. If you are laying parquet/parquet boards, then you can buy a cork expansion joint without any treatment (pictured) and sand and varnish it at the same time as the parquet.
View this post on Instagram
Cork expansion joint available in natural color. Easy to paint. Used to fill joints where parquet joins. Chistopolskaya 20b, “Cork Gallery”. #CORGALLERY #parquetkazan #floors made of corkkazan #cork compensator #cork compensator #wooden parquet
Posted by Eduard Nechaev (@edouard_netchaev) Sep 25, 2021 at 3:42 PDT
- Cork expansion joints with veneer are available for sale - this is an excellent choice for wooden floors.
Installation: the compensator is glued with parquet glue. The work is carried out as follows:
- First we lay the tiles. We grind the edge, level it, and clean it from dust and dirt using a vacuum cleaner.
- We apply the compensator and, if necessary, trim it.
- We treat the edge of the laid tile with glue.
- We insert the compensator into the seam and press it firmly against the edge of the tile, for example, using a building level.
- We fill the micro-gap between the tile and the expansion joint with sealant (to match the expansion joint/floor covering), for this you can slightly bend it. Next, firmly press the compensator again. Wipe off excess sealant.
- We lay the laminate close to the compensator.
Use for soundproofing
Cork sealing products are often used for gluing soundproofing sheets and boards, as well as for sealing seams between these panels. The material significantly reduces the noise level, and when applied to a subfloor, it eliminates the squeaks of wooden boards. The product is used for soundproofing machines, installing certain blocks and components, and also makes it possible to reduce vibration of generators, machine tools, and other electrical equipment.
Method 4. Joint with liquid cork (cork sealant)
Cork sealant is an elastic mixture based on cork chips and glue.
Pros: Can be used at the joints of complex shapes.
Cons: Looks less neat than sealants or cork expansion joints, especially in wide joints (more than 7 mm). Despite the fact that liquid plug is difficult to insert into narrow joints.
Application for thermal protection
When insulating houses and other structures, sealing seams is a mandatory procedure. Creating thermal insulation of joints, seams and various surfaces protects against the occurrence of cold bridges, which could penetrate through hidden places and areas. Thanks to the reliable and strong adhesion of the cork sealant to the base, a monolithic, durable joint is formed.
The sealing agents have optimal fluidity and plasticity, due to which they penetrate even the smallest cracks, joints and defects, are very easy to apply and are simply smoothed out with a regular spatula. When the composition is used to seal joints of laminate or other finishing materials, it perfectly levels out any unevenness and roughness and makes the surface visually attractive. After hardening, the product can be tinted or painted.
Some more tips
- The easiest way to choose a matching threshold is from the laminate manufacturer's collection.
- Sometimes, instead of racking your brains over creating a joint without a threshold, it’s easier to completely abandon the idea of combining dissimilar coatings. For example, if you visually like wood, then you can replace it with practical wood-look porcelain tiles along with a heated floor system. But it’s not worth joining imitation wood (the same porcelain stoneware) with natural wood or laminate, since it’s almost impossible to choose tone-on-tone materials that match the texture.
- It is very important to find a qualified craftsman who has already performed similar work when laying the floor and designing the joint between tiles and laminate.
- Keep in mind that if the room is small (up to 8 sq. m), then combined floors will not look very good, they will visually fragment and reduce the space.
- If you want to combine tiles and laminate in the kitchen, we recommend making a tiled area at least 1 meter wide (from the cabinets with the stove and sink). The photo below shows an unsuccessful example of combined floors - the strip of tiles is too narrow.
- It's best to lay the tiles first. Since it is easier to adjust the level of the laminate to it. In addition, working with tiles is always wet, and this is harmful for the laminate.
Photo gallery
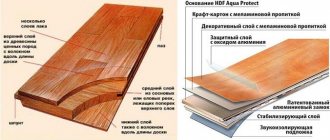
Support the project - share the material with your friends on social networks:Description of material
A cork compensator instead of a plinth is a strip formed from crushed cork by pressing. Under external influence, it is capable of contracting and also returning to its original position. The end of the strip is usually coated with a coloring agent and polyurethane varnish. A huge range of colors for such products makes it easy to choose the desired shade for sealing the joint between different floor coverings.
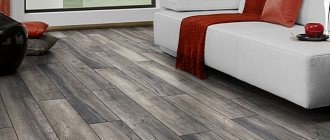
A correctly selected cork expansion joint for laminate flooring is not at all noticeable and makes the transition unnoticeable. At the same time, the high-contrast leveler emphasizes the boundary line of zones in the room, giving the home a stylish look. In addition, cork elements prevent destruction of contacting materials and protect them from negative external influences.
On the market, cork expansion joints are presented in different colors, which allows you to choose the best option that will fit perfectly into the interior of a particular room Source bazazakonov.ru