Plaster is one of the main methods of finishing walls at the rough and finishing stages. Therefore, it is not surprising that questions about removing old decorative and other plaster arise quite often. Depending on the situation, the process can be simple or very labor-intensive, when it becomes quite difficult to remove a layer of plaster with a tool. But with our tips, you can do it yourself in the shortest possible time.
In what cases may such an operation be required?
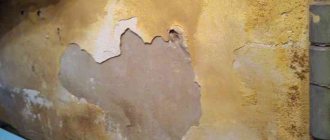
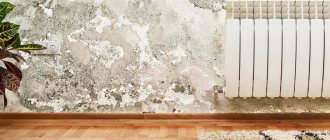
When carrying out a major renovation, we evaluate the condition of the finish on the walls and make a decision on whether to preserve, repair, or remove it. If the layer of plaster is severely damaged, then sometimes the ideal solution is to break it completely, reaching the brick or concrete wall, since repairs will become too labor-intensive.
Sometimes, as part of a major renovation, we want to implement a radically different concept for decorating a room, and then the only option is to completely clean the walls, gaining access to them, then carry out insulation and finish everything again in accordance with the plan. For example, old plaster must be removed when installing heavy elements such as tiles and natural stone, since the base for them must be as strong and reliable as possible.
Important! Sometimes it may be necessary to remove not all the plaster, but to clear part of the wall from it. This happens when the wallpaper is unsuccessfully dismantled, the coating is otherwise damaged, or when greasy stains form that cannot be removed in any other way.
No dust
It is quite possible to get rid of the old coating without dust, the main thing is to properly prepare the walls. So, they need to be well moistened with water using a sponge, roller or spray bottle. The layer of old plaster will swell and can be easily removed with a regular spatula. During the dismantling process, the wall must be constantly moistened.
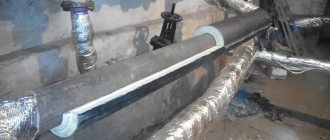
For façade work, you can use a hose or a mechanized high-pressure water jet. This method is not suitable for apartments; there will be a lot of liquid on the floor, which will lead to flooding of the neighbors below.
The old layer can be softened by applying a special solution to the wall. To do this, dissolve 2 tbsp in 1 liter of water. spoons of corn or potato starch. The resulting composition is carefully treated with the wall. It will disrupt the adhesion of the plaster layer to the base and after 10-15 minutes the old coating will become looser.
What kind of plaster will you have to deal with?
The degree of complexity and other nuances of the work depend on what kind of composition was previously applied to the walls. At the moment, several options are most popular on the market:
- Cement plaster. It sits extremely firmly on the sides, and it is quite difficult to knock it down. Therefore, it is worth thinking about the feasibility of the work, looking for compromises - the ability to finish the room without the need to remove this layer:
- Lime composition. Over time, it may weaken and lose the ability to interact effectively with other types of finishes;
- Clay plaster. If it is necessary to carry out repeated plastering work, the clay layer must be completely dismantled, unless, of course, it is planned to apply exactly a similar option to it. All other types of plaster will be too durable for such a base;
- Polymer option. Due to their flexibility and durability, these types of finishes are highly durable and may not need to be removed frequently. The exception is the hasty initial finishing, when the building has shrunk and the material simply cracks;
- Gypsum plaster. The option of dismantling it may become relevant if it is necessary to carry out finishing work with something stronger and heavier than plaster.
In this case, it is easiest to remove clay, gypsum or lime compounds from the wall.
Wooden walls
In old houses, wooden walls were often plastered using reinforcing structures in the form of metal mesh and other materials. If you plan to leave the retaining structure, then the old coating is removed using a chisel and hammer.
If you need to completely replace the coating, including reinforcement, then you need to make a wide vertical furrow in the middle of the wall. Afterwards, the mesh is dismantled right along with the old plaster.
If there is no reinforcing structure, then the old coating from wooden walls can be removed with a sharp scraper or spatula.
What tools need to be prepared
There are two main ways to remove plaster. The first is a manual option. In this case, we must prepare a metal brush, scraper, chisel, spatula, sledgehammer or hammer. The mechanized method uses a hammer drill, grinder or grinder.
Important! Regardless of the method, it is necessary to prepare personal protective equipment. First of all, these are gloves and goggles that will protect your eyes from dust, as well as from fragments flying out at high speed. A respirator will help make breathing easier while working.
Personal protective equipment and safety precautions
Mandatory equipment includes respirators and safety glasses, closed clothing and hard shoes. It is necessary to determine in advance the places where hidden wiring runs. This helps to properly de-energize the equipment before plastering.
Mandatory equipment includes respirators and safety glasses, closed clothing and hard shoes.
Finding weaknesses
The work of cleaning the wall needs to start somewhere. And it’s better to do this from the area where the coating has already been weakened. You can understand this by tapping the wall. Tap areas located at a distance of 30-40 centimeters from each other. In the case of a ringing sound, we are talking about good adhesion of the coating to the wall. Well, if the sound is dull, there are voids there, which will make the work easier. Also, wet spots or cracks can be a sign of weakness in a place.
Important! When cleaning a wall fragmentarily, it is necessary to remove not only the problem area, but also the surrounding finish at a distance of about forty centimeters.
Drywall
Removing the old coating from drywall is not so easy, because this material is very fragile. If the integrity of the layer that covers the drywall is compromised, it will lose its protection. Therefore, power tools and even chisels and hammers cannot be used for dismantling. It will not be possible to diagnose walls by tapping.
In order not to damage the material, you need to take a knife or screwdriver and pick out a layer of plaster in one of the corners to the very base. Having exposed a small area, then do all the work of dismantling the cycles. To do this, carefully push the tool under the finish and pick out piece by piece.
We work using an automatic tool
- Hammer. We switch the drill to impact mode and insert it into the thickness of the plaster at an angle of 80 degrees. Having reached the base, we shift the slope to 40 degrees, after which we move the tool to the side, destroying the plaster along the way;
- Bulgarian. The wall is divided into squares with sides of half a meter, along the perimeter of which grooves are cut. The latter will become the starting point for working with a hammer drill;
- Sander. On the surface of the tool there are rollers with spikes, which allows you to remove the plaster if its strength is relatively low. The advantage of this method is that it saves effort, but the disadvantage is a large amount of dust.
In general, the work about automatic means can be said that the grinder has relatively little efficiency in cutting plaster. Well, with a hammer drill, you need to take into account that during operation there is a lot of noise, and the duration of the process is very long, so the neighbors will have a hard time. Therefore, it is still better to try to get rid of it manually.
Important! We can radically reduce the amount of dust during work by pre-wetting the walls with water. Use this trick with any method of removing plaster, as it also softens the coating, making it easier to remove.
Should you throw away construction waste?
If renovation work is carried out in a city apartment, then you can safely get rid of construction waste, but owners of country houses should not rush to throw it away. Such waste can also serve:
- clay ones can be reused; to do this, they are soaked and then mixed with additives;
- mineral - an excellent filler for the foundation of load-bearing walls, for filling shelves, paving paths, etc.;
- old gypsum coating is an excellent insulation material for the bulk layer;
- Lime debris can be buried under paths; it will prevent plants from sprouting where they are not needed.
If you know how to properly remove plaster from walls, then all the work can be done quickly and on your own. Considering that dismantling the old coating is not cheap, this means that you can also save significantly on repairs if you do the work yourself.
Post Views: View statistics 1,513
Articles on the topic
Skirting on a brick wall - is it necessary, how to fasten it, instructions, advice from masons
How to lay a foundation with bricks - stages of work, instructions, advice from masons
Switching from brick to sandwich - installation, pros and cons, instructions, advice from masons
Brick columns for joists - preparation, how to make them, instructions, advice from masons
How to brick a house made of SIP panels - required materials, instructions, advice from masons
Repair of the basement of a brick house - major, partial, instructions, advice from masons
Soundproofing a brick wall - what can be done, instructions, advice from masons
How to renovate an old brick house - methods, preparation, instructions, advice from masons
Reviews ()
Efflorescence-resistant materials
- Clinker brick
is a cladding material with high protective properties. It protects the walls of buildings from rain and snow, and is also particularly reliable and durable. If efflorescence does appear on clinker tiles, it is quite easy to remove it with plain water or weakly concentrated cleaning agents. After removal, the walls are treated with products containing silicones. - The fifth element is a facing brick of very good quality, but it costs much more than usual.
TOP 9 stores where I shop profitably
- Petrovich - construction-trading house
- InstrumTorg
- Leroy Merlin
- Stroylandia- Construction and finishing materials
- OBI - building materials and everything for the home
- Building yard
- Maxidom
- All Tools
- Garage Tools
TOP 7 for goods and furniture for the home:
- Brownie
- Furniture for home
- HomeX - everything for decoration
- Designer furniture
- Furniture and kitchens to order
- 220 Volt - Tools for home
- MVideo equipment for home
From white plaque
The white coating that appears on the brickwork is formed due to the penetration of salts contained in the solution onto the surface. Often this problem occurs after heavy rainfall and brings a lot of problems.
Salt negatively affects not only the appearance of the walls, but also the strength of the material. It destroys the top layer of brick, which leads to the formation of cracks and chips. Therefore, you need to get rid of this problem in time.
You need to purchase a special cleaner concentrate from a hardware store. After this, dilute with water in a ratio of 1:10. Then:
- Apply the solution to the wall with a brush.
- Leave for 20 minutes.
- Rinse with water. You can use a clean rag for this.
The acids and various surfactants found in white plaque removers react with the salts, making them easy to remove. To consolidate the result, the surface of the walls must be coated with water-repellent agents so that next year you will not have to remove the plaque again.
How to clean soot from cement
During the operation of a building with brickwork, soot may appear on it. You need to get rid of it as early as possible, otherwise it will be much more difficult to remove the soot later.
Before starting work you must:
- Cover the floor with film so that soot does not settle on it.
- Take detergent and tools for work.
- Clean the wall.
Any detergent (for example, powder) is suitable as a detergent. The main thing is that it foams well. A soap solution is diluted in a basin. After this, a sponge is dipped in soapy water and the cleaning of the brick begins.
You need to start from the top corner, then gradually move down. The surface should be slightly moistened and leave soap foam. After a few minutes, this foam along with the soot can be easily removed using a clean cloth.
After applying a soap solution with thick foam to the wall, you need to wait a while. If after a few minutes the foam turns black, then this product has begun to act and the solution can be washed off.
In addition to soap, you can use regular table vinegar. To do this, it is diluted in water in a 1:1 ratio. After this, the solution is applied to the wall, and after a few minutes the wall is cleaned with a wire brush.
There are special soot removers that are sold at any hardware store. They remove dirt more effectively and quickly, but this option is more expensive.
Chemical cleaning
This method can be used to clean red and ceramic bricks. You need to carefully select a cleaning solution that matches your specific type of brick, otherwise the material may be damaged.
Chemical cleaning is carried out in the following sequence:
- Preparation of the composition;
- Application;
- Biding time;
- Removing solution residues.
As a rule, all cleaning solutions contain acid. The only difference is in the concentration and application conditions. Dissolved hydrochloric or sulfuric acid can also be used in a ratio of one to ten. Application is carried out on a pre-moistened surface, after a while the residue is washed off with water. If the cement pieces are large, then you need to give more time to soak and then remove the softened residues.
Important: When working with acids, it is necessary to use protective equipment to prevent contact with the skin and respiratory system.
Sulfuric acid is used to clean cement stains from ceramic bricks. Wet surface, carefully wipe with a cloth soaked in acid. Bricks not in masonry can be boiled in acid. For this purpose, a cast iron container is placed over the fire, into which the material is placed, filled with an acid reagent and boiled until the cement is completely dissolved. Afterwards, the material must be rinsed well.
From grout on brick
It is best to remove grout from the surface of the brick immediately. If a day has passed since application, you can lightly moisten the contaminated areas with water, wait 20 minutes, then clean with a spatula.
If much more time has passed, then you need to proceed according to the following scheme:
- Purchase a special solution in the store and dilute it according to the instructions.
- Apply to surface.
- Wait a certain time.
- Clean off with a spatula.
You need to act carefully and do not leave the product on for longer than the prescribed time. Before starting work, it is best to seal the seams with thin masking tape to prevent chemicals from getting into them.
Read how to do jointing correctly in the article Joining brickwork joints with your own hands.
Categories
- Apartment design
- All about repairs
- Doors
- Window
- Ceiling
- Walls
- Plaster and putty
- Drywall
- Furniture
- Other about repairs
- Floor
- Leveling the floor
- Cement strainer
- Dry floor screed
- Semi-dry screed
- Self-leveling floor
- Flooring
- Warm floor
- Electric floor
- Water heated floor
- Floor coverings
- Tile
- Laminate
- Everything about plumbing
- Water pipes
- Bath, shower
- Faucets
- Toilet
- Heating
- Everything is electrical
- Wiring
- LED in everyday life
- Ventilation
- Construction materials
- Tools
- Materials
- Construction calculators
- Repair of a country house
- Miscellaneous articles
- Top review
- Question answer
- News
- Repair video
Methods for cleaning the stove
If you see that the chimney is clogged, then you need to start cleaning it. Of course, a chimney sweep can help you with this, but it is cheaper to do it yourself.
You should choose how often you need to clean your stove or fireplace depending on the frequency of its use.
Sooner or later, every owner of a private house faces the question: “How to clean a chimney without disassembling it?” There are several ways and we suggest talking about them.
Methods for cleaning a chimney:
- To clean the chimney using mechanical methods, you will need a special device. The point of such cleaning is to remove soot by scraping it off.
- Chemical chimney cleaner. Chemistry is now presented in a wide variety, so you can easily find the right product.
- Cleaning with folk remedies is one of the ways to remove soot from a chimney. At this time, there are a huge number of options for cleaning pipes.
Each of the methods is good in its own way. You can handle cleaning with chemicals yourself, but we’ll talk in more detail about removing soot using folk remedies and mechanical methods.
Adviсe
After such work there is always a large amount of construction waste left. On average, one wall produces 15-25 kg of waste. It’s better to immediately take special bags and put all the waste in them. But you shouldn’t fill these containers to the top, otherwise it will be impossible to lift them later. In apartment buildings, it is customary to hire special machines to get rid of garbage, then the work complies with accepted norms and rules.
Cement-sand plaster scrap is often reused. For example, for various country houses and extensions. Clay is also a good natural material that can be reused. Plaster material will always find application.
Clay is one of the good natural materials that can be reused.
Even construction waste can always be put to good use. It is enough to ensure that it folds only in specific places. Only at first glance it seems that removing plaster is difficult. You just need to adhere to all technologies and recommendations from the builders and manufacturers themselves.
Sticky foods and chewing gum
Stained tiles are a common sight on outdoor cafe areas and in private gazebos. These shortcomings can be eliminated in the following ways:
- By cutting. This removes chewing gum that has hardened and mixed with dust. The material is cut under the base with a sharp stationery knife. The remaining stains are washed off with alcohol, acetone or gasoline.
- By heating. When exposed to high temperatures, chewing gum becomes liquid; it can be easily collected from the surface with a thick cloth and a short-haired brush.
- By washing off. Sticky food products (lard, oil, animal fat) can be treated with a hot solution of dishwashing detergent. It is necessary to use a stiff brush to remove dirt from the pores.
- By dissolution. Protein compounds dissolve in gasoline, kerosene, acid and alcohol. The surface is soaked, brushed and the waste solution is collected with a rag.
If the above methods do not work, then the organic matter is burned out with a blowtorch, and the carbon deposits are removed with superheated steam or soap solution.
Removing contaminants
Most often, brick is processed to clean it from traces of dirt and construction dust. Due to its high porosity, brick is easily soiled, so to maintain the attractive appearance of the material, it must be cleaned occasionally. In addition to mortar residues, a variety of types of contaminants may appear on the brick, including paint, dirt, bitumen, fuel oil, lime, soot, and rust.
Often the brick becomes moldy or has traces of efflorescence. It will take a lot of time and effort to remove dirt, since cleaning brick is a very labor-intensive job.
In practice, the question of cleaning the material usually arises after the construction of brick walls made of ordinary or facing bricks. It is also often necessary to clean the mortar from old bricks that have been decided to be reused. The specific method of cleaning the material is selected based on the type of contamination.
The following types of cleaning are commonly used in the construction industry:
- high-pressure water jetting;
- sandblasting technique;
- mechanical cleaning with a tool or manually (hammer, sandpaper, chisel, brush with stiff bristles, hammer drill);
- using a special cleaning liquid, which can be either purchased ready-made or made on your own.
Below we will look at each method separately.
Water jet cleaning
A water jet under high pressure (15-220 bar) removes, first of all, efflorescence. Despite this pressure, cleaning occurs very carefully, without damaging the material. In addition, the method is environmentally friendly.
Sandblasting method
Cleaning is carried out using special equipment and under high pressure. During the process, the brick is treated with sand or another abrasive substance.
The purpose of sandblasting is to remove foreign materials and prepare the surface for application of various coatings. The brick is sanded before filling or painting. Thanks to sandblasting, you can clean brick from old paint, bitumen, fuel oil, plaster, soot and all kinds of substances containing dyes. The result is a clean surface suitable for further processing.
The challenges of sandblasting and finishing are not the same as with surface preparation. The difference is that this technique involves improving the appearance of the product and increasing its performance, and not just preparing for coating.
To confidently use sandblasting equipment, you will need certain qualifications. Therefore, the cost of such work is quite high.
Manual or mechanical cleaning
Typically, the method is used to remove solution residues or other solid foreign substances from the surface of a material. The main tools for cleaning are a drill, sandpaper, a hammer drill, a jackhammer, a brush with stiff bristles, a chisel, and a hammer.
When carrying out work, you need to take care of your own safety, so you will need safety glasses, a respirator, and rubber gloves.
Red brick is cleaned only by hand. To do this, you need to break off pieces of the mortar using a hammer and chisel. After removing large pieces, the crayons are sanded with coarse sandpaper.
Sand-lime brick is stronger, so it can be cleaned using equipment such as a hammer drill or jackhammer. Then, as in the case of red brick, sanding is carried out with sandpaper. The process is completed by soaking the material in water to finally wash off the remaining solution. During soaking, you can additionally use a brush with stiff bristles. The brick must be dried before use.
Chemical cleaning
Based on the type of contamination, a certain chemical composition is used, which can either be purchased or made independently. Also during the work, a tool is used, as with mechanical cleaning.
You can remove cement mortar as follows:
- If the brick is made of ceramics, it needs to be boiled in water. In this case, you need to pour sulfuric acid into the water in advance. For one part sulfuric acid you need one part water. At the same time, you must not forget about protective measures (special clothing and glasses), otherwise burns to the skin and respiratory organs are possible. After dipping into this mixture, removing the old solution will be easy. However, this method cannot be used to remove mortar from sand-lime brick - it will simply fall apart.
- If the contamination is minor (for example, only on the masonry seams), the brick can be wiped with detergents from the auto chemical arsenal. After applying the product, let the wall dry and then rub it with a mixture of ground brick and vegetable oil.
- You can also use diluted hydrochloric acid. Before treating the masonry with acid, it is necessary to wet the bricks with water. The work should be carried out carefully so that the hydrochloric acid does not damage the mortar in the brickwork.
You can get rid of other contaminants like this:
- If the wall is painted, stains can be removed using household chemicals.
- Efflorescence, soot on the stove and traces of rust can be removed with a hard bristle brush, water and detergents.
- To remove moss or lichen, you need to wet the brick with water and then treat it with a detergent, but not just any detergent, but a specialized one (for example, Sammalpois).
- To remove oil, tar or bitumen stains, you will need one of the organic solvents. White spirit, turpentine or kerosene will do. To avoid leaving streaks, you need to treat the maximum possible surface area.
- To remove efflorescence, it is recommended to use a substance such as “Decap' sols Guard”. Before applying it, you need to check the quality of the waterproofing. You also need to clean the seams first.
Some useful tips
- Efflorescence will become less likely if the brick is well dried, there is waterproofing, and drains for waste water.
- During laying, work should be carried out carefully to prevent excessive contamination of the material. This will require additional effort, but will further reduce the need for cleaning brick walls.
- When cleaning brick, you must not forget about the technological nuances, otherwise you can damage the material.
- When working with facing brick or stone, you should use a dry sponge to avoid damaging the surface.
- To remove traces of soot on facing bricks, it is recommended to use specialized pastes and household chemicals.
Causes
Before you start fighting this annoying phenomenon, you should find out its causes. It is on them that further steps to eliminate white plaque will depend. The causes of efflorescence are divided into those independent of humans, as well as those caused by human activities (in particular, violation of brick making technology and the masonry process).
The following factors are considered the main cause of alkaline plaque on facades.
- The use of low-quality masonry mortar with a high content of alkalis, chemical additives and excess impurities leads to damage to the brick. Over time, it not only turns white. In deeper layers, scales begin to form, which leads to gradual destruction of the material under the influence of additional mechanical stress.
- Carrying out construction work in winter or rainy weather, especially with the use of various water-repellent and anti-frost additives, which also negatively affects the quality of the structure.
It also happens that efflorescence occurs due to non-compliance with the manufacturing technology of the material itself at the factory. For example, if instead of drying it in a special oven, it was simply air dried. Salts are contained in varying quantities in alumina itself, which is one of the main components in the manufacture of bricks. Its excess due to poor quality of raw materials, and in case of disruption of the production process, at the first serious moistening will lead to the release of salt to the outside.
Grayish-white plaque on the outer surface of walls is common and common. It occurs due to natural chemical and physical processes. Basically, water-soluble salts evaporate and are carried to the surface. Moisture moves through the capillary structure of the brick, washing away salts. Thus, where water comes to the surface, it evaporates, and impurities in the form of tiny crystals accumulate in spots.
Precipitation with a high content of various impurities and harmful substances in water can also damage the brick. This happens especially often in large industrial cities with poor ecology.
The least rare reason is improper storage conditions for bricks in the cold rainy season without protection directly on the ground. Also, moisture can get in from the soil, but this is only possible if the foundation layer is poorly waterproofed.