Andrey
12662 0 2
Andrey July 11, 2017 Specialization: facade finishing, interior finishing, construction of dachas, garages. Experience of an amateur gardener and gardener. We also have experience in repairing cars and motorcycles. Hobbies: playing the guitar and many other things that I don’t have time for :)
How to glue wallpaper in the corners of a room so that it lays flat and does not peel off? I often do similar work and, having learned the secrets of gluing, I want to share them. I am sure that this information will help beginners avoid common mistakes.
Pasting corners contains a number of nuances, ignorance of which can greatly reduce the quality and durability of the finish.
Scope of use
Corners are the most problematic place. When carrying out repairs, it is difficult to decorate them beautifully. The wallpaper pasted on them peels up and comes off after some time. When furniture is brought into rooms or rearranged, hard large elements often become damaged, resulting in a sloppy appearance. All this can be prevented if you purchase decorative corners for the walls and install them at the finishing stage. They will completely cover the ends, allow you to form a smooth transition from one material to another, and cover up some of the sins of the painter’s poor quality work.
Decorative corners are a decorative element that gives the finish a complete appearance Source design-homes.ru
In addition to a purely technical function, corners carry an aesthetic load. If you cover the perimeter of the window opening with a white profile, the window will look better. This technique is often used when, according to design requirements, the window is not covered with curtains, but is decorated with blinds. In this case, the color of the corner should match the color of the wall trim. When contrast is used, the profile acts as a separate decorative element. It immediately catches the eye and becomes an original part of the interior.
Corner profile for window decoration Source i0.wp.com
Designers love to use decorative corners for the outer framing of doorways. This becomes especially relevant when the thickness of the wall is greater than the width of the door frame. This difference is completely covered by the extensions, and then corner elements are placed on top of them, the color of which completely matches the color of the door.
Doors with extensions and decorative corners Source skobdom.ru
External wall corners, arched openings, ledges and niches need additional protection. Installing corners will prevent the risk of damage from an accidental impact. It is relevant when the walls are simply plastered or covered with wallpaper. In addition, it is easier to clean and remove hand marks. If the corners are covered with a plastic profile, it will be easier to keep clean.
Metal corner for internal corners Source sprofiles.ru
Corners can be used to cover the ends of a wall trimmed with ceramic tiles or wall panels. Often the edges of such materials are not sanded, so the edge looks unattractive. Installing a profile helps to completely hide such a defect.
External aluminum corner for tiles Source profil-mo.ru
Another area of application is decorating the external corners of structures assembled using plasterboard. Today, the technology of creating open shelves and racks from this material is actively used. Joints covered with a profile look more aesthetically pleasing.
An arch whose corners are closed with a decorative corner Source avatars.mds.yandex.net
Using decorative corners, you can make frames for large mirrors, cover skirting boards, and any joints that take the shape of a corner. There are profiles for plaster, models for ceramic tiles, profile products for bathtubs, and furniture.
Element for decorative design of external ends Source 1decor.ru
Trimming at window slopes
An important step in the final aesthetics is the careful cutting of the wallpaper near the window opening. In this situation, follow the following sequence of actions.
- Paste the wallpaper with a slight overlap: part of the canvas should protrude beyond the edge of the window opening.
- Carefully bend the canvas towards the window so that a clear bend line is formed on the wallpaper.
- Attach a metal strip, construction ruler or other tool that has a clear horizontal line that coincides with the end line of the slope to the bend.
- If in doubt, you can draw a line with a pencil.
- Using a sharp knife or blade, carefully trim the overhanging edge of the sheet in line with the edge line of the slope.
- Remaining glue should be removed with a soft cloth.
To protect the window opening trim from glue, you can use masking tape.
Types of corners
The appearance of the products and their technical characteristics depend on the material from which the profiles are made. It also determines the scope of use.
Decorative metal profile Source i.ebayimg.com
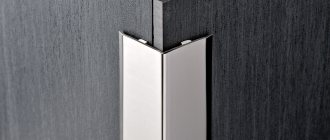
Metal
Aluminum, brass or steel are used to make such corners. Angles made of brass and steel have a smooth, well-polished surface. The aluminum profile is available in three varieties. Polished samples, anodized products, and corners with decorative coating are available for sale.
Brass-look profile for decorating external corners lined with tiles Source kantiere.ru
Most often, such products are used in the furniture industry, but designers also like to use them when walls are decorated with furniture panels, MDF sheets or chipboard. In this case, a metal profile is selected, painted to match the base material. Unpainted metal corners are suitable for framing mirrors, pictures or posters placed under glass.
Metal profile for external corners Source www.bradjenkinsinc.com
Craftsmen use metal corners to create the basis for installing lightweight Armstrong-type suspended ceiling structures. Using them you can install lightweight plastic panels. They can act as anti-slip pads or protect the edge of the structure from chips and cracks.
Armstrong ceiling with metal inserts Source i.pinimg.com
See also: Catalog of companies that specialize in decorative forms
Finishing wooden
Their main area of use is finishing the external or internal ends of walls covered with block house, plank or clapboard. They are made from expensive or cheap types of wood, so they have different prices. They can be additionally painted and varnished, and various patterns can be created on the surface using a milling machine.
Wooden corners for decoration Source static.tildacdn.com
Recently, designers like to use a technique that allows them to cover the ends of walls covered with wallpaper or painted. This is only permissible if there are strictly straight surfaces.
Decorative element made of wood Source avatars.mds.yandex.net
When choosing this finishing option, it is important to consider that a wooden corner is a fragile product; with the slightest effort it can break or crack. Excessive moisture or prolonged overheating can ruin its attractive appearance. Therefore, they cannot be used to decorate walls and window openings in a bathroom or bathhouse.
Wooden corners are a fragile product Source pilomaterial-stroi.ru
The wooden elements are attached using wood glue or PVA glue. Liquid nails are suitable for the indicated purposes. If the walls are not concrete, you can also attach wooden corners with finishing nails. In this case, the gap between the edge of the profile and the head of the nail must be at least 10 diameters of the fastener.
Wooden corners to match the main finish Source pilomaterial-stroi.ru
Silicone transparent corners
Such products are ideal for framing corners covered with wallpaper. They feel very soft to the touch. If they cover corners in a children's room, children will be less injured. The silicone profile has only one drawback: its transparent texture is unable to hide finishing defects from prying eyes. This must be taken into account when choosing and purchasing products of this type.
Silicone profile is an excellent tool for ensuring the safety of children Source d.allegroimg.com
See also: Catalog of companies that specialize in facade materials
Polyurethane
With the advent of polymer materials, the possibilities for decorating residential premises have expanded significantly. On sale there are corners with smooth surfaces, with complex relief, skillfully imitating the texture of gypsum stucco. Unlike a plastic profile, their shelf thickness is greater. This complicates the installation process, but the appearance of the finish benefits from it. The polyurethane corner creates a solid effect. In addition, it can be additionally painted with paints used in finishing, but the plastic profile cannot.
External polyurethane profile Source lative-oboi.ru
Pressing technology is used in the manufacture of products. It allows you to create decorative profiles of various shapes. They are not afraid of moisture, temperature changes, and last a long time.
A decorative corner made of polyurethane can replace gypsum stucco. Source 1decor.ru
Manufacturers offer universal white polyurethane corners; they are best suited for painting. There are profiles whose texture skillfully imitates wood. Products in which the smooth part is painted and the upper ornament is decorated in gold look beautiful. Such corners are ideal for classic interiors. They are attached with a special adhesive composition. Liquid nails can also be used for these purposes.
Universal white polyurethane profile Source cap40.ru
Colored plastic
Such products have a smooth, even surface. They are made from polyvinyl chloride. Manufacturers produce collections that feature products in thirty shades. Among them there are profiles that imitate the surface of wood and metal. Their scope of application is not limited by physical parameters, so the plastic profile is used quite widely. To decorate arches, flexible corners and arched products are produced.
Plastic corner in the bathroom Source kitchenremont.ru
Installing a plastic profile on a plastered wall is simple:
- Glue is applied to the surface of the inner part of the profile in dotted lines at a distance of 30 cm.
- The profile is then applied to the surface of the arch or straight end.
- The corner is secured at the top with masking tape.
Multi-colored plastic corners Source sumyplast.com
What do you need to hang wallpaper?
To begin the renovation, you need to clear the room of everything unnecessary, prepare wallpaper, knowingly calculating the required amount with a reserve, and a knife with removable blades that can easily cut plastic, paper, and drywall. In addition to all this, you will also need sharp scissors, a building level and a wedge.
Video description
The video explains how to glue plastic decorative corners:
MDF
This material is also used to make decorative profiles. In the process of its creation, two strips of the same size are fastened together with adhesive film. It is applied from the front side. Its color and pattern matches the color and pattern of MDF. Such products can be used both for decorating external corners and for framing internal ones. The degree of angle is not important.
Universal decorative profile made of MDF Source remont-book.com
Note! It is undesirable to use corners made of MDF in the interiors of rooms with high humidity.
In this way, the corners of walls covered with MDF panels are designed. Source www.meister.com
How to cut an edge correctly
Trimming edges
Thin wallpaper is glued overlapping. This means that the edge should be cut on one side. Scissors or a construction knife can be used for this. Thick wallpaper is glued end to end. In this case, the edge is cut on both sides. It is important to do this carefully, using a knife and a ruler (construction spirit level).
After cutting, the finished canvases are laid on a flat, dry surface free of dust and dirt. Now you need to inspect the edges of the wallpaper for possible defects that may form if the edges are removed incorrectly. Now you can start cutting the wallpaper.
Choosing a corner design option
To ensure that the decoration of the room is in harmony with its contents, it is important to take into account various factors when choosing a profile. It is important to pay attention:
- On surface materials. If the walls are covered with clapboard, the ends covered with a white plastic profile will look ridiculous.
- For the color of the finish. A red profile will ruin the overall impression if the room is made in pastel colors.
- On the design style. The metal profile is not suitable for interiors in a classic style, but it can emphasize the concept of hi-tech.
- On the function of the room. A plastic profile is ideal for kitchens and baths; for children's rooms it is better to choose silicone corners. Wooden with chamfers will be appropriate for decorating cabinets.
Design options may vary. The easiest way is to match the color of the profile to the color of the walls. He will merge with him and will not attract attention to himself. This decision is justified when the surface often catches the eye, this could be, for example, the corner between the hallway and the room.
The color of the corner profile matches the color of the walls. Source www.grandecor.ru
If the choice falls on wooden corners, designers advise choosing the colors and textures of the doors or floor finishes to match. Then it will look organic. If you want to save money, you can purchase plastic corners that look like wood.
Corner profile made of plastic to look like wood Source imageserver.ibud.ua
When creating laconic interiors with a minimalist style, the choice of metal corners becomes justified. They look good in high-tech, in a loft. The width of the shelf must be chosen so that it completely covers the end of the corner. You need to pay attention to this if the walls are covered with panels, plasterboard, if insulation and sound insulation are additionally performed. Such designs always have uneven edges; the decorative angle covers all defects well.
Metal corner in tile finishing Source krovati-i-divany.ru
Usually the angle between the slope and the wall is more than 90 degrees. In order for the selected profile to fit well on it, it must be slightly bent. This can be done with both a metal and plastic corner. To do this, experts advise placing the product on a flat surface with one edge, and then lightly pressing on top with your hands and using a brush to push along the entire length of the corner. In the cold season, this procedure should be done after the product has been in the room for a day and has reached room temperature.
Conclusion
We got acquainted with all the most important nuances of wallpapering corners. Before you get started, watch another video in this article. If any of your questions on this topic remain unanswered, write a comment and I will be happy to answer you.
Did you like the article? Subscribe to our Yandex.Zen channel
July 11, 2021
Wallpaper, Finishing materials
If you want to express gratitude, add a clarification or objection, or ask the author something, add a comment or say thank you!
Recommendations from professionals
Questions from the topic “how to hang wallpaper” puzzle amateur craftsmen and sometimes give rise to doubts in them about the speedy and successful completion of the undertaking repairs.
Without a good understanding of all the intricacies of the pasting workflow, you can ruin the wall covering.
Not too right angles are found not only in old apartments: they are also common in new buildings. Uneven walls also often make it difficult to carry out repairs quickly and easily. Let's look at some recommendations that will help us cope with the task.
1. Avoid creases
When gluing wallpaper to the corner outer projections, you should try to do it in such a way that the wallpaper sheets fit as tightly as possible to the wall.
Professionals do not recommend gluing the entire length of the strip to the corner at once. If the joint is not very smooth (and this often happens), then the paper may bunch up in sloppy folds.
2. Maintain overhang
It is not advisable for the wallpaper to end in the very corner. It is advisable to leave a three-centimeter protrusion, which can then be carefully cut off with a knife.
This way you can achieve a more even pasting. If you purchased heavy and dense wallpaper, then when decorating the walls with it, you should use a plumb line.
3. Remove electrical accessories
Switches or sockets are often located near the joints. Remembering to turn off the electricity, remove the outer casings.
After this, you can begin the process of directly gluing the wallpaper. Then, when the glue has dried, circles with a diameter slightly smaller than the casing itself are cut out on the dry canvas with a sharp knife. After completion of the work, the fittings are returned to their place.
The most common beginner mistakes
First of all, let's look at how not to glue wallpaper. The most common mistakes newbies make are:
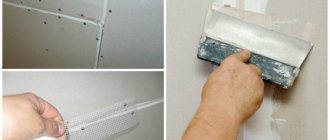
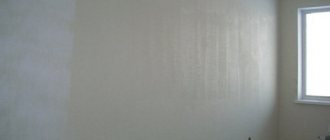
- Poorly prepared surface. The level of complexity of pasting the joint of planes depends on their quality. If the apartment has crooked corners, then it will not be easy even for a specialist to complete the finishing properly. Of course, it is not always possible to make the wall joints ideal, strictly at 90 degrees, but there should be no deviations from the vertical. Therefore, spare no time and effort in preparing the surface - putty the walls or even plaster them;
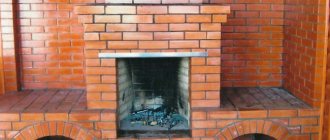
The photo shows a plaster corner, which allows you to quickly and efficiently level the outer joint of the walls
Plaster corners will help you quickly and easily align external wall joints. During installation, they are leveled and then glued with plaster or putty. The price of corners starts from 30 rubles per 2 meters.
- Cutting wallpaper. As a result of this decision, the edges of the canvases may diverge or, on the contrary, overlap each other unevenly, and accordingly, the gluing looks sloppy. Therefore, according to the technology, it is necessary to provide a slight turn onto the adjacent plane.
When gluing paper wallpaper end-to-end, strips are placed under it
The exception is paper sheets that can be cut vertically. The only thing is that in this case, you first need to stick a thin strip of wallpaper onto the joint of the walls in case the joints come apart;
- Big twist. If the joints of the walls are even, then such a mistake is not terrible, but in crooked corners a large turn will cause the strip to deviate from the vertical. As a result, all subsequent canvases will be glued crookedly;
The canvas must be carefully pressed
- The canvases are not completely glued. When gluing the canvas, many beginners do not push it all the way, as a result of which a small area located opposite the inner corner hangs in the air. This leads to the fact that over time the coating begins to peel off and even tear;
- Poorly applied glue. If wallpaper on a non-woven basis is pasted, then the glue is applied to the surface of the walls, and not the canvas. In this case, it is a mistake to work with a roller, which does not always allow you to completely coat hard-to-reach places.
Beginners are often interested in what angle should they start gluing wallpaper? If they are all level, then it doesn’t matter where you start gluing. Otherwise, start gluing from an even angle to avoid distortion of the stripes on the walls.
If the wallpaper has a pattern
Wallpaper with a monotonous small pattern, for example, checkered or striped, does not need to be adjusted to the pattern. The joints will not be visible to the naked eye. The situation is different with a more pronounced pattern, when the entire wall forms a full-fledged image or, if there is no pattern at all.
In this case, it is better to join the wallpaper end-to-end rather than overlapping. Non-woven wallpaper, which is always glued end-to-end, is perfect.
It is better to cut the sheets immediately before work on the floor covered with clean oilcloth. This way you can immediately cut strips that will match the pattern.
Features of installation by material
Fastening corners for internal or external wall corners depends on 2 factors: the material of the corner itself and the wall covering.
- Wallpaper. Decor made of plastic, wood, MDF can be glued to almost anything: from double-sided tape (not the most reliable option) to special mounting adhesive. The main thing is to choose the right composition: for non-absorbent surfaces (plastic) or porous (wood, MDF). Due to their weight, metal structures require a particularly strong adhesive.
Advice! If you use glue, until it dries completely, the function of fixing the corner in the right place will be performed by ordinary masking tape. Simply press the corner strips against the adjacent walls.
- Tile. Tile joints or baseboards usually have a special lip installed under the tile, which holds the corner decor firmly in place. There are also metal external parts of different sizes for finishing corners; they are glued with epoxy or polyurethane glue.
- PVC panels. As a standard, plastic panels come with plastic corners that are installed during their installation - they are securely attached to the profiles using a simple stapler or self-tapping screws. If the task is to decorate the finished finish, use a corner without partitions and suitable glue.
- Plaster, concrete. Porous, rough surfaces are not the best base for glue. However, if the task is to make the end smoother using an internal panel, you can attach it using regular finishing putty.
Smooth corners
Happy owners of high-quality overhauls, as a rule, do not have problems with distortions on the walls. Wallpapering a smooth joint is much simpler and does not require extra costs.
Internal and external (protruding) wall junctions are covered equally. Let's look at the whole process step by step.
First of all, you need to decide where to start. If thin paper strips are used that will overlap each other (usually up to 0.5 mm), then you should start from the window (so that the seams are not noticeable). If the wallpaper is denser, then it will be glued end to end. In the second case, you should start from the door.
Once you have decided on the direction, you can start taking measurements. It is necessary to note how many strips of wallpaper it will take to reach the nearest corner. The fact is that the final strip should lie evenly on the adjacent wall by about 2-5 cm. It is better to trim off the excess.
Using a plumb line or laser level, you should mark a straight line perpendicular to the ceiling, and start gluing from there. This way, as you move towards the corner, the trellises will not shift (tilt).
Now you need to apply the next sheet, but starting next to the corner (no matter how even it may seem) is undesirable. For the same reason, an overlap of several centimeters is left on the adjacent wall. Otherwise, there is a high probability of holes and an unaesthetic appearance, which will be difficult to correct.
It is necessary to smooth out the glued panel at the junction of the walls very carefully. It’s not so bad if the edge of the strip, which goes around the corner, protrudes somewhere by 3 cm, and somewhere by all 5. It is much more important that at the junction of two walls the wallpaper fits tightly to the surface without creases, swelling and excess tension.
Advice! If you are too lazy to press the wallpaper tightly in the corners during repairs, then later the pleasure of picking holes in the sagging wallpaper will become a very exciting activity for the child.
The next strip of light paper or thin wallpaper on a non-woven basis can be glued on top of the previous one, focusing on a straight perpendicular line, passing as close as possible to the junction of the two walls. Before you start covering a new wall, you can trim off the excess if the edge of the spade is uneven, or leave the bottom layer as is.
Wallpaper that is glued end-to-end (that is, dense and does not stretch after being coated with glue) in the corner is processed using the following technology:
As in the case of paper wallpaper, there is already a small strip of width left after gluing the trellis on the adjacent wall. Apply glue to it, press it and carefully smooth out the entire corner.
On top of this strip - the spade - mount, focusing on the perpendicular line, a new wide strip. All that remains is to make an even joint (after all, the material is dense, possibly embossed, you cannot leave an overlap).
Along the perpendicular line, using a building rule or a fairly long ruler, you need to make a deep cut in the wallpaper from the ceiling to the floor. It should go through both layers, making a straight edge on each side. It is most convenient to do this with a very sharp stationery or construction knife (the second is preferable, since its blade does not bend so much).
Now you need to carefully remove all the excess trim, re-glue the edges of the opposing strips and straighten the joint. It should turn out perfectly smooth, at a distance of 1-2 cm from the corner.
Advice! You should not overlap or join the wallpaper directly in the corner. There will always be holes or cracks that will ruin a smooth edge. 1-2 cm from the corner is the optimal distance for both internal and external walls.
Decorative examples in the interior
If ordinary corners seem boring or don’t fit into the style, but you need to disguise an ugly joint or defect, there are other ways to decorate the corners.
- Furniture. In the literal sense, you can close the inner corner with the help of a cabinet or rack. The method is best suited for bedrooms and living rooms. Rearrange by moving the tall pencil case to the damaged area.
- Decor. Decorations like paintings and photographs in baguettes solve the problem of empty, ugly corners. Schemes on how to hang photos correctly can be found on the Internet. The method is not ideal - for example, children can touch or drop the frames while playing, but the corner will look complete.
The photo shows the finishing of the ends with ropes
Decorative corners greatly simplify the finishing process: do not be afraid to use them in repairs if you are not confident in your abilities or simply want to extend the life of coatings in so-called “stress” areas.
Did you like the article? Subscribe to the channel to stay up to date with the most interesting materials
Source