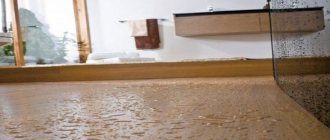
You may not be a perfectionist, but you must hide the cracks in the bathroom. Let us allow ourselves to paraphrase Nekrasov’s well-known “verses” to clearly illustrate a simple but practical idea: at the junction of the bathtub and the wall, ugly cracks often form, which not only spoil the overall appearance, but also allow water to flow down, thereby causing much more serious troubles . How to seal the gap between the bathtub and the wall? In today’s material we will analyze in detail 5 options for solving the problem and visualize each of them with photographic examples from life.
- Why is joint sealing necessary?
- We use cement mortar;
- We use polyurethane foam;
- Another option is silicone sealant;
- Ceramic skirting boards are a beautiful solution;
- Border tape is the final touch;
- Useful materials. 3 video instructions;
- Conclusion.
Cement
There are many home-grown experts on the Internet who advise sealing the gap between the bathtub and the wall with ordinary cement. This is the simplest, cheapest and most unreliable option . Cement itself absorbs and allows water to pass through; it is quite fragile. To prevent such protection from leaking, it must be primed and painted.
The bath constantly heats up and cools down during operation. When heated, the material from which it is made expands, and when it cools, it contracts (especially if you like to take a bath rather than a shower).
Due to deformation, gaps appear between the cement, the wall and the bathtub. The cement itself cracks over time. We do not recommend using it to seal the joint between the bathroom and the wall. Better pay extra and buy cement grout. It contains additives that protect it from cracking.
Plastic and polystyrene structures
Panels made from these materials are the most common and most popular option for decorating a screen for a bathroom.
Advantages:
- service life can be characterized by the expression “until you get tired of it”;
- simplicity and convenience in caring for plastic surfaces - no special detergents are required, just wipe with a damp sponge with the addition of dishwashing liquid;
- scratch resistance;
- incredibly wide palette of colors and designs;
- wealth of shapes, sizes, types;
- installation does not require special knowledge and tools;
- products are sold in almost all construction supermarkets and plumbing stores.
The installation sequence of such panels is very simple:
- the upper part of the screen is brought under the side of the bathroom;
- the panel is located vertically;
- The structure is tightly fixed with adjustable legs.
Molding (plinth)
Moldings and baseboards are universal products. They are not intended for installation on a bathtub, but craftsmen have found such a use for them. Using molding or plinth, you can close a gap of any width, it all depends on its size. But it is difficult to find a product more than 80 mm wide.
Moldings and baseboards are made from different materials. The most common:
- Polystyrene;
- Expanded polystyrene;
- PVC (polyvinyl chloride);
- Polyurethane.
The best option is to use products made of PVC and polyurethane. They are durable, not afraid of impacts, and have a long service life. Polystyrene moldings and baseboards are fragile and if you drop a shower head on them, for example, it can crack. Expanded polystyrene refers to foam plastics and that says it all. It is easy to wrinkle, for example, when you hit the polystyrene foam molding when getting up from the bath.
Gluing molding or baseboard
- Measure and cut the baseboard or molding to the length/width of the tub;
- Cut its ends at 45 degrees if you are going to join it with the same one on the adjacent wall;
- Degrease the surface of the wall, bathtub and molding or baseboard;
- Apply sealant or glue to the surface at the junction with the bathtub and the wall;
- Place the molding (plinth) in place and press it, running your hand along it with force along its entire length;
- If the sealant comes out from under it, remove it with a dry cloth;
- Try not to use the bathroom for the next 24 hours.
Advice
To glue molding or baseboard to the bathtub and wall, it is better to use silicone sealant. It will not allow water to seep through; if necessary, it can be easily cut off with a stationery knife, and the remains can be simply removed with your fingers.
Useful tips
In this section we offer several useful recommendations that will help make your work more efficient:
- Before you begin to eliminate cracks, be sure to securely fasten the container on four sides, and if necessary, set the level and adjust the structure using the legs (modern bathtub models have threads).
- Fill the gap between the bath only after the tank is almost filled to the top with water. This will prevent deformation of the seam during operation. Drain moisture only after the seams have completely hardened.
- If the container is cast iron, then it must be fixed at the installation stage, and then begin filling the gaps. This will prevent the structure from becoming unstable and moving during operation.
Eliminating a joint in a bathroom using sealant and PVC baseboard Source nikastroy.ru
Sealants
The best way to seal cracks up to 1 cm is with sealant. There are two ways to apply it, depending on the gap between the bathtub and the wall. If it is less than 5mm, apply sealant along the gap. If the distance from the bathtub to the wall is 5-10 mm, squeeze out the sealant with a “snake”, from the wall to the bathtub and back.
There are four types of sealants:
- Acrylic – has poor ductility, we do not recommend using it in the bathroom;
- Silicone – elastic, adheres well to any surface, easy to remove;
- Acrylic silicone (silicone-acrylic) – firmly adheres to surfaces, has average ductility, loses elasticity over time;
- Polyurethane is plastic, adheres best to surfaces, has a service life of more than 20 years, and practically does not lose its properties over time.
Advice
Use silicone or polyurethane sealant. The fact is that the bath periodically heats up and cools down (even if you take a shower). When heated it expands, when cooled it decreases in size. Acrylic and silicone-acrylic sealants cannot compensate for such deformation.
Correct use of sealant
- Cut the tip of the tube with sealant so that the diameter of the hole matches the width of the slot;
- Cut the tip at a slight angle, 15-25 degrees;
- Before use, heat the tube with sealant in warm water - it will become less viscous;
- After applying the sealant, it can be leveled with a special spatula or scraper (see photo), or pressed into the gap with your finger;
- To ensure that the silicone sealant sets and hardens well, try not to use the bathroom for the next 24 hours;
- Polyurethane sealant hardens well regardless of humidity.
Metal corner corners for cladding
This method is applicable at the stage of creating the cladding. The metal corner is attached to the wall so that its bottom shelf fits snugly against the side of the bathtub. Next, the bottom row of tiles is inserted into the groove of the corner or directly onto it (depending on the design).
Sealing is necessary, because otherwise dampness will penetrate under the tiles and gradually destroy the adhesive composition.
Fugue (grout)
Small gaps between the bathtub and the wall up to 1 cm can be sealed with grout. There are 4 main types of grout. They differ in elasticity, composition, service life and application features. The main advantage of grout is that it is easy to add dye to them, which cannot be done with sealants.
Cement grout is the simplest option. It is suitable for filling gaps between the bathtub and the wall up to 1 cm wide. The main problem when using it is to achieve the desired consistency. A solution that is too thin will run off after application; a solution that is too thick may leak after drying. To give the screed plasticity, it contains additives, additives, and fillers.
There are ready-made mixtures with all the necessary additives. For example, the composition of Ceresit CE 33 grout includes:
- Cement;
- Mineral fillers;
- Pigments;
- Polymer modifiers.
Epoxy grout is made from epoxy resin and is the strongest and hardest of all. This is both a plus and a minus. This grout adheres well to surfaces, but may crack when the bath expands due to temperature. We recommend using epoxy grout only if the bathtub is rigidly fixed between the walls or using a frame.
You can add any color (dye) to epoxy grout. It is very viscous; to apply it you need to use special bags with nozzles. It adheres well to different materials; if the grout dries on a bathtub or tile, it will be difficult to get rid of it.
Silicone grout is the second name for silicone sealant. The difference is that it can be bought not in tubes, but in other containers. It is more convenient to add dye (color) to them. This is the best option in terms of price-quality ratio.
Silicone grout Ceresit.
Latex grout is a relatively new material for sealing seams and gaps. Its properties are similar to silicone, but it has a longer service life and ductility. Due to its elasticity, it does not peel off from surfaces if they expand or contract under the influence of temperature.
Latex grout is used as an additive for cement grout. It gives the cement tensile strength and protects against the formation of cracks. Even if the cement with latex grout additive is cracked, it will not allow water to pass through.
Latex grout is considered the most modern. It has all the necessary advantages: water resistance, resistance to low and high temperatures and a rich palette of colors. To improve the properties of cement grout, a latex additive is poured into it.
Applying grout
You will need a putty knife to apply the grout, although latex and silicone grout can be pressed in with your fingers. To remove the residue, you can use a scraper or a sealant spatula (see photo).
Work order:
- Clean and degrease the surface of the bathroom and walls;
- Fill the gap with fugue (grout);
- If you have a spatula or scraper, remove the remaining grout
- If they are not there, run your finger along the gap, pressing the fugue;
- Remove any remaining grout from the bathtub and wall;
- Allow it to dry for the required time specified by the manufacturer.
Temporary measures
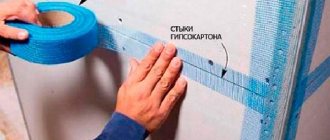
If a gap appears unexpectedly, and there are no plans to carry out repairs in the near future, you can use a budget-friendly and quick, but, unfortunately, not very durable method of sealing the seam - using self-adhesive tape.
The tape is simply glued over the joint so that the fold falls on the line separating the two surfaces. The procedure is very quick and does not require much effort or skill.
The surface, of course, must first be cleaned and degreased - this will improve adhesion and help the tape last not 8...12 months, but at least two years. However, the duration of use also depends on how actively the bathroom is used.
You can watch the installation process in the video.
Polyurethane foam
Polyurethane foam should not be underestimated. It is best used as a base for another coating (sealant, cement, tile, etc.). With its help, it is best to cover gaps between the bathtub and the wall with a width of 3 cm to 10 cm, and even more if you have experience. It is not advisable to use foam if you have an acrylic bathtub - it can deform it and create a stress point.
Application of polyurethane foam
Important
After application, the polyurethane foam expands. If it rises above the desired level, do not touch it! After complete hardening, remove with a kitchen or stationery knife.
The procedure for applying the polyurethane foam base:
- Degrease the surface of the wall and bathtub (under the edge);
- Let the surfaces dry or dry with a hairdryer;
- Wet the surface with a spray bottle or wipe with a wet cloth;
- Completely fill the gap with foam so that its layer is no less than the width of the gap;
- Wait 24 hours for the foam to dry completely;
- Trim off any leftovers.
After the polyurethane foam has hardened, the coating can be laid. You can simply cover the entire surface with sealant, put plastic on it, coat the surface with grout, and lay tile.
Important
Remember - over time the foam will become brittle. Choose a method to close the gap in such a way that it can hold on without a base of polyurethane foam. For example, if you are laying tile, lay it at an angle so that the top rests on the wall. Then it will not fall down after the foam becomes unusable.
What is a gap near a wall and how to avoid it
If you have already installed a bathtub before, then you should know that all models on the market correspond to a standard size range. Thus, long bathtubs are most often sold:
- 1.5 meters;
- at 1.7 meters.
Unfortunately, with regard to the construction of residential buildings, and specifically the arrangement of apartments, equally clear standards for bathrooms are not implied. Quite often, the wall to which the ablution container is supposed to be installed is short or, on the contrary, excessively long.
There are no standard bathroom designs, so often there is empty space between the bathtub and the wall
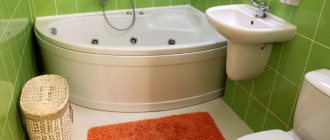
Please note: in this case, the best way to avoid the appearance of a gap near the walls, as well as unnecessary costs and, in general, any other headache, would be to replace the traditional bathtub with:
- miniature seated model;
- shower stall.
Shower stall placement option
You can do it another way: use a hammer drill to punch a niche in the wall, and place one of the edges of the bathtub inside it. This unusual way out is rarely used, because:
- it is required that the wall initially has sufficient thickness;
- you will have to figure out exactly how to make this hole in the wall aesthetically pleasing.
In this case, you can very conveniently and beautifully beat the gap by creating a box from plasterboard, which is then covered with tiles, the same ones that were used to decorate the floor or walls. As a result, you get the space you need, and a kind of cabinet for it, on which it is very convenient to create various kitsch for bathing.
Preparing the bathtub box
Finishing the box with ceramic tiles
However, more often than not, the length of the walls turns out to be much greater than the same parameter for various models of bathtubs made of:
- acrylic;
- become;
- cast iron, etc.
In this case, the very joint that interests us is formed between the bathroom and the walls - a crack, the width of which can be several millimeters or one and a half to two centimeters.
General unevenness of walls and corners should also be taken into account. The sides of the room simply cannot be completely ideal and coincide in all cases with the norm of 90º. That is why the gap we are interested in, also known as a gap, most often occurs on all three walls to which the sides of the bathtub are directly adjacent. In this case, the gap can be:
- smooth throughout its entire length;
- intermittent, especially if there are any bumps or, conversely, pits on the walls.
How the gap is sealed will depend on how big it is
Provided that the width of the gap on the end side is more than three centimeters, you can also hide it using a false wall. If the parameter we are interested in is approximately 10 centimeters, then we can create an add-on. But the small distance, represented by 1-2 centimeters, is still better compensated by using various construction fluids and other devices. We will consider which ones later in the article.
Wooden beam
Actually, this is not an option for sealing the gap, but a way to reduce it. If the distance from the wall to the side of the bathroom is 5-10 cm, you can attach a beam with a cross section of 40*40- or 50*50 mm to the wall along the entire length. This way you will reduce the gap, there will be many options for sealing.
Before installing the timber, you need to do the following:
- Before processing, dry the timber in a dry room;
- Soak the timber with an antiseptic;
- Apply a moisture-repellent agent to it;
- If possible, use oak, elm or hornbeam timber.
Why is it so important to get rid of cracks?
There are several reasons that require urgent removal of gaps in the bathroom. We list them below:
- Unaesthetic appearance. The presence of voids greatly spoils the picture of the interior in the bathroom.
- Moisture ingress. This can cause water to leak to neighbors, and untimely removal will lead to the formation of fungus and mold.
- Damage to the floor covering. Sooner or later, if moisture gets on the floor, limescale and damp spots will appear on the floor, which are difficult to remove.
Border tape
Curb tape is a good and simple solution for sealing joints. It is made of moisture-proof material, coated on one side with an adhesive composition. It can be two-way (with one groove) and three-way (with two grooves). The downside of border strips is the limited number of colors.
Two-strip border tape (with one groove) in different colors.
Three-lane curb tape (with two grooves).
The grooves on the curb tape are folding points. The two-strip is bent at an angle of 90 degrees, an L-shaped corner is formed from it. The three-strip can be bent along the two grooves at any angle. The width of the border strip determines how much of a gap between the bathtub and the wall it can bridge. The most common tapes are 20-60 mm wide; less common are 80 and 100 mm.
There are two ways of gluing border tape - in pieces and as a whole. In the first case, you will get even 90-degree angles. In the second, the tape will be rounded at the corners, which is less aesthetically pleasing (see photo). The radius of the rounding depends on the thickness and rigidity of the tape. The gluing process itself is not much different.
In this case, the curb tape was laid entirely. It could not be bent 90 degrees and the gaps had to be sealed with sealant.
Gluing curb tape for the bathroom with 90° angles
- Cut a piece of border tape to the required length;
- Wash and degrease the wall and bathtub in the area where it is glued;
- Bend the tape along the groove so that it folds in half;
- Remove 10-15 cm of protective covering from one end;
- Place the end of the border tape against the corner of the bathroom and stick it in place;
- Gradually removing the protective coating, glue the tape along its entire length.
If you covered two or three sides of the bathtub, at the joints the border tape will overlap the other. Cut them at an angle of 45 degrees and remove excess (see photo). Fill the joint between the tapes with sealant.
After gluing, run your hand over the tape, pressing it firmly against the bathtub and wall. After 6-8 hours, check how well it has set. If the tape peels off in some places, seal it with sealant or glue.
Self-adhesive corners may be included with three-strip bathtub curb tapes. They must be installed on a clean, grease-free surface before gluing. Watch the video on how to glue border tape yourself:
Types of bathroom screens
A screen is a structure that allows you to cover the visible sides of the bathtub, from the floor to the edge. It can be made of various materials and have completely different appearance and configuration.
- Blind design. It is a continuous canvas and makes the bathroom look neater. It has one drawback - the space under the bathtub cannot be used.
- With hinged or sliding doors. The most functional type of bath screen, providing free access to the space under the bathtub and allowing you to use it to store useful little things: cleaning products, towels, cosmetics.
- Design with shelves - screen-cabinet. Usually it has a back wall, which significantly limits the size of the shelves and complicates access to the sewerage system. Sometimes it is equipped with retractable trays, which gives the device additional functionality.
- Curtain made of waterproof material. A budget option, which is also often used instead of a screen for a non-standard-sized bathtub. It is easy to make a curtain yourself from moisture-resistant textiles that match the design of the bathroom.
In addition, screens can be front or end, covering the bathtub from the front or side.
Ceramic plinth (border)
You can close the gap between the bathtub and the wall with tiles. There are two options - use regular tiles or ready-made ceramic borders. If you use mounting foam or a frame as a base, you can close a gap of more than 10 cm.
If you are going to tile your bathroom walls, it makes sense to install a ceramic border. It is attached with clips to a fastener mounted into the wall. The curb is the first thing to install. Next, laying the tiles starts from there upward.
Ceramic bath border. Cracks in the grout appeared due to thermal expansion and contraction of the bathtub.
How to prevent a gap from forming
If you think through all the stages of repair in advance, you can prevent the appearance of a gap. Technologically, it looks like this: first we install the bathtub, and then we lay the tiles. But this method is not suitable for acrylic bathtubs; it can only be used when installing cast iron and steel products. Let's look at several options and nuances of this method.
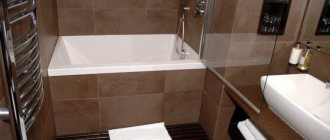
One option is laying tiles from the side of the bathtub . In this case, the wall behind the plumbing equipment is not lined, which has its advantages and disadvantages. In this case, the water flowing down the lining goes directly into the bathtub. Since the tiles are laid almost flush against the side (a gap of 1–2 mm is left), such a seam is usually filled with elastic, waterproof grout or sanitary sealant.
Another version of this technology is that the tiles are laid from the floor , and when they reach the height where the side of the bathtub will be located, a small indentation is made. After installing the bathtub, laying the tiles continues from the edge of the equipment. Thus, it turns out that the wall behind the bathtub is protected from dampness, but at the same time the side is recessed into the cladding. As in the previous case, the seam between the cladding and the edge of the equipment is filled with grout or silicone.
Note! It is not recommended to embed corner bathtubs, Jacuzzis or other equipment with additional functions into the tiled finish, or if the mixer is installed on the side. If it is necessary to access the flexible connection points, the bath will have to be moved away, which will cause damage to the lining.
When laying tiles from the edge, a plastic corner is sometimes installed, which with one of its edges is wrapped behind the tile. This design of the junction allows you to make the seam more attractive and “streamlined”, since the lower part of the plinth has a smooth bend for water drainage. This option is well suited for bathtubs with a wide side. But when choosing plastic, you need to take into account that if it turns yellow during operation, it can only be replaced by dismantling the bottom row of tiles.
You can also use a built-in ceramic border, which is glued above the side, and tiles begin to be laid from it and cover the upper edge of the border. Built-in borders often have a decorative design like marble, granite or a colored pattern, which allows you to beautifully design the junction, but there are also pure white products. The disadvantage of this option is the laboriousness of installation, as well as the fact that the border does not hide the unevenness of the edge of the bathtub and cannot be adjusted to this curvature.
Tile
A small gap between the bathtub and the wall can be closed with tiles laid at an angle. To do this, you can use small border tiles, or cut regular ones into strips. For good adhesion to the wall, you need to clean it with a grinder.
Such a border will only stick if you use high-quality tile adhesive. With its help, you can close a gap of up to 5 cm. To ensure that the tile lasts a long time and does not allow water to pass through, use silicone or latex grout. It is advisable to add plasticizers to the glue or buy a ready-made mixture.
Drywall and other panels
This method of solving the problem is only suitable if the surface of the panels is carefully protected from water, because even moisture-resistant drywall cannot withstand direct contact with water and constant high humidity.
GKL requires good waterproofing at the ends of the sheets and painting with waterproof paint on the reverse side; OSB panels, chipboard, fiberboard, wood - high-quality waterproof impregnation. The panels are laid on a prepared frame, wooden (also impregnated) or metal. Typically, this method of closing the gap is used in conjunction with installing a protective screen under the bathtub.
The panels are also finished with tiles, waterproof paint or high-quality plastic.
Frame
If the distance between the bathtub and the wall is more than 10 cm, you will have to work hard. In this case, you need to make a frame that can be lined. It is best to make it from timber. And so that the space does not go to waste, you can make a pull-out shelf inside. It is ideal for storing household chemicals.
A universal pull-out shelf that can be installed on the side of the bathtub.
Sew the upper part of the frame with MDF, chipboard or fiberboard. This surface can be painted, it is easy to lay tiles on it, cover it with decorative plastic, or lay stone. The arrangement of the internal space is at your discretion. You can leave it empty so that there is access to communications.
Other options
In addition to screens of various designs, the space under the bathroom can be closed:
- ceramic tiles;
- podium;
- decorative curtain.
The bathroom looks much better if sewer lines and objects located under the bowl are not visible.
Tile finish
To cover the screen with tiles, you need to prepare the base.
To make it you will need brick or waterproof plasterboard. Many people prefer the second option.
Making a plasterboard base is easier and faster than laying a brick wall. Mount the material on a frame made of metal profile. The side and bottom horizontal strips are fixed with dowels.
Vertical racks are installed in increments of 50-60 cm. In the place where the inspection hatch will be, a kind of frame is made from the profiles, the dimensions of which correspond to the dimensions of the decorative grille.
Pieces of drywall are screwed with self-tapping screws. The finished structure is treated with a primer to increase the adhesion of the material. The tiles are laid on an adhesive mixture such as Ceresit.
To reduce the weight of the structure, you can use dispersion or polymer glue. Its main advantage is water resistance.
Laying begins from the most visible corner with a whole tile. It is better to use the material with which the walls are lined. Then the structure will be perceived as a single whole. You can cover the screen with mosaics. The rules for its installation are similar.
Bath podium
This design can be built in a large room
There are many options for arranging a podium. Here you can bring to life any ideas that are limited only by the dimensions of the structure.
The monolithic podium is made of brick or small blocks and lined with tiles, porcelain stoneware or mosaics. The steps are finished with anti-slip material.
To make frames in the form of a podium, wooden beams are used. The structure is covered with wood, which is pre-treated with a special impregnation against rot. The top of the product is varnished.
The option with a podium does not provide the possibility of servicing communications, and in the event of a breakdown, dismantling of the structure will be necessary.
How to seal the gap between the bathtub and the wall to prevent water from leaking, depending on its width
- Up to 1 cm: cement, moldings, baseboards, sealant, grout, border tape, ceramic border, plastic corner;
- 1-3 cm: cement, moldings, baseboards, grout, border tape, ceramic border: tiles;
- 3-5 cm: skirting boards, polyurethane foam with subsequent finishing, tiles;
- 5-10 cm: polyurethane foam followed by finishing, timber, tiles;
- 10 cm or more: installation of a frame followed by finishing or cladding.
In this article we tried to answer the following question: how to seal the gap between the bathtub and the wall to prevent water from leaking? We hope the publication will be useful to you and you will make the right choice. You can share your opinion and experience in the comments. Don't forget to share the article with your friends!
more
Brick construction
Brick, for which finishing is required, is laid out in half-brick masonry, decorated with ceramic tiles, mosaics or other materials.
Installation nuances:
- the rules of bricklaying apply - subsequent rows are shifted by half a brick;
- a window is made near the water drain, which is closed with a special plastic door;
- a 2 cm high gap is kept under the edge of the bathtub, which is then sealed with polyurethane foam;
- It is advisable to make a recess for the legs in the middle of the structure.
An advantage can be considered the presence of space for finishing design.
If the cladding is made of mirror panels, this will help visually expand the space.
The disadvantage of the design is that it is fundamental - if complex repairs of sewer units are necessary, the brickwork will have to be dismantled. In addition, the construction process is labor-intensive and requires professional tools and specific knowledge.
How to glue a plastic, tape baseboard to a bathtub, installation methods
Not a single wall in a building, including the walls in the bathroom, is perfectly straight - not to mention modern buildings. Moreover, during construction it is impossible to achieve absolute parallelism of opposite walls. Therefore, when installing a bathtub, there is always some kind of gap, a gap between the sides of the bathtub and the walls of the room, and as a result, water leaks on the floor and even higher humidity in the room.
There are many ways to seal these cracks. Every apartment owner comes up with something based on the circumstances. You can seal the gap, for example, with cement or some other suitable building material. However, the durability of such a “design” remains in doubt. The best solution is to glue a special baseboard to the bathtub.
This product is called differently: baseboard, border, bathroom corner. There are three main types of such skirting boards: tape, plastic and ceramic. There are also VIPs (made of marble, etc.), but they are a separate discussion, since they are not widely used.
Therefore, for self-installation it is better to use tape or plastic skirting boards. However, there are some differences in their installation, so we will briefly talk about each type of skirting board.
Plastic skirting board
It is considered the most economical and easiest to install type of borders. On sale there are not only straight skirting boards that are easy to cut, but also various corners. Therefore, with the help of such skirting boards you can reliably “insulate” a bath of any size and configuration. To fasten the plastic, liquid nails and silicone glue are used. The entire installation comes down to the correct marking of the elements of the overall edging of the bathtub and gluing them. One side is towards the bathtub, the other is towards the wall. Moreover, you can glue it both on the tile and “under” it (on the wall). This kind of work can be done by anyone, even an inexperienced person. The main thing is to then thoroughly seal the joints of the plinth strips and corners with sealant. However, you need to take into account that over time the edges of the plastic may “lift” and it will begin to let moisture through. Therefore, it is better to lay wall tiles on top of the baseboard.
General measures for both types of skirting boards:
- prepare surfaces;
- Pre-seal the gap with sealant;
- After drying, apply liquid nails;
- press the plinth (tape) tightly;
- seal the joints;
- thoroughly dry the gluing areas.