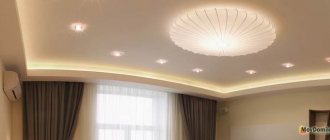
When planning finishing work, you have to decide on decorating the ceiling, where open communications or other details that spoil the appearance are unacceptable. If you hide them in a box, you can make the interior complete at minimal cost. This design becomes part of a multi-level plasterboard ceiling. The box can be located around the perimeter of the ceiling, in the center or in the form of a geometric figure. Elements covered with tension fabric, LED lighting or built-in lamps can be an effective addition. Let's figure out how to make a plasterboard box on the ceiling. And instructions, useful tips and videos on the topic will help with this.
Advantages of a gypsum plasterboard box
Installing a plasterboard box on the ceiling has some advantages:
- possibility of installing backlight;
- a variety of design options with different configurations;
- the ability to hide unnecessary parts, problem areas, wiring or communications;
- ease of installation of plasterboard structures with your own hands;
- environmental friendliness and fire safety.
Materials
When installing the box, the following materials are needed:
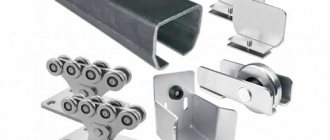
- guide profile (UD) – 28 × 27 mm;
- rack profile (CD) – 60 × 27 mm;
- fasteners - dowel-nails, screws for metal;
- dewlaps and crabs;
- drywall;
- acrylic primer;
- putty for seams between gypsum boards;
- reinforcing mesh.
There are 3 types of drywall on sale:
- for dry rooms (gray);
- moisture resistant (green);
- fire-resistant (pink or gray with red markings).
When purchasing materials, you should pay attention to the absence of chips in the sheets and the uniformity of the zinc coating of the metal.
To ensure a strong frame, all profiles should be used for their intended purpose and from the same manufacturer.
Tools
The following tools are required for work:
- perforator;
- screwdriver;
- metal scissors;
- hammer;
- plumb line, tape measure, level, rule;
- narrow, wide and angled spatulas;
- construction knife.
You can understand how tools are used during installation by watching video instructions for installing plasterboard ceilings.
USEFUL INFORMATION: Is it necessary to prime the walls before puttying?
Rules and tips
Before installing spotlights, it is advisable to familiarize yourself with the basic tips and rules developed by installation specialists:
- If you want to regulate the power of the light flux, then before installing the spots you need to select dimmable LED lamps and the same switch.
- Never use twists for electrical connections; this is an extremely dangerous option.
- If there are suspended ceilings in close proximity to the spotlight, carefully select the power of the light bulb, as the film may be deformed.
- When installing halogen lamps in a spotlight, do not touch the bulb with your bare fingers - this will shorten its service life.
- If you need to power spotlights from low voltage, they are connected via a power supply or transformer. The power of the transformer or unit is selected depending on the power of the lamps.
- In cases where the installation of a point device requires special care, the mounting springs are tightened with wire, which is cut after installation.
Preparatory work
Before making a frame, you should first map the location of the drywall sheets. This will make the work easier and allow you to economically select the material. The standard sheet widths are 600 mm and 1200 mm. Their length ranges from 2 m to 4 m. The thickness of the sheet for a box made of plasterboard on the ceiling is from 6.5 to 9.5 mm. If the box on the ceiling is small, it is enough to pick up pieces from waste. It is important here that they are free of chips and cracks.
The base surface is prepared as follows:
- Old finishing is removed from the ceiling.
- Slots, cracks and holes near the pipe exit are sealed.
- A cable is attached to the ceiling in a corrugated sleeve, hanging from the ceiling at the locations of the lamps.
- The base ceiling is primed.
It is also necessary to take care of the hidden metal pipes: prime them and paint them. This will prevent rust stains from appearing on the box trim in the future.
Now you need to make a drawing and markings:
- A diagram of the box frame is drawn with the obligatory indication of dimensions. It also marks holes for pipes and built-in lights.
- Markings are made on the walls and ceiling with a pencil and the lower level of the box is beaten off with a cord. The evenness of the lines is checked with a building level. Attachment points are marked
The recommended distance between the suspended ceiling and the box representing the second level failure is 10–20 cm.
Preparation
Properly organized room lighting provides a pleasant and comfortable pastime, helps decorate the interior or create effective visibility in the work area. However, to achieve high-quality lighting effects, it is important to correctly select the necessary materials, tools, equipment, plan the location, etc. First, let's look at the possible options for tools that may be useful to you for carrying out activities for installing spotlights.
Required tools and materials
In each specific situation, the installation of a spotlight can differ significantly, since the process is associated with the characteristics of the ceiling structures, the stages of repair work and the tools and devices available.
The most relevant tools are for drilling holes in drywall; this process can be carried out using:
- A special flexible crown for working on plasterboard is the best option, as it is designed specifically for plasterboard ceilings. The set contains several ring-shaped files of different diameters, which are inserted into the drill attachment.
Flexible crowns
- Circular tile drill (ballerina) , despite the fact that their direct purpose is to work on ceramic surfaces, they do an excellent job with drywall. A significant advantage of such a drill attachment is the ability to set the center of the hole with fairly high accuracy.
Crown on tiles
- Jigsaw - working with an automatic blade is more difficult than with previous attachments, but it is still possible to make a hole close to round in shape.
Using a jigsaw
- Drill bits - with its help you can drill a fairly large number of holes in a circle, and break out the inside with your fingers.
- A hacksaw blade or a stationery knife are the most difficult options, since all the work will have to be done manually.
Using a utility knife
You can take any of the above tools for working on drywall that you have on hand. Most of them can be driven automatically using a drill, a screwdriver, or a hammer drill with a drill function.
To connect spotlights you will need connecting wires or cable. Connecting wires to the lamp can be done using soldering, terminals or sleeve crimping. When working with cable and wire products, you may also need pliers, wire cutters, and pliers to remove insulation. To tighten/unscrew the bolts, you must use slotted and Phillips screwdrivers.
Spot lamp selection
The very concept of a spotlight comes from the English lexicon, where they are called spot. In domestic usage, such lighting devices are called soffits, spotlights or spots; the main difference between such lighting sources is their local location and the same effect. However, the variety of their shapes, design features and design requires a responsible approach to choosing a spotlight model for installation in a ceiling frame. The division is made according to a number of factors, so below we will consider them all in turn.
Based on the type of lamps installed, lighting spots are divided into:
- Incandescent lamps are the simplest option, but are characterized by very low efficiency, only about 5% of the electricity is spent on lighting and poor light output of 8 - 10 Lm/W;
- Halogen lamps - have slightly better light output than incandescent light bulbs from 12 to 18 Lm/W, but are not easy to touch with bare hands;
- Fluorescent light bulbs are a category of gas-discharge lamps that have a high light output of 40 to 60 Lm/W, but contain toxic mercury, which is easily absorbed into drywall. They belong to the category of energy-saving lamps, therefore, despite their high cost, they can significantly save energy.
- LED light bulbs are the most effective, as they can provide from 90 to 120 Lm/W and are completely safe for humans. They also fall into the category of energy-saving devices. LED lamps are often used for LED lighting of premises.
For spotlights, the most profitable are fluorescent and LED lamps. They generate relatively little heat, consume little electricity, and can provide a wide range of color temperatures - from warm to cold spectrum.
By type of base - there is quite a wide variety of connection options, but in spotlights they are used with base G, E and non-separable models. In the latter, the light bulb is not separated from the lamp; they use built-in lamps and the entire lamp must be replaced.
By type of base
In terms of overall dimensions, they can have different diameters and heights, which must be taken into account in relation to the size of the plasterboard boards in which they will be installed. The height of the ceiling light should be less than the space in the niche behind the drywall so that it fits freely in the hole.
Based on the method of arrangement, recessed and surface-mounted ceiling lamps are distinguished. The first of them are completely hidden under drywall, overhead devices remain outside, and the mounting method is identical to that of a chandelier.
Built-in and overhead
According to their design, they can be stationary or rotary, single or block. Stationary spotlights illuminate only a strictly defined area, while rotary spotlights can change the position of the illuminated area. Single ones contain only one point of the lighting device, while block ones contain several at once in one housing.
Stationary and rotary
Frame installation procedure
Installation of a plasterboard box on the ceiling is done in stages.
- Holes for dowels are made along the line of the guide profile.
Each profile is glued with sealing tape at the points of contact with the base to improve sound insulation. In the corners, it is better not to separate the profiles, but to bend them: this increases the strength of the structure.
- The first to attach are the guides along the perimeter of the top of the wall, where the top of the box will be.
In that case, the width of the box is small, the profile can be connected along the contour on the floor, fastened with self-tapping screws, and then transferred to the ceiling.
- U-shaped suspensions are mounted on the ceiling. They can be made from a UD profile by cutting them with scissors. The supporting profile in the form of short pieces of CD running along the bottom of the box is inserted into the guides and attached to the hangers.
USEFUL INFORMATION: Which putty is better for drywall: which one to choose?
- Also, guides (UD) are attached along the perimeter of the future structure, to the ends of the supporting profile, forming an edge of the structure.
- Transverse profiles are attached in increments of 60 cm.
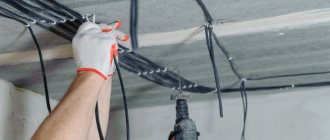
A popular solution is a plasterboard box with lighting. For such a case, wiring is laid, which is attached to the ceiling with plastic clamps. In this case, the cable should not sag.
After installing the frame, you should once again check the evenness of the structure. It is advisable to study the basics of installation using video instructions, where you can choose your own option.
Recommendations for selection
Before you begin designing a future lighting system, be sure to perform special calculations. Make sure that the system you choose will fully meet the requirements for it and fully perform its basic functions. This must be done even if we are talking about a bathroom with two spotlights.
A minimum amount of illumination will be appropriate in the recreation area, but in all other rooms it will negatively affect the performance, mood and psyche of a person as a whole. For such rooms it is better to take lighting fixtures with a reserve!
If zoning is carried out, then the calculations must be approached with even greater responsibility. In the recreation area, try to provide two operating modes - light for reading and dim lighting for sleeping (you won’t turn on bright lights at night if you go to the toilet).
Decide on the required illumination in the room, calculate how much power is required for each lamp and how many of them should be per square meter (don’t be alarmed, the result may not be a whole number, so round up).
When choosing the lighting spectrum, try to bring it as close to natural as possible and ensure the best color reproduction. The last parameter is designated Ra and for residential premises should be in the range of 80–100%.
If you find it difficult to make your own calculations, consult with qualified electricians and builders. Even if you are able to install lighting fixtures yourself, it is advisable to entrust the calculations to professionals.
Attaching drywall to the frame
Sheathing the gypsum board box occurs in the following order:
- If necessary, insulation or sound insulation is placed inside the frame.
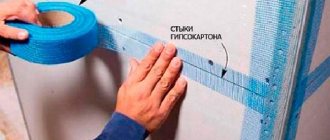
- Pieces of drywall are cut to the size of the box. At the joints of the sheets, chamfers are made so that the seams can be properly sealed with putty.
- The bottom sheets are installed. The joints must be on the CD profile.
- Lastly, the side edges of the box are sewn up.
Each self-tapping screw head is recessed into the sheet material by 1–2 mm, which will then allow these places to be puttied. To control the depth of screw tightening, it is convenient to use a special bit with a limiter.
- The corners of the drywall are not screwed tightly, otherwise cracks may appear.
- It is advisable to cut holes for spotlights before installing the sheet. After its installation, the ends of the cables for connection are led out through the holes.
Installation Requirements
There are no general requirements for installing spotlights in plasterboard, but there are recommendations regarding some parameters. Firstly, built-in lamps must provide good visibility or local illumination in a certain area. Secondly, the choice of installation location and technical parameters must be consistent with other elements of the lighting system - hanging chandeliers, LED strips, sconces, etc.
Thirdly, it is recommended to maintain the distances between spotlights in the following ratios:
- If lamps are mounted in rows, then there should be no more than 1 m between them;
- Within one row, the distance between spotlights should not exceed 1.5 m;
- If there are several rows, then the point devices should be staggered relative to each other;
- The distance from built-in spots to walls or windows should be at least 0.5 - 0.6 m.
Box finishing
Puttying drywall is an important stage of work, since if it is done poorly, the structure will have an unsightly appearance. In the video you can see what a plasterboard box looks like after finishing in reality.
Finishing sequence:
- The surface of the drywall is coated with a primer, special attention is paid to the seams
- After the primer has dried, the seams and recesses of the screw heads are filled with specialized putty. The joints of the sheets are glued with reinforcing tape or serpyanka mesh, and after drying, the putty is reapplied.
- On the internal and external corners of the structure, perforated paint corners are attached to the putty.
USEFUL INFORMATION: How to make a plasterboard ceiling with your own hands: marking, assembly, finishing
- After processing the joints and corners, the entire surface of the box is puttied. The mixture is applied in several layers to level the surface as well as possible. The last layer is made the thinnest.
- After drying, the surface of the structure is sanded with an emery mesh, after which it is painted, covered with wallpaper or finished with decorative plaster.
Strengths of LED luminaires
LED devices have excellent durability, which explains their widespread use.
Advantages of LED luminaires built into a slatted ceiling:
- Low temperature operating conditions of lamps. Unlike luminescent analogues, they do not provoke heating of the surrounding space. This significantly expands the choice of ceiling finishes.
- Emitting an imitation of natural light. As a rule, ceiling lamps are equipped with daylight LEDs. In general, products of this type can reproduce shades of a different spectrum.
- Long service life. The service life of different modifications differs. Experts do not recommend using cheap models that wear out very quickly.
- LEDs are not afraid of high humidity. This significantly expands the range of their use: LED lamps for slatted ceilings in the bathroom are very popular