Hi all! In the article we will touch upon the rather sensitive, and most importantly interesting topic of laying an Internet cable at home, in an apartment or in a country house. If you are reading this article, then most likely you want to do everything correctly, and not so that the wires hang from the corners of the doors like vines.
Our portal mainly specializes in explaining Wi-Fi wireless technology. And as you understand, we know almost all the disadvantages of a wireless network. Therefore, if possible, you should think about a cable connection. You need to understand that radio waves are a very fickle thing that will be worse or better in some parts of the house or apartment.
If we talk about a large multi-story building, then the problem only increases. Walls, mirrors, steel beams and rods will all greatly degrade the signal. For phones and smartphones, this may be acceptable. But, for example, to connect the same TV or desktop computer - it can be critical.
Especially for those who play online games. If the radio wave is extinguished and the signal is weak, then the Internet speed will drop and the ping in the game will increase. So it is computers and televisions that need to be connected directly. I hope you now understand that Wi-Fi is certainly good, but a cable connection is better.
Next, the article will be divided into two blocks, where I will give advice on wiring the Internet in an apartment or private house. The first part will contain tips for those who decided to lay the wire before a major overhaul. The second part will be intended for people who now want to lay the cable so that it is as invisible as possible.
How to run a cable before renovation in an apartment or house
Here you have a bare apartment or house, where there is nothing but walls. In fact, this is the best option when you can route wires to different places. Most likely, you have already roughly imagined what will be located and where - since we will start from this first of all.
Wiring after repair
This is probably the most difficult option. The difficulty is to lay the cable so that it is not visible, plus you need to not ruin any aspects of the new or “not so” repair. If you have baseboards, then this is a great option. You can lay a cable from the router to the baseboard, and then distribute them between rooms.
Wire selection
In fact, there is nothing difficult in choosing; you can choose the cheapest one for laying the house. But for outdoor use, it is best to take it with protection from moisture, dust and sudden temperature changes. Therefore, I have a separate article about twisted pair, which we will use. I also advise you to save the article on twisted pair crimping, because it will most likely be useful to you.
Wiring throughout the apartment can be done with your own hands. To do this, you need to familiarize yourself with the existing instructions for this process. You should consider what materials will be needed for the job.
Advice from professional installers will help you learn how to install an Internet cable. They give recommendations on how to do the job well.
Joyner and patch cord: detachable connections
This option is simple. Each device owner can independently cope with the process, because special knowledge and skills are not required. To extend the cable length, you will need to visit a specialized store to purchase a patch cord, suitable sockets, and an RJ-45 plug, called a joyner. The cost of the listed computer connectors is low.
It is very important to carefully choose a lan splitter for the Internet, because in appearance it looks like a telephone adapter. In order not to confuse them, you should pay attention to the number of contacts. A computer splitter for the RJ-45 Internet has 8 of them, while telephone adapters have only 7.
For reference! A significant disadvantage of this method is the need to use special equipment for crimping the RJ-45 splitter, which in stores can be called not only a crimper, but also crimping pliers.
It is also worth noting that the contact area will be smaller than other methods. Reliability and tightness indicators also leave much to be desired.
The following technique will be a solution if the owner of the device wants to achieve good reliability of the separator. In this case, you only need the ability to hold a knife in your hands and use electrical tape. The device will last for many years. On cable sections up to 100 m, speeds of up to 100 Mbit/s will be maintained.
If desired, you can wrap the wires in tape and snap them together with pliers
The twists will need to be done at the same level. Each of the wires is insulated separately. Everything would be fine, but system administrators, installers and telephone operators, who often independently extend the cable, need a more reliable way to connect wires. In this situation, it is advisable to connect the cables at different levels to eliminate the possibility of contact between wires that have been stripped.
Step by step process:
- First of all, users remove 8-10 cm of wire from the outer sheath. The manufacturer places a split nylon thread in the inner part of the cable. Having cut the shell, the owners of the devices find a thread with which to clean the shell.
- A similar procedure is performed with the second piece of cable. The sheath cut along the wire is not completely cut off. It can be used again after the connection is ready.
- Each of the twisted pair wires is stripped by 1 cm. It is important to remember that according to the location of the twist, they should not touch each other.
- Stripping requires the craftsman not only to be patient, but also to be careful not to accidentally cut the copper strands. The wires also need to be cut off gradually, after completing the next twist. When such a process is performed for the first time, experts recommend practicing on a piece of cable that will no longer be used.
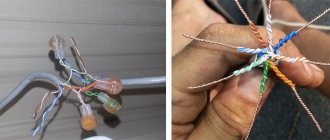
- A pair of stripped ends are placed crosswise and gently twisted with your fingers. The end result should be something similar to a braid.
- When connecting copper wires, you should carefully twist the wires together. It is unacceptable to leave one wire straight and wrap the other around it.
- After completing the twisting process, you need to bend the workpiece in half and press it with pliers. This will provide the product with mechanical strength.
- Each of the twists must be insulated. For this purpose, insulating tape is used, which increases tightness and reliability.
At the end, the wires are placed in a cable sheath and covered with a second one. The connection area is tightly tied with electrical tape, which will give the cable additional strength and a completed appearance.
Is it worth doing the wiring yourself?
Many owners, having moved into a new apartment or carrying out renovations in their home, are faced with the need to install network cables to use the Internet. In this case, property owners must decide whether to do this work themselves or turn to the services of professionals.
The average cost of laying an Internet cable per meter is about 30 rubles. However, it is worth saying that craftsmen do not undertake such work for less than 1,100 rubles. For this reason, many homeowners choose to install network cables themselves. In this case, it is recommended to carefully study the instructions for this process.
Most often, when laying a line to use the Network, television and telephone wires are installed simultaneously. In order for all actions to be performed correctly, you need to carefully plan the scheme of future communications. This will avoid installation errors. Laying an Internet cable in an apartment is a responsible job that requires certain preparation.
Crimping a network cable directly and crossover for printing on a b/w printer
1.When connecting Computer-Hub/Switch (card-hub/switch), the following crimping scheme is used:
One side crimp | Crimping on the other side | ||
1: White-orange 2: Orange 3: White-green 4: Blue 5: White-blue 6: Green 7: White-brown 8: Brown | 1: White-orange 2: Orange 3: White-green 4: Blue 5: White-blue 6: Green 7: White-brown 8: Brown | ||
When connecting two computers crossover (card-to-card), the following crimping scheme is used:
One side crimp | Crimping on the other side | ||
1: White-orange 2: Orange 3: White-green 4: Blue 5: White-blue 6: Green 7: White-brown 8: Brown | 1: White-green 2: Green 3: White-orange 4: Blue 5: White-blue 6: Orange 7: White-brown 8: Brown | ||
Features of creating wiring
Internet cable installation can be done in different ways. The wire that the provider brings to the apartment or house must be brought inside the premises. To do this, you will have to make a hole in the wall, which is located between the staircase and the apartment or the street and the premises of a private house.
Next, this wire is connected to the router. Other wires will go from it to devices for using the Network. In some cases, owners choose to connect the Internet wirelessly. The router distributes Wi-Fi throughout the apartment. However, a wired connection has a number of advantages.
Wires can be connected to devices in a hidden or open way. In the first case, you will need to ditch the walls. This option is possible at the stage of construction work or major repairs. The second option involves laying wires along the walls. They can be covered with special cable ducts, skirting boards, etc.
General conclusion
A computer network in an apartment can be made using wired, wireless or combined technology. Since the connection of the router and its configuration are carried out by the employees of the Internet provider, a computer network in an apartment with your own hands is a completely doable task.
Sources
- https://WiFiGid.ru/poleznoe-i-interesnoe/prokladka-internet-kabelya
- https://FB.ru/article/363542/prokladka-internet-kabelya-v-kvartire-kakoy-kabel-dlya-interneta-luchshe-ispolzovat
- https://vpautine.ru/internet/kak-razvesti-po-kvartire
- https://profelektrika.ru/uslugi/internet-razvodka/
- https://ehto.ru/slabotochnaya-set/kompjuternaja-set-v-kvartire-svoimi-rukami
- https://rusenergetics.ru/provoda-i-kabeli/kak-obzhat-internet
- https://tokzamer.ru/bez-rubriki/shema-podkljucheniya-internet-kabelya
Benefits of a wired connection
Not all owners of private property use an Internet cable. However, Wi-Fi has certain disadvantages. The advantage of a wired connection is a number of factors.
In this case, the setup will be easier. You will not need to enter a password to gain access to the Network. Some apartments, especially older ones, have thick walls. The signal may not travel well wirelessly throughout the premises.
Microwave ovens and some other appliances can also cause signal deterioration. With a wired connection, such troubles do not happen. Also, when connected to Wi-Fi, the signal transmission speed may be slower. It's not noticeable when watching a video. However, gamers feel this lag very acutely. In the game, they can constantly lose, since the enemy reacts more quickly to changing situations. To improve signal quality, it is recommended to connect all devices for Internet use using wires.
The essence of a leased line
For residential cable installation for Internet connection, it makes no difference which connection method is used in your home.
The Internet connection point of your apartment should be located in the low-current section of the floor panel or in the panel that replaces it. Less often, providers make an access point in the apartment itself.
It doesn’t matter whether your home uses a fiber-optic connection or a simple cable connection, from the access point to the computer(s) in your apartment, computer wiring is done with a twisted pair cable.
It should be noted that twisted pair cable is the simplest cable from the group of communication cables. Although its pairing can reach several hundred, it can rather be considered obsolete. For home and office networks, twisted pair is ideal, but for laying external communication lines, a more modern optical cable is needed. You can view an example and characteristics of an armored optical communication cable by clicking on the link. This is the IKB-M cable.
Cable laying rules
There are certain rules for laying Internet cables. They need to be taken into account during the work process. Many owners of houses and apartments, after connecting the wire to the apartment, leave the router in places not intended for this purpose. The device is in plain sight, which increases the likelihood of mechanical damage.
Also, do not leave unprotected wires on the walls and especially on the floor. This may lead to their accidental breakage. Therefore, communications should be hidden either under a layer of plaster or in special cable channels. This will greatly improve the aesthetics of the room. Wires running openly along the wall degrade the overall appearance of the interior.
You should also remember that the wire for connecting the Internet cannot be run together with the power cable. They should be kept at a distance from each other, even if they run in the same direction. Otherwise, if the electrical wire overheats, the network communications will also be damaged. These types of wires can cross at right angles.
Types of wire
Many private property owners are interested in the question: which Internet cable is best to use? To get the correct answer, you need to consider the existing types of communications presented.
All wires for connecting the Internet can be divided into two categories. The first group includes shielded wire. A metal tube runs along its entire length. It gives the wire rigidity. Such a wire is less susceptible to mechanical damage and other adverse factors.
The second type of wires does not have such a screen. This is a softer type of communication. Although it is inferior in strength characteristics to the first group of conductors, unshielded varieties are used more often for home wiring. It costs less. With proper use, such a wire will be durable and functional. Shielded varieties are used for long-distance street wiring.
Also, when purchasing, you can see that there are wires with different color combinations. In total, the network cable includes 8 different wires. Products for connection of type A and type B are available for sale.
The colors of the Internet cables are identical for both groups. However, the order of installation of individual conductors in the overall system changes. When choosing, it is important to pay attention to how the wires are located in the wire. The fact is that you can connect all devices to the router only using one connection. To do this, you will need to use either a type A or type B cable everywhere. This wiring must be at the ends of all cables.
Most often, a type B connection is used for connection. It is also called a direct connection. If you need to connect two laptops or computers, you will need to use cross-soldering. In this case, connector A is installed on one side of the wire, and connector B on the other.
How to share the Internet on several computers
The easiest way to solve this problem is to use the tools available in the Windows operating system. The main thing is that all devices connect to the same network. Network cards and the necessary cables are the most important elements, without which the problem cannot be solved. Otherwise, the LAN splitters will not work.
What are the differences between 3G and 4G networks: features, advantages and disadvantages
An appropriate cable is purchased for the physical connection between all machines. The main device is equipped with two network cards, which provides Internet access.
Note! From the very beginning, you need to give each computer a different name. To configure the parameter, just right-click on the “My Computer” icon. From the context menu that appears, go to the “Properties” item.
The relevant information is checked in the “Computer name” tab. The same workgroup is established for all computers using the same section.
Next, the order of actions is as follows:
- The computer name can be adjusted when the user clicks on the “Change” button. The working group can be changed in the same tab if necessary.
- The user account must be named differently than the computer itself. Information in this regard can be easily obtained by clicking on the “Start” menu, and then going to the following items: “Settings” - “Control Panel” - “User Accounts”.
- The last requirement is the installation of identical protocols on devices related to the network. To do this, go to the “Control Panel”, then find the connections icon.
- Right-click on the connection and select “Properties”. The main thing is that the same components are installed for all connection participants. In this case, twisted pair splitters for the Internet will be quite effective.
All that remains is to go to the properties of the second network card installed on the computer device. Here, go to the “Advanced Settings” tab to allow both types of connections currently available to users. After this, other users will be able to connect to the Internet, which is distributed from one or another computer. All you have to do is click OK.
Note! Don't forget about the TCP/IP Protocol component.
The IP address is filled in by the user himself. The subnet mask is set automatically. Gateway is a line that is left empty by default.
In the lower field, if you wish, you can check the box next to the “Obtain a DNS server automatically” function. Another option is to manually enter the IP address associated with the network card. This is a field called "Preferred DNS Server". After this, the so-called divider can be turned on.
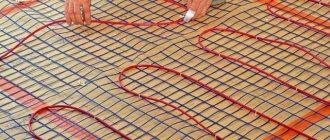
Hidden wiring
When considering how to connect the Internet via cable, it is necessary to consider the procedure for creating closed wiring. This option is suitable if a major renovation is being carried out. Also, hidden wiring is more suitable for a building made of concrete blocks. For wooden houses it is better to choose an open type of wiring.
First you will need to create a diagram on which all elements of the system will be indicated with natural dimensions. The plan should indicate the router, as well as all wire lines. They will be connected to stationary devices. Next you need to prepare the necessary tools.
Lines are marked on the walls. Wires should only run vertically or horizontally. To mark channels for future cable laying, you will need a nylon thread. It needs to be rubbed with colored chalk. Next, the thread is stretched between the beginning and end of the straight route. It is pulled tight and quickly released. A straight line will appear on the wall. The second line is drawn parallel to the first. The distance between them should be no more than 40 mm.
Arrangement of hidden wiring
When figuring out how to connect the Internet via cable, you need to consider the procedure for creating hidden wiring. When the marking is completed, the grinder is drawn along the marked lines with a diamond disc. Using a hammer drill, a groove is knocked out.
You will also need to outline and create a place to install the router. It should be in a niche covered with a shield. For sockets and other elements of the system, using a round crown, cut out recesses in the walls.
After this, the cable is pulled through the corrugated pipe. This will allow you to dismantle it if necessary. The corrugated pipe is fixed in the groove using special dowel clamps or asbestos. Next, the entire system is covered with plaster. You need to fix the shield at the installation site of the router. This will allow you to access the device if necessary.
After this, it will be possible to carry out finishing work indoors.
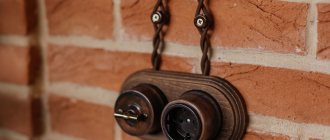
Open wiring
The installation of the Internet cable can be done after the repair. Most often, cable ducts or baseboards are used for this. In the first case, the wire runs along the surface of the wall. First, the cable channel profile is installed. A wire is installed in it. A decorative overlay covers communications.
Another popular method is to lay cables in special skirting boards. They also have cable channels. There are models on sale in which several channels are created at once. In this case, electrical, television and network wires can run parallel in the baseboard. Everyone will be in their own department.
This is a simple but effective way to quickly route the cable to the appropriate devices in the apartment.
Connecting the cable
It is not advisable to purchase special tools for stripping wires. You can get by with a flathead screwdriver. You need to purchase special clamps for the cable cores. The insulation common to all cores must be removed from the wire. This must be done carefully so as not to damage the wires.
Next, the wire for the Internet is straightened. Each core is placed using a flat-head screwdriver into the corresponding section of the clamps. The common wire must remain stationary. You need to adhere to the color sequence for the selected type of scheme. After this, the clamp snaps into place. It can be connected to the corresponding socket of the device.
Having considered how to lay an Internet cable, you can perform this procedure yourself.
Hi all! In the article we will touch upon the rather sensitive, and most importantly interesting topic of laying an Internet cable at home, in an apartment or in a country house. If you are reading this article, then most likely you want to do everything correctly, and not so that the wires hang from the corners of the doors like vines.
Our portal mainly specializes in explaining Wi-Fi wireless technology. And as you understand, we know almost all the disadvantages of a wireless network. Therefore, if possible, you should think about a cable connection. You need to understand that radio waves are a very fickle thing that will be worse or better in some parts of the house or apartment.
If we talk about a large multi-story building, then the problem only increases. Walls, mirrors, steel beams and rods will all greatly degrade the signal. For phones and smartphones, this may be acceptable. But, for example, to connect the same TV or desktop computer - it can be critical.
Especially for those who play online games. If the radio wave is extinguished and the signal is weak, then the Internet speed will drop and the ping in the game will increase. So it is computers and televisions that need to be connected directly. I hope you now understand that Wi-Fi is certainly good, but a cable connection is better.
Next, the article will be divided into two blocks, where I will give advice on wiring the Internet in an apartment or private house. The first part will contain tips for those who decided to lay the wire before a major overhaul. The second part will be intended for people who now want to lay the cable so that it is as invisible as possible.
How to split a twisted pair into a two-port socket
The algorithm for embedding a twisted pair cable into a switching device is not that complicated. For example, a situation where the main cables have already been laid. And a seat for the socket is prepared in advance. The procedure to follow in such circumstances is as follows:
- The outer layer of insulation from the end of the wire is cut off. Regular pliers are suitable for this. 4-5 centimeters of exposure will be enough to obtain the desired result. The main thing is to work carefully so that the wires are not damaged. If this does happen, you can simply trim off the damaged area. Then the depth of the incision is adjusted and the operation is repeated. Otherwise, the adapter will not be able to be organized correctly.
- Each pair must be leveled when the insulation is removed. There is no need to completely clean the working surfaces. Each of the contacts on the site has its own micro knives. They trim the insulation, provide reliable fixation, and additionally secure wires.
- The socket needs to be disassembled. To do this, the front panel is completely removed. Usually, special latches are unfastened or the fixing screw is unscrewed. The decision depends on the design of a particular model. When using modular sockets, the internal elements are also removed from the latter.
- The cable is fixed to the module using a tie. You can use other methods provided by the design.
- The wires are inserted inside the clamps. Connecting them to the system later will not be difficult. The main thing is to adhere to the color markings so that they correspond to the applicable standard. The veins do not need to be immersed too deeply. It only takes a little effort for the fixation to be successful.
- Pressing using an extractor.
- The module is installed in place after pressing is completed. The base of the socket is screwed to the corresponding platform if the device itself is external. The cable entry must be from above. As a result of the work performed, the connector for the connector is located at the bottom. If an internal socket is installed, the base is mounted in a prepared glass. Afterwards, the device is fixed.
- Screwing the front panel.
- When the previous steps are completed, you can check the functionality. It is recommended to use special testers that give the best results. But it's easier to just connect your computer to check if there is a network connection.
Important! The correct pinout is the first thing to check when problems arise. This is the reason why breakdowns occur most often.