If the children's room is small, its area is increased by adding a loft bed. Children will have the opportunity not only to expand the space for games, but they will also find it interesting to sleep on such a bed. For example, they can imagine that they are going on a voyage around the world or into space. A loft bed can also be useful in a small apartment, significantly increasing the usable area.
Such designs, which are also called loft beds, are not cheap, but if you wish, they are quite easy to assemble yourself. We will tell you what is needed for this and how to carry out step-by-step assembly.
DIY loft bed: design requirements
First, let's take a closer look at the types of loft beds. In fact, it is the same bed, but without a back, and is significantly raised above the floor. The height of such a lounger can be 1.2 - 2 meters from the floor. There are different types of structures and fastenings.
- Attaching the bed to the ceiling. No frame support is needed; only fastenings are used. An important condition is the purchase of reliable fastenings. It is also necessary to check the reliability of the ceiling itself.
- Mounting to the wall and two supports is a more reliable design. The bed will not tip over, even if children start fussing on it. The only negative is that it cannot be rearranged.
- Frame base without fastenings. This bed is stable and easy to move from place to place. This is the most common design as it is more convenient.
Although beds are made mainly for children and teenagers, if necessary, it can also be made for an adult. The only thing he won’t experience is the romance that children get, and it’s more comfortable for an adult to sleep downstairs. It is important not to neglect safety rules when creating a loft bed, especially when attaching it to the ceiling.
Also, when making a bed, consider the age of the person who will sleep on it.
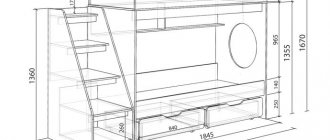
A sleeping place for a preschooler is installed at a height of 1 m 20 cm. Width 0.7 m, length 1.6 m. It will be comfortable for a child to sleep on such a bed and, if necessary, it will be easy for parents to approach the baby and pick him up. Below are usually installed drawers and shelves on which things are stored.
a sleeping place for a teenager to a height of up to 1.8 meters. The width of the lounger reaches 0.9 m, and the length is 2 m.
The sleeping place for an adult depends on his height. The taller a person is, the farther his bed should be from the ceiling so that he can sit on it freely. The length and width of the berth are 2 m and 1.4 m, respectively.
Another prerequisite is the sides. Their height is usually 30 cm. They are necessary to prevent the child from falling while sleeping.
Organizing your desk or desk
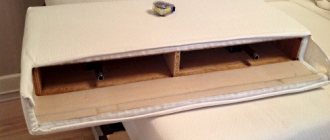
If there is sufficient height from the floor to the bed, it is recommended to leave some space for the tabletop. This option is optimal for study and work: the width of a single bed is about 80–100 cm, the same depth is optimal for a spacious table.
For double beds, the installation height in this case should be 10–15 cm higher than the height of the person using the work or study place. Also, due to the overhanging bed and side rails, shading is possible, so the table will need a close electrical connection point and at least a simple table lamp.
The table does not have to be tied to the bed structure, but when making a support structure from chipboard, it is very convenient to use one of the side panels as a support point for the table top. All that remains is to place another board 70–80 cm high on its edge - the space for work and creativity is already ready. To further save space, the tabletop can be made folding or retractable.
Do-it-yourself children's loft bed: pros and cons
Before we start creating a loft bed, let's weigh the pros and cons. Is it worth making a loft bed with your own hands, even using ready-made drawings and dimensions?
Advantages of making a bed . These include:
- Increased space. The bed will be raised up, and under it, for example, you can create another play area or put a table for studying.
- Creativity. Loft-style interiors look especially interesting with a loft bed, but it fits well into many others.
- Separate sleeping area . Children feel it well. They seem to go into their own space, where they quickly relax and fall asleep.
- Place for games and sports . It is possible to equip the bed so that it becomes a place for children to “transform” and play sports. If you make the bed yourself, then this issue is very easy to solve.
But, of course, there are certain disadvantages .
- Inconvenience during cleaning . Children are already not very fond of making their beds, and when she is upstairs, it is still inconvenient to do it. And to wipe off the dust, you will also have to climb up.
- Risk of falling . Although every bed has bumpers, the risk of falling still remains when the child sleeps too restlessly. Therefore, it is better to make low models.
- It's stuffy. Everyone knows that it is more stuffy at the heights than at the bottom. Therefore, in the summer heat or when the house is too hot, sleeping on a loft bed is not very pleasant.
Organizing your desk or desk
If there is sufficient height from the floor to the bed, it is recommended to leave some space for the tabletop. This option is optimal for study and work: the width of a single bed is about 80–100 cm, the same depth is optimal for a spacious table.
For double beds, the installation height in this case should be 10–15 cm higher than the height of the person using the work or study place. Also, due to the overhanging bed and side rails, shading is possible, so the table will need a close electrical connection point and at least a simple table lamp.
The table does not have to be tied to the bed structure, but when making a support structure from chipboard, it is very convenient to use one of the side panels as a support point for the table top. All that remains is to place another board 70–80 cm high on its edge - the space for work and creativity is already ready. To further save space, the tabletop can be made folding or retractable.
DIY loft bed for children: unusual ideas with photos
There are a lot of things that a loft bed is made from: timber, MDF, plywood, laminated chipboard, metal pipes, assembling models with your own hands. The designs are made with additional shelves, hangers, they come up with interesting models and decorate them in an original way.
A do-it-yourself loft bed made from solid wood is a very reliable and, most importantly, environmentally friendly design. Furniture made of beech or oak will be durable, but pine will also work. It is a less expensive material and easier to process. A do-it-yourself attic bed made of wood is a common option due to its durability.
Designs made from chipboard, MDF, and fiberboard are very common . When assembling, they are often combined with wood. The structures turn out to be less reliable, but very beautiful.
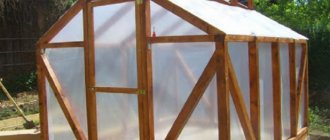
Products made from metal pipes will last a long time, but their disadvantage is that welding is required for assembly. But if this is not a problem for you, a do-it-yourself attic bed made from corrugated pipe is also an acceptable option, and you should not forget about it.
Original models
If you like to fantasize and want to make not just a bed for your children, but an interesting and original design, then the following ideas will come in handy.
Bed house. Children constantly strive to create a house or hut in the apartment. So why not organize a separate space for them. Let them have at the same time a crib and a house in which it is good to hide and share secrets with a brother or sister. The house will require a little more materials and time, but it is not difficult to assemble.
Bus-bed . Having made such a bed, you don’t have to worry about the children not having the opportunity to have an interesting time. They will temporarily become drivers, tour guides and passengers. To make this design, all you need is the simplest materials, bright colors and a little imagination.
Spaceship bed . Children who are dreamers have always been partial to space travel. Why not meet them halfway and build a bed in the shape of a spaceship? Here you can show maximum ingenuity, and use the most common materials - plywood, chipboard, fiberboard. It’s good to integrate buttons and lanterns into the model to make the bed seem more magical.
Superhero bed . Every child dreams of being a superhero. So why not give him the opportunity to feel like him at least for a little while? At the bottom you can make a closed fort, and at the top there is a place for several superheroes at once. To bring the idea to life you will need two sheets of MDF, seven bars, boards and plywood. A little patience and effort - and your children will feel like they are in a fairy tale.
Finishing
After making the bed, it needs to be given an aesthetic appearance. If desired, the bed can be covered with stain and varnished in two layers . Some parents get creative and paint the beds in bright and rich colors. This option is more popular with young children. So the bed becomes for them not only a place to sleep and relax, but also for active and exciting games.
Advice : if you are serious about saving space in your apartment, try making a lifting bed, a bed-wardrobe and a bed-chair. For children, it also makes sense to make a sand painting table, desk or children's table.
How to make a loft bed with your own hands: examples with instructions and photos
When the decision to make a miracle bed has already been made, you need to decide on the dimensions, installation location, materials, and design. The age and gender of the child should also be taken into account.
Do-it-yourself attic children's bed made of wood: instructions, drawings and photos
The easiest way to make a wooden loft bed is to start with a wooden frame. The main parameters that will need to be taken into account:
- simplicity of design;
- the ability to quickly disassemble and assemble the bed.
To make a bed you will need a tongue and groove board, plywood, a level, U-shaped brackets, screws, timber, a saw or jigsaw, and a screwdriver.
- We determine what height the structure will be, you need to make it such that you can sit on the bed freely, that is, no less than 0.8 m from the ceiling. At this height we fasten the boards using a water or laser level, since they must be located at a certain height.
- We attach brackets to them, at a distance of 0.5 m from each other, and then with their help we secure the logs that will become the basis for the bed.
- The next step is preparing the loft bed frame. For this purpose you will need a tongue and groove board. It is laid across the joists and secured with self-tapping screws. They must be three times the thickness of the board, then there is no doubt about the strength of the structure.
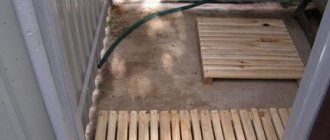
- After this you can start creating the stairs. For this purpose you will need a beam. We saw off the ends of two beams at a slight angle.
Taking wood glue, use it to secure the base of the stairs and make markings for the steps. It is better to do this using a level, measuring a distance of 30 cm. The steps are attached with self-tapping screws. After this, we cut out and attach the railings. The staircase is ready.
- An important detail is the side of the bed. It should be high enough - 30-40 cm, so that the child does not fall out of bed while sleeping. It is better to nail the beam, attach a plinth at the top and glue a shaped strip so that the surface is smooth and looks good.
At the end of the work, the boards are sanded with sandpaper, treated with stain, and varnished. All that remains is to place the mattress, which should be 5 cm smaller than the frame.
DIY loft bed with work area
This option is extremely convenient when there are schoolchildren in the family. In addition, it is easy to fit another chest of drawers underneath.
The bed is created to match a specific chest of drawers or closets that are available in the house. The “Baby” model is very convenient, where there is a table, a chest of drawers and a retractable ladder, which at the same time serves as chest drawers.
If you already have a chest of drawers, then it is complemented with a table and a chest of drawers - a ladder.
The work area is quite simple to equip, complementing the already familiar design of their tree. You will need boards, folding hinges, and screws.
Ladder
After this, we make a reliable ladder with wide and stable rungs and attach it to the body. The ladder will be located at the end of the bed. For safety and convenience, it is better to place the steps as close to each other as possible (13–16 cm) since the angle of inclination will be insignificant.
Loft bed diagram
Note!
The distance between the side bars should allow the little owner to freely get up and down from the bed. Considering that the user is growing, it is better to make this distance with a margin.
How to make a loft bed yourself and decorate it beautifully
The design of an attic bed depends entirely on the capabilities and imagination of the creator. For wooden structures, varnish and paint are used, wood carving or burning is used. Beautiful stickers, fabric, foam, plastic. A kind of lighting will also turn the bed into a fairy-tale home. Any bed will become a real work of art when there is a desire for it.
Drawings for self-production
Drawing: loft bed for a teenager with wardrobe and workplace
A simple option - and no drawing needed
This option can be assembled from wood
A low bed is suitable for younger children
A whole corner with a closet and a workplace
Do-it-yourself attic bed drawings and dimensions, diagrams and projects sketches
For the little ones.
What should be included in a baby corner? This is, first of all, of course, a crib and a changing table.
Any mother will appreciate it if all the children's things are at hand and in one place. For this purpose, you can make several drawers.
Which style should you choose for your headboard?
This is the very first thing where you should start designing future headboard . In no case should it contradict the overall interior of the room or the style of the bed itself. Let's look at the most popular styles:
- Baroque. This style is preferred by people who want to emphasize their wealth. It includes a lot of gilding, expensive luxurious fabric, and artistic forging. The main atmosphere that this style creates is luxury, wealth, chic and pomp. A soft headboard made of velvet, brocade or other beautiful fabric with gold buttons will fit perfectly into such an interior. Or mirror headboard in a wide beautiful carved frame, painted with gold paint, or a canopy headboard made of heavy, light-proof fabric with gold garters with tassels at the ends. In general, everything that looks expensive, but is not a rectangular wooden headboard.
- Provence . A very light and pleasant style comes from France. This is a beautiful combination of classic style with rustic elements. French country houses are often decorated in this style. Characteristic features are the use of warm pastel shades , preference for natural materials with their natural texture, specially aged elements of wooden furniture and cute floral patterns. Wooden headboards with antique elements or panel headboards made of light light fabrics with an unobtrusive floral pattern are perfect for this style.
- Vintage. Home feature this styles are well visible and clearly defined antique elements, and not just old things, but those that really belong to past eras, precisely from the materials that were used in those times. Collecting decorative elements for this style is sometimes difficult. Color spectrum neutral and includes “faded” shades. For material headboards wood in its natural form, an old mirror, or a soft headboard made of light linen fabric or specially aged velvet are suitable.
- Art Deco. This style is very easy to recognize because predominance in him lines, stripes, broken curved lines and trapezoidal objects. It is characterized by natural rough surfaces, mirrors, stained glass. For an Art Deco style bedroom, it is preferable to use a large mirror, because this style implies a lot of space and light. It can also be used as a headboard. The colors of this style can be colorful, but always muted. Preferred shades brown, white or metallic. The color of the furniture should contrast with the color of the walls, and one of its elements must be of a non-standard shape. In addition to the mirror, a soft rectangular or trapezoidal fabric is well suited as a headboard.
- Loft. This style is loved by many due to its spaciousness. Integral element this style - the presence of rough brick masonry, often white. ABOUT main flowers are white, gray, shades of brown. MaterialsCharacteristics of this style are wood, glass, concrete, brick, chrome parts. This style combines rough finishes that have an unfinished look with modern technology. Furniture simple, concise and extremely practical. Headboard It is better to make the beds made of wood or make them soft, so it will create the effect of incompleteness, especially against the background of a brick wall.
- Eco style differs in use natural materials with preserving their textures. Color spectrum as close to natural as possible - shades of green, brown, yellow. Such an interior has a positive effect on human health, not only physical, but also mental, having a calming effect. Furniture - made of natural wood. The headboard of the bed can be like wooden, and soft, the main thing is to maintain the overall color scheme.
Lace headboard
The most delicate and delicate type of headboard that can be. It will fit very well into the interior of a bedroom in light colors. Making such a headboard will be very simple, especially if you yourself know the technique of artistic knitting, and maybe your grandmother or mother can help you with this. We will need crocheted lace or lace fabric, fabric for the base and the base itself. If you want a flatter headboard, then a sheet of chipboard or an old shelf from a wardrobe is sufficient in thickness; if you want a more voluminous and soft one, then you also need foam rubber.
Let's make a soft lace panel. We have a door from an old cabinet with a thickness of 12 mm. Glue 5 cm thick foam rubber onto it and trim off the excess along the edges.
Our lace is white, so to make it
stand out better and be more noticeable, you can use dark gray linen fabric as the fabric for the base. Just like when making a soft headboard, you need to cover the base with fabric and secure it around the perimeter with a stapler. Now let's carefully secure our lace on top of this. Then you can modify the headboard to your liking. You can add some rhinestones or bows. You can not use foam rubber, but make the headboard flat, then it will look more like a panel. In any case, the lace will look very original.
Minimalism
A minimalist headboard can also make a bed design look very attractive. A lattice of horizontal slats installed behind the bed, among other things, is a very fashionable element in 2021. Assembling such a headboard with your own hands, of course, will not be difficult.
A song from Belarus was not allowed to participate in Eurovision 2021: video
Forgiveness Sunday (March 14): what not to do on the big holiday
Pancakes for Maslenitsa should be perfect: how to prepare and filling options
Decor options
The good thing about a house bed is that it can be easily decorated with a canopy. By sewing two or three different sets of fabric curtains, you can change the appearance of this piece of furniture beyond recognition.
If she stands opposite the window and bright sunlight wakes up the child earlier than necessary, a canopy made of dense opaque material will come in handy. If the cape is only to decorate the bed, you can choose any material you like.
A narrow long curtain woven using the macrame method can also serve as a decorative element. It will also make your sleeping area more comfortable.
If desired, a short canopy can be styled to resemble a tiled roof. This decoration option is suitable for beds where there is only a triangular frame and no wooden floor.
However, you can do without fabric curtains altogether. And so that the structure does not look empty and boring, it is worth decorating it with soft toys, garlands of paper letters that make up the child’s name, hanging a dream catcher or a beautiful trinket with tassels or pom-poms from the top beam.
You can create an atmosphere of mystery and at the same time comfort by wrapping the vertical supports and cross beams with an LED garland with star-shaped bulbs and hanging three-dimensional clouds cut out of paper from the ceiling. The design will be complemented by wallpaper depicting the night sky.
Older children who often read in bed in the evenings will love the lighting option shown in the photo below. Before putting it into practice, it is worth treating the wooden parts of the bed with a fire retardant (a special liquid that prevents fire).
Making a house bed with your own hands is quite simple. In addition, the family budget will not suffer much, even if you buy not only lumber and consumables, but also tools. This is also a creative process, and all family members can participate in it, spending time together doing a useful activity.
Headboard with shelves
The most practical type of headboard, which is quite easy to make yourself. The material you can use is an old cabinet or an old countertop. If you don’t find anything suitable in your house, you’ll have to spend a little money and buy sheets of laminated chipboard and a special tape that covers the ends. One sheet should be enough for a medium-sized headboard, since chipboard is quite large. to make the markings correctly and cut the sheet with a minimum amount of waste. The same place where you will make the purchase can help you with this; they usually have their own small sawmill and cutters.
After you have the rectangles of the required sizes cut, you will need to assemble the entire structure together, having previously covered the ends with a special laminated strip. This is done very simply using a regular iron. Heat the iron to maximum temperature, apply the tape to the end of the sheet, you can cover it with a thin cloth on top, and iron it several times until it sticks, trim off the excess. This way you should finish all the edges except those that will be adjacent to the base of your headboard.
Now you need
to mark the location of the shelves on the base and the distance for the mounting holes.
When the work is done, drill small holes in the marked places, attach the shelf and use a marker to mark a dot on its end through the hole in the base, so you will be sure that the holes will line up exactly when assembling. To attach the shelves, you can use self-tapping screws, which must be screwed into the back of the base. If you don't want to bother with a screwdriver and screws, you can use special glue. This way the work will be completed much faster, but remember that such shelves should not be overly loaded. They should serve as a location for decorative objects or lamps, but not books or massive figurines.