Living room. Hidden gadgets
Numerous devices that surround us everywhere do not always decorate the room. If you want to take a break from them, you should find a special place that hides them. In a small apartment, a variety of electronic devices overload the decor, and to disguise them, you can design a special drawer or drop-down drawer.
An outlet hidden inside will allow you to charge gadgets without spoiling the look of the room.
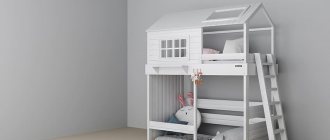
Making a lift bed
A bed that can be folded saves a huge amount of space in the apartment.
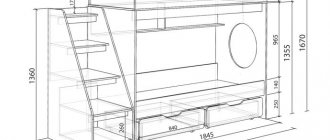
Taking into account the measured data, a bed assembly diagram is drawn up.
How to make this design:
- project preparation (drawing the drawings yourself or selecting the desired diagrams on the Internet, purchasing materials and tools);
- be sure to pay attention that there is a sufficient number of plates (lamellas);
- the bed frame is placed on reliable wooden beams;
- side markings are made;
- installation of the monolithic bed structure begins;
- a front panel is attached on top of the structure (this is the bottom - it can be covered with a laminated chipboard sheet);
- the bed frame is fixed to the wall;
- a lifting mechanism connects the body and the bed itself;
- We make boxes for clothes according to the drawing.
The set of accessories depends on the selected product model. You need to think through everything in advance, make a list of the necessary elements for assembling the furniture.
Additional Information. Choose a mattress according to your desires. Orthopedic options are popular today.
Kitchen. Hidden shelves and drawers
In a kitchen, especially a compact one, most appliances should be kept in closed cabinets: this way less dust accumulates on them, and the environment seems tidier. We recommend using every centimeter to make the most ergonomic use of the area.
You can create a separate “garage” for household appliances by using part of the countertop - it will not be visible behind the facades.
For small appliances, spices, bags, bottles and jars, it is worth setting aside a drawer in a narrow partition: the space involved here is small, but the benefits from it are great. Don't forget about plinths: this is an excellent option for storing trays, baking sheets and lids.
Required Tools
The set of necessary tools for making it yourself will also differ, depending on the type of furniture chosen. The general list will include:
- hinges for facades;
- metal or plastic connecting angles;
- drawer guides;
- electric drill with a set of drills;
- clamps;
- cutter;
- hammer;
- iron;
- jigsaw or hacksaw;
- measuring instruments.
This list may vary depending on the selected model
Kitchen. Roomy seats
Hidden storage can also be organized in the dining area if you use unusual seats instead of chairs and stools: a special bench with a lifting lid or a furniture corner. Wooden boxes would be appropriate in a loft style. And if you strive for originality, place a chest in the kitchen and cover it with a soft pillow.
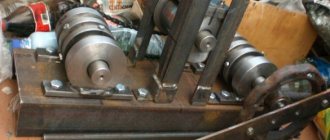
How to make a transforming mechanism for furniture
There are plenty of types of lifting mechanisms on the market today. Let's consider the equipment that is used for beds. The most popular devices: mechanical and gas springs. The first ones work by tensioning springs. The second type is spring shock absorbers (gas lifts). There is also a hinge mechanism - a design where a person puts more effort into raising the bed.
At the moment, manufacturers offer many interesting options.
Making a folding device is not easy, but it is possible if you follow the instructions:
- We make the top rail (corner) from metal parts;
- the bottom rail is flat (attached to the box);
- it is necessary to connect the slats with two metal, moving (bolted) vertical slats, one larger in size;
- We buy, for example, a gas lift and attach it to a metal base.
The mechanism of transforming furniture wears out quickly, which can lead to its premature failure.
Important! It is better to buy this mechanism in a specialized store. The sofa bed is made by hand, and the device, as a rule, is purchased.
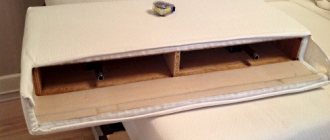
Bedroom. Shelves inside the headboard
If you don’t want to fill the space under the bed, you can use a headboard: both ready-made designs with built-in drawers and free-standing narrow cabinets are sold. It is very convenient to store things in special compartments - they do not gather dust and are always at hand.
In addition to books, you can store night cream, small decorative pillows, a change of bed linen or a blanket inside.
Necessary materials, tools, cutting and bed design
Materials:
- sheet of plywood or MDF 12 mm thick (1 pc.);
- boards 2.5×30×240 cm (3 pcs.);
- board 2.5×20×240 cm (1 pc.);
- board 2.5×10×240 cm (1 pc.);
- board 2.5×7.5×240 cm (1 pc.);
- boards 2.5×5×240 cm (3 pcs.);
- decorative strips 6 mm thick;
- 50 mm self-tapping screws;
- 50 mm nails;
- 30 mm nails;
- 15 mm parquet nails;
- glue;
- wood putty;
- sandpaper;
- hinges (strong door hinges or special hinges for folding beds);
- heavy-duty magnetic latch that can hold the bed in the raised position and prevent it from tipping over;
- hinges with a closer for slowly lowering the bed to a horizontal position.
Tools:
- roulette;
- square;
- pencil;
- hammer (can be replaced with a gun for hammering parquet nails with a hammer);
- protective glasses;
- Kreg Jig – a device for drilling holes for flush-mounted miter joints;
- drill;
- a circular saw;
- gun for hammering parquet nails;
- eccentric sander.
A few general notes:
Work on a clean, level surface
Take proper precautions and use personal protective equipment. Using a square, check after each step that the corners of the structure do not deviate from 90 degrees.
Use quality, non-warped lumber. Before screwing in the screws, drill pilot holes and countersink them. When starting to make your own folding bed, study the drawings presented here.
Cutting list
For "Box"
- 2.5×30×199.4 cm (2 pcs.) – side walls
- 2.5×30×107.3 cm (1 pc.) – bottom
- 2.5×10×107.3 cm (2 pcs.) – rear cross members
- 2.5×5×111.1 cm (1 pc.) – front cross member
- 2.5×5×195.6 cm (2 pcs.) – finishing of the front side of the drawer, vertical sides
- 2.5×5×31.1 cm (2 pcs.) – finishing of the side walls of the drawer, top part
- 2.5×5×114.9 (1 pc.) – finishing of the front side of the drawer, top part
- 2.5×7.5×120.0 cm (1 pc.) – back part of the “ceiling”
- 2.5×30×120.0 cm (1 pc.) – front part of the “ceiling”
For "Bed"
- plywood 6 mm thick ×102.9×191.1 cm (1 pc.) – bottom
- 2.5×20×102.9 cm (1 pc.) – back wall
- 2.5×20×139.7 cm (1 pc.) – side walls (cut the board diagonally, as shown in the plan, to get two parts)
- Finishing the front side using 6 mm thick slats according to your wishes
Bathroom. Hidden shelves
Often the space under the bathroom is undeservedly empty, but a functional screen can easily unload cabinets and open shelves, hiding household items. You can order the design from craftsmen, make it yourself, or purchase a ready-made screen-cabinet with sliding doors.
It is important that the ventilation in the bathroom is working properly and that dampness does not accumulate in the room, otherwise storage under the bathroom will become impossible.
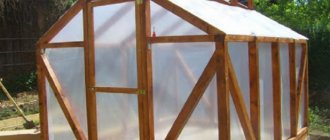
How to make a transforming sofa bed with your own hands
To create this sofa you will need the following tools:
- drill and various drills;
- hacksaw;
- screwdrivers;
- furniture nails (screws, self-tapping screws);
- tape measure and pencil;
- grinding materials.
Materials you will need:
- boards;
- plywood;
- hinges (or other mechanism);
- dye;
- varnish
It is necessary to select well-dried raw materials, otherwise the furniture parts may become deformed after assembly.
How to make a drawing of a transforming sofa bed with your own hands:
- the diagram must demonstrate the monolithic structure and each part separately, including the smallest elements;
- the correct drawing will make it possible to calculate the amount of material needed;
- It is also possible to find suitable projects on special resources on the Internet.
Drawings and diagrams must be made to a strict scale and clearly correspond to reality.
Installation is carried out as follows:
- We form a supporting structure from the boards and secure it with screws;
- we strengthen the box with transverse bars;
- we fix the casing at the end, and where the drawing suggests;
- attach the front pillar;
- We place a cross beam, focusing on this element, and attach an end board on top;
- we attach the plywood to the box (reinforce it with boards);
- We make a folding element from plywood, simply attach it to the end with a board;
- Now we connect the two parts with a lifting mechanism.
All dimensions should be clearly defined in advance.
Note! Proper drawing is the key to the successful implementation of your project.
Hidden household items
A variety of household aids (ironing board, clothes dryer, vacuum cleaner and mop) do not decorate any interior. Hidden storage systems are also useful in these cases:
- for the ironing board, a special shallow cabinet masquerading as a tall mirror is successfully used,
- and instead of a free-standing dryer, a built-in dryer is often used: wall-mounted or in the form of a drawer.
Necessary materials
The set of necessary materials will directly depend on what type of furniture the home craftsman chooses. However, there is a list that is present with any choice.
MaterialMain parametersWhere it is usedLDF boards with a thickness of 10 to 22 mmManufacture of cabinets and shelves with high bending strength
DecorationMDFStrong sheets
Increased moisture resistance and density Tabletops, bench seats, kitchen facades Wood Solid wood, timber Any products Foam rubber Soft, comfortable, inexpensive For padding upholstered furniture Glass Thickness from For decorating cabinets and shelves Furniture fasteners Various types For all products Furniture accessories Various configurations and purposes For decoration
When decorating cabinet doors, drawers
Installation and decoration of the product
When all the components have been cut, the cutting areas have been sanded, and the mounting locations for the fasteners have been marked, it is time for assembly. You can assemble a wardrobe bed in just a few hours if all the previous steps are completed efficiently.
Installing the cabinet will not take you much time if you have made all the drawings and cut out the parts correctly.
First of all, we assemble and attach the cabinet frame to the wall and floor. Then we move on to assembling the bed. We fasten the elements of the bed frame together, then fasten the bottom. And only after making sure that these parts are securely fastened can you proceed to installing additional shelves or other selected elements.
After assembling the bed-wardrobe, you can begin decorating it.
The last step is installation and fastening to both parts of the transformation mechanism
It is important that when folding, the fasteners do not cling to the furniture frame. We check the lifting mechanism several times for correct operation and proceed to installing the façade elements
Choose a quality bed mattress that will serve you for a long time.
Once this stage has been completed, we again unfold our bed and install the mattress in its frame. You should remember the need to keep the mattress in place in a horizontal position - when the bed is folded. Most often, ordinary furniture belts are used for this, secured together with plastic locks.
The mattress must match the size of the bed.