Review author: Terra Design School
When there is a body of water on a site, whether natural or artificially created, most often the owners build a bridge across it. This attractive decorative element fits harmoniously into the natural landscape.
A decorative bridge can be made even if there is no pond. This design has a wide variety of options.
Types of bridges for the garden
There are a great variety of garden bridges; depending on the design, the following types can be distinguished:
- straight, suitable for any style of landscape design;
- the suspension bridge looks very attractive, but this masterpiece must be created in such a way that it meets safety rules;
- the zigzag garden bridge looks very original;
- stepped, looks like two stairs between which there is a platform;
- arched, one of the popular forms of bridges;
- stepwise represents a collection of individual elements.
Exercises for back flexibility
The bridge is not only a spectacular exercise that shows off your flexibility and fitness, but also a very useful exercise for the back. By regularly performing bridges, you can improve your posture, stretch your spine, and get rid of back pain.
The bridge can be performed from a lying position (even beginners can do this) and from a standing position (this option is suitable for more advanced ones). In order for the bridge to be of the highest quality and amplitude, first of all, good back flexibility and a strong muscle corset are necessary. In addition, for a confident bridge stance, you need to regularly work on opening the chest and shoulder joints, stretching and strengthening the quadriceps, and opening the hip joints.
We offer you a number of exercises that will help you improve flexibility in the spinal region, as well as strengthen your back muscles. If you regularly do yoga or gymnastics, then you can safely skip this stage and move on to mastering the bridge from a lying and standing position (the following subheadings of the article). But if your body is not yet ready for a full bridge, we recommend that you perform a number of preparatory exercises to improve the flexibility of the spine and strengthen the corset muscles.
Sphinx pose
The Sphinx is one of the best exercises for developing back flexibility and is very easy to master. Lie on your stomach, stretch your feet, and lift your upper body, resting on your forearms. The stomach and entire lower body lie on the floor. Pull your shoulders back, bringing your shoulder blades together. Feel the deflection in the spine, do not throw your head back. Stay in the sphinx pose for 40-45 seconds, repeat the exercise in 2-3 approaches.
Cobra pose
A more complex modification of the Sphinx is the cobra pose. In this exercise, you will not rely on your forearms, but on the palms of your hands. Due to this, the deflection in the back increases, which means the exercise is performed with greater amplitude. Cobra is a basic exercise for improving back flexibility, which means it will help you get to the bridge faster. Stay in the cobra pose for 40-45 seconds, repeat the exercise in 2-3 approaches.
Box
If you are confident in performing the cobra pose, then this exercise can be complicated. Stay on your stomach with your hands on the floor. Bend back and bend your knees. Your task is to touch your head with your toes. Do not tilt your neck too far back; the movement is carried out by bending the thoracic and lumbar spine. Try to stay in this pose for 20-30 seconds, repeat the exercise in 2-3 approaches.
Downward Facing Dog Twist
Get into downward-facing dog pose. Grab your left calf or ankle with your right hand, twisting at the spine. Lengthen your spine from the tailbone to the crown. Distribute the load evenly on both legs, the pelvis remains motionless. If you don't have enough stretching, bend your knees or lift your heels off the floor. Hold this pose for back flexibility for 30-45 seconds and then switch sides. Repeat the exercise on each side for 2 sets.
Back arch
Lie on your stomach with your arms extended along your body. Lift your upper body off the floor by arching your back. Feet lie on the floor, arms stretch back. Do not throw your head back, look forward. Please note that the deflection is carried out not only due to the lumbar, but also due to the thoracic spine (middle of the back).
All kinds of deflections, which are performed while lying on your stomach, are an excellent tool for increasing the flexibility of the spine and strengthening the muscle corset. Such backbends can be practiced in various variations, including with your hands behind your head, with your hands behind your back, and with your arms spread to the side.
Superman pose
Superman pose also improves the flexibility of the spine and is great for strengthening the back muscles. Lie on your stomach with your arms extended forward. Simultaneously lift your upper and lower body up, lifting your chest and hips off the floor. Don't bend your knees. Hold the superman pose for 20-30 seconds, repeat the exercise 3-4 times. If this exercise is still difficult for you to do, you can lower your hips to the floor and lift only your upper body.
Swimmer
The swimmer exercise will not only help you stand on the bridge, but will also qualitatively strengthen your abdominal and back muscles. To perform it, lie on your stomach with your arms extended forward. Raise your right arm and left leg at the same time as high as possible, hold in this position for a couple of seconds, then return to the starting position. Repeat the same movement on the opposite side. Perform 2-3 sets of 10-12 repetitions on each side.
Cat pose
Cat pose is one of the simplest and most effective exercises for developing back flexibility. To perform it, get on all fours, knees and palms on the mat. As you inhale, bend your back as much as possible in the spinal region, without straining your neck and lower back. As you exhale, round your back, feel the relaxation in your back. Repeat 10 times in 2-3 approaches.
Grasping the foot on all fours
This simple static exercise perfectly develops back flexibility and strengthens the entire muscle corset. Get on all fours with support on your palms and knees. Raise your bent left leg up and place your right hand behind your head. Grab your leg with your hand, arching your spine. Try not to strain your neck. Hold the pose for 20-30 seconds, trying to increase the arch in the thoracic region. Repeat the exercise 2 sets on each side.
Bow pose
Bow pose is one of the best exercises for those who want to bridge. If it is still difficult for you to perform this exercise, then with a high probability you will not be able to do a high-quality bridge. To perform Bow Pose, lie on your stomach, arch your back, move your arms back and grab your legs at the ankles. Bend over as much as possible, lifting your legs and chest off the floor. The body weight is transferred to the stomach. Hold the bow pose for 20-30 seconds, repeat the exercise 2-3 times.
Camel Pose
Get on your knees, body straight, arms along your body. Bend your back back, grab your feet with your hands. Relax your neck, do not throw your head back too much. The tilt is achieved by arching the back. Stay in the camel pose for 30-40 seconds, repeat the exercise 2-3 times.
Table Pose
Table pose is an excellent preparatory exercise for bridging. This static exercise strengthens the muscle corset, opens the chest and shoulder joints, thereby helping to prepare the body for the bridge. At the same time, it is very accessible even to beginners. To perform it, sit on your buttocks, legs extended in front of you, arms along your body. Leaning on your palms, push your pelvis up, thighs and shins form a right angle, body weight is transferred to straight arms and legs. Stay in the table pose for 30-40 seconds, repeat the exercise 2-3 times.
Puppy pose
This exercise may seem difficult at first glance, but it is quite easy to master. To perform puppy pose, kneel, arch your back, lie with your chest on the floor, and extend your arms in front of you. Imagine that you need to crawl under a low stick. Feel the pleasant arch in your spine. Stay in the pose for 30-40 seconds, repeat the exercise in 2-3 approaches.
Half Bridge Pose
Lie on your back, bend your knees, and place your arms along your body. Lean on your hands and lift your pelvis up, arching your thoracic and vertebral spine. The upper back, neck, head, arms and feet remain on the floor. Half-bridge pose is a basic preparatory exercise for those who want to bridge.
Bridge with fitball
Fitball is an affordable sports equipment that will help you get on the bridge. Lie on a fitball with your back, feet and hands on the floor, imitating a classic bridge. This exercise is not only useful for those who want to learn how to stand on a bridge, but also for relaxing your back after a hard day at work. Stay in this pose for 45-60 seconds.
The position of your body when performing a bridge on a fitball will largely depend on the ratio of your height and the diameter of the fitball. Adjust your posture for a comfortable position and deflection in the spine.
Child's Pose
It is advisable to perform the child's pose throughout the entire training session to develop back flexibility, as well as after performing the bridge. This exercise relieves stress from the spinal region and helps relax your back. Hold child's pose for 30-40 seconds and move on to the next exercise. It is enough to take the child's pose once every 4-5 minutes, but you can do it more often if you feel the need.
If you are new to the sport, perform the above exercises for 2-3 weeks (4-5 times a week) before moving on to bridge practice. You should not immediately try to stand on the bridge if you are not confident in your abilities. An awkward movement can cause injury to an unprepared back.
Best place for a bridge
If you place the bridge on a flat surface, it will not look organic. When there is no body of water on the site and the terrain is flat, a pond or stream for a bridge can be created artificially, as well as uneven landscapes; a bridge can be placed on one of the paths to be used.
There is an opinion that bridges look great only in large areas; this is a misconception. Made in a small size, appropriately integrated into the landscape, a bridge decorated with flowers will be a wonderful decoration even in a small area.
Under the bridge, you can make a dry stream from a string of green plants or colorful flowers. If the bridge is installed near a gazebo or recreation area, it will add additional picturesqueness to the landscape.
A gentle method of arranging support
This method is recommended for constructing walkways in an artificial pond. The main advantage of this method is that it does not violate the waterproofing of the reservoir. In addition, such installation of supports is much easier than conventional screwing in piles.
What this method consists of: at the stage of waterproofing the pond, the piles are installed in a plastic container, which is filled with concrete; The container is installed at the bottom of the pond on top of the film. The load-bearing supports of the structure on the shore must be installed on the foundation. This design will be no less durable than walkways on screw piles, and it will serve regularly for several decades.
To make such a gentle design you will need:
Operating procedure:
The difficulty in this process usually arises with measurements. It is necessary to make sure that all supports are the same size, installed at the same level, and that in all containers (usually two are enough) the concrete is poured at the same level.
When the concrete has dried, the load-bearing beams can be secured and the structure of the walkways can be completed.
Bridge material
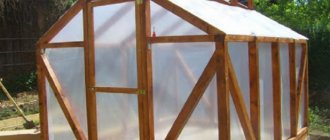
In order to decide on the shape and material for the bridge, it is necessary to decide what function the structure will perform and where it will be located. A bridge over a pond or dry stream is usually made of concrete, metal, stone, wood, or a combination of several materials.
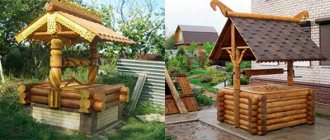
The most common option for a summer house is a wooden bridge, as this is the most budget option. This is a photo of bridges for a summer house. You can buy a metal bridge ready-made, or you can make it yourself if you have the right tool.
Such a bridge looks very presentable, especially if it is decorated with ornaments. Stone and concrete bridges are not a cheap pleasure. Their main advantage is that they will look harmonious in any style of landscape design.
Bridge construction work on a garden plot
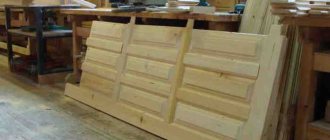
To make the flooring you will need a frame, and you can make it yourself from wood in two ways: by installing the boards on edge or by laying them flat. The first option will require less lumber, but the span will most likely be straight, since bending the board along the plane is a long and difficult task. The maximum that can be done is to give it a slight bend by cutting off part of the edge along an arc. It is much easier to build wooden humpbacked bridges for a summer house from planks placed flat, so we will go this route, considering various assembly possibilities.
To fly through a narrow ditch, two boards with overall dimensions of 3x18x200 centimeters will be enough for the frame. They are connected to each other by thinner crossbars, nailed to the bottom at the ends, as substrates. However, you can connect the foundation logs with two beams; they will also serve as “supports” for the bridge. If the flooring needs to be thrown over a long distance, under the load-bearing boards, along the outer edge of the frame, it is advisable to fill the beams of the appropriate length, with a cross-section of at least 10x10, and only then attach the cross members.
Next, we begin to form the ledges. To do this, we lay shorter boards of the same 3-centimeter thickness directly along the load-bearing joists of the frame at an equal distance from the ends. Thus, if your frame is 3 meters long and you want the steps to be 40 centimeters wide, the next board should be 0.8 meters shorter than the base. If you want higher steps, use 10x10 timber instead of the boards that form them (including load-bearing ones), this will only make the bridge stronger and more durable. True, it will be more difficult to put together such a frame, and, most likely, you will have to use metal plates from the inside of the frame to reliably connect the beams.
Do-it-yourself country bridge
Many summer residents, wanting to make their plot of land unique with the help of decorative compositions, are wondering how to make an original bridge at the dacha? The process of creating a bridge needs to start with a drawing, which you can make yourself.
The simplest bridge model consists of stringers (the curved base of the bridge) and a deck, usually wooden. For structural strength, you can pour a strip foundation for the bridge.
Instead of a foundation, you can put wooden blocks or stones so that the product does not sink into the soil and does not deteriorate from moisture. Stringers or a base can be made of wood, metal or concrete, which should be installed on a prepared foundation. Then, make wooden flooring. The boards are laid on the base and screwed onto self-tapping screws. This is the most reliable and optimal option.
In addition to boards, flooring can be made from logs. Install balusters with railings. To install balusters, you need to measure 20-30 centimeters from the top edges of the boards. Mark the curved lines going to the bottom of the boards. Cut shallow holes along these lines with a distance of a couple of centimeters.
Using a protractor, mark the location of the balusters on the base and make holes for screws or nails. Attach the balusters to the base. The railings are also attached to the balusters with nails or screws.
Assembly and installation of a decorative bridge
Based on the methods described above for assembling structures from any material, it is necessary to create a support on different banks of the reservoir. To do this, dig a hole in the ground, install concrete or wooden piles, and fill it with cement mortar and crushed stone. The finished structure is easily installed on these supports. It can be secured using various fasteners - steel bolts, screws (if the bridge is not too heavy), creating a monolithic layer of concrete (in the case of installing a reinforced concrete product).
Bridges in various styles
The most common are bridges in the Japanese style, Russian (village) or avant-garde. To install a bridge in the Japanese style, it is necessary to create accompanying elements, that is, a pond or stream.
The design feature of this style is the simplicity of details and strict lines. The materials used are wood and stone. A straight wooden bridge with or without steps is a rustic style.
To make it more natural, you can use parts of tree trunks or branches as railings. Avant-garde style is characterized by a combination of materials and a predominance of arched details.
Warm-up
- Initial muscle warm-up. Includes jumping rope, regular squats, jumping jacks, jogging in place and other exercises for beginners. Warm-up is designed to activate the circulatory system.
- Working out the ankles. Raise your leg in front of you, begin to pull your foot up towards your body, and then lower it down towards the floor. Do about 12 repetitions, change legs. You can use a support.
- Warm up your wrists. Extend your arm forward, straighten your elbow, turn your palm up. Start pressing on the palm of your other hand so that it becomes closer to the wrist. Repeat for the other hand.
- "Cat". A classic yoga pose that is perfect for preparing for a bridge. Starting position - on all fours, back straight, wrists under shoulders. As you inhale, lower your stomach down, arching your back; as you exhale, arch your back and pull in your stomach.
- Continuation of yoga. Other poses aimed at developing the back, shoulders, arms, and legs are also suitable from this direction.
Advice! For convenience, it is recommended to use a mat or soft covering that will not slip and prevent discomfort. Many beginners give up just because their palms and feet begin to hurt.
Design safety
It is important that the bridge is not only stable, but also safe, especially if there are children. The best solution would be a bridge with rounded shapes without sharp corners.
Iron handrails will heat up in the sun in summer, so it is better to cover them with wooden material. The bridge must be safe to walk on.
In order for the bridge to be functional for as long as possible, it must be impregnated with special means. This applies to both wooden bridges and metal structures.
A properly treated wooden bridge will last for many years. Periodically care for the decorative structure, maintaining it in proper condition.
The history of the appearance of wooden crossings
The first wooden bridges were just a log or tree trunk that was thrown from one side of the river to the other. With a significant width of the reservoir, people built a raft or constructed a suspended structure. Over time, the population increased, the volume of trade increased, and the number of movements and the weight of cargo required a more durable structure. The growth of human settlements and their importance determined a new reality in which the development of bridges became a priority. To ensure rapid exchange of goods between cities, people improved bridge-building technologies and invented increasingly better structures.
A significant disadvantage of wood is its susceptibility to rotting, which occurs due to the influence of the environment, as well as the activity of microorganisms. Wooden bridges are easy to burn, so the likelihood of them being preserved after a fire is low. These structures are lightweight, but their load capacity is significantly inferior to metal products. It is not surprising that with the development of technology, buildings made of wood were gradually replaced by more durable structures. Currently, this type of bridge is quite difficult to find. They have been preserved mainly in rural areas, historical centers of ancient cities and the remains of old settlements. However, many documents and drawings have been preserved that make it possible to understand the bridge construction technology, as well as reproduce it in real conditions.
River and wooden bridge Source ru.m.wikipedia.org
Interesting Facts
Natural bridges made of trees are actively used in India; this is achieved using the peculiarities of the growth of ficus rubber. Roots also grow from the trunk of this plant, which are directed into the palm trunk lying across the river. When the roots reach the opposite bank, they grow into the soil, forming a bridge.
The zigzag bridge is believed to protect household members from evil spirits.
In Xingshan County, China, a bridge was built along the river, not across it, four kilometers long.
The Norwegians built an unusual bridge designed by Leonardo da Vinci, which he designed for the Ottoman Empire. The artist’s idea, a 240-meter long bridge, was not realized at the time.
Not long ago, a bridge was built across one of the tributaries of the Amazon with a length of 3595 meters.
There is a bridge in Scotland from which dogs periodically jump and most often die. The surviving animals come to the bridge and jump off it again.
In South America, monkeys cross bridges made of spider webs.
Tips from fitness instructors
So, what do those who professionally engage in fitness say? There are a few tips that will definitely help you become better and more successful at this exercise:
- Stretch regularly. To increase plasticity and flexibility, it is important to constantly warm up before performing certain exercises. This way your muscles will be in order and you will be able to feel your own body better.
- Arch your back as much as possible. This is the main thing in setting up a bridge. Many beginners first want to put their hands and feet on the floor, and then arch their back, but this does not help. Having arched your back, only then can you lower your hands to the surface.
- Arms and legs are tense, knees and elbows are bent. This rule is important to remember, since these are the parts of the body that are responsible for the correct placement of the bridge.
- When you return to the starting position, strain not your back, but your buttocks. This way you can avoid injury.
- It is better to use the wall as the first support. This will suit almost all types of bridge. If you want to learn how to place it, practice against a wall.
Here are some tips that will help you get on the bridge without any problems and perform this exercise perfectly in the future.
Thus, the bridge is a fairly effective, not very difficult, good exercise that will help you pump up some muscle groups, make your back straight, and strengthen it. If you have long wanted to stand on the bridge, but couldn’t, now you can. The main thing is to believe in yourself and not give up until victory.