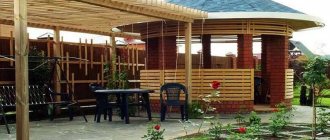
While at the dacha, sometimes you want to freshen up, relieving fatigue after working in the garden or vegetable garden. Of course, for these purposes you can build a bathhouse or arrange a swimming pool, but such solutions require a lot of free space and decent financial investments. An alternative and budget option would be to create a summer shower (portable, mobile or stationary), whose warm jets of water will help relieve fatigue and calm the nervous system. To create the structure, you can use any available materials, so setting up a summer shower in your dacha with your own hands is not as difficult as it might seem at first glance.
Film shower
This type consists of corners made of wood or metal, which are covered with film. The main disadvantage of this structure is its short service life.
If we consider the advantages, then such a shower is easy to assemble and it is mobile. If necessary, it can be moved to another place.
Tips for finishing
For interior decoration, choose facing materials that have increased moisture resistance: PVC film, linoleum, plastic. When choosing wooden cladding, the surface must be treated with drying oil and painted.
To make hygiene procedures more convenient and safe, a grid made of wooden boards is installed on the floor, on top of which a rubber mat is laid.
The grid is assembled from wooden slats measuring 30-50 mm. Wood preparation is the same. If you want to increase its resistance to shoe wear, treat the material with an acrylic compound used for repairing bathtubs.
It is advisable to separate the dressing room and the bathing compartment with a curtain made of waterproof textile fabric or polyvinyl chloride film
If desired, both the internal and external walls of the facing material can be painted and decorated with designs. The original design will allow you to turn the shower not only into a place for taking water procedures, but also into a decorative element of a suburban area.
Additional interesting options for arranging a garden shower are offered in these articles:
- Do-it-yourself summer polycarbonate shower: step-by-step design instructions
- Country toilet project with shower: choice of design + construction instructions
Frame building
This is a solid monolithic structure that will last a long time. It has good ventilation and fast water heating. The downside is the environmental impact.
After several years of operation of such a structure, the appearance will not be very attractive.
Results
Using these tips, you can build an outdoor shower at your dacha in just a few days. Construction costs will be minimal if the necessary materials are available. There is no need to build thick walls. They do not allow air to pass through, as this creates favorable conditions for the development of fungus. Mold appears in the corners. Such a building will not stand for long.
Drawings of a country shower:
Video instructions for building a wooden shower for a cottage measuring 100 X 100 X 200 cm:
Photos of finished showers for example:
Don't be greedy, share with your friends;)
Existing types of shower
To build a shower in a country house, different materials are used. The choice depends only on the finances that you are willing to allocate for this building.
Water supply
It is quite difficult to collect water into containers with buckets, especially for pensioners.
To facilitate this task, you should use a pump, which can be of two types:
- Mechanical - in this case, the pump is driven, usually by foot, like a car pump. This option is not the most convenient in terms of operation, however, its advantage is energy independence and low price. With this pump you can pump water from a barrel or buckets into the tank.
- Electric – allows you to pump water into the tank directly from the water supply source. The type of apparatus depends on the depth at which water will be extracted. It should be noted that the installation instructions for some types of this equipment are quite complex and require the involvement of qualified specialists.
Advice! If the country house is connected to a central or independent water supply, you can equip a country bathroom with a shower indoors, which will make living outside the city even more comfortable.
Tire drain pit
If more than three people live at the dacha, then it is necessary to organize the drainage and disposal of wastewater, since on average, about 40 liters of water are spent on bathing one person. Otherwise, the water will spread over the area, turning it into a swamp.
If the dacha does not have an autonomous sewer system, then the solution to the problem will be a drainage hole, which, as a rule, is dug behind the shower. Its size depends on the number of people living. The larger the family, the more spacious the pit should be.
The easiest way to build a pit with your own hands is to lay car tires on top of each other and fill the bottom with sand and crushed stone. If the pit is large, then its walls should be filled with concrete or lined with brick.
Note! For safety reasons, the top of the pit must be covered with a concrete slab or boards.
To drain liquid from the shower stall, an asbestos-cement or plastic pipe is laid into the pit at a slight slope and inserted into the pit. The drainage system must be thought through at the stage of arranging the pit.
Shower head with valve
After erecting the cabin and solving the main problems of its arrangement, you should install accessories, which include a shower head, mixer or valve, etc. Recently, purchasing accessories for a country shower is not a problem, since they are sold in every specialized store.
As a rule, fittings are installed as follows:
- A fitting is cut into the tank, to which the pipe is attached.
- A valve is installed on the pipe.
- A shower head is attached to the valve.
Shut-off valves are often controlled using a pedal. This option is more complex, however, it is easy to use and economical in terms of water consumption.
Diagram of a water supply device using a pedal
It should be noted that components for a country shower are selected depending on the equipment. For example, with natural heating, a ball valve will be sufficient as a shut-off valve. If the water is heated by force to a high temperature, then you cannot do without a mixer.
Advice! If a collapsible cabin is installed on the site, a country mini-wash shower is an excellent option for its arrangement. This is a small electric pump that supplies water from a container directly to the watering can. The device can operate both from a car cigarette lighter and from a 220 V network.
Here, in fact, are all the most common options for arranging a summer country shower.
You can build and equip an outdoor shower in different ways, each of which has its own advantages and disadvantages. In most cases, the best option is a frame country shower with a pedal and heating, which is easy to erect and at the same time convenient to use.
From the video in this article you can find some additional information on this topic.
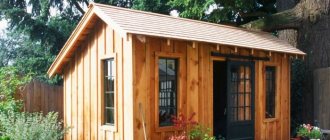
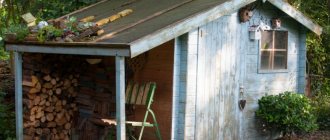
Wooden shower
A wooden shower is a well-known and common construction option. This is explained by the fact that it is very simple to build.
One of the few disadvantages of this type of shower is its poor moisture resistance. To do this, before construction, all wooden parts are treated with special substances.
The optimal type of wood for such buildings is coniferous wood. They have better moisture resistance.
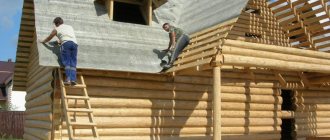
A wooden shower is a frame structure. To protect logs that will be in the ground, they are treated with bitumen mastic and wrapped in roofing felt. The racks are connected at the top and bottom using horizontal bars.
Ornamental grass: review of the best decor options and instructions for using ornamental grass (170 photos)How to design a flowerbed - instructions, diagrams, types and options for proper placement of a flowerbed (140 photos)
- DIY flower beds - 180 photos of unusual ideas for beginners and features of their application
They are usually fastened with bolts and a metal corner. A sanded board is installed in the sides of the cabin. At the end, all wooden parts of the shower are coated with varnish or paint to protect the wood from moisture.
During construction, it is necessary to consider a drain for used water. Shower containers of various shapes and sizes are used for serving. They are located on the roof.
Should I choose a Eurocube or a barrel?
There are several options for water tanks.
These are barrels and Eurocubes. Barrels come in plastic and metal. If you have a choice, it is better to buy a plastic barrel, since metal ones quickly rust. At the same time, plastic barrels also have a disadvantage - they can crack in the cold; they must be additionally insulated. A plastic tank is more durable, but the water in it is not as warm as in a metal one. Metal is quite heavy and requires special care: painting or applying special anti-corrosion solutions. Metal barrels take a long time to heat up, but when painted black, the heating speeds up. And the price of an iron barrel is a little cheaper.
In general, barrels are very convenient due to their compactness and variety of available volumes. The disadvantage of barrels is their shape: when installed vertically, it requires additional fastening. Installation of barrels has its own characteristics. If desired, the barrel can be laid horizontally, but in any case there must be supports to prevent it from swinging.
You can buy eurocube barrels of various sizes with heated water inexpensively in our store. In this case, pickup in Minsk or delivery throughout the Minsk region is possible.
Eurocubes are large-volume containers, they can be from 800 to 1800 liters. The scope of application is households, as well as industry, that is, for larger-scale purposes. They are ideal as a reservoir, but it is better to install them on permanent brick structures.
Since barrels and Eurocubes have different shapes and designs, this causes some differences in the installation of such tanks on the top of the shower. We will discuss these features below, but in any case, the containers listed are an excellent way to arrange a country shower without high expenses.
Corrugated sheeting for a country shower
Another material from which you can build an outdoor shower is corrugated sheeting. It is relatively lightweight and durable. The frame is constructed from wooden blocks.
The construction of the shower is carried out by analogy with polycarbonate. The transverse profile is used to connect the racks. It adds rigidity to your structure.
The corrugated sheet is fixed with galvanized self-tapping screws and a sealing washer. To cut corrugated sheets, use a grinder.
Organization of heating
The simplest option is to use solar energy. Yes, it heats water through the walls of the tank. But the water thickness is too large for it to warm up quickly. That’s why people come up with various installations for solar water heating.
Method of heating water by the sun
As mentioned above, the warmest water in the tank is at the top. And the traditional feed comes from below. That is, we take the coldest water. To ensure that the warmest water flows into the watering can, a hose is attached to it, and it is attached to a piece of foam plastic, which I let float. So water is taken from above.
To speed up the heating of the water, they make a “coil” (in the photo above it is the right picture). At the bottom of the water tank and above, two pipes are welded into one of its walls. They are connected to a black rubber hose, which is folded into rings in the sun. If there is no air in the hose, the water movement will be quite active.
If the sun is not enough for you, but you can supply electricity to the shower, you can use heating elements (wet). They need to have a thermostat so you can set the required temperature. They are usually used in storage water heaters, so you can find them.
Diagram of a device for heating water with a heating element in a summer shower
When you pull the power line to the shower, do not forget to install a circuit breaker with an RCD. This is the minimum that will ensure your safety.
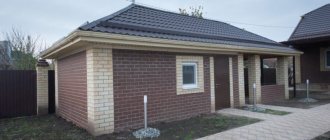
Brick shower
To build a brick shower, you need to prepare the foundation. When the concrete mortar on the foundation has hardened, you can begin laying bricks. Calculate how much area the door will occupy and leave the doorway unblocked.
For the door, choose a frame made of metal or wood. It is sheathed with corrugated board. Wooden blocks are laid on top. They will form the basis for the roof.
Drain pit equipment
From a biochemical point of view, draining wastewater from the shower and street toilet into a common pit is a gross mistake. It is necessary to build a separate pit under the cabin. To equip a summer shower, which is supposed to be used only from time to time, a drainage hole with a capacity of no more than two cubes is sufficient.
When calculating the required volume of a structure, adhere to the rule that its capacity should be 2.5 times greater than the contents of the water tank
The drain should not be located under the shower building itself or even near its walls, but two to three meters from the building.
This arrangement allows you to solve two problems at once:
- prevent the appearance of unpleasant odors of decaying organic matter;
- minimize the risk of foundation failure.
To construct a drainage pit, dig a pit 2-2.5 m deep. At this depth, wastewater will be discharged into the soil below the fertile layer. Thanks to this, soil microliving creatures will not suffer from such a “neighborhood”.
To make drainage, the bottom is lined with gravel and sand. The thickness of the drainage layer should be 20-30 cm.
When creating a waterproof layer, you should not use clay, since during operation, as a result of the natural erosion process, it can simply break the drainage system.
To avoid shedding of the walls of the drainage pit, they must be laid out in several rows with bricks or decorated with used tires.
The upper part of the drainage pit must be tightly closed. The lid can be made from a wooden panel or a piece of sheet metal.
The technology for constructing a tire drainage pit is described in this article.
Choosing a location
Before building a country shower, you need to choose its location. In this case, you must adhere to the following rules:
- The selected location should be illuminated by sunlight throughout the day. This will allow the water in the tank to warm up well.
- It is better to build a shower near the house.
- It must be installed on level ground.
- There is a water drain nearby.
A foundation for an outdoor shower will only be necessary when it is planned to build it from bricks, concrete blocks or other heavy materials.
One of the most common types is a tile foundation. In addition, it serves as a floor in the shower stall.
How to auto-fill a tank
The most advanced ones do automatic filling. Then the water supply is opened/closed by a float system similar to the one in the tank. Only in case of breakdown should provision be made for draining excess water. And, preferably, when leaving the dacha, turn off the supply tap. Otherwise, you can turn your and your neighbor’s dacha into a swamp.
Water tank design with automatic level control
An approximate diagram of the implementation of auto-filling the tank is shown in the figure above. Please note: the water intake into the shower occurs close to the surface: this is where the warmest water is usually located. Only this pipe is placed at the opposite end from the cold water inlet, otherwise the water will still be cold.
There are two pipes going into the sewer system: one is an overflow pipe (mustard colored). With its help, the tank will not overfill if the float mechanism breaks down. The second drain into the sewer for complete drainage (brown). It is useful when preserving the system - draining it for the winter, which is why a tap is installed on it.
Construction process
They choose a place, clean it and make markings.
They dig a pit. When making a brick shower stall, the depth of the pit is approximately 15 cm. 5 cm of sand is poured onto the bottom.
Concrete is poured. The surface must be made smooth. This will avoid making a screed.
Features of the construction of the heating system, floor
To heat the washing room, you need to install an old thin-walled radiator connected to a closed circuit with heated water circulating through it.
The movement of water in the circuit is ensured by a circulation pump.
In the washing room, instead of the floor, you should install a commercial shower tray (low version).
It is installed inside a frame made of wooden beams.
The floor in the locker room is made in the form of a grid, which is assembled from beams with a cross-section of 40x40 mm or polypropylene pipes. In the latter option, the holes in the pipes should be filled with foam so that moisture does not accumulate in their cavities.
Installation of a shower cabin
You can build a shower at your dacha yourself or buy a ready-made model in a store.
If you are purchasing a shower stall, then before purchasing you should pay attention to the following:
Dimensions. The cabin should be comfortable for absolutely all family members. To do this, you need to try on the largest family member in it.
What materials is it made from? Your cabin should not outwardly stand out from the overall design of the summer cottage. The material from which the cabin is made should perform well in this climate.
Water tank size. When choosing, you need to take into account the number of family members and calculate which tank is needed. One person uses approximately 35 liters of water. You should choose a tank with a small reserve.
Price. There is now a wide range of prices for shower designs on the market. You can buy a cabin starting from five thousand rubles and up to infinity.
To install the cabin, you need to prepare a level place. It is best to make a concrete platform on which your shower stall will be stable.
When building a shower, you must complete the following points:
- Make a shower drain of water.
- Build a foundation.
- Build a frame
- Finish.
- Install the tank and connect it to the water.
Preparatory work
The construction of such an important building for a dacha as an outdoor shower begins with the selection of a location. It is recommended to install a stationary shower stall in a sunny area, maintaining a distance of one and a half to two meters from the house. More often it is placed at the back or side. However, there are options for directly connecting the shower head to the main structure.
When calculating the size of the booth, it is taken into account that the minimum area is one square meter, but for convenience, a size larger than the recommended figure should be provided. If possible, they provide a vestibule in which to leave dry things and change clothes, so the area doubles.
An outdoor shower shouldn't be cramped. The more free space there is, the more pleasant and comfortable it will be to be in it.
It is recommended to make the height of the shower stall 2.5 meters. When creating a project, do not forget to leave a gap of about 20 cm from the walls to the ceiling and floor for ventilation. Think through the water supply and drainage system. Its installation is carried out at the stage of construction of the zero cycle. The source can be a well, which is drilled directly on the site, or a water supply.
Small diameter pipes are used to connect the shower stall to the moisture source. It is recommended to choose plastic options, which do not rust or erode compared to their metal counterparts. They are easy to install and put away for the winter.
The source of water for a shower attached to the house can be a home water supply system
It is important to consider draining the water. To do this, at the stage of preparatory work, they dig a drainage hole, which is located directly under the cabin or next to it. The depth is required no higher than 0.6 meters, the diameter is about one meter.
After the hole is dug, the bottom is compacted and a small layer of crushed stone is poured. You can use broken bricks. Then install a pallet made of plastic or wood. If the pit is located next to the cabin being built, then lay a branch from a plastic pipe.
Formation of a drain pit and tray (floor) for a summer shower
Having completed the preliminary stage, they think about what material the cabin itself will be constructed from. This point is important both from a practical and aesthetic point of view.
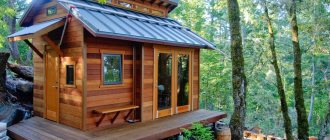
Cabin made of wood
Having decided to build a wooden shower at the dacha, they prepare the necessary timber and consumables. You will need a rubber hose, pipe, adapter, bracket, nozzle, screws, mixer.
Step-by-step construction technology
- After the drainage pit has been prepared, cinder blocks are laid in the corners, leveling the horizontal line, and a frame is built. It will require a beam of 100x70 mm. It is important to make the top dressing strong, since it must withstand a tank with an optimal volume of 100 liters.
- The frame is sheathed with clapboard. You can use false timber or boards 30 mm thick and 150 mm wide. Provide gaps between the grooves, since the wooden material expands when wet.
- All wood parts are primed using antifungal impregnation, and acrylic water-based varnish is applied in three layers. You can paint the building by choosing a shade that is in harmony with the surrounding landscape and the main buildings in the dacha area.
When designing a cabin, it is important that it harmonizes well with the appearance of the house and garden
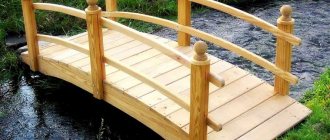
Simple and beautiful wooden shower for a summer house
Wood does not like prolonged contact with water, so so that during washing it can easily and quickly flow down, it is advisable to provide small gaps in the floor
Wooden shower stall attached to the house
Polycarbonate shower
From the variety of types of polycarbonate for shower stalls, an opaque option is selected. The most durable structure will be one with a frame made of a 40x20 mm metal profile. You will also need a steel corner 50x50 mm.
Do it yourself
- It is more convenient to assemble the wall frame on a flat, hard platform, where the racks and crossbars are laid. They are welded overlapping and then installed by immersing the racks in a concrete screed prepared for the booth. Check verticality and horizontality, strengthen the hinges for the door.
- All that remains is to cut the polycarbonate to size and fix it to the frame using self-tapping screws. Install a water tank at the top. Plastic flat tanks are recommended. They can act as a roof if they exactly match the dimensions of the cabin.
Advice! A building made of modern, aesthetic polycarbonate looks attractive and organic in any landscape if you choose a color scheme that matches the overall style.
Plastic shower for arched roof
It is better to choose a plastic tank for a country shower; it is cheaper and will last longer than a metal one.
Cabin made of stone, concrete or brick
Having decided to create a durable concrete, brick or stone structure for a summer shower, you need to take into account that you will have to build a foundation.
Construction order and stages
- They dig a trench 20 cm wide and 40 cm deep along the perimeter. Cover it with broken bricks and pour in a liquid cement-sand mixture. A week later, walls from the selected material are erected on the hardened concrete.
- Wooden blocks are laid on the last layer, on which the tank will be installed and the roof roof will be fixed. It is advisable to make it from slate or corrugated board.
- After installing the tank, water is supplied, shower fixtures and taps are attached. The top surface of the tank is covered with black paint, which allows the water to quickly heat up from the sun.
Advice! If it is possible to supply electricity, then a low-power heating element is installed in a metal tank. If necessary, wood-burning titanium is provided in the brick cabin, which allows additional heating of the air inside.
Solid and practical summer shower made of stone in eco style
Sturdy and reliable shower structure made of concrete, lined with beautiful beige tiles
A shower made of stone is durable and reliable for many years
Summer shower made of corrugated sheets
Characterized by durability, strength, and light weight, profiled sheets are popular in the construction of various buildings, including shower stalls.
The shower frame can be made of either wood or metal. It is recommended to first make a frame from a metal profile or wood beams by welding. Then the corrugated sheet is attached to it using galvanized self-tapping screws equipped with sealing washers. First, the walls are sheathed, then the door itself is mounted.
Original shower design made of wood and metal
The semi-closed cabin design is the most common option for a summer shower.
Insulation materials
For insulation use:
- Mineral wool. This material is easy to install.
- Glass wool. This option is much more difficult to install; you need to be very careful when working with it.
- Waterproof foam. A new material suitable for insulating shower stalls.
An insulated shower can be used even in adverse weather.
Warm shower at the dacha with your own hands - design
At the design stage, the following questions should be considered:
- Tank volume: depends on the number of users. For a quick rinse, 1 person will need at least 15 liters of water.
- Volume of the drainage pit: the pit should be at least two and a half times larger than the tank.
- Frame and cladding material: the frame can be assembled from polypropylene pipes, rolled metal or wooden boards and beams. For cladding, any moisture-resistant sheet material is used: plastic panels, polycarbonate, special plywood. When choosing a material for the first layer of sheathing, there is no need to pursue aesthetics: for the purpose of insulation, the heated shower will be covered with foam plastic.
- Shower dimensions.
As experience has shown, the most comfortable are structures with dimensions of 1.9x1.6 m in plan (shower + changing room) and a height of slightly more than 2 m.
Installing a water tank
When choosing a shower tank you should consider:
- Heating of a metal tank occurs much faster. At the same time, a plastic shower is more durable. It is also an order of magnitude lighter, which makes the process of constructing the foundation and frame easier.
- When painting a tank, you should give preference to dark colors. This will reduce the time it takes to warm up the water.
- Tank tightness. This will avoid water contamination.
- Before installation, it is necessary to make holes in the tank through which water will be drawn in and drained.
At the end of installation, the water source should be connected to the tank. This is done using garden hoses and polyethylene pipes.
If desired, you can make a heated summer shower. The optimal way to heat water is to use a heating element. You can also heat water using a boiler or boiler. Some use solar panels for heating.
Preparation for construction
Next, we will consider the process of constructing an all-weather shower, as the most in demand throughout most of our country.
Choice of frame material
Before starting construction, you need to select the frame material. As was said, plastic pipes are no longer needed due to insufficient strength, so you have two options to choose from: wood or rolled metal.
Wood
Positive sides:
- low cost;
- ease of processing.
The disadvantage is a short service life due to susceptibility to rotting and drying out.
Beams of a certain cross-section are suitable for the frame
Specifically you will need the following lumber:
- for the bottom trim: insulated shower - timber with a section of 150x150 mm, lightweight - from 60x60 mm (optimal - 100x100 mm);
- for racks, oblique connections and top trim: board with a section of 100x40 mm.
Rolled metal
It is important to understand that in this case we are not talking about galvanized metal profiles with a thickness of 1.5–2.5 mm - this material is not suitable for such tasks. A channel with a height of 50–80 mm is used as the lower frame; the posts and other frame elements are made of a square pipe from 25x25 mm with a wall of 1.5 mm to 40x40 mm with a wall of 2 mm.
A shower with such a frame will cost much more than a wooden one, and it is more difficult to build - steel is more difficult to process, and electric welding will be required to connect the parts. But the gain will be significant: the frame will be stronger and more durable.
Metal construction is more durable
Calculation of shower sizes
A building with plan dimensions of 2 x 1.2 m can be considered optimal. The height can be taken to be from 2 to 3 m. It must be remembered that the higher the water tank, the stronger the water pressure in the watering can.
The drawing shows the dimensions of the shower
Choosing a waste disposal method
Even if a cesspool or septic tank for a toilet has already been built on the site, the shower room must be equipped with a separate structure. This is explained by the presence of large amounts of alkali and surfactants in shower drains, which can destroy beneficial microflora in the septic tank.
Sanitary standards require making cesspools with a volume of 2 m3 or more. But this requirement is relevant for standard drains. In the case of a shower, their value will be much smaller, so the volume of the pit can be reduced. Since, due to the need to heat the water, showers one way or another have to be taken with long pauses, its size can be taken equal to the volume of the shower water tank.
Another important question is how deep wastewater can be dumped into the ground so that the chemicals it contains do not poison the fertile layer. With a volley discharge of up to 50 l or a gradual discharge of up to 100 l/h, the safe depth is two thicknesses of the fertile layer. A country shower fits well into these figures.
Therefore, instead of a full-fledged cesspool, you can make a drainage well from a metal barrel with a height of 0.85 mm and a volume of 200 liters. We can guarantee that such a height will certainly be enough, since a fertile layer with a thickness of over 40 cm is quite rare in summer cottages.
If the thickness of the humus is small, you can use a smaller plastic barrel, the main thing is that it is not smaller in volume than the shower water tank.
You can build such a well directly under the shower stall.
The volume of the wastewater receiver must be no less than the storage tank
If you decide, as is often advised, to make a drainage well from old tires, then do not forget to periodically disinfect it with bleach: water will stagnate in the interior of the tires.
Preparing tools
The builder must have the following available:
- pegs and a roll of twine - for marking the territory;
- garden auger;
- shovels and bayonet shovels;
- bubble and water (hose) levels;
- plumb line;
- roulette;
- wood hacksaw;
- grinder with cutting disc for metal;
- drill;
- hammer, screwdriver (or screwdriver);
- marker, chalk or pencil for marking materials.
Shower drain
Draining is performed in several ways. The water is either discharged into the sewer system or passed through a filter and used for irrigation. The second option allows you to water your summer cottage without unnecessary expenses.
A shower in a country house is a fairly cheap and very necessary device. This article will help you choose a shower cabin and material for it. To make it easier to choose a model, you can look at a photo of a summer shower.
What types of heated showers are there?
In specialized stores you can find a great variety of different devices and devices to make country life easier. There are also shower installations.
All showers for heated cottages can be divided into two main categories:
- Shower installations. This device is a cabin with a tank installed in the upper part and having a heating function. Such showers work from the network. They may have additional functions such as temperature display, mode switching, fast heating, and so on. It is worth purchasing an installation if you plan to use it constantly and place it in one specific place. The cost of this shower ranges from 15–20 thousand rubles.
- Portable portable water heater-shower. It has a body with a heating element, wire and nozzle. The device is placed in a container of water, connected to the network and begins to supply heated water through the hose to the nozzle. Such a device can be placed in a tank installed on the roof of the shower stall. This device is not distinguished by high power and heating speed, but still in about 10-15 minutes it can heat approximately 8-10 liters to 40-45 degrees. The cost of such water heater-showers varies from 5 to 10 thousand rubles. The main advantage is mobility, because the device can be taken with you on a trip and moved to any suitable place.
Summer shower photo
Please repost

22222222