Michel
22705 0 3
Michel September 28, 2016Specialization: plumber with 10 years of experience, computer repair specialist, powerlifting coach. I have extensive experience in construction, interior decoration, and making homemade furniture. Hobbies: sports
When does it make sense to install a plasterboard sheet on a frame in general, and on a wooden one in particular? In what cases is it not advisable to use wooden sheathing? How and from what to properly assemble a wooden frame for drywall? How to cover the frame and putty the gypsum board? In my article I will try to answer these questions.
Wooden frame and sheathing for plasterboard.
Cladding walls with plasterboard on a wooden frame - disadvantages
Cladding walls with plasterboard over a wooden frame has a number of disadvantages.
- The frame is made of wooden beams and is susceptible to rotting. Over time, such wood cladding begins to warp and compromise its integrity.
- For the frame you need to look only for dry and absolutely even timber. And such timber is not only difficult to find, but also its cost is considerable.
Despite the shortcomings, wall cladding on a wooden frame has been used and is still used to this day. This is not to say that this is very rare.
Wood preparation
In order for a wooden structure in a house to last a long time, the wood must be properly prepared. This material is very susceptible to biological corrosion, climatic influences and burns well. Therefore, before making a wooden frame or partition, the tree should be prepared according to the rules. Note! It is best to make a partition or frame from coniferous trees. Before starting, chemical treatment is usually carried out. To do this, wooden slats are treated over the entire surface with antiseptic substances. This will help you prevent:
- damage to wood by mold or fungal microorganisms. And under their influence the tree deteriorates very quickly;
- the risk of damage to the tree by wood insects that use wood as food;
- biological decay;
- damage to beams by rodents that can be found in a house, especially a country house.
Today the market is replete with a wide variety of antiseptics. But sodium fluoride is considered the best. It penetrates very deeply into the wood and is poorly washed out of it.
Sodium fluoride
It is worth noting that sodium fluoride does not decompose and cannot lead to metal corrosion. It is also non-toxic to humans and odorless, which is an excellent advantage for treating wooden beams and slats with this substance at home. In addition to sodium fluoride, sodium fluoride with the addition of soda ash is also used for wood processing. The use of the following types of oil antiseptics in residential premises is strictly prohibited:
- coal;
- creosote;
- anthracene oils;
- shale.
When treating wood with such substances, a person can harm his health!
Before installing wooden planks, the slats should be in the room where they will be attached for several days. Thanks to this, they will undergo sufficient acclimatization. Remember that the slats must be made of high-quality lumber, which must meet fire safety and humidity requirements.
The seller, upon request, is obliged to provide you with a certificate or certificate stating that the material has been treated with a fire retardant and has passed a special examination by authorized bodies.
Preliminary work
- Before covering the wall, lay all utilities along the lined wall, namely, install electrical wiring under the plasterboard and/or plumbing in the plasterboard structure (if any).
- Electrical wiring can be laid openly, in a corrugated or box. Then, when installing the frame, you will need to cut out places in the frame bars for electrical wiring and/or water pipes.
To work at height, you can use construction towers. They are easy to assemble and disassemble. They create a convenient high-rise platform and are easily transported from place to place. For example, prefabricated ARIS towers up to five meters high can be assembled by one person in 20-30 minutes. You can view ARIS tower tours here.
Finishing a plasterboard partition
Subsequent wall finishing depends on the design concept. The partition can be puttied by first covering the seams between the sheets with putty and reinforcing tape. This method is perfect for painting or wallpaper. Grouting putty can be a rather dusty process, so be sure to use respiratory protection.
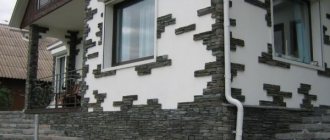
If the wall is finished with decorative stone or gypsum panels, then they can be attached directly to the drywall.
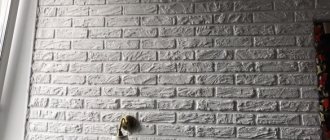
If your apartment or house has brick walls, be sure to read our article: 5 options for finishing a brick wall inside the house
Frame making
- For the frame, dry, even timber measuring 50×25 and 75×25 mm is used.
- The 75x25mm beam should rest on the edge of the plasterboard sheet, and the 50x25mm beam should support the sheet along the surface.
- The timber frame is attached directly to the wall of the room. For fastening, use nails (if the wall is wooden or plaster) or dowels - nails (if the wall is concrete) or plastic dowels and screws (if the wall is brick).
- If the fastening is used, standard fasteners for plasterboard structures are used. Fastening is done using dowels and screws, and holes for fastening are drilled in advance. The distance between the fasteners is 500 mm.
- When fastening with dowel-nails, the timber is drilled together with the wall and the dowel and nail are driven into the hole. The distance between them is also 500 mm.
- First, horizontal bars are attached, near the ceiling and near the floor. After securing them, we move on to the vertical posts. The first beam is attached to the corner.
- For convenience and correct calculation, the bars are first attached, which will fall on the edge of the drywall sheet. Their size is 75x25 mm. Since the width of the plasterboard sheet is 1200 mm, the pitch between the bars should be 1200-1205 mm (with single-layer cladding).
- With a two-layer cladding, the number of 75×50 bars is doubled, and the second layer of plasterboard is attached to the frame with an offset of half a sheet, both vertically and horizontally.
- Of course, you don’t have to bother with buying different timber and, for simplicity, buy a timber of the same size: 75 × 25 mm.
- After securing these bars, 50x25 mm bars are attached between them. The pitch between them is 400 mm. With a two-layer cladding, the step between the racks increases to 600 mm and their number decreases.
Cost of gypsum plasterboard partitions
If you are going to install the partition yourself, then the costs of its construction will consist only of the prices of materials.
Let's calculate the cost of a plasterboard partition per m2 from our example. Let's count several options: from a thin profile, from a thick profile and from a thick profile with sound insulation. GCR is applicable, not moisture resistant. Prices for materials are taken from the Leroy Merlin online store.
| Partition option/material | Quantity of material | Price | Cost of thin profile | Price | Cost of thick profile | Price | Cost of thick profile with sound insulation |
| GKL 12.5 mm | 10 pieces. | 267 | 2670 | 267 | 2670 | 267 | 2670 |
| Guide profile | 4 things. | 85 | 340 | 228 | 912 | 228 | 912 |
| Rack profile | 11 pcs. | 105 | 1155 | 231 | 2541 | 231 | 2541 |
| Noise insulation | 3 packs = 17.3 m2 | — | — | — | — | 734 | 2202 |
| Sealing tape | 1 roll 30 m | 174 | 174 | 174 | 174 | 174 | 174 |
| Self-tapping screws for metal | 1 pack 22 pcs. | 27 | 27 | 27 | 27 | 27 | 27 |
| Self-tapping screws for gypsum boards | 1 kg | 284 | 284 | 284 | 284 | 284 | 284 |
| Driven anchors | 1 pack | 350 | 350 | 350 | 350 | 350 | 350 |
| Dowel-nails | 2 packs = 20 pcs. | 18 | 36 | 18 | 36 | 18 | 36 |
| Total, incl. per m2 | — | — | 5034 rub. 395 RUR/m2 | — | RUB 6,994,549/m2 | — | 9196 rub. 722 RUR/m2 |
If you want to entrust the construction of the partition to a construction team, then you need to add the cost of the workers’ services to the above figures.
Here are approximate prices for the cost of installation of plasterboard partitions, price per m2:
- single-layer - from 400 rubles;
- two-layer - from 570 rubles;
- sound insulation - from 80 rubles.
Please note that the cost of installing (constructing) a plasterboard partition depends on the region, the complexity of the design and the remoteness of the facility. Therefore, when calculating, always check prices with construction companies.
In order to roughly estimate the cost, we can assume that the cost of installing a square meter of a plasterboard partition is equal to the cost of materials for its construction.
Fastening plasterboard sheets to a wooden frame
When attaching plasterboard sheets, the following rules are observed:
- There should be a distance of 10 mm from the sheet to the floor and ceiling.
- The distance between the sheet fastening screws should be 250 mm.
- Some experts believe that a 5 mm distance should be left between the sheets. It's too much. To putty joints, it is better to buy a sheet of drywall with a thinned edge (UK) or make a chamfer on the edge of the sheet manually.
- With two-layer cladding, the sheets of two layers are shifted both vertically and horizontally. The distance between the wooden posts is 600 mm, which corresponds to half a plasterboard sheet.
To maintain a 10 mm gap between the floor and the sheet, prepare pads for the sheet in advance.
Reinforcement and puttying
A wall or partition covered with plasterboard is not yet ready for finishing: the heads of the screws and the seams between the sheets must be hidden with putty. In addition, the seams and outer corners of the walls need reinforcement and reinforcement.
To reinforce the seams, serpyanka - a self-adhesive fiberglass mesh with a cell size of about 2 millimeters. It is glued along the seam, after which it is filled with putty directly through the mesh cells. You have to putty at least twice: gypsum putty gives a small but quite noticeable shrinkage when drying.
Reinforcement of the seam between sheets with sickle tape.
External corners are reinforced:
- Galvanized perforated corner profile;
- Plastic profile with mesh.
The corner is sunk into the putty applied to the corner, after which it is covered with another layer of it.
The corner profile will be completely closed when the wall is puttied.
However: I prefer to use a decorative plastic corner glued with silicone sealant after puttying and painting to protect the corners.
The photo shows a corner of the partition protected by a decorative plastic corner.
What putty should I use to level the surface?
The most common gypsum putties in Russia produced by the German company Knauf are HP Finish and Fugen. However, I liked the cheaper and less common ABS Saten : the mixture lives noticeably longer (at least 45 minutes versus 25-30 for Knauf products), if necessary, can be diluted with water (which increases its life time to an hour or more) and does not lumps during mixing.
Finishing gypsum putty ABS Saten.
How to prepare putty correctly?
- Water at the rate of 1 liter per 1.6 kg of dry gypsum mixture is poured into a wide bowl (I use a plastic paint bucket);
- The mixture is poured into water, distributed as evenly as possible over its surface;
- After 3-5 minutes, the swollen putty is mixed - manually (with a spatula) or with a mixer attachment for a drill.
How and with what to properly putty seams, corners and screw heads?
- The caps are covered with two movements of a spatula 10-12 cm wide, crosswise. The first sliding movement fills the recess with putty, the second (“scraping”) removes its excess;
- The seams are also filled with cross-shaped movements of the same spatula. In this case, the seam is filled with putty as tightly as possible. Cavities in it increase the likelihood of cracks. In the second pass, the seam, together with the serpyanka reinforcing it, is covered with longitudinal movements of a spatula 30 - 35 cm wide;
Puttying with a second pass should completely hide the texture of the reinforcing material.
- To align external and internal corners, it is better to use special corner spatulas.
After filling the seams and masking the heads of the gypsum board fasteners, they are often puttied over the entire area. A layer of putty about a millimeter thick completely masks the seams and does not allow the base to show through the paint.
The next stage is grinding . GKL is sanded with grids No. 80 in the first pass and No. 120 - 160 in the second pass. It is better to sand in bright, oblique lighting, which will highlight the slightest irregularities due to the shadows they cast. I use an inexpensive oscillating sander for sanding.
Vibrating sander with attached sanding mesh.
By the way: if necessary, intermediate sanding can be performed after filling the seams and sealing the screws. Its necessity is determined only by the condition of the surface.
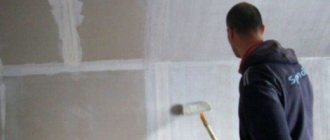
The smooth surface of the gypsum board is dust-free (I clean it of dust with a regular broom) and primed with penetrating acrylic primer. The primer will stick the remaining dust and improve the adhesion between the surface of the drywall and the final coating - paint or wallpaper.
Deep penetration acrylic primer from Ceresit.
Wallpaper can be glued immediately after the soil has dried, but painting will have to wait at least two weeks after puttying. If you hurry, the seams will show through any number of layers of paint due to the moisture that has not completely evaporated.
Technology of fastening sheets to wooden frames
- Place 10 mm padding on the floor near the frame.
- Bring a sheet of drywall to the frame, place the edge of the sheet on the spacer and lift the sheet.
- Fasten the sheet with TB type screws with a drill at the end. The distance between the screws is 250 mm.
Of course, there will be a strip on the wall on which neither half nor a full sheet of drywall will fit. In this case, cut a sheet of drywall to the desired size and attach it to the frame. When attaching sheets of drywall, do not forget about the electrical wiring in the structure. Immediately cut round holes in the sheets for mounting boxes for hidden sockets or simply take the wires out from under the cladding to install overhead sockets.
That's all! Wall cladding with plasterboard on a wooden frame is completed.
©Gipsokart.ru.
Other articles in the section: Plasterboard structures
- Architectural terms
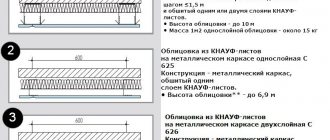
- Types of wall cladding on a metal frame
- Soundproofing tape
- How to cover a curved wall with plasterboard
- How to connect drywall profiles
- Frame made of metal profiles for plasterboard
- Plasterboard structures in wet areas
Types of profiles
Metal profiles are mounted using additional fasteners:
Tree vs profile
In what cases is it permissible to install drywall on a wooden frame, and when is a galvanized profile preferable?
The bar has only one advantage: it is cheap . In order not to be unfounded, I will give the average prices for bars and profiles for the Moscow region:
| Product | Price, rubles |
| Edged block 50x50x3000 mm, pine, 1st grade | 50 (17 rubles/linear meter, 6600 rubles/cubic meter) |
| Ceiling profile CD 60x27x3000 mm (manufactured by Knauf) | 142 |
| Ceiling guide profile UD 27x28x3000 mm (manufactured by Knauf) | 98 rubles |
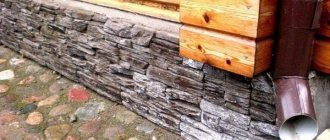
Further: wood, unlike galvanized steel, is hygroscopic , and is also capable of changing its linear dimensions and geometry depending on air humidity. From a practical point of view, this means that in a damp room, the wooden sheathing can warp and bend the wall cladding, or even lead to cracks appearing at its seams.
Deformation of lumber during drying.
The warped frame resulted in cracks in the final finish.
Finally, the tree is subject to biological influences : it rots and becomes food for wood borers. Again, unlike galvanizing.
Conclusions?
- A wooden frame for plasterboard can only be used in dry rooms . For a bathroom, kitchen or combined bathroom, you should prefer a galvanized profile;
- The elements of the sheathing must be treated with an antiseptic .
Antiseptic for wood from the Neomid company.
Loophole
There is, however, a simple way to bring wood closer to a galvanized profile in terms of performance. In order for it to completely lose its hygroscopicity and ability to deform due to fluctuations in humidity, it is enough to soak the block in drying oil : its constituent oils will fill the pores between the fibers in the outer layer of the wood, forming a water-impermeable shell during polymerization.
Drying oil will reliably protect the wood from dampness.
This operation has several subtleties:
- It is better to apply drying oil heated in a water bath. Then it penetrates deeper into the fiber structure; accordingly, the waterproof coating will be more durable;
Drying oil heated in a water bath will penetrate deeper into the wood structure.
- It’s easier not to cover the ends of a bar cut to size with drying oil using a brush, but to dip it in a jar with it. It is the ends, due to the orientation of the fibers perpendicular to the surface, that are most vulnerable to moisture;
- Drying oil dries for several days and has a strong, characteristic odor. To dry the bar, it is better to select a separate room with good ventilation.