It is difficult for a home craftsman to install a frame under plasterboard with his own hands, plus such a design “eats up” at least 40 - 50 mm of area, so in residential premises leveling walls with plasterboard without a frame is more important. In the article I will talk about three methods of covering gypsum board walls and will dwell in detail on small but important details.
Installation of drywall on walls without a frame
Why drywall?
By leveling walls with plasterboard, you get a number of significant advantages:
- The composition of plasterboard sheets does not harm human health and the environment.
- Installation can be carried out even by a non-professional.
- The material is not subject to rotting.
- Drywall does not interfere with air circulation and has vapor permeability properties.
- After installation in the room, the sound insulation indicator improves.
- After installing plasterboard sheets, there are many options for further finishing.
- Drywall creates minimal load on load-bearing structures due to its low weight.
Where and when can you level walls with plasterboard?
Wherever you want to quickly, inexpensively and efficiently level the walls and you are not particularly concerned that the thickness of the walls will increase. This may even be a plus - extra. noise and heat insulation.
Alignment of the gypsum board wall
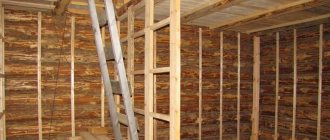
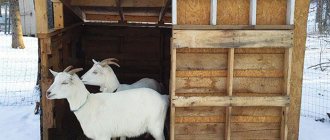
Wooden houses
Wooden structures are no less common. The unique atmosphere inside such a building has a calming effect on guests and owners, and the fresh and fragrant air gives a good mood .
The tree requires constant maintenance; the only repair option is to replace sections.
Using a support system, the load on the damaged part is removed, damaged logs are removed and replaced with new ones. This work is quite complex, requiring the participation of several people.
It is better to take care in advance of waterproofing, lining external walls with suitable materials, creating a drainage system and draining the soil under the house.
Types of gypsum boards
First of all, you need to choose the type of gypsum board that will be most suitable for the type of room.
There are four types of gypsum board sheets:
- standard (they have gray cardboard with blue markings, density - 800 kg/m3, thermal conductivity - 0.35 W/Mk, the most popular option, suitable for all types of dry and heated rooms);
- insulated (have two components - polystyrene foam + gypsum board sheet);
- moisture resistant (the cardboard is green and blue marked; the cardboard itself is impregnated, including antifungal, hydrophobic additives in the core material, suitable for finishing rooms with high levels of moisture)
- fire-resistant (pink or gray cardboard with red markings, density - 850 kg/m3, thermal conductivity - 0.22 W/Mk, covered with multi-layer fire-resistant impregnation, not exposed to fire for up to 30 minutes, sheet thickness 12.5 mm, They can also be used to equip home boiler rooms and industrial premises).
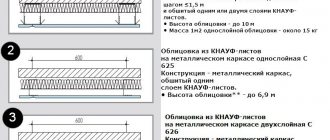
When choosing gypsum board sheets based on thickness, keep in mind that for a flat wall surface, thicker sheets are applied, and thinner sheets are applied to a curved surface. On the presented table you can familiarize yourself with the optimal parameters and ratios of gypsum board sheets.
When is the best time to use plaster?
If you do not want to deal with repairs for a long time after completing the current work, you should choose plaster. She is ready to serve for several decades. Experts advise choosing this mixture also if you need the walls to be reliable and resistant to mechanical damage. Plaster is not only recommended, but also mandatory if you intend to hang heavy objects on the wall being finished, which cannot be done with plasterboard facing.
Attention! If you have grandiose plans for finishing the room, then it is better to choose drywall, since after its installation you can use any interior solutions, but plaster can only be painted, but other manipulations with it are unacceptable.
Methods of attaching drywall, their pros and cons
You can attach gypsum plasterboard (“plasterboard sheet” or simply “plasterboard”) to the wall using 2 technologies:
- put on glue;
- attach with self-tapping screws to the sheathing (wooden or metal profiles).
Each of them has its pros and cons.
The adhesive method preserves the volume of the room, is much faster and cheaper, and is technologically simpler. However, it does not allow you to level walls with a curvature of more than 4-5 cm, or hide soundproofing materials, insulation and communications. In addition, in this way it is impossible to turn into reality design ideas for decorating an apartment.
Installation of the frame using hidden communications.
For the frame method, the advantages listed above turn into disadvantages, and the disadvantages into advantages. However, it is impossible to say with certainty that one of these methods of fastening gypsum boards is better than the other. It all depends on the specific situation in the room where the renovation work is being carried out.
For lathing under plasterboard, wooden blocks and galvanized metal profiles are used. By the way, in the USA and Western countries, wooden frames dominate, in the post-Soviet space - metal profiles. It is impossible to explain such a commitment to a specific type of frame. Most likely these are just established traditions.
In passing, we note that wooden blocks have some disadvantages:
- cannot be installed in damp rooms - deformation is possible;
- the installation process is more labor-intensive;
- must be passed, without fail, through a 4-sided machine (cutting on any type of equipment allows a deviation of dimensions in any direction by 2 mm, which is unacceptable with “dry plaster”) to bring them to the same size.
Comments
- Alexey on the post Spotlights fall out
- Yar to the entry Metal hose or corrugated pipe?
- Nailya on the post the float gets stuck
- Alex on not moisture resistant drywall in the bathroom
- Rem on the post How to make black mortar for laying black facing bricks
- Full or partial copying of materials is prohibited; with the agreed use of site materials, a link to the resource is required.
Information portal: renovation of apartments, offices, cottages All rights reserved.
Materials and tools
Like any type of repair work, leveling walls with plasterboard with a frame with your own hands requires the purchase of materials and the availability of certain tools.
Materials for work you will need:
- Plasterboard sheets. For the bedroom, living room, nursery and corridors - ordinary, light gray color (GKL), bathroom, bathroom and kitchen - with a greenish tint, which means increased moisture resistance (GKLV), for cladding the walls of a wooden house, as well as walls next to the fireplace or stove - warm pink tones with good fire resistance (GKLO). There is also plasterboard for boiler rooms with baths (GKLVO). It has increased moisture resistance combined with good fire resistance (dark gray color);
- Gypsum putty;
- Galvanized metal profile PNP (UD), size 28*27 mm. Attaches to floors, walls and ceilings. Serves as guides for the frame;
- Galvanized PP (CD) profile (also called ceiling) with a cross-section of 60*27 mm. Serves as a grid for fastening gypsum boards;
- Hangers for attaching the CD profile to the wall. The greater their number is installed, the stiffer the frame and, consequently, the cladding will be;
- Self-tapping dowel 6*60 mm (8*80 mm) for installing PNP guide profiles;
- “Bedbug” hardware (9 mm) for fastening hangers to the CD profile;
- Self-tapping screws 35 mm long. They are used to fasten sheets of plasterboard with sheathing;
- Reinforcing fiberglass mesh for filling joints between gypsum boards (serpyanka).
The work cannot be completed without the following tools:
- an electric drill or hammer drill with a concrete drill for purchased dowels;
- screwdriver with a cross-shaped tip;
- Bulgarians;
- construction knife with replaceable blade;
- jigsaw;
- hammer;
- plumb line;
- pencil;
- tape measure or metal ruler 1 m long;
- pliers for bending hangers;
- metal scissors for cutting profiles to size;
- a plane with a beveled blade - to form a chamfer for the putty;
- narrow and wide spatulas.
If you plan to carry out insulation or soundproofing work, additional materials will be required.
We insulate from the outside
External insulation
Any surface requires external cladding. Wind and precipitation gradually destroy any material, negatively affecting its heat and sound insulation qualities .
Additionally, after prolonged exposure, it can cause the wall to collapse and require costly restoration.
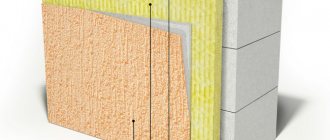
- An adhesive layer is applied to the surface, allowing the thermal insulation materials to be secured.
- Foam-based slabs are attached to this layer using dowels.
- A painting mesh is installed on top of the foam, and two layers of putty are applied.
- When insulating and repairing external walls, the last step is to apply a decorative protective layer of mineral plasters or silicate facade paints.
Pros and cons of the frameless method
To attach gypsum boards, they use an adhesive instead of screws.
Each type of finish has both advantages and disadvantages. What are the pros and cons of leveling walls with plasterboard? Using gypsum plasterboard to level walls without a frame has the following advantages:
- no need to spend money on profiles and screws;
- no need to look for metal scissors, a screwdriver, a drill and other tools that are necessary to create a frame;
- no useful area is lost, which is hidden by the frame design;
- there is no need to cut sheets of drywall so that their joints fall on the profile.
However, the lack of a frame leads to certain inconveniences. Therefore, it is worth considering the disadvantages of the frameless method of leveling walls.
- Leveling the walls with plasterboard without a frame can hide only a slight curvature. If the unevenness of the walls is too great, then this method will be too costly and time-consuming. If the difference is no more than 4 cm, then there will be no problems during operation.
- It is necessary to carefully prepare the wall, because the drywall will be in direct contact with it.
- It is not possible to make insulation using the same mineral wool.
- After all the work, a lot of dirt remains from the solution.
- For additional cable routing, you will have to groove the wall to create gutters.
- You will need special adhesives to attach drywall. You will need to dilute them yourself using a mixer.
- The wall will not be as smooth as with a frame.
Self-tapping screws can act as beacons that help to install gypsum boards evenly.
As you can see, leveling walls with plasterboard with your own hands has more disadvantages than advantages. However, all the shortcomings are usually overlooked due to the fact that it is easier to work with the adhesive solution yourself than with profiles for the frame. Although this is very relative. It will be much easier for someone to do the sheathing than to work with a spatula and mortar.
In wet rooms, moisture-resistant plasterboard is used. It has a greenish color. It is also used in rooms where there is increased dampness due to heating problems in winter.
How to prepare the base
Installing drywall on a wall without a frame always begins with preparing the wall itself; the base must be strong, not peel off and have good adhesion. The work is divided into 2 stages.
- Cleaning the walls.
- Impregnation of walls with soil.
How and with what to clean the walls
The gypsum board wall must, first of all, withstand the load; accordingly, it is advisable to completely remove the old, often multi-layer coating.
- Take a hammer or something similar and tap all the planes for voids. Places where voids are identified are knocked down to a solid base.
- If the plaster comes off easily, you can pry it off with a spatula. Problem areas are cleaned with a chisel and hammer.
- Lime or chalk whitewash is soaked with water and removed with a metal spatula.
- Oil-based (alkyd) paint is heated with a hair dryer and removed with a spatula.
- Acrylic paints can only be torn off; for this I use an angle grinder with a cord brush, it is also called a petal attachment, as in the photo below. You can also take a vibrating grinder with grain No. 80 - 100, but here it will take more time.
Installing drywall without a frame requires preliminary cleaning of the base
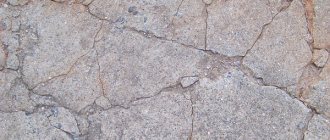
If cracks are found on the wall, they need to be slightly widened and cleaned with a chisel or grinder, and always to the full depth. And when you prime, these places need to be impregnated especially carefully, because this is where fungal spores settle.
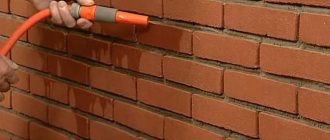
Primer of walls
- After cleaning, the wall needs to be dusted; vacuuming is not necessary, just brush off the dust with a brush.
- The primer is applied with a soft brush, roller or spray gun in 2 layers, without intermediate drying.
- At room temperature, covering walls with plasterboard begins within a day.
- There are now enough types of soil (Betonkontakt, Tiefengrund, etc.), but when choosing, make sure that the composition has deep penetration, plus it contains antiseptics and antifungal additives.
Advice! If you are attaching drywall without a frame to a wooden wall, then a day before priming it is advisable to apply a complex antiseptic impregnation for wood.
Cladding walls with plasterboard without a frame requires a good primer
Important! At the last stage of preparation, cleared cracks and deep potholes need to be filled with putty. For these purposes, it is better to use starting putties; if you want to save money, you can putty with cement-sand mortar or gypsum; the putty areas should be primed again.
Installation using frameless method
The good thing about the frameless method is that even a person who is not the most experienced in this area will be able to do the work themselves and understand how to level walls with plasterboard without using a profile. But there are several rules and inconveniences for this method - protrusions and irregularities on the wall should be less than five centimeters; if the irregularities are larger, then you first need to plaster the wall (it is better to take a dry mixture on a gypsum basis, due to the content of special additives it has increased adhesive properties, but with such material you need to work quickly, since the solution also dries quickly, avoid lime plaster, otherwise all the work will be useless) and after drying, begin the process. The disadvantages include the fact that it is impossible to insulate the wall using this method, as well as to hide communications behind the plasterboard.
Before you begin the frameless alignment process, you need to prepare the necessary materials:
- gypsum board sheets;
- primer;
- adhesive installation mixture;
- self-tapping screws;
- dowels;
- drill attachment for mixing;
- plumb line;
- water level;
- construction knife;
- putty knife;
- wooden plank;
- roulette;
- stationery knife;
- reinforcing tape.
The temperature of the room should be above 10 ° C, and the material itself should lie in the room itself for two or three days in order to adapt to its climate. Make sure that electrical wiring, distribution boxes, installation of communications and “glasses” for installing switches and sockets - all these processes are completed, only then proceed.
Before starting the process, the wall is intensively cleaned of dust and contaminants, wash the walls down to the brick, then begin priming.
The surface must be strong and dry. When everything is ready, screw in self-tapping screws along the entire perimeter of the wall, take strong threads, preferably bright ones, so that they stand out, and stretch them between the screws.
Cover the entire wall with marks - install along a horizontal line every 65 cm under the ceiling screw, determine the points for the vertical beacons, using a water level and a plumb line.
Using a tape measure and a utility knife, we adjust the sheet to the size of the wall.
To effectively bond the sheet to the wall, treat the sheet itself with a primer. For the adhesive solution, mix water with the mounting adhesive, following the instructions on the package. Using a drill attachment, mix the composition to a homogeneous mass, estimated at 10 kg. Glue for 1 sheet. Based on the size of the sheet - for a small sheet size, the glue is applied directly to the sheet itself, if the sheet is large, the glue is applied to the wall. Can be applied dotted or in large strokes.
Press the sheet itself very tightly against the wall.
To check for evenness, by leveling the sheet, there should be a zero mark.
After the glue has completely dried, the glued sheet can be secured with dowel nails, this will increase the service life and strength of the gypsum board. This is done by drilling a hole every 40 cm around the perimeter, inserting a dowel into the hole, and driving a nail into it. The head of the nail should sink into the drywall, but without damaging it.
Finally, putty is carried out, defects are checked, all heads of the screws must be tightened and not protrude beyond the level, the places where the screws are installed are puttied. Here you cannot do without reinforcing tape; it is pressed with a spatula for the first layers of putty onto the prepared joint, and then putty again. Next, the seams between the sheets are puttied. After drying, the putty is applied to the sheets themselves.
The end result should be a smooth, even surface without roughness or flaws.
Surface preparation
Leveling walls with plasterboard without a frame with your own hands begins with preparing the surface. Their durability depends on how the adhesive solution adheres to the wall. It is also important to repair all defects in the load-bearing foundations, because cracks, if they appear, tend to expand until the wall is completely destroyed, such as in aerated concrete.
Based on the fact that it is necessary to ensure good adhesion (adhesion) between the adhesive solution and the wall, preparatory work is carried out in the same way as for plaster (this problem is discussed in detail in the work “Preparation of surfaces for plastering”).
The accumulated experience shows that preparation should be carried out in stages.
1. All construction and installation work is completed: door and window blocks are attached, all types of cables are laid (electrical, telephone, fiberglass for the Internet, etc.), a heating system is installed, etc. At the same time, there is one exception here - the finishing coating of the floor is not performed, unlike plaster, where such a technological operation is considered mandatory (SNiP requirement).
2. The walls are cleaned of old plaster using a hammer drill or chisel with a hammer. Wallpaper is removed with a spatula and water, or, in extreme cases, with special removers that you prepare yourself or buy. If water and removers do not help, you can steam the old wallpaper with an iron. The paint is removed mechanically or thermally.
3. The walls are repaired - cracks are sealed with repair mortar, masonry joints, if necessary, are deepened and also sealed with either mortar or construction foam.
4. Various types of contaminants are removed from the walls: grease stains, soot, etc. Oil stains are removed with greasy clay, other contaminants are removed with a metal brush. Efflorescence, fungus, and mold are scraped off with a spatula and then treated with special solutions. It is advisable to wash concrete and brick walls with a 3-5% solution of hydrochloric acid to degrease, followed by plenty of washing with plain water.
5. Conditions are created for good adhesion of the adhesive mixture to the wall - concrete and brick are treated with deep penetration primers (Betonokontakt, Typhoon Master No. 100, etc.). The work is carried out in two passes.
The first time the primer is diluted with water in a 1:1 ratio and applied to the wall with a roller, paint brush, garden sprayer, etc. The second layer - after 3-4 hours on a wet surface, intermediate drying is not necessary. The primer is diluted in accordance with the manufacturer's instructions. Double application is necessary to saturate the wall with water to a depth of 2-3 cm.
But you can continue work only a day later, after the wall is completely dry.
Attention: it is useless to prime aerated concrete - the glue will come off the wall in any case. The technology is a little different.
6. The wall is hung - its verticality and the curvature of the surface are determined.
Cutting drywall
Cutting a sheet of drywall to size is not very difficult. Using a tape measure and a rule, cut lines are drawn along its surface with a pencil (marker). Using a construction knife with a replaceable blade, the first movement cuts the cardboard. To prevent the knife from going to the side, it is better to cut along the edge of a metal ruler or rule.
With subsequent movements, the plaster is cut through 1/3 of the thickness. Then it is placed vertically or placed on the table and breaks with a sharp movement. If the cut is made correctly, a light force is enough. If there are poorly made cuts, the work must be repeated, since there is a possibility of spoiling a narrower sheet - it will break.
The sheet broken along the cut is turned over and one side rises. In the resulting corner, the cardboard remaining on the reverse side is cut with a knife.
Sheet cutting.
When cutting, you should consider some nuances:
- The drywall should be 1-1.5 cm shorter than the wall in case it shrinks. The resulting gap will be closed either with a floor covering, if the work is being carried out in a new building, or with a plinth. As a last resort, they can be sealed with sealant or silicone;
Important: when attaching gypsum boards to the wall with adhesive mixtures, it is not recommended to allow horizontal seams. Therefore, before purchasing material, you should measure the height of the ceiling in order to buy sheets of the appropriate length. If it is impossible to do without a horizontal seam, then the sheets are attached in the same order as brickwork.
- In a new building, when the floor has not been laid, it is necessary to exclude contact of the plasterboard with the wet screed - the gypsum will be saturated with water and collapse;
- The edge of the cut is processed with a special plane - a chamfer is made on the outside of the sheet for filling the seams;
- Holes for switches and sockets are marked and cut out on a cut sheet;
- It is more convenient to cut curved lines for shaped obstacles on the wall with an electric jigsaw;
- When attaching a sheet to an opening in a wall (door, window), it is more convenient to cut the sheet already fixed. The incision is made not from the front side of the room, but from the back side.
Leveling walls with plasterboard using adhesive
Most often, installation is carried out using ready-made adhesives, which are diluted immediately before use, since they tend to harden quickly.
- If the walls are uneven up to 4 mm, gypsum putty is used, which is applied in longitudinal strokes using a notched trowel along the perimeter of the sheet, as well as in its center.
- For walls with curvatures in the range of 4–20 mm, use special plasterboard adhesive “Perlfix” from Knauf. Unlike putty, it is applied to sheets or directly to the wall not in stripes, but in piles, the height of which should not exceed 30 mm.
Consider the type of room where the leveling takes place; if it is, for example, a kitchen, and the wall will subsequently be subject to heavy loads due to the installed hanging furniture, we recommend gluing over the entire area. The same applies to the situation when tiles are glued to a wall lined with plasterboard.
- If we are dealing with a fairly curved wall, the unevenness of which reaches 4 mm, it is permissible to first glue an intermediate layer of plasterboard strips approximately 10 cm wide, which are installed in increments of 30–60 cm. Solid sheets are glued on top of them.
USEFUL INFORMATION: Installing a profile under drywall: doing the work yourself
Installation process
Installation of drywall begins from the most right angle.
- Along the entire perimeter of the walls near the floor, linings are made from pieces of drywall, which will be removed after the glue has dried.
- The sheets are pressed against the wall and gently tapped with a rubber hammer.
- When the glue has dried, the joints between the floor and ceiling are sealed with silicone. This cannot be done earlier, since the adhesive composition dries only with air access.
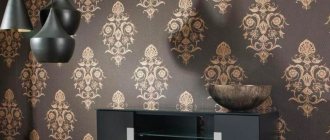
After all the necessary surfaces have been leveled, the seams between the sheets are sealed and reinforced using a special paper tape or sickle mesh, and then the entire surface of the plasterboard wall is puttied. Now the room is ready for final finishing. To do this, use decorative plaster, wallpaper, and tiles.
In the video below you can see the stages of work on leveling walls using plasterboard without using a profile.
As you can see, the process of creating perfectly smooth walls with your own hands using drywall, despite all its apparent simplicity, is quite complicated. Before you start, try to objectively assess your own strengths; if you lack knowledge, consult with professionals regarding the properties of the materials you plan to use, optimal primers and adhesives, watch several video tutorials.
We glue gypsum board sheets
After applying the solution, carefully take the sheet and press it against the wall. We press a little into the solution, first with our hands, as much as possible over the entire area, then we take the rule and press the sheet with the rule at the same time placing it vertically. It is more convenient to use the rule with a bubble level, but if there is none, study the wall in advance, determining where the vertical will be.
The drywall sheet must be leveled (from the edge of the sheet), this way you will avoid many problems with the subsequent installation of the sheets. If, after gluing the sheet, gaps have formed between the perpendicular wall and the sheet, then they should be sealed with the same solution; if the gap is more than 2-3 cm, then such a gap should be sealed with carefully cut pieces of gypsum board. In general, if you are leveling more than one wall, then there should not be such gaps, since you will also level the perpendicular wall.
The same applies to the gaps between the ceiling and the sheet, and the floor and the sheet; they should also be carefully sealed, if any. Since one sheet of gypsum board may not be enough in height, another sheet cut to size should be glued higher.
Having glued one sheet or one part, apply glue (solution) to the next part of the wall. If you managed to glue the drywall in more than one sheet in height, the second whole sheet should be placed under the ceiling so that the seams (joints) of the drywall do not coincide, so the structure will be stronger.
Sequence of gluing gypsum board sheets
As can be seen from Fig. above, gluing 1-2 sheets, measure, cut out, and glue the bottom piece of the sheet, the 3rd one.
How to cut gypsum board
Cutting gypsum board is very easy. Having marked the required size on both sides, we apply an even strip to these marks (ideally the rule) and with a stationery knife we forcefully cut (draw the knife with a little pressure) the sheet along the strip from one mark to another to a depth of 2-3 mm. Next, lift and break the sheet at the cut site. You can place the sheet on an edge, which will make it easier to break and cut. After the break, bend the sheet at a slight angle and use a knife to cut the cardboard at the break point on the other side.
If the cut was smooth and of high quality, it will break easily and evenly at the cut site. If there are any irregularities, this is not a big deal, the main thing is that there are no large irregularities, when when joining sheets, a gap of more than 3-5 mm will form at the place of the uneven cut. Irregularities at the cutting site can be smoothed out with the same knife or a gypsum board plane.
The pictures above clearly show how to cut a sheet of drywall (pictures are clickable).
Second and subsequent rows
Having glued one vertical row, we glue the second one in the same way, setting the plane as a rule, working as a rule over the entire area of the glued sheets.
We apply the rule in many places, achieving a flat plane with virtually no gaps
We fix the sheets in one plane, pressing and, conversely, lifting the sheet from the wall. The gap between the 2-meter rule and the sheet should ideally not exceed 2-3 mm. We pay special attention to the corners of the walls, places under the ceiling and above the floor, where floor plinths and suspended ceilings (or fillets - ceiling plinths) will be attached.
Sealing joints of gypsum board sheets
After you have laid out (leveled) the entire wall/room and when the solution has dried - a day later or the next day, you can start sealing the gypsum board joints. About sealing joints → a separate article has been written and everything is described there in great detail (follow the link).
Sealing joints of gypsum board sheets
Next comes the turn of finishing, but that's a completely different story. For example, you can → paint drywall with water-based paint without putty - this finishing method is quite cheap, the link describes this in detail. Ask questions, write comments, read other articles on the site!
Leave your tips and comments below. Subscribe to our newsletter. Good luck to you and good luck to your family! 12/28/2018 / Walls and partitions, CONSTRUCTION / Tags: Leveling walls, leveling walls with plasterboard, Drywall, plasterboard One comment
Video: installing plasterboard sheets on the wall using glue
Self-tapping installation
The method is more complex than the previous one, but the fastening is reliable, and the method is successfully used on walls with a large curvature. For this you will additionally need:
- Electric drill and screwdriver;
- Glue and polyurethane foam;
- A set of self-tapping screws and screws with washers with a diameter of more than 1 cm;
- Thick foam.
With the frameless method of installing plasterboard slabs, the ceiling height should not be higher than 3 m, since the technology does not provide for the installation of horizontal joints.
After priming the wall surface with all prepared sheets, the following actions are carried out:
- The plate is applied to the wall, and holes are drilled in it at a uniform distance from each other at 8-10 points, which are marks;
- The sheet is removed, and dowels are driven into the drilled holes at the marks;
- Foam rubber is glued onto the drywall 10-12 cm from the holes, which will act as a shock absorber during installation;
- The sheet is applied to the wall and secured with screws with washers on them;
- Using a level, the sheet is installed in a strictly vertical position by screwing or unscrewing the screws;
- The actions described above are carried out with all plasterboard boards;
- A hole with a diameter of up to 7 mm is made near each screw for injection of mounting foam for the purpose of fixation. Its supply is carried out blindly, and you first need to experiment with the dosage to get a spot with a diameter of up to 15 cm;
- All slabs are fixed with simultaneous control of their position using the building level;
- The screws are removed after the foam has hardened, and the remaining holes are filled with putty;
- The work is completed by standard puttying of the seams and then sanding them with sandpaper after drying.
Frameless leveling of walls with plasterboard slabs is a complex technology that requires knowledge of the properties of the materials used and skill in working in this area. You need to be able to choose putties and glue based on the conditions of the work and the characteristics of the surface on which installation will be carried out. You need to take on this task yourself if you have confidence in your abilities. Otherwise, it is faster and cheaper to entrust the repair to professionals.
Leveling wooden walls
I would like to separately consider the question of how to level walls with plasterboard in a wooden house. Usually in this case the walls are almost flat, so you can work using the first method. However, wood has its own nuance. You can use less adhesive, and additionally fasten the sheets to the wood with self-tapping screws. Some people recommend using nails, but you can overdo it and drive them in too hard, bending the drywall.
Self-tapping screws should be used carefully. They are driven flush with the gypsum board, but the screw will first attract the plasterboard to the maximum, and then only “drown” into the sheet. Therefore, it is worth considering whether it is necessary to use self-tapping screws in this case.
Also, do not forget about special primers for wood with antifungal additives. Before leveling work, the wooden base itself must be covered with a special waterproof mixture to prevent rot and mold.
Making the finishing touches
When the work is completed and the wall is leveled, you need to wait for the mixtures used to dry completely. This will take 2-3 days. Then you should putty all the joints. All places where gypsum from plasterboard protrudes must be covered with putty or acrylic sealant. This is done so that moisture does not penetrate into the sheet and it does not swell in the future.
Since no self-tapping screws were used, there is no need to putty them, which is a definite plus. Everyone will decide for themselves what to do next with a flat and smooth surface. The choice should depend on what finish will be used.
Average cost of work
By deciding to level the walls with plasterboard exclusively with your own hands, you can save significant money, because you will only have to spend money on materials and, possibly, tools.
Let's assume that we want to finish walls 3 m high in a room measuring 4 by 5 meters. To do this, we will need 15 sheets of plasterboard, 34 rack profiles, 6 guides, 136 hangers, a pack of dowel screws and a couple of packs of self-tapping screws.
MaterialPriceQtyAmount, r
| Drywall | 250 RUR/piece | 15 | 3750 |
| PS Profile | 90 RUR/piece | 34 | 3060 |
| PN profile | 70 RUR/piece | 6 | 420 |
| Suspension | 4 r/pcs | 136 | 544 |
| Dowel-screw | 300 r/pack | 1 | 300 |
| Self-tapping screw | 70 r/pack | 2 | 140 |
| Total | 8214 |
Not so much, considering the area to be finished is 54 m2. Naturally, we should not forget that for further finishing you will still need putty, serpyanka and other materials. Those who do not want to do this work with their own hands should be prepared to increase the price per square meter by another 300-500 rubles.
Sheet cutting
Before proceeding directly to leveling with plasterboard without a frame with your own hands, it is necessary to correctly cut the sheets. Their standard height is 2.5 meters, but the ceiling in the room can be higher. Then you will need additional pieces, which we recommend preparing in advance.
Drywall is cut according to the marks made with a pencil or marker. Using a construction knife, make an incision, then bend the sheet and carefully break it, making a similar cut on the reverse side.
If during your work you need to make shaped inserts from drywall, use a jigsaw for these purposes.
Keep in mind that it is necessary to leave gaps of 1–1.5 cm between the ceiling and the floor. To create such gaps, it is convenient to use drywall cuttings as a substrate.