Stone has been used for cladding the lower part of the facade since ancient times. And despite the fact that today a large number of modern materials have been developed, this type of finishing is widely in demand to this day. This material is attractive in appearance and practical in use. This article will describe in detail the main properties of natural and artificial stones, as well as the process of lining the base with these stones.
Facing stone
Facing stone for plinth
Facing the base with stone
The base is the above-ground part of the foundation.
Its basement decoration can be either contrasting to the main decor of the facade or not differ from the color of the building. In any case, the finishing should protect the foundation of the house from the destructive effects of external factors. Of the available material options for finishing the basement of a house, they use:
- Siding/lining;
- Natural/artificial stone;
- Plaster.
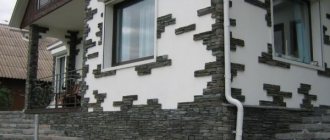
Of all the materials presented, natural stone is the most expensive option. There may be problems finding a specialist, since a beginner should not be trusted with the finishing process. With proper finishing, the building takes on a solid appearance. Finishing the base with stone harmoniously combines with most home finishing options in any style and does not lose its popularity.
A clear example of cladding a plinth with decorative stone
Let's talk about price
- The cost of cladding the base with natural stone, compared to plastering, will, of course, be somewhat more expensive, but the difference will not be big. You should also take into account the fact that the plastered zero level will have to be updated in a few years, regardless of the quality of the work. And properly laid natural material will last for many years without repairing the base.
- The price of material with minimal initial processing will not be very high. But if you want to purchase artificially aged stone or slabs with rounded edges for the base, the price will increase by an average of 40%. Since they will be additionally processed in a tumbling machine.
- If we talk about facade work, the cost of cladding the basement of a house with natural stone is relatively low. This is due to the fact that access to the zero level is free, plus the size of the level itself is, as a rule, not large. Therefore, it is quite possible to do this work yourself and significantly reduce the cost estimate. Next we will talk about the technology for performing this work.
High base.
Natural stone for finishing the base
When finishing the base with natural stone, it is worth considering:
- On one façade you cannot combine carbonate rocks, that is, dolomite, limestone or shell rock, with silicate rocks, which include sandstone and quartzite. Being nearby, these rocks interact and are actively destroyed.
- During installation, it is necessary to leave small gaps between them to allow freedom of temperature changes in the natural material. The size of this gap depends on the density of the stone. If a mixture of stones for the base is used in the cladding, then you should focus on the maximum value.
Advantages of stone in finishing the base
- Eco-friendly material – does not emit fumes;
- High strength and reliability - the service life of this finish reaches 100 years;
- Fireproof - stones are non-flammable and do not emit toxic substances at high temperatures;
- Moisture resistance - stone cladding can withstand both wet weather and cleaning without problems;
- The decorative properties are excellent - such decor looks solid and even expensive, emphasizing the financial situation of the home owners.
Varieties of natural stone
Depending on the chosen option for finishing the plinth, it is necessary to pay attention to the surface treatment. The ease of use and appearance of the material depend on this parameter. Choose from the following options:
- Untreated materials have a rough surface;
- Sanded – smooth and with a slight relief;
- Polished – these tiles are perfectly smooth and shiny;
- Crushed - this surface has a noticeable relief, externally reminiscent of slabs of artificial stone.
When choosing a species for finishing the base, you should pay attention not only to the appearance, but also to the parameters that will affect the care of the foundation. This part of the house is regularly exposed to contamination, so the material used to finish the foundation should be able to withstand wet cleaning without any problems. This is why textured slabs are not the best choice, as they require more effort to keep clean. The same can be said about light-colored tiles - dirt and stains are more visible on them.
Types of natural stones that are used for cladding the base
Material selection and basic recommendations
There is a large assortment on the market for plinth cladding. But first of all, we are guided by the available budget, which is most often limited. In this case, you should choose quartzite, shell rock or sandstone. And if the homeowner can afford a more expensive finishing option, then consider eye-catching granite. There are exclusive options that make the finishing prohibitively expensive and belong to the luxury class. But in most cases the following options are used:
- Wild stone is slate or quartzite; their dense structure ensures resistance to destructive environmental influences. The color range is wide and varies from light to dark shades, and spectacular veining is often found. If desired, you can use slate in a mixture with other rocks, but they must be from areas with the same climatic conditions.
- Shell rock is also quite durable, but cannot boast of a variety of shades - there is only a yellow color. The presence of porosity implies mandatory treatment, which will protect the pores from clogging with dirt.
- Sandstone - sand-colored tiles and blocks are also popular, but the strength of the material is not the best.
- Granite combines both a spectacular appearance and good parameters; in particular, the rock tolerates temperature changes and high humidity.
- As for the most budget-friendly decorative stone, you can easily make it yourself from concrete. The foundation will have to be painted, imitating the natural structure. Even though outwardly such a coating will look like a natural material, for a professional the difference is obvious. Moreover, do not forget about the durability of such finishing. However, if finances are limited, but there is a desire to give your home an elegant, attractive and solid look, then this is the option that is worth using. Moreover, even a beginner can cope with the implementation of the technical process, while for installing stone it is better to hire a professional.
Both slabs, blocks, and small tiles are available for sale - the latter option is the most attractive because it minimizes installation costs.
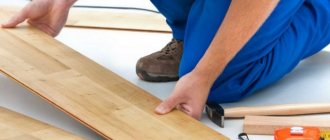
Preparation, necessary materials and tools
Depending on what material you choose, preparation will differ. So, for a brick plinth you don’t need any tricks, you can install it right away, but with other varieties it will be necessary to level the surface, and this will require the appropriate tools. Traditionally, the base is leveled using a concrete screed. For this procedure you will need:
- special sealant;
- primer and a couple of beacons;
- profiles and quick-hardening adhesive solutions;
- concrete solution 1 to 3.
Tools:
- tape measure for measuring distances;
- spatula for applying an adhesive layer;
- level;
- rule.
Don’t forget to prepare the appropriate material
Grouting and finishing
After direct installation, it will be necessary to grout the joints, hiding them from an external observer. Then the finishing begins, when the “sharp corners” of the material are cut off, it is polished and, if necessary, tinted or a protective layer is applied.
Cladding the base with natural stone
Preparatory stage
to cladding the base with natural stone with your own hands. But for this you need to choose the right binders for installation. It does not have to be a cement-sand mortar. Currently, the construction industry offers a large selection of adhesives - they are more expensive, but more effective than traditional cement-sand mortar. Savings in this case are not welcome, since the large weight of the finishing material in some cases can cause destruction of the masonry. Therefore, the choice of adhesive composition directly depends on the selected breed:
- Low-porous quartzite and dark granite do not absorb moisture well, so they can be laid on any composition, be it glue or mortar.
- Dark marble, sandstone, and light granite have medium porosity, so they can be laid on mortar only in warm and temperate climates. If frost is expected, it is better to choose glue.
- Travertine, white marble, white granite, limestone are highly porous, and under no circumstances should they be laid on cement-sand mortar. For these materials, only special glue is used.
Necessary tool
We prepare a suitable set of tools for finishing the foundation of a private house. It is worth including the following:
- Rubber mallets;
- Putty knife;
- Building level;
- Accessories for mixing the solution;
- Grinder – using a special disc we will cut the slabs;
- Paint brushes.
Preparing the walls
The technology for finishing the base directly depends on the selected material. It is worth considering the option of fastening slate, since it makes up the majority of the market for facade cladding materials:
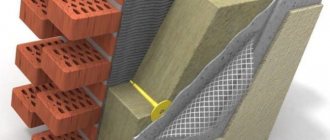
- First, you need to assess the condition of the foundation, since the cladding weighs quite a lot. Ideally, natural stone is mounted on a solid strip foundation. As an option, a plinth made of FBS blocks is also suitable. It is necessary to make sure that the surface is even, knock down the beads, rub the seams and cover it all with primer for optimal surface adhesion - apply primer in 2 layers.
- It is very important to choose the right material with which the pieces will be attached to the base. During installation, it is important to choose the right solution and, if necessary, even reinforce the surface, which will simplify load distribution. The base can be reinforced using a chain-link mesh with medium or small cells. It is enough to attach the mesh with dowels and wide washers.
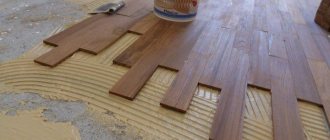
Finishing the base with natural stone: step-by-step instructions
The facing stone for the plinth is mounted only on a flat surface.
Let's look at the first option for installing natural stone for finishing the plinth.
- When choosing tiles in a store, you need to pay attention to their thickness and size. They may be different. The specialist recommends giving preference to models up to 30 mm thick. The first thing to do is to decompose all the purchased material into three parts, sorting the pieces by size.
- After this, we first lay out the mosaic on the ground - such a blank will allow you to quickly lay out the base, because the construction glue sets very quickly.
- To begin with, the lower support row is laid out, which are attached not only with glue, but also with anchor bolts. This is necessary so that the finish does not sag over time.
- As for the general layout system, we first glue the large fragments, and carefully fill the rest of the space between them with small and medium-sized pieces. Leave the necessary space between the pieces.
- Once the pieces are laid and the glue has set, you will need to caulk the seams. Use a special grout - it should be matched to the color of the rock.
- The final stage of finishing the base is varnishing. If such a stage is present in the technological process, then it can be started only after 3-4 days after the masonry has been completed. During this time, all materials used will be completely dry, and it will be possible to apply 2 layers of waterproof facade varnish.
Dry styling
A separate type of preparation is to put together a mosaic drawing. For convenience, make an initial sketch on paper, where the dimensions, transition boundaries, and shape are indicated. The material is first laid out on a dry, flat sandy area. Advantages of the demo version: you can change places, adjust, adjust the drawing. If necessary, cut or trim the edges using a grinder with a special attachment. In this case, it is necessary to securely secure the tile with a clamp.
Be sure to take into account the space between boundaries. We are talking about technological tolerances. Half a centimeter on each side. If the distances on the seams are not taken into account, and the elements are laid out closely, then a bevel will be obvious towards the top rows. The edge will either rise up or “fall” down. With seasonal temperature changes, natural stone expands or contracts. The seams compensate for micro-movement and the styling remains even.
The space between large pieces is filled with small elements. The difference in surface textures is taken into account. The flat and smooth side will be adjacent to the wall.
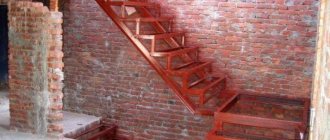
Finishing the base of a wooden house
A stone base in a wooden house looks impressive, so it is not uncommon. Before performing such finishing, you must ensure the following:
- The house has undergone shrinkage, which means that the logs will not change their size. Otherwise, the masonry will be deformed.
- We treat the logs with an antiseptic - this will prevent the formation of rot and other types of pest damage. It is also worth using fire retardants, which will increase the fire safety of the building.
- We carry out waterproofing steps without fail. To do this, it is enough to cover the logs with bitumen solution; you can use a special membrane.
- To evenly distribute the load on the wooden plinth, we use a reinforcing mesh that is attached around the perimeter of the house.
- Laying stone tiles is done using elastic adhesive, leaving the necessary space between the constituent elements.
- We seal the seams between the pieces.
- We cover the finish with moisture-resistant colorless varnish.
Processing degree
Harvested natural wild mineral can be pre-processed and left as it is – unprocessed. Without processing, the pieces are supplied in the form of sheets, cobblestones, and pebbles. Large gaps are filled with pebbles, achieving a uniform thickness of the seam between large parts, including other types.
An unusual effect is created by combining tiles and strips
According to the form obtained as a result of processing, they are distinguished:
- Tile. Cutting is done to size. The perimeter comes with a pin;
- Tumbled stone. On tumbling equipment, a rotating drum rounds off sharp edges;
- Gorbushka. A flat plane is achieved on one side for ease of installation, the remaining sides have a natural relief;
- Strip. Cut elements 3-5 cm wide.
Any prepared natural cladding of the house significantly speeds up installation work.
The outer cut of the façade according to the degree of processing is:
- Polished. Smooth, shiny surface;
- Polished. Smooth, with the presence of slight roughness, structure;
- Rough. No processing;
- Chipped. Ragged chip line.
How to further protect the surface
Despite the high performance characteristics, maintenance of a stone plinth is mandatory. In particular, a special soap for stone is used to wash the finish - it not only cleans the surface, but also helps preserve the natural color of the natural material and even forms a protective layer on the surface. This is the product that needs to be used to treat marble, granite and travertine.
Caring for porous surfaces involves a filling step, which closes the pores, preventing them from becoming clogged with dirt. The filling is a transparent acrylic film that closes all pores. After the procedure, even porous material acquires water-repellent properties. This surface is less dirty while remaining attractive.
Before using any product, you must carefully read the instructions, since not all compositions are suitable for all types of cladding. In particular, it is enough to wipe durable rocks with a cloth periodically, but it is undesirable to use chemicals for cleaning.
In general, it can be noted that facing the base with wild stone looks attractive, but such decor requires systematic maintenance. Only in this case can you obtain a durable, durable and beautiful coating.
Kinds
Currently, there are many types of finishing stones to suit every taste.
Based on a number of characteristics, natural stones of igneous origin are chosen for this task - gabbro, granite, labradorite, dolomite, shungite, lemezite. Sandstone and quartzite (dark) are widespread.
- Marble is significantly inferior in its ability to maintain an attractive appearance for a long time in open spaces, so it is more used for interior decoration.
- Granite has received widespread practical use for its varied patterns, rich colors, and the strength of the igneous rock. The finishing of the house is highly polished, and its service life is calculated in hundreds of years.
- The next most popular is sandstone. In terms of color variety, it is inferior to granite, a more budget option. Many historical buildings are built from this sedimentary rock.
- Shell rock is stronger than sandstone. Needs external protection, as it is a porous material.
- Quartzite, slate are resistant to weather changes, a wide range of colors with veining. One condition is that the climatic zone of production must coincide with the climate of construction.
- Rubble stone, like rock, has a good decorative appeal in fragments of various shapes.
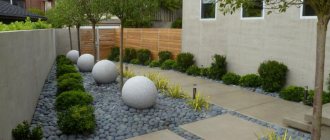
- The natural wild mineral is used not only for finishing the basement, but also for creating a landscape design complex for the yard (borders, paths, fountains, patterns on the lawn).
Decorative brick
To equip a base made of decorative bricks, a separate base is prepared from a sand-gravel mixture and several layers of waterproofing.
To prevent subsidence, it is necessary to use a rigid connection with the load-bearing wall using reinforcement with a diameter of 8-10 mm.
Bricks are laid in spoon rows. To eliminate cold bridges, a heat-insulating layer is laid between the masonry and the base.
Useful tips
- Cladding the walls with stone can begin after the house has completely settled. This usually takes six months.
- This process is the latest, that is, it is carried out after all other stages of building a house have been completed.
- For a homemade mortar, it is best to use Portland cement of at least M300 and washed coarse sand.
- One of the main requirements for the solution is the absence of efflorescence. Therefore, it is recommended to add plasticizers to the cement mixture. Please note that you cannot add plasticizers based on sodium chloride; efflorescence will still appear.
- The process of cladding house facades is messy. Therefore, it is worth covering the front sides of stone tiles with protective materials. If the surface of the stone is polished and smooth, then paper is glued onto it. If it is polished and porous, then you can spread a clay solution. After completion of work, the protection is removed or washed off.
- Multi-storey buildings are faced with stone tiles a little differently. After all, the load on the first rows can be very large. Therefore, in the process of laying the cladding, it is necessary to use special metal products: pins, staples, clamps and others, which must undergo anti-corrosion treatment (for example, painted).
Cladding the facade of a house with stone is a very complex and time-consuming process. It takes a lot of time, you can't lift the finish high in one pass. The higher the installation height, the greater the load on the lower rows of tiles, which will not be able to withstand it. Therefore, it is very important that the lower rows set well and the fastening solution dries out. It is better not to engage in this process if you are not a specialist. The quality of the final result will depend on the qualifications of the work performer. Which, in the end, will affect the cost of the finishing process itself.
Rockery
The rock garden is created on a flat area; for this you will need to build high flower beds made of stone. The main varieties of rockeries imitate the landscape of a mountain valley or meadow, but rockeries in the form of a mixborder are also common.
Quite large travertine, slate or limestone boulders are placed in a chaotic manner, singly or in small groups. For better stability, they are dug into the soil. For decoration, decorative fills from the same rocks are used.
Limestone
Limestone is found in white, gray and cream shades. Wind and water grind its sharp protrusions, smoothing out the roughness. Faults and cracks often appear in it, which can be used for planting plants. Moss and algae often grow on this stone.
Dimensions
The most commonly used tiles are 20x20 cm or larger.
Finishing stone can be of very different sizes. For ease of installation, it is made in the form of slabs or blocks. One fragment is 0.2-0.5 m, thickness - from 1 cm. Obtaining smaller parts, changes in shape are achieved with a circular saw, or by chipping.
The edges can have smooth transitions, relatively even. The broken edges of the rubble facing element will increase the time of working with the stone. One side will be fairly flat. It is placed on the mortar/glue to the base of the house.
The adhesive composition can only be used with stone with an area of up to 40 cm², 1 cm thick. More massive fragments for cladding need to be fixed with a solution with careful sealing of the seams. When purchasing, it is correct to increase the estimated amount of material required by 1.1 times per cut, fitting according to the drawing.
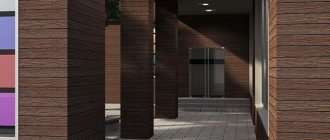
Polymer-sand slabs
A relatively new method of cladding. Very light (suitable for a base with a small load-bearing capacity) and plastic. It is attached using a lathing, inside of which insulation is placed.
Installation must begin from the lower outer corner. For fixation, ordinary screws are used.
DIY stone flowerbed
The simplest option for decorating a flower garden with stones is to lay them around, lightly pressing them into the soil. With a certain skill and taste, very aesthetic flower beds are obtained, despite the simplicity of the technology.
Stones of different textures and sizes can be scattered near the flowerbed and try to create an imitation of a mountain landscape.
You might like the idea of creating a high border. The technology for its creation involves digging trenches with a depth of about 40-50 cm and a width commensurate with the parameters of the pebbles used.
Roofing felt or polyethylene is laid at the bottom of the trench, and then work begins on creating a concrete foundation, although it is not required for a low curb; you can get by with large stones and a 10 cm layer of sand.
Having laid the foundation, they proceed to the construction of the wall. Based on the shape of the stone elements and the height of the wall, choose dry masonry or with mortar.
When laying, care must be taken to ensure that there are no cracks or gaps.
Although several specially made holes in the wall will serve as a drain for excess water. Having finished building the walls, you can fill the area with soil and begin planting plants.
Travertine
Essentially a type of limestone, it is very porous in nature and therefore air and water pass through it well. Like limestone, it is great for mosses and ground covers. Moreover, you can plant it directly on a stone, for which you make a hole, fill it with soil and plant the plant. When the plant takes root, it will begin to grow and entwine itself around the boulder.