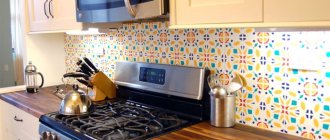
In some cases, laying tiles on GVL is considered the most appropriate option for surface cladding. Tile is a finicky material that requires a leveled base. In addition, it is most often used in rooms with high heat and humidity conditions, that is, in the bathroom and toilet. And for such conditions, a gypsum fiber sheet with special improved properties, called GVL, is just suitable.
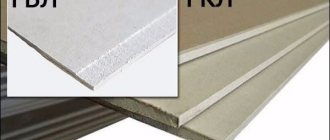
GVL differs little from ordinary drywall in many external parameters (with the exception of the color: for gypsum board it is gray, for gypsum board it is greenish). However, there is a difference, and it is based on the degree of density of the sheets. In this regard, gypsum fiber takes a more advantageous position, since it is very difficult to break. It is precisely the quality of strength of GVL that is responsible for the fact that it is chosen as a tile base for the floor.
Preparation
Proper preparation is a prerequisite for successful installation.
Tile selection
Choose only high-quality tiles from well-known manufacturers.
Choosing tiles is not as easy as it seems. Low-quality or counterfeit tiles can create an incredible number of problems that neutralize all the advantages of the gypsum plasterboard base. (See also the article Bathroom Tile Design: Options.)
Therefore, we advise you to take note of the following points:
- There is no absolutely even tile, however, the degree of unevenness is a good criterion for identifying low-quality material . Place the two tiles back to back and see how tightly they fit. If the tiles wobble or the gap between them is easy to notice, it is a low-quality product.
- Pay attention to the pattern; a good tile has a clear and high-quality pattern . If the front side is blurry, has many small flaws, or the lines do not match when joining, do not buy such a tile.
- The corners must be perfectly straight. Apply the tiles to each other with different sides and see how correct its shape is.
- The wrong side or back side is also important; the pattern and manufacturer's mark should be clearly visible on it . If they are difficult to see, most likely you are looking at a counterfeit product.
- The hardness of the tile is quite difficult to determine by eye; you can only listen to the sound the material makes when struck lightly . Normal tiles should sound dull. Overheated tiles usually have a shiny backside and uneven color on the front side; you should not buy such tiles.
Advice! When counting tiles, it is better not to be lazy and count individually, and not by meter. This is especially true when buying expensive tiles, especially since the bathroom is not so large that such a calculation would seriously complicate the work.
Glue selection
The service life of the coating depends on the quality of the glue.
Before laying tiles on drywall in the bathroom, it is important to choose the right adhesive. (See also the article Is it possible to glue wallpaper on drywall: pros and cons.)
Let's consider three possible options for combining drywall and ceramics:
- Cement based adhesive . Cement is not used to work with plaster, but since the plaster is covered with paper, this material is quite acceptable. The price of such glue is low, it holds quite satisfactorily.
- Elastic tile adhesive . Almost all tilers highlight this particular option among others.
- "Liquid Nails" . This is a very durable, but also expensive way to fix tiles. Typically used for repairs when it is necessary to glue one or more loose tiles. For the bathroom it is necessary to use moisture-resistant brands.
Primer
Drywall must be primed.
Before gluing bathroom tiles onto drywall, apply at least two coats of primer.
Advice! The selection of primers in modern large construction supermarkets is simply amazing. We recommend Mira 4120, Tifengrund Knauf.
Preparation of glue
We choose glue from the following types:
- cement-based adhesive is economically acceptable, but does not always meet the requirements of water resistance;
- elastic glue - a more expensive, but at the same time higher quality option;
- Liquid nails are the most expensive option; I advise you to use them only in places with a lot of load on the tiles, where they most often fall off.
Most often we use elastic glue, but the choice depends entirely on the person’s wallet.
If the glue mixture is liquid in the bucket, then it is ready for installation. If the mixture is dry, it still needs to be prepared. The algorithm is like this. Pour the mixture into a container of water in small portions, while at the same time stirring it with a drill mixer.
From my experience, I will say that you don’t need to pour a lot of the mixture at once, because it will be difficult to mix it immediately to the desired consistency, while avoiding the formation of lumps of glue.
As a result, we will end up with a mixture that is not very liquid, so that it does not spread over the surface, but also not very thick, so that it is not difficult to stretch. After preparing the adhesive mixture, we can begin installing the tiles.
Sequence of work
Preparation is no less important than the installation itself.
Stage 1: preparatory
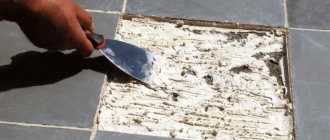
Before laying tiles on drywall in the bathroom, you need to carefully prepare the surface. To do this, using an even spatula, you need to putty all the joints between the gypsum board sheets.
For work, use a special putty for joints, for example, KnaufFugenfuller. Also, for strength, the seams can be covered with reinforcing tape (serpyanka).
Also, laying tiles on drywall in the bathroom requires the correct choice of installation scheme. To do this, the length of the row is divided by the width of the tiles, taking into account the gaps. If the remainder exceeds half the width of one tile, installation should begin from the corner that is visible. Then the trimmed edge will be hidden in a less noticeable corner.
If the remainder is less than half of the whole tile, installation begins from the center, and the trimmed tiles fall on the corners, but look symmetrical.
Stage 2: preparing glue
The glue is mixed in a plastic container using a drill.
If the tiles in the bathroom are glued to drywall using a dry mixture, it must be prepared correctly. To do this, pour 1/4 of the volume into a clean plastic container, add the mixture to the water and mix with a mixer. Knead at low speed, otherwise the mixture will set quickly.
Advice! As practice shows, it is better to prepare the amount of glue needed to lay a maximum of 2 m². For beginners, it is better to cook no more than one meter.
The consistency of the glue should resemble thick sour cream.
Stage 3: laying the first row
It is important to constantly monitor the surface for unevenness.
At the height of the second row, we fix the rail on the wall, as shown in the photo. Using a level, set the rail strictly horizontally.
We lay the first tile on the plank and move in horizontal and vertical directions. We adjust the distances between the tiles with crosses.
Important! The space between the tiles must also be filled with glue.
In this way, we cover the entire wall with tiles, remove the slats and lay the bottom row.
Advice! We lay the tiles in several stages, no more than 5 rows in one go. We take a break of 45–60 minutes, this allows us to relieve stress in the base sheets.
Stage 4: grouting
Proper grouting is the key to a durable coating.
After laying, let the glue set a little and unstitch the tile seams. To do this, we use wooden or metal jointing. The seams should resemble grooves, which we will fill with grout. (See also the article Plasterboard putty under wallpaper: how to apply it yourself.)
After jointing, we wait a day for the glue to completely polymerize. Take a rubber spatula and fill the joint space with grout. To do this, grout is applied diagonally from top to bottom at an angle of 45°.
Leveling the walls with plasterboard in the bathroom under the tiles makes it possible to achieve a fairly even surface, which significantly saves grout. For the bathroom it is better to use epoxy compounds. Also, after work, the seams can be treated with silicone or liquid glass.
Requirements for drywall
It is better to use special drywall for wet rooms.
For wet rooms it is better to use moisture-resistant grades of drywall - GKLV. This material does not change shape at high humidity, does not swell and does not require special installation conditions. Drywall under tiles in the bathroom should be of this brand.
Laying tiles on drywall in a bathroom with your own hands requires the work of an amateur who is unlikely to cope with the deformation of ordinary plasterboard when moistened, so it is important to choose the right gypsum.
Features of GVL base
First, let's figure out what GVL is. Everything here is quite simple, since these are the same sheets, the only difference being the improvement. In particular:
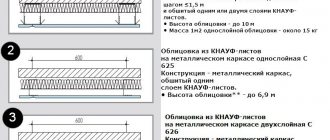
- The first difference is the absence of a double-sided frame.
- In addition, the gypsum itself is reinforced using special cellulose components.
- There is also a high level of moisture resistance and fire resistance, higher than that of gypsum plasterboard.
GVL sheet with edge, for quick installation
Conventional gypsum plasterboard sheets, which require double flooring with overlap and gluing.
It should also be noted that it has greater strength, which is why gypsum plasterboard sheets are used as a dry screed base. In cases where work is carried out in damp rooms, specialized gypsum plasterboard is used, which has a higher level of moisture resistance.
Directly for high-quality performance of work, it is necessary to fully comply with the technology, which involves the step-by-step implementation of the following steps for laying gypsum fiber board on the floor.
Is it possible to glue tiles to drywall in the bathroom: instructions and nuances
The decoration of the bathroom is not as varied as in the case of other rooms, since functionality comes to the fore there. The walls and floor in this room should not absorb moisture, and should also be cleaned as quickly and easily as possible. And tiles are the ideal solution to the situation in this case. Therefore, today we will look at the question of whether it is possible to combine tiles and drywall in the bathroom and whether it is necessary to do this at all.
Disadvantages of gypsum fiber
- Price. GVL sheets are an order of magnitude higher than gypsum board sheets. But considering the technical characteristics and service life, it is better to overpay once than to change the floor every few years.
- Rigidity. Gypsum fiber is a very hard material. Therefore, it will not be possible to use it in a curved form. For figured coverings it is better to use plasterboard.
Such modern material as gypsum fiber is widely used on an industrial scale. It has positively established itself in the construction market. Therefore, in the modern world it is in great demand, despite the price.
Why drywall
We have repeatedly heard that drywall is very afraid of moisture. And this is true - the gypsum in its base is unlikely to be able to resist high humidity, or even direct exposure to water. However, some points still make us pay attention to its use in decorating a bathroom:
- Tile must be laid on a perfectly flat surface, and drywall is the simplest and most effective way to provide such a surface;
- There are many elements in the bathroom that we would like to hide, such as pipes. Plasterboard boxes are ideal for this. In addition, based on this material, you can create various functional interior elements, such as boxes and shelves;
- There are types of gypsum boards suitable for use in rooms characterized by high humidity. Special moisture-resistant types of drywall (GKLV), known for their green color, can serve you in the bathroom or kitchen for quite a long time if installed correctly.
The disadvantages of this approach are that sheets of this material, if they are not glued directly to the walls, are usually mounted on a frame. And this takes up free space in our bathrooms, which for most are already quite small.
Features of GKLV
- The following helps this material to successfully resist high humidity and be suitable for laying under tiles:
- Water-repellent coating on the outside;
- Antifungal and hydrophobic additives directly into the gypsum part.
Rules for installation and operation of gypsum boards in the bathroom
- Moisture resistance does not mean complete protection against high humidity. Over time, any protection may weaken and the material will begin to deteriorate. Therefore, constantly high humidity in the bathroom is unacceptable, and good ventilation is necessary, or better yet, an exhaust hood;
- All joints, corners and outlets for communications must be treated with sealant or mastic with water-repellent properties. This way you can provide protection against moisture penetration into the most vulnerable places of the gypsum board. We proceed in the same way with the heads of the self-tapping screws, with the help of which the sheet is mounted to the frame;
- The ideal solution would be to treat the entire surface of the drywall with antiseptic impregnation and a primer with water-repellent properties. At the same time, the primer will also provide more convenient further finishing.
Important! Since the tile itself is quite heavy, it is better to use two layers of drywall instead of one. This way you will also protect the walls from unexpected impacts, which can sometimes break the sheet. Layers should be overlapped to ensure maximum strength.
Learn more about hiding communications
When using metal pipes, hiding them from view is extremely important to ensure protection against corrosion and condensation. The ideal way would be to wrap the pipes with mineral wool. In this case, it is best to treat all metal components with a primer and paint them in two layers.
We should not forget that even if communications are hidden, we must still have access to them. So the installation of a portal hatch at the installation site of meters and taps that shut off the water supply is mandatory. There are now ready-made versions of such hatches on the market, which are as inconspicuous as possible due to the absence of protruding elements and the possibility of finishing in the same style as the surrounding space.
Some tips for installing communication boxes:
- You should not make these elements too cramped, even if your toilet or bathroom is of very modest size. The distance between the pipes and the inner wall of the box should not be less than three centimeters;
- Installation of the frame of the box, as in the case of the rest of the walls in the bathroom, the best option would be a galvanized metal profile;
- Installation of vertical posts and horizontal jumpers for the frame under the gypsum board in the case of a bathroom is best done in increments of 40 centimeters. At the same time, the sheets themselves adapt to the frame elements in increments of 25 centimeters.
Laying tiles on plasterboard in the bathroom
Having covered the bathroom with plasterboard sheets, we need to carry out further finishing. And if it is a tile, then it is imperative to treat the surface of the sheet with water-repellent primers, which must be applied in two layers and with antiseptic compounds.
What adhesive can be used to lay tiles on drywall? At the moment, there are three options: a dry mixture, which we dilute with water, universal in its ability to attach any and all liquid nails, as well as a cement-based adhesive composition, which interacts especially well with the paper surface of gypsum boards.
In this case, it is best not to use a conventional mortar based on cement and sand, prepared with your own hands. Moreover, there are many extremely attractively priced and effective analogues on the market today.
As for the installation process itself, it is no different from what happens in the case of other surfaces. On the contrary, in the case of drywall, the work is even easier. However, it is necessary to pay attention to the quality, since it determines whether the tile will allow water to pass through. All joints must be as tight as possible. In general, the process consists of the following stages:
- Selecting a laying scheme. If it is vertical, then we start from top to bottom so that the cut pieces are less noticeable. In the case of horizontal markings, we start either from the center of the wall or from a corner that is in plain sight;
- We apply markings to the wall, drawing horizontal and vertical stripes. In this case, the markings should be as even as possible, for which we use levels and plumb lines;
- We mark where the bottom edge of the first row of tiles will be, and attach a straight wooden plank there. The latter will play the role of support so that our tiles do not slide until the glue sets. Subsequently, this row of tiles will serve as a support for the others if they are located higher;
- Ceramic tile adhesive is applied to a small section of the wall. There is no need to mix a lot of glue and treat large surfaces with it, since the composition dries quickly. It is best to level the glue with a notched trowel;
- We install the tile, lightly pressing it into the adhesive base. You can maintain the distance using cross-shaped inserts;
- After laying out the first row, you need to wait about an hour for the glue to set as securely as possible;
- Grouting of joints is carried out only two days after completion of work. It is best to process the seams diagonally, this way we will distribute the material into them as efficiently and quickly as possible, and the excess will be easy to remove. Good grout resists moisture very well, but the best results can be achieved when using latex options. In addition, seams are often treated with water-repellent varnish or liquid glass. The latter must be applied as carefully as possible and the excess must be removed quickly, as otherwise marks may remain on the surface of the tile.
- It has a perfectly flat surface that does not need to be further leveled before finishing;
- High degree of strength. Even such heavy materials as ceramic tiles are mounted on drywall;
- Plasticity, which corresponds to the level of wood. That is, the driven nail will be securely held in the drywall without crumbling the material.
However, in the bathroom you can only use certain brands of drywall, which contain special substances that impart moisture-proof properties. All surfaces exposed to water - walls near the sink, bathtub and shower, floors and the lower part of the walls - should be protected by a waterproofing system applied under the tiles to the drywall in the bathroom. Elastic waterproofing mastic is used under the tile facings and waterproof tape to seal the seams.
The first layer of waterproofing is applied no earlier than 4 hours after priming.
Subtleties of the facing process
To properly glue the tiles to the gypsum plasterboard, the solution is applied not directly to the tiles, but to the surface of the base. For this purpose, the adhesive composition collected with a spatula is distributed in an even layer over the floor. In this case, the glue covers an area of no more than 1 square meter. Then they take the tile and place it at the corner from which the layout of the diagram will begin. The tiles are pressed tightly, which ensures optimal adhesion of all surfaces to the adhesive. Then, using a level, the levelness of the element is checked. When protruding the edge, take a rubber hammer and tap the tile on top, trying to give it the desired location on the surface.
Sometimes during installation a small mistake may occur - the tiles may sink. Then the recessed element must be removed and placed again. According to this principle, the entire surface of the base is laid out sequentially. After each element, be sure to check how it is laid relative to the previous ones.
How to glue tiles onto drywall in a bathroom: selection of materials and installation instructions
The disadvantages of this technology for finishing bathrooms include the fact that the usable area of the room is reduced due to the creation of a frame from a metal profile necessary for attaching gypsum boards.
- It is best to cut this way they will be less noticeable.
- If the tile also needs to be cut in width (a whole tile in one of the corners is not included), then laying begins from the freest corner, and it is best to cut in a corner crowded with furniture. You can also calculate that the tiles are cut on both sides of the wall, as well as below and above, to the same distance.
Two options for laying tiles. You can often hear that for wet rooms, instead of drywall, it is better to use gypsum fiber (GVL) sheets. Let's briefly look at the differences between these two materials.
- Construction level, tape measure and marker.
- Tile cutter or grinder.
- Spatulas with smooth and serrated edges.
- Construction mixer or drill attachment for mixing dry mixture.
- Distance crosses for setting equal spacing between tiles.
- Self-adhesive mesh (serpyanka).
- Container for preparing glue.
- Rubber spatula.
- Moisture-resistant grout for joints.
If you do not have the skills to work with gypsum fiber, then to do wall cladding in the bathroom with your own hands, it is better to use moisture-resistant plasterboard (GKLV). This material is easy to work with, and when sealed with moisture-resistant grout, it can last for a very long time.
Puttying plasterboard base
The plasterboard base for the tiles must first be prepared. First you need to clean the surface of the gypsum board from dust and other contaminants that arise during the installation process. Plaster for drywall can be prepared from a dry mixture or use a ready-made liquid composition.
Installation of drywall to walls
The plaster is applied with a spatula with a smooth edge to the seams between the gypsum board sheets. Distribute the plaster carefully so that all cavities are tightly filled. It is necessary to avoid the formation of tubercles of the mixture on the seams when applying plaster. They definitely need to be aligned. The joints between sheets of material can be sealed with reinforced tape.
Preparing the plasterboard base for putty
It is recommended to choose high quality plaster for joints, for example, Knauf Fugenfuller. If it is necessary to eliminate surface damage to plasterboard sheets, then use plaster for surface finishing.
Plasterboard putty
After the first layer has dried, apply a second layer of plaster. The dried surface of the seams is treated with fine-grained sandpaper.
How to properly glue tiles onto drywall in a bathroom
- White, gray - common material, suitable for flat surfaces in dry rooms.
- Green is a moisture-resistant material for use in rooms with high humidity.
- Pink – fireproof material.
Tiles with a hard texture are not subject to deformation when temperature and humidity increase. You can determine it by lightly tapping, a dull sound is formed. If the walls are uneven, you must use a metal base for fastening. Wooden is not suitable for high humidity, as it deforms over time. If the plane is relatively flat, then the material can be glued.
In both cases, it is necessary to install a waterproofing layer in advance. Liquid nails are also actively purchased for finishing drywall tiles in the bathroom. Made on a water emulsion, it prevents the spread of mold and mildew and does not change when in contact with humidity. This glue is sold ready-made, which simplifies working with it. It also dries quickly, but some mixtures contain toxic substances.
Working with it predisposes the use of IZ means. When buying drywall, take into account its size and thickness. Rectangular sheets are available for sale with a length from 2 to 4 meters, a width from 0.6 m to 1.2 m, and a thickness from 6.5 mm to 24 mm.
Area of use and varieties
If you need a high-quality finished bathroom, finishing with glvv plates will be the best option for leveling the walls, floor and ceiling. GVLV, like drywall, is divided into several types. By area of application it is divided into:
- floor;
- wall.
According to physical characteristics, it is divided into: Are you thinking about how to cover a bathtub with plasterboard? Work procedure and installation recommendations
- ordinary;
- moisture resistant.
Floor or wall slabs differ from each other not only in thickness, but also in size. For the convenience of laying dry screed, smaller slabs of 1500 x 1000 millimeters are used, while standard wall sheets are produced with dimensions of 2500 x 1200 millimeters.
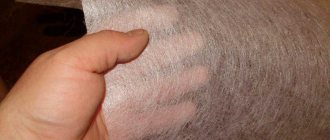
The use of gypsum fiber has already become widespread among large construction companies, so the advantages of this material when finishing rooms with high humidity are obvious. Strength allows you to build not only various wall structures with increased load, but many people even use this material to build steps on a metal or wooden frame. The surface of each slab is finely porous and has a non-uniform structure, which promotes good adhesion of any decorative finishing material using standard adhesive solutions. Using moisture-resistant gypsum fiber for the bathroom would be the best option.
Don't miss: DIY tile cutter - 3 possible options + instructions
How to glue tiles onto drywall in a bathroom
Important: all technological openings for communications must be treated along the contour with silicone sealant to avoid moisture accumulation in these places. Preparing the drywall surface for laying tiles involves applying putty and primer. It will not be possible to do without these steps, otherwise the tile will come off under the influence of negative factors. Step 6. After the putty has completely dried, proceed to applying a primer.
It is applied with a brush and a paint roller in two layers, and each of them should be allowed to dry (at least 45 minutes). In order for tiling a plasterboard surface to be reliable and durable, you should avoid a number of mistakes that beginners often make. Important: to get a good final result, you need to choose the right consistency of the adhesive mixture.
If the glue is too liquid, it will run off the wall, and if the mixture is too thick, it will be unevenly distributed over the surface. The optimal consistency of the mixture should resemble thick sour cream.
Cladding repair
If a tile laid on drywall cracks during use, it can be easily replaced. To do this, cut out the area with the damaged tile so that you get a small hole. After this, take a new profile, fix it on the wall with hangers, cut out a suitable piece of drywall, close the hole and stick a new tile in this place.
How to repair a plasterboard wall
How to glue tiles to drywall
The process of laying slab material consists of several stages. The most important ones include assembling the frame and installing drywall. Gluing tiles on a plasterboard base that is as flat as a table is not so difficult; even a beginner can do it, provided that all preparatory assembly operations are carried out in good faith.
Some craftsmen use special finishing wheels with glued sandpaper. Before gluing the tiles to the drywall in the bathroom, the edges and ends of each are carefully sanded down with sandpaper to make all the material the same size. Fitting the tiles must be done on waterproof sandpaper with a slight clamping force.
When adjusting the tiles, you need to be as careful as possible so as not to overheat and chip the edge of the glaze. If the frame is assembled correctly, then the main load from the weight of the drywall and cladding is directed strictly vertically. In this case, plasterboard sheets can withstand even very heavy tiles. If the plane of the plasterboard base deviates from the vertical, gluing the tiles will be much more difficult; the material will move away from the base at a negative angle or push the frame into the wall at a positive angle.
If the plane has fallen below the general level, the tile must be removed, the glue must be reapplied and the gluing attempt must be made again. You can post no more than four rows in one session. If you work with quick-drying glue, the next rows can be glued in just an hour.
In other cases, the difference between sessions should be at least 3 hours. To simplify the alignment process, you can attach a plumb line with a weight to the top row of the profile, using which you can control the position of the drywall on the frame. Later, when you need to glue the tiles, the plumb line will come in handy.
It is clear that it is easier to install a profile and glue tiles using a laser level or a pointer, but often you can achieve high-quality laying of the material using simple tools.
Tiles on drywall in the bathroom: installation technology
After completing the preparation, you should wait at least a day for all materials to dry and set. After this, you can begin the main part of the work. Safety. The material is completely safe for human health. Only when cutting it you need to cover your eyes and mouth so that dust does not get there; fire resistance. This type of slab is used in rooms with a dry microclimate, as well as where there are increased fire safety requirements.
Thanks to special additives, such material can withstand exposure to open fire for about 40 minutes. Gypsum boards must be mounted exclusively on a metal frame, no wood. It is advisable to strengthen the frame by reducing the distance between the rack profiles to 40 cm and adding transverse profiles. First, measure the width of the wall, subtract 3 mm from it (since one seam should be removed, we only take into account the internal spaces) and divide it by the width of one slab plus 3 mm.
If the result is a fractional number, round up.
Additional recommendations from professionals
Many years of professional experience shared by specialists indicate that some manipulations should be done in a certain way, and not in any other way. After all, the secret to successfully creating a high-quality floor lies precisely in such nuances.
- Tying GVL sheets together will provide them with greater resistance to stress. Fixing with self-tapping screws will allow you to hold on better;
- Before laying the tiles, the gypsum fiber flooring is kept indoors for about 3 days, and only then covered with a primer;
- When buying tile adhesive in a store, be sure to find out its capabilities regarding gypsum fiber;
- Laying tiles begins only on a completely dry primer. This is done using a hammer, beacons and a spatula. In this case, all the rules described above are taken into account.
These are all the nuances that you will encounter in your work.