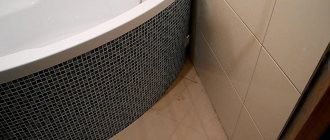
There is always a characteristic gap along the interface between the side of the bathtub and the wall. Its size depends on the quality of installation of the container, the evenness of the walls, and the characteristics of the sanitary bowl. Regardless of whether this gap reaches a whole centimeter or is a tenth of a millimeter, it freely allows water to pass through.
Agree, it is not very pleasant to periodically or constantly conflict with neighbors from the apartment located below regarding constantly flooded ceilings. But to avoid negative situations, it is enough to close the gap with a flexible or rigid border. It will hermetically seal the joint and effectively design the perimeter of the bowl.
We will tell you in great detail how to glue a border to a bathtub. All options for sealing and decorating the gap between the bowl and the wall are collected and systematized for you. In addition to valuable recommendations, visual photo guides and video instructions are included.
Strip plinth and its installation
There are several options for gluing a strip corner to a bathroom.
Often this product already has a layer of a special fixing substance. However, if the owners are interested in the question of how to properly glue the baseboard to the bathtub, they should still choose a different sealant. If desired, the factory glue can be carefully removed from the polyethylene product. This is done using a knife. The main thing is to perform all actions carefully.
Sometimes such a fixing layer is left, but silicone sealant is additionally used.
The different widths of the tape will also help you choose the desired border. It is even easier to install than a hard corner. However, it is used in case of rigid fixation of the bathtub.
How and with what to glue a plastic corner in the bathroom
What to use to glue the corner in the bathroom? There are special types of glue designed for this type of work. In particular, the glue must be transparent, so that even if it protrudes beyond the edge of the corner, no traces remain.
The plastic corner on the bathtub will be glued correctly if:
- Choose the right glue;
- Do not violate the installation technology;
- The product will be of high quality.
When choosing a material on which to glue an acrylic or clinker border, you should also take into account what the bathroom itself is made of. Namely, compositions made on the basis of acrylic can glue plastic, but if the plumbing equipment is made of metal, then you can use the most ordinary liquid nails.
Plastic corner in the bathroom can be glued
To do this, you can use a sponge and a mild solvent. If the bathtub is made of a material for which the use of solvent is strictly prohibited, then the remaining adhesive is removed immediately after applying the corner, until the composition hardens.
If the corners need to be installed after the bathtub has been purchased, then the tile covering must be washed to remove dirt and dust. This can be done with a hard sponge and soapy water.
After this, the surface of both the bathtub and the tiles must be dried, since the glue will not adhere to a wet coating, and repeated installation work will have to be carried out. To degrease the tile surface, alcohol or white spirit is suitable. Too aggressive compounds cannot be used, as they can corrode the plastic corner. The glue is applied around the perimeter of the back side of the corner, but the line should be as thin as possible. To seal the seams between the bathtub and the wall, you can use silicone sealant or putty that is resistant to water and high humidity.
Main installation features
Pasting a border is a fairly common task, but it requires attention and consideration of certain aspects. Therefore, before we begin to consider the detailed annotation, we first present some features that will have to be taken into account:
- the installation of PVC skirting boards should be done immediately after installing the bathtub, otherwise dirt and dust will appear on the surfaces;
- the surface must be prepared, since otherwise the product may not fit tightly, even if high-quality glue is used;
- You can use either glue or watery nails, the main thing is to carefully read and correctly follow the instructions from the manufacturer, which will allow you to stick the product perfectly;
- excess glue should be removed from the surface immediately, otherwise it will dry out and the plinth will lose its aesthetic properties;
- if the plastic border is glued to the ceramics. tiles, there will be places where there is a loose fit (taking into account the shape of the products and the presence of joints between the tiles), so they need to be treated with a sealant;
- The border must be held until the glue dries to ensure a high seal.
What are the benefits of corner-shaped borders?
In addition to its low cost, a plastic bathroom border has a number of advantages that often tip the scales in its favor.
Thus, there is no glue already applied to the baseboard, so you can choose the most suitable composition applicable specifically to your operating conditions. In this case, you will not have to scrape off the “native” glue, as often happens when using self-adhesive tape.
In addition, plastic bathroom borders in the form of a corner are very useful in cases where, as a result of installation, the gap between the wall and the edge of the washing container is quite wide.
A plinth made of self-adhesive tape is unlikely to close such a gap, and even if it is possible to cover the gap, then, most likely, such a border will come off quickly enough.
A plastic curb for a bathtub provides additional rigidity for fixing the bathtub, while it is practically not affected by vibrations and high humidity.
Glue the corner to the arch
A finishing element such as an arched corner is used to decorate curved structures. Such corners, like ordinary straight ones, protect corners, prevent paint from falling off and rubbing off, and clearly highlight the shape of structures.
The corner on the arch can be attached in the following ways:
- Glue with glue - the gluing pattern is similar to vertical corners;
- Secure with self-tapping screws;
- Secure with nails without heads.
The last two options slightly spoil the appearance of the corner, as they are noticeable and can leave cracks or bend the corner.
In addition to PVC arched corners, there are also perforated ones. They are attached as follows:
- The tightly pressed corner is adjusted to the surface with staples;
- Next, a solution of gypsum plaster is applied to it with a spatula, which is pressed tightly;
- After the plaster has dried, it is sanded with a mesh or sandpaper.
How to choose a corner
When choosing a corner to close the gap between the bathtub and the tiles, you must consider:
- type of sealing element;
- device manufacturing material.
Types of bath corners
The main types of corners designed to eliminate gaps in the bathroom are:
- soft corners, which are made in the form of a tape;
- rigid corners made from various types of materials.
The advantages of soft tapes are:
- ease of installation, since in most cases the tape is supplemented with a self-adhesive base;
- low cost;
- ease of care. There is no need to purchase specialized products to clean the tape;
- diversity. Ribbons are available in different colors, sizes and shapes.
Self-adhesive bath tapes
Manufacturers produce two types of tapes:
- corner tape, which is intended to eliminate gaps no larger than 3 mm - 5 mm;
- curly tape to eliminate large gaps.
Differences between types of self-adhesive tapes
A significant drawback is the short service life, since over time and when exposed to moisture, the adhesive base loses its qualities.
Rigid corner corners are different:
- variety. For the manufacture of sealing elements, various materials are used, varying in quality and cost. In addition, corners are available in different shapes, colors and sizes;
- durability;
- minimal care.
Bath border
To reduce the complexity of installing a rigid corner, you can use special fittings made in the form of corners, plugs and other additional elements.
Additional items for easier installation
Materials used for making corners
Soft corners are made exclusively from PVC, and for the production of hard borders the following are used:
plastic. The plastic corner is characterized by minimal cost, a variety of shapes and colors, maximum level of tightness, and resistance to temperature changes. To clean the corner, it is not recommended to use products that contain abrasive substances, as this will negatively affect the surface of the sealing element;
Assortment of plastic corners
ceramics. The ceramic corner is highly durable and resistant to various phenomena (temperature changes, mechanical stress, and so on). Unlike plastic corners, ceramics can be cleaned using any chemical composition and this will not affect the quality of the glossy surface;
Ceramic Bathtub Sealing Corner
Ceramic corners are not recommended for installation on acrylic bathtubs, since it is impossible to achieve maximum contact between the surfaces and, as a result, complete tightness.
- acrylic (a type of plastic). The acrylic corner has an aesthetic appearance, unlike other types of plastic, a variety of models, but at the same time a higher cost. However, the difficulty of cleaning acrylic elements significantly reduces the possibility of their use. It is recommended to install acrylic corners on bathtubs made of the same material. In this situation, there is no need to purchase additional surface cleaning products;
- natural and artificial stone (marble, granite, etc.). Stone corners are distinguished by their presentable appearance, maximum stability and durability, as well as their large size and high cost.
Marble bath corners
Which corner is better to choose? It all depends on the user’s priority and the size of the budget, as well as the decoration of the bathroom, since the best corner is a corner that is completely compatible with the design of the room.
Sealing options
Choosing a sealing method for a bathtub
Before making a rim in the bathroom, you need to select a suitable material that will not only perform sealing functions, but also match the overall interior of the room. Today, for decorative seam sealing, the following are used:
- polyethylene adhesive tape;
- plastic corners;
- ceramic corners.
Each of the listed options differs not only in cost, but also in the installation process, as well as in service life.
Ceramic borders
More recently, ceramic tiles have been an important finishing material for plumbing fixtures.
And if there was a gap between the wall and the bathtub, you had to figure out how to make a border in the bathtub from tiles. It was quite difficult and diligent work: I had to cut small squares from the tiles, which were then used to form the slope from the wall to the bathtub. If the work was done conscientiously, the effect was absolutely decent. Now there is no such need.
In many construction stores, when you buy tiles for a toilet, they can immediately recommend favorable ceramic borders. But often they still have to be purchased separately. When choosing such a frame, you need to work hard so that the border matches the color of the tile itself.
In exceptional cases, you should choose a white border, then merging with the plumbing fixtures, it will not stand out from the uniform design.
In fact, all ceramic products are considered quite strong and hard. And therefore, of all the options that have been considered, ceramic borders will especially last a long time; they are virtually not subject to deformation and can be used without replacement for many years.
But you need to remember about the disadvantages of this option: it has poor resistance to mechanical damage, i.e. with a strong blow, such an object may prick.
In most cases, this kind of trouble occurs when installing ceramics, and already installed borders add to their own hardness the mechanical strength of the wall and bathtub and are virtually invulnerable.
Working with ceramic components requires specific skills, and therefore the best option is to entrust this process to specialists. If, for example, you personally agreed to take on this task, then it will be useful for you to read how to make a border in the bathroom from ceramic profiles (or baseboards).
Features of installation work
To work, you need to purchase the required number of blanks. Buy borders with a reserve (in case of damage), and also calculate how many corner-type elements you will need. You will also need specialized tile adhesive (it must be moisture resistant), sealant and grout. All work consists of several stages:
- Surface preparation. They must be very thoroughly cleaned and dried.
- Sealing the gap. If it is small, you can get by with silicone sealant. If, for example, the gap is large, it is sealed with foam for installation.
- Preparation of glue (according to the rules).
- Laying the border itself. How to glue a ceramic skirting board to a bathtub? Using a spatula, glue is applied to the back side of the parts, and they themselves lie close to each other so that there is no gap. Special corner components are placed in the corners. You need to give it a day to dry.
- Grout. The finished grout removes small gaps between the parts, and also between the wall and the baseboard.
Any of these types of borders has both its own advantages and disadvantages. When choosing an option for yourself, consider the entire interior of your bath. In any case, decorating your bathtub with a border will give it a complete and beautiful look.
Self-adhesive border tape
Decorating and sealing the joint between the bathtub and the wall using a flexible border is carried out in several stages:
- clean all contacting surfaces from dust and dirt, wait until they are completely dry;
- treat the sides of the bowl, tiles on the wall with alcohol or another degreasing compound;
- Fill the existing gap with sealant and level the surface using a spatula;
- take measurements of the seam;
- mark the desired length on the tape, add 2-3 cm to the result and cut the border;
- Bend the baseboard along the bend of the mowing line. Cut the part of the product that will be located on the side of the bathroom at an angle of 45 ⁰ (trimming is not necessary if you are using a curved baseboard - the product is equipped with decorative corners);
- mark the top border of the border on the wall by gluing masking tape; heat the tape with a hairdryer - this will ensure the flexibility of the product and a better fit to the base;
- peel off the protective film from a small area (up to 20 cm) and glue the plinth , pressing it firmly to the base. If you are installing a shaped product, then initially you need to fix all the corners;
- inspect the curb: if there are gaps in the joints of the tape, fill them with sealant;
- do not use the bath until the adhesive has completely hardened;
- Check the installation of the border after a day: if you find areas where the tape has moved away from the base, glue it with liquid nails or sealant.
READ Interior decoration of a house using imitation timber
As you can see, there is nothing complicated in choosing and installing a plastic skirting board. It is important to take into account the tips given, look carefully at the photos, follow the technology and be careful. Additionally, you can also watch video instructions.
Surface preparation and preliminary work
The technology for laying the border around the bathtub may be different, but preparation of the base is mandatory. You should clean the wall and edge of the bathtub with a good, high-quality detergent, then rinse with water and degrease. For the latter purpose, soda ash is used; if it is not available, regular soda or alcohol is used. Before gluing the baseboard, you need to make the surface dry. To do this, you can wipe the base with a lint-free cloth and dry it with a hairdryer. When you have to re-glue the headband, you must carefully scrape off the remnants of the old glue.
To glue the border, the following tools and materials may be useful (depending on the type of profiles, some will not be needed):
- glue or sealant;
- mounting gun;
- level, preferably laser;
- rubber spatula;
- sandpaper on a block;
- pliers;
- Bulgarian;
- roulette;
- construction tape;
- sharp knife;
- profiles of the required length.
Materials and tools
To glue ceramic corners you will need the following materials and tools:
- Ceramic borders of selected lengths plus stock.
- Laser level.
- The tile adhesive is water-repellent (liquid nails will also work).
- Silicone based sealant containing antifungal elements.
- Construction gun for easy, precise application of sealant.
- Sandpaper.
- Grinder with discs, pliers.
- Construction tape.
- Stationery knife.
- Grout mixture.
- Clean, dry rags.
How to glue a plastic, tape baseboard to a bathtub, installation methods
Not a single wall in a building, including the walls in the bathroom, is perfectly straight - not to mention modern buildings. Moreover, during construction it is impossible to achieve absolute parallelism of opposite walls. Therefore, when installing a bathtub, there is always some kind of gap, a gap between the sides of the bathtub and the walls of the room, and as a result, water leaks on the floor and even higher humidity in the room.
There are many ways to seal these cracks. Every apartment owner comes up with something based on the circumstances. You can seal the gap, for example, with cement or some other suitable building material. However, the durability of such a “design” remains in doubt. The best solution is to glue a special baseboard to the bathtub.
This product is called differently: baseboard, border, bathroom corner. There are three main types of such skirting boards: tape, plastic and ceramic. There are also VIPs (made of marble, etc.), but they are a separate discussion, since they are not widely used.
Therefore, for self-installation it is better to use tape or plastic skirting boards. However, there are some differences in their installation, so we will briefly talk about each type of skirting board.
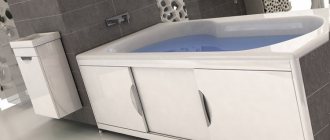
Plastic skirting board
It is considered the most economical and easiest to install type of borders. On sale there are not only straight skirting boards that are easy to cut, but also various corners. Therefore, with the help of such skirting boards you can reliably “insulate” a bath of any size and configuration. To fasten the plastic, liquid nails and silicone glue are used. The entire installation comes down to the correct marking of the elements of the overall edging of the bathtub and gluing them. One side is towards the bathtub, the other is towards the wall. Moreover, you can glue it both on the tile and “under” it (on the wall). This kind of work can be done by anyone, even an inexperienced person. The main thing is to then thoroughly seal the joints of the plinth strips and corners with sealant. However, you need to take into account that over time the edges of the plastic may “lift” and it will begin to let moisture through. Therefore, it is better to lay wall tiles on top of the baseboard.
General measures for both types of skirting boards:
- prepare surfaces;
- Pre-seal the gap with sealant;
- After drying, apply liquid nails;
- press the plinth (tape) tightly;
- seal the joints;
- thoroughly dry the gluing areas.
Why is it difficult to join materials?
The tiles do not absorb moisture. The slippery glazed top layer prevents the raw material from absorbing not only water, but also fixing substances. It is very difficult to attach a foreign part to a wall or floor, so professionals prefer to screw the elements. The design with screws looks rough. If the operator moves inaccurately or lacks experience, the ceramic under the drill may burst.
Connection difficulties Source kvartal-club.com.ua
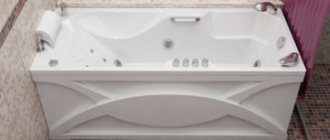
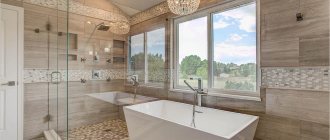
Benefits of installing a corner bath
Bathroom design with a corner bathtub is becoming increasingly popular not only because of its ergonomics and aesthetic appeal, but there are many more benefits.
- Saving room footage.
- Easily fit into any interior style.
- Easy to install, does not require special skills.
- Surpasses traditional rectangular models in terms of filling capacity and displacement.
- The corner bath resembles a small swimming pool, where 2 people can easily fit, it can accommodate both lengthwise and crosswise.
Modern corner baths have built-in hydromassage, occupancy control and other useful functional additions.
A corner bath has a number of advantages
Corner bathtub is easy to install and does not require special skills
Modern corner baths have many different functions
Ceramic border
Ceramic border for waterproofing
A ceramic border for a bathroom is considered the most beautiful type of design and is durable, although its installation requires much more time. Previously, to decorate the joint and seal it, it was necessary to cut borders from the remaining tiles, but today this is no longer necessary, since the production of ceramic corners has been established at an industrial level.
Such a corner between the bathtub and the wall is sold today in almost every building materials store. The product has a wide range of colors and design variations, which allows you to choose a model for almost every interior style. The material is highly durable and durable, although its installation process is a little more complicated than previous ones.
Important! Before choosing corners for bathroom tiles, you need to remember that this method of sealing the joint is not able to withstand bending stress and deformation, since it is laid on tile adhesive. It is better not to use this option for acrylic or steel bathtubs, but only for cast iron ones
- Before starting work, purchase the required number of curb modules with corner joints;
- clean and dry the joint;
- then seal the gap using polyurethane foam or silicone, depending on the thickness;
Color options for ceramic borders
For your information. At this stage, you need to decide how to glue the corner in the bathroom. If you have an acrylic bathtub, then it is prone to expansion when heated, which means it is better to use a sealant for the corner, which will provide elasticity when dried. If the bathtub is cast iron, then this material practically does not expand and in order to securely fix the bathtub corner, you can use ordinary tile adhesive.
- mix the tile adhesive and apply it to the joint using a spatula, then tightly lay the curb modules, saving space for grouting;
- After installing the border on the bathtub is completed, you need to wait a day until the tile adhesive has completely dried and then apply moisture-resistant grout for the joints.
Having studied the information presented above, you already know how to glue a corner to a plastic or ceramic bathtub yourself, which will allow you to significantly save money on repairs. And to consolidate the material, we suggest watching a video clip that will answer many questions.
Finishing methods
The construction market today offers several options for how to design a joint around a bathtub:
- plastic bath skirting board is a simple, affordable product that allows you to reliably cover the risk area, and also makes it clean, well-groomed and attractive;
- self-adhesive tape - easy to install, does not require effort or skill, protects the joint quite reliably, and is a very economical option;
- using mortar or glue for tiles - if tiles were laid on the walls, then the joint can simply be covered with the remains of glue or mortar, trying to level this layer as aesthetically as possible;
- use of silicone sealant - if the joint is not very wide in width, then you can use a sealant that will reliably protect the area from exposure to water and moisture;
- ceramic border or tiles - the market offers special skirting boards that allow you to beautifully and securely close the joints; you can also use pieces of tiles for this.
We will look at how to glue PVC skirting board
The gap between the wall and the bathtub and the choice of border
If the bathtub was installed after finishing the walls, a gap will inevitably remain between its side and the wall. Large or not very much depends on how smooth the walls are and whether the bathtub itself is level. In any case, it is better to seal this gap. Firstly, there will be no dampness under the bathtub, and secondly, the appearance is better.
To choose a border for a bathtub, you need to proceed from the width of the gap. Depending on the distance to the wall, the installation sequence changes:
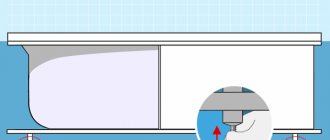
- If the distance between the bathtub and the wall is up to 3 cm, you can immediately install the side. Only its bottom shelf should be wide - it should be 3 times wider than the slot. And one more thing - in this case, only hard corners - ceramic or plastic - are suitable. It is better to glue the border tape with a small gap of a few millimeters or pre-seal it with a cement-sand mixture.
- If the distance from the side to the bathtub is more than 3 cm, it must first be sealed. There are three options: Attach the formwork from below, fill it with concrete, after setting (at least three to four days) you can continue work.
Having decided on the technology for sealing the gap, you can choose a border for the bathtub. It's not as easy as it seems - there are many different options, so you can get lost.
Read here how to restore the cover of an old bathtub.
Installation technology under tiles
Installation of the border to the wall cladding is carried out in stages:
- The sealant is installed in the mounting gun, then carefully, without interruption, the compound is applied between the bathtub and the wall. If a gun is not available, then the sealant should be purchased in smaller volume tubes with a special tip for application.
- When using a rubber spatula, the silicone is smoothed evenly until it hardens. If there is no spatula, then this process is done with a finger dipped in water. If the creation of a seam is required to be more than 5 mm wide, then it is better to use polyurethane foam for filling.
- While the seam is hardening, an adhesive mixture is prepared. It should not be made liquid as it will spread. The consistency should be similar to sour cream.
- If there are no corner fasteners, then you should adjust the corners using a grinder. The adjustment is made in pairs with an angle of 45 degrees. Trim using a grinder with a special diamond disc or cut off with pliers. Sand the cut area with sandpaper.
- Using a level, the angle is adjusted from 5 to 8 degrees. With a plinth width of 5 centimeters, the edge that touches the wall rises by 5 mm. Then, a layer of glue is applied from the corner to the reverse side of the product with a spatula, and the part is pressed against the wall. Each subsequent unit is glued as tightly as possible to the previous one. Excess amount of glue is immediately removed from the surface.
- After gluing, the border is wiped with a damp cloth.
- Drying lasts up to 10 hours.
- Then all the glued material is filled with water and left until completely dry. This action is necessary in order to prevent the appearance of cracks.
- To fill the space between the wall and the curb, silicone or grout with a water-repellent effect is used. The tone matches the tile grout.
Tips on how to install an anti-leak corner on a bathtub
Experts do not recommend using the bathtub until its edges have been sealed.
This can lead to:
- To mold;
- To the fungus;
- Excessive moisture.
The plastic border must be glued strictly according to technology so that the product fits tightly to the bathtub and to the wall. Only in this way can correct installation be carried out, in which the waterproofing will be correct and without defects. Due to the fact that the plinth is sold in large metres, when framing the bathroom you will need to first cut it into small elements. First, the corners are formed, then other parts are cut. Then fitting and gluing is required.
Corners or border tape on the bathtub must be glued strictly according to technology
The gap between the bathtub and the wall can be left free and closed with a corner, or it can be filled with silicone sealant to improve sealing. In this case, you will have to wait until the composition dries and only then install the corner. Special plugs are placed along the edges of the corner so that the finishing of the bathtub looks complete, and sharp cuts cannot cause a cut on the skin when using plumbing equipment.
Tape installation technology
Installation of self-adhesive tape includes the following steps:
- Measurements are taken , an allowance of at least 10 centimeters is made on the long side of the bathtub, and 2 centimeters on the short side. Then the strip is cut into the required lengths. If you lay the tape as a whole, going around the corners, the sealing material will not fit on the folds.
- Before gluing, the border is folded in half with the adhesive side facing out and heated with a hairdryer so that the material becomes elastic and flexible. Glue the tape from the corner, gradually removing the protective film from every 5-6 centimeters of the canvas and pressing the material using an applicator to the surface of the bathroom and tiles. The remaining sections are glued in the same way. The quality of gluing depends on how tightly the border fits, especially in places of contact with the tile seam.
- In the corners the pasting is done with an overlap . The border will lie beautifully if the upper bend, which is in contact with the wall, is left smooth, and the lower bend, which joins the side of the bathtub, is cut at an angle of 45° from the middle to the outer edge of the edge.
The figured curb tape for the bathroom is glued differently. The corners are installed, and the tape is attached to them. At the joints of the tape in the corners, use sanitary sealant to prevent moisture from penetrating inside.
Until the glue dries (at least a day), you should not use plumbing fixtures. If after 24 hours the tape still comes off, sealant or liquid nail glue will help.
In the room where the curb seal is installed, the temperature should be at least 10 degrees Celsius.
Advantages and disadvantages of using a plastic corner in the bathroom
Any building and finishing material is characterized by certain advantages and disadvantages that determine the possibility of its use in one capacity or another, its service life, as well as other distinctive features on the basis of which the consumer makes his choice.
For plastic corners or in other words - special skirting boards for a bath, the following indicators are the distinctive features below.
pros
- Low cost.
- Ease of installation work.
- Resistance to moisture and changes in ambient temperature.
- Plasticity, allowing for surface cladding that differs from straight geometric lines.
- Not subject to destruction when treated with chemicals (detergents).
- Easy to use and care.
- Reliability.
Minuses
- If installation is performed incorrectly, mold and mildew may form in the space between the corner and the elements of the enclosing structure (wall) and the bathtub.
- Limited service life compared to tile analogues.
Skirting is an important element in bathroom decoration
Everyone remembers the time when everything in the bathroom was very simple - the “minimalism” style was followed: a sink, a bathtub and, possibly, a small washing machine were installed. Given the limited variety of building materials, it was quite difficult to make high-quality repairs. The walls were most often simply painted or tiles were installed, skirting boards were not used at all, and the seams between the materials were sealed using cement mortar and paint.
Since this stage was necessary to prevent moisture leakage, it was natural to paint the seams several times a year. Of course, such a cement border has outlived its time, and it has been replaced by more modern and high-quality materials, including ceramic and plastic skirting boards. They, of course, differ in their technical characteristics and cost, but are designed to perform the same tasks: preventing water from entering the joints between the wall and the bathtub, preventing the risk of damage to finishing materials, and also increasing the attractiveness of the bathroom.
Tape variations
If you need to instantly and cost-effectively remove gaps between your bathtub and a wall or sink and give the room a great look, then curb tape is great for this.
But do not forget that this curb will serve you no more than 2 years, and therefore this option can only be analyzed as short-term. Such tapes have a thickness of about 2 mm and are available in different widths. High-quality curb tape has excellent performance properties.
It is made from polyethylene or elastomer. One side of it is covered with butyl glue. Many border tapes contain fungicides that protect the bathroom from the formation of fungi and mold. This border is completely waterproof, will not crack, is easy to use, and thanks to its plasticity, it can be bent at any angle.
Features of installation work
Of course, first of all you need to purchase a border strip of the required width. In order not to make a mistake, measure the largest width of the gap between the wall and the bathroom. And now, the tape has been purchased, where to start, how to stick the border on the bathtub? Let's consider all the work steps and their distinctive characteristics.
- You should carefully prepare the surface on which the tape will be glued. It must be cleaned of dirt and grease. You can use cleaning products and soda for this purpose. For degreasing, you can use gasoline or alcohol. If you are gluing the border a second time, then make sure that there is no old glue left on the surface of the wall and the bathroom. The surface must be completely clean and dry.
- If the cracks are wide enough, it is better to carry out preparatory sealing. Silicone-based sealant for acrylic bathtubs is excellent for this.
- When the silicone is completely dry, we begin gluing the border. As a rule, you can get by with the glue that is applied to the tape itself. To do this, you need to heat it with a repair hairdryer. But, this glue is not considered very durable. Also, when heated, the tape stretches somewhat, and when it cools down, it begins to shrink, which leads to its peeling off from the wall. And therefore it is better to use liquid nails for this. At this step, you need to stock up on this “miracle glue” and a gun for applying it to the planes.
- Then you need to prepare pieces of tape of the required length. Plus, you need to remember that this length must be a couple of cm longer than the length of the plot on which it will be glued. Apply a thin layer of glue to the base of the tape and press it against the bathtub, and the other edge against the wall. It is better to start gluing from the corner, slowly removing the film in small pieces. Since the quality of the entire work depends on the pressing force, it is better to perform it with an assistant. Each area must be pressed for 20-30 seconds.
- After finishing the work, it is necessary to seal the joints at the corners, and for 24 hours do not allow water to penetrate the curb.
If you follow everything exactly, you will get a beautiful look for your bathtub.
What glue to use
Most often, in the process of installing a bath corner, silicone adhesive-sealant is used. Depending on the intensity of use and sufficient ventilation of the room, after a few months the seam darkens as mold appears. In this case, remove the old adhesive, remove the skirting board and carry out the installation work again. To prevent such troubles, use glue:
- aquarium sealant: transparent or white, elastic, resistant to high levels of humidity and vibration, resistant to chemicals;
- waterproof tile adhesive: for installing ceramic baseboards or products made from natural materials;
- universal sealant based on MS polymers: a composition that has adhesion to all mounting surfaces;
- liquid nails: use only waterproof nails that do not contain acids, which can damage plastic or acrylic.
When choosing an adhesive composition, take into account the material from which the bathtub : if it is cast iron, then the use of tile mortar is acceptable, since the metal almost does not expand when heated. If the tank bowl is made of acrylic or steel, use a more elastic mixture.
Preparation of tools and materials
- glue or liquid nails;
- construction gun;
- primer;
- silicone sealant;
- masking tape;
- roulette;
- miter box;
- sharp knife or hacksaw for PVC;
- sponge and gloves.
Instructions for installing a ceramic border
Let's look at how to glue a skirting board to a bathtub if it is made of ceramics and the wall is already tiled. You need to do the following:
- We take measurements of the sides and cut the plinth into pieces of the required length.
Advice! You can cut a ceramic plinth using an angle grinder (grinder) using fine diamond-coated discs. This tool does not damage the glaze and forms an even cut.
- The ceramic plinth is attached to the tile adhesive.
- Special parts - corners - are installed in the corners of the room.
- After the glue has dried, sanitary grout, which is used for ceramic tiles, is applied to the edges of the baseboard.
Requirements that the plinth must meet
Since the baseboard for the bathroom is not only a decorative, but also a protective element, it must meet certain requirements. Here are the main qualities that a bathroom baseboard should have:
- Absolutely waterproof.
- No tendency to rot.
- Resistant to deformation.
- Ease of installation.
- Easy to clean, resistant to household chemicals used to clean the bathtub.
- Variety of execution.
Instructions for installing a plastic border
- When choosing this option, installing the plinth on the gap between the side of the bathtub and the wall is done with glue. The main requirement for the adhesive composition is fast setting and transparency.
- Skirting boards are cut to the size of the sides using a regular hacksaw with a fine tooth. In corners, the cut should be made at an angle of 45 degrees.
- Next, install it in place and stick strips of masking tape along the edges. This will protect the surfaces (tiles on the wall and the side of the bathtub) from getting glue that protrudes from under the baseboard.
- Glue is applied over the entire surface of the border and installed in place. The main difficulty is that the baseboard needs to be kept pressed against the wall until the adhesive sets, so it is important to use glue that dries quickly.
- At the last stage, the corners and plugs are glued.
- The junction of the border with the wall and bathtub is treated with silicone transparent sealant.
Self-adhesive border tape
Self-adhesive polymer flexible skirting board for a bathtub is the simplest and cheapest option for sealing a joint. Anyone can install it. However, if you seal the gap between the tiled wall and the bathtub with a self-adhesive bath skirting board, you will have to replace it after 1-2 years of use.
Preparatory work
Whatever option of bath skirting boards is chosen, at the first stage you need to carry out preparatory work. How to do them correctly? It is necessary to clean and degrease the surfaces - the side of the bathtub and the tile covering on the wall. How to do this work correctly so that the border installed between the wall and the side of the bathtub does not fall off a week after gluing?
- If the baseboard is being reinstalled, then you need to do the following: carefully remove the old border and clean the surfaces of old glue and dirt.
- If traces of mold are found under the removed baseboard, they will need to be scraped off with a spatula and then treated with an antiseptic solution. This must be done, otherwise the mold between the wall and the bathroom will continue to grow.
- Clean surfaces are wiped with a cloth soaked in alcohol or solvent. This must be done to remove the fat film.
- Then the treated surfaces are dried using a hairdryer.
- To ensure better sealing of the junction, before installing the curb, it is recommended to fill the gap between the wall and the side of the font with silicone sealant. Apply it in an even layer over the entire joint surface.
Advice! If the gap between the wall and the side of the bathtub is large, then it should first be filled with waterproof foam, and after drying and trimming the excess material, apply silicone sealant over the foam.