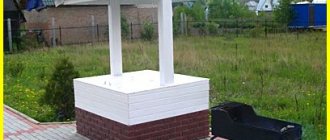
The most preferable source of water in the absence of a centralized water supply is a well, because, unlike a well for sand or limestone, it does not have a negative impact on the local hydrogeological situation (we do not take artesian wells into account - their construction requires a special permit).
To make using this structure truly comfortable, you need to start arranging an autonomous water supply system. You will learn from this article how to organize water supply to your dacha from a well with your own hands.
Drawing up a water supply diagram
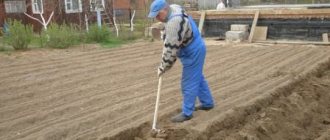
Even the simplest plumbing starts with a project.
The network diagram should be as detailed as possible, indicating all, even the smallest and most insignificant details - this will make it possible to purchase all products and materials at one time.
When drawing up a diagram, several fundamental issues need to be resolved. The first is the choice of wiring method. There are two options:
- Serial or tee: all consumers are powered from one common line, connecting to it through tees. It is characterized by minimal consumption of materials, but the water collection points become interdependent: when other taps are opened/closed by household members, the pressure in yours will change significantly.
- Collector (parallel): in this option, a distributor is installed at the inlet (this is the collector), which is a piece of large diameter pipe with bends. From each of them a separate pipe is laid to the kitchen sink, washbasin (the toilet tank should also be connected to this line through a tee), water heater, hydraulic accumulator (usually installed next to the collector) and shower stall.
After the boiler, another collector is installed, from which a separate pipe is also laid for the sink, washbasin and shower. The manifold circuit provides stable pressure in any tap, regardless of the condition of others, but is more expensive due to increased pipe consumption.
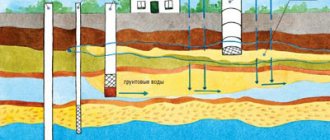
Water supply diagram from a well
You also need to select the type of accumulator. The traditional option is gravity: it is simply a container installed on an elevated platform (on an overpass or in an attic) equipped with level sensors.
A more modern type is a membrane or balloon accumulator. It can be installed at any level, and a pressure switch is connected to the pipeline to control the pump.
A balloon storage tank is more convenient, since it is easier to replace the elastic element in it than in a membrane storage tank.
Possible problems with concrete rings
To begin with, let’s pay attention to the fact that wells made from concrete rings are more susceptible to leakage. Plastic structures are often seamless; waterproofing has to be carried out only at the connection points of pipes or other elements. The most common problems with concrete rings include the following:
- Moisture can seep through seams or in places where pipes connect to wells if waterproofing work is performed poorly. In this case, the situation of wear of waterproofing under the influence of the environment quite often occurs.
- Sewage can penetrate into the environment not only through the joints of the rings, but also through the bottom part. In this case, the well creation technology was most often violated.
- The reinforced concrete rings themselves can become damaged due to exposure to low temperatures, errors made during installation work, and for many other reasons. Moisture can slowly penetrate into the environment through cracks.
- Over several years of operation, concrete walls may lose their thickness due to the slow destruction of the structure under the influence of the environment. As the wall thickness of the rings decreases, the waterproofing qualities are significantly reduced, and moisture also begins to seep into the environment.
During operation, reinforced concrete wells can wear out, the integrity of the concrete is destroyed, and therefore leaks and unpleasant odors around the well are possible. - There are no such problems with plastic wells, but you can encounter a situation where cracks appear under the influence of low temperature and pressure from the environment. In some cases, the problem can be solved by using special insulating materials; in others, the destruction of the plastic becomes critical and the well has to be replaced.
Construction of a water pipeline in summer
People live in dachas mainly only during the warm season, so the water supply system can be built according to a simplified scheme - without digging into deep trenches, insulation and cable heating devices.
There are two options for summer water supply:
- Temporary: the network is laid directly on the surface of the earth or in closed trays buried in the ground (in the latter case, the pipes will not interfere with walking and traffic). In the simplest version, the water supply is assembled from rubber or silicone hoses; a more durable option is a system of HDPE pipes. For the winter, the pipeline will need to be dismantled, so HDPE pipes are the most preferable: all pipeline connections are assembled and disassembled literally with bare hands.
- Permanent: the pipes are hidden in shallow trenches, so there is no need for annual dismantling - just drain the water from the system for the winter.
To avoid difficulties in finding hidden leaks, you can use polypropylene pipes, the installation of which by welding (a very simple operation) creates more reliable permanent connections.
Design of a system with a sewer well ↑
There are internal and external sewerage systems. The layout of the internal system depends on the number of plumbing fixtures and the features of their connection. The external structure depends on the design of the storage or treatment tank. Wastewater is discharged either into a septic tank or into a sewer well. Here they accumulate or are filtered depending on the purpose of the structure. External systems can be of different types:
- Separate. They consist of several pipelines through which melt water, rainwater, and household waste flow into various reservoirs. This system allows for rational use of water and high-quality purification of household wastewater.
- Semi-separated. There is one reservoir for collecting wastewater, but water enters them through different pipelines.
- General alloy. Such systems are rarely installed in private homes. All waters flow into them - wastewater, melt, rain.
Elements of external sewerage
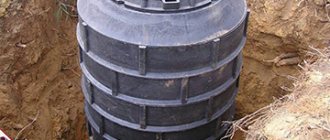
Self-contained septic tank systems are typically designed to collect and/or filter domestic wastewater. Tanks can be made from different materials. To decide how best to install a sewer into a well, you need to focus on the type of container, the material from which it is made, and the features of the pipes.
Scheme of a system with a sewer well
How to protect water in a well from high water?
Groundwater located near the surface of the earth, which accumulates many chemical and organic contaminants, if it enters a well, will make the water in it unsuitable for drinking and cooking. To prevent this, a clay castle is built around the well:
- If the well has just been built, you need to wait some time until the soil around it is properly compacted. Next, the soil around the mine is selected to a depth of 1.5 - 1.8 m and a width of 0.5 - 0.6 m.
- The exposed mine shaft should be wrapped with any non-woven, easily deformable (plastic) material, for example, Secutex. This is necessary so that the clay does not stick to the concrete. Otherwise, due to the deformation of the wet surface layer of clay during freezing, the rings may be shifted. The bottom edge of the shell should be at least 20 cm below the lowest seam.
- Next, fairly plastic clay (optimal humidity is from 15% to 30%) is poured into the recess with layer-by-layer (every 15-20 cm) tamping. It is necessary to compact very carefully, for which you should use the heaviest possible tamper with a small sole.
The clay backfill should be 15–20 cm above the ground level, and in the upper part it should be made with a slope to ensure the removal of rain moisture from the well.
Conclusion
It is clear that plumbing is the most popular engineering system for healthy comfort. The instructions we received will help us independently, correctly and properly lay out this most important local system. This decentralized method involves connecting to an already drilled artesian well or directly supplying well water to the house.
Let's summarize the procedure.
- We will wrap the pipes with insulation or simple glass wool, securing it with wire and wrapping it with moisture-proof film.
- We lay pre-insulated pipes in the trench. It is necessary to insulate the pipes completely along their entire length, as well as at the points where they enter the well or house.
- After this, we fill the trench, sometimes compacting the earth.
The entrance of the system to the ring is the most important place due to the seepage of contaminated water. It is necessary to check the functionality of the new water supply system; the absence of leaks is the expected result of our work. The video in this article will show the correct insertion of the well pipe.
Scheme for combating sand drift into the well
To protect the well from sand, you need to carefully seal the seams between the rings.
In this case, the rings must be fastened with brackets or plates with bolts (a nylon spacer sleeve is placed into the hole before screwing it into the hole).
The traditional seal in the form of a linen rope coated with liquid glass is not always effective.
Today, more reliable materials are produced that are designed specifically for sealing seams between reinforced concrete parts. An example is the RubberElast tape, which ensures the tightness of the seam even when one ring is displaced relative to the other (up to 7 mm).
Instead of classic cement mortar, for sealing joints you should use the quick-hardening composition Plitonit Aquabarrier or frost-resistant tile adhesive with the addition of liquid glass. When the solution has dried, 2 layers of fiber rubber (Kiilto Fiber Pool is suitable) and 2 layers of Aquabarrier are applied to the seam on the inside with alternating layers (1st layer - over the reinforcing mesh).
The outside of the entire shaft, or at least the seams, should be covered with EPDM film or polyethylene (in 2 - 3 layers), unless, of course, the rings were laid openly (in a finished recess, and not by digging).
It is impossible to use coating waterproofing based on bitumen to seal the seams of a well, since bitumen can poison the water.
To avoid sand from the bottom of the well, you will need a bottom filter.
A well is the simplest option for organizing water supply; it can be used to supply water directly to the house. How to bring water into a house from a well: features of water intake, pipe layout.
Read about how to properly install plastic rings for a well here.
And in this article https://aquacomm.ru/cancliz/zagorodnyie-doma/prochistka-v-chastnom-dome.html you will find useful information on cleaning sewers in a private house. Chemical, mechanical, hydromechanical methods.
Features of materials for the manufacture of wells ↑
Filtering or storage tanks are made of concrete, reinforced concrete, metal, and plastic. All these materials have their advantages, and the features of inserting sewer pipes into wells largely depend on their strength and thickness:
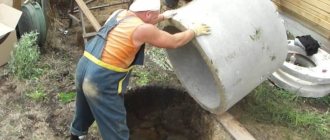
- Concrete and reinforced concrete. The most reliable and practical materials for the construction of storage tanks. They are characterized by high mechanical strength. If properly waterproofed, the tanks will be completely sealed. At the same time, the greatest number of difficulties arise when installing sewerage into a concrete well. The material is thick, durable and difficult to process with tools.
- Metal. Not the best choice for an autonomous sewer system for a private house. Even the highest quality metal tanks last no more than 10-15 years. They quickly collapse under the influence of moisture and chemicals. But it is much easier to arrange the entry into a metal sewer well than into a concrete one. You can always make a hole for the pipe, which will not be much larger than its diameter. This makes it easier to seal the insertion site.
- Plastic. In recent years, industrially produced plastic containers have been increasingly used. They are impermeable to water, do not require additional waterproofing, and tolerate aggressive chemicals well. Problems rarely arise with inserting a pipe into a sewer well, because... ready-made structures are often supplied with all the necessary components. The main thing is not to make a mistake with the diameter.
Welded plastic construction
Bottom filter for a well
Often the aquifer on which a well is built is quicksand - fine sand saturated with water. This sand enters the well with springs gushing at the bottom and very quickly sands it down.
Experienced well builders on the forums recommend going through quicksand when digging a well and installing the shaft on the waterproof layer located below (there should be one in any case).
To combat quicksand, you need to build a bottom filter:
- A disk of wooden boards wrapped in geotextile is placed on the bottom, in which 70 to 100 holes are pre-drilled. The wood must be stainable - usually aspen or oak.
- On top of the aspen “pancake”, 2–3 layers of pebbles or gravel (crushed granite is not recommended) of different fractions are laid: at the bottom are the largest stones, in each subsequent layer their size decreases by about 5 times. As the last layer, you can use silicon or shungite on a geotextile gasket (the material must be placed on the walls of the well and secured with stainless tape).
Over time, the wooden shield will sink in the quicksand, so every 5 - 7 years the filter will need to be re-equipped.
Types of seals for hydraulic structures
Previously, before the invention of hydraulic seals, wooden boards, hemp and jute materials were used as plugs for wells. A significant drawback of outdated types was rapid delamination and decay, which led to a deterioration in the quality composition and taste of well water.
With the invention of the hydraulic seal, it became much easier to eliminate leaks and operate wells. Modern manufacturers of building materials offer ready-made waterproofing compositions based on polymer materials.
However, many well owners and professional repair teams prefer to use self-made seals, rightly believing that this will lead to cheaper repair work without loss of quality.
Hydroseals are divided into two types:
- Pressure, quick-hardening mixtures . It takes 10 to 60 seconds for them to harden. A special repair compound that has waterproofing properties is applied over such a seal.
- Non-pressure, hardening within 5-7 minutes . Such mixtures are used not for emergency work, but for preventive work, for example, planned insulation of seams.
We'll look at each option in more detail below.
Waterproofing grouting materials (water seals) are often used in emergency cases, when the time of hardening determines how much water will run out or seep in, thus the amount and severity of damage that can be prevented depends on the quality and correct use of the water seal.
High-quality hydraulic seals can eliminate leaks in 30 seconds, stopping the flow up to 7 atmospheres!
Waterproofing seals are used in the following cases:
- to protect drinking water in a well from groundwater penetration
- plugging water breakthroughs in basements, adits, wells
- isolation of a breakthrough in places of contact of the floor, walls, between foundation blocks
- hermetic sealing of seams and cracks in wells
- express pipeline repair.
Sealing the passage of a water pipe through the concrete wall of a well
When installing a water supply system, a pipe from a well must be passed through a hole in the wall of the shaft, through which dirty water from the surface can also seep into the source. The most reliable way to seal this hole is in a way reminiscent of installing a float valve in the wall of a drain tank:
- We insert an inch brass rod into the hole, generously coated with fiber rubber. All cracks must be carefully filled with the same material.
- On both sides, you need to put on 2 washers with an internal diameter of 1 inch - first rubber (cut from a regular car inner tube), then steel.
Again, we screw the nuts on both sides (they should compress the well wall), and then - HDPE fittings for connecting a pipe made of the same material with a diameter of 32 mm.
Technology of using ready-made compounds
Ready-made waterproofing seals are most often used to seal leaks when the water that leaks or leaks can cause serious damage.
When using ready-made hydraulic seals, it is necessary to strictly follow the work technology:
- Surface preparation . At this stage, using a perforator or hammer, it is necessary to clean the surface of the well from exfoliated concrete. However, first the surface must be cleaned of dust, dirt, and mold.
- Expansion of the repaired area . It is necessary to widen the hole by 20-30 mm and deepen the hole by 30-50 mm. This is done in order to “refresh” the edges of the hole. In this case, you should try to give the sealed crack the shape of a funnel. When sealing a seam, it is necessary to strip it and deepen it by 5-10 mm. To expand, it is best to use a wide spatula, working the damaged area from top to bottom. Small cracks and holes can be expanded in any direction as convenient for the repairman.
- Preparation of the solution. The solution is prepared no later than 2 minutes before use. Recommendations for preparation, proportions, optimal water temperature - all this must be studied before preparing the waterproofing mixture. To dilute the mixture, use a clean metal (not aluminum!) container.
- Filling the crack. We fill no more than 50-70%. This is necessary so that the waterproofing solution, which expands during the hardening process, does not damage the walls of the well.
- Stabilization of the filling. Press the finished filling with your hands for 3-5 seconds to several minutes (indicated in the instructions for use).
- Care. Depending on the mixture used, it may be necessary to periodically wet the seal over a period of 12-24 hours. If the instructions do not provide for this, then there is no need to do this.
- Treating the seal with a waterproofing compound . At this stage, a penetrating waterproofing material is used, which will protect the concrete wall of the well and the installed hydraulic seal from further destruction. From ready-made waterproofing mixtures you can choose: “Osmosil”, “Hydrotex”. Waterproofing can be applied only after the filling has completely hardened, unless otherwise provided by the manufacturer.
When diluting the solution, strictly follow the proportions specified by the manufacturer. You should not skimp and try to dilute the mixture thinner or, in an effort to increase its effectiveness, make it too thick. In both cases, the waterproofing properties of the seal will be impaired.
Often, along with sealing cracks, more serious damage is revealed that requires major repairs of the well. We recommend reading information about their elimination methods.
Water supply diagram when using a submersible pump in a well
A submersible pump is used when the well depth is over 8 m. It is not recommended to install a vibration pump in the well: the vibrations it generates affect the soil and lead to the formation of a cloudy suspension of sand and clay particles.
A centrifugal or screw pump should be used. The power cable (copper 3-wire brand VVGNG is suitable) is laid in a polymer corrugation at a depth of at least 0.5 m with protection made of bricks on top. Above the cable, at half the depth, you can bury a bright-colored warning tape.
To connect a submersible pump, a socket with a moisture and dust protection class of IP44 or higher, equipped with a cover, must be secured outside the well. It is better to place it in a special plastic shield (splash protection).
Water supply from a well - distribution diagram
The external main leading from the well to the house is made of HDPE pipe with a diameter of 32 mm. It is laid in a trench below the freezing depth. It is advisable to insulate the top of the trench with foam plastic or other heat-insulating material about 100 mm thick. Inside the well you need to install a check valve (you can screw it onto a squeegee running through the wall), then attach a reinforced hose leading to the pump to it. The hose is placed on a “ruff” type fitting screwed into the valve and secured with a clamp.
Outside the well, a tee with a valve should be cut into the pipeline, through which the system can be drained.
You should not install ball valves outdoors, as they quickly exhaust their service life under conditions of temperature changes.
The control element for the submersible pump is a pressure switch, which is connected to the pipeline next to the accumulator. It is most convenient to connect both of these devices, as well as a pressure gauge, to the water supply through a special manifold, commonly called a “five-pin fitting” or “herringbone” in everyday life.
Today on sale you can find pressure switches equipped with a dry-running protection mechanism and a soft-start function for the pump motor. It is believed that if you have such a device, you can even do without a hydraulic accumulator. True, using water supply in this case will be less comfortable.
Ready-made waterproofing seals
Ready-made hydraulic seals for concrete wells are very convenient: to use such a seal, it is enough to dilute the solution with water according to the manufacturer’s instructions. Let's look at the most popular waterproofing sealing mixtures.
Option #1: water plug. This mixture contains fine-grained quartz sand, aluminum cement, and active chemical additives that give the composition plasticity and allow it to quickly harden. Using this type of seal, you can quickly eliminate a leak within 2 minutes.
The waterplug can be used at temperatures from +5 to +35 degrees. It is used in waterproofing swimming pools, underwater bridges and similar structures. Among the disadvantages of this hydroseal is the need for dilution with warm water +20-25 degrees, which in some cases is not entirely convenient.
Option #2: peneplug. Available in the form of a dry powder that must be diluted in water. This mixture is intended for waterproofing concrete wells, as well as wells paved with brick, natural or artificial stone. The hydroseal is based on high-quality cement, quartz sand and polymer additives.
This mixture is capable of stopping a leak with a pressure of more than 5 atmospheres. Hardening time 40 seconds.
Option #3: powder ex
A fast-acting waterproofing seal that sets within 10 seconds after application. This filling has excellent characteristics: frost resistance, resistance to aggressive environments, ease of use.
The disadvantages of this mixture include high cost and the inability to work at temperatures below +5 degrees.
After using any chemicals to perform repair operations, well water should be submitted for analysis to the SES or a laboratory accredited to conduct this type of research. Studying the composition of the water will help to find out whether there are any sources of pollution left in the mine, or whether the repair material has affected the quality characteristics.
Electric cable heating of water pipes
Through a special outlet located inside the house, a heating cable (for example, Ensto brand) is launched into the pipe, the length of which corresponds to the length of the section outside the trench. This area should be insulated from the outside.
The heating cable, like the submersible pump, must be connected to electricity through safety devices - a circuit breaker (the rated current depends on the power of the pump, usually 3 - 6 A) and an RCD designed for a leakage current of 10 mA.
Polymer materials are increasingly replacing concrete, so new reliable materials have also appeared in the construction of wells. Polymer sand wells - main characteristics and scope of application.
Read all about storm drain design at this link.
Waterproofing tasks
Waterproofing the chimney pipe on the roof is carried out during the final stage of roofing work, so some developers neglect this technological operation in order to save time or money. However, unsealed seams of parts cause leaks and accelerated wear of the structure. High-quality chimney sealing is a comprehensive solution for the following tasks:
- Improving the safety of stove heating. The chimney of the stove, especially if it is solid fuel, heats up to high temperatures, so its outlet on the roof is isolated from the flammable wooden frame.
- Increased energy efficiency. Thanks to insulated seams, heat loss through the roof slope is reduced, which leads to fuel savings and, consequently, lower heating costs.
- Condensation protection. Waterproofing the chimney allows you to maintain the temperature of its walls to reduce the process of condensation.
Exiting the chimney through the roof
Experienced craftsmen note that in addition to practical tasks, sealing the joints between the chimney and the roofing material performs aesthetic functions, making the appearance of the roof more complete and organic.
Review of famous brands
The modern construction market contains a lot of offers from various companies. Despite the fact that the technologies for using hydroseals are similar, the effectiveness and quality are different. Therefore, it is recommended to opt for products from the world’s leading brands that have proven themselves among specialists who deal with shotcrete professionally.
Waterplug
This is a dry mixture that is packaged in a plastic container. Before use, it is necessary to prepare an aqueous solution in accordance with the attached instructions. The composition includes quartz sand, and special hydraulic cement is used as a binder.
The peculiarity of this mixture is that it is possible to seal the holes through which water rushes out under pressure. Three minutes is enough for the solution to harden. The effectiveness of waterproofing concrete wells is achieved due to the ability to expand when hardening, which fills the pores and ensures a strong, airtight connection.
Peneplug
This is a similar composition to the dry mixture, but the aqueous solution has a faster setting time. 40 seconds to a minute is enough to eliminate a leak under pressure. Sealing is achieved due to the ability of the mixture to expand as it hardens.
The advantages of this hydraulic seal include:
- Fast setting, effective sealing, durable.
- It can be used at temperatures from 5 degrees Celsius.
- Resistance to water and aggressive environments.
Puder Ex
The quick-setting material allows you to seal holes under pressure. The composition is resistant not only to water pressure, but also to the capillary action of moisture. In a well, dry joints are sealed in 7 seconds. This is exactly how much water sealing is needed to make the concrete structure airtight again.
Despite the high performance and advantages, the price of this dry mixture is low. German quality and reasonable cost have made it popular among builders of hydraulic structures and workers of specialized teams performing their repair and maintenance. The maximum water pressure withstand is up to 7 atmospheres, which means that this hydraulic seal will be able to eliminate any leak.
Selecting and installing a pump for water supply at home
The choice of a surface pump is more preferable if we evaluate the issue from the point of view of routine repair and maintenance of the unit, which is much more convenient to carry out in a heated basement room than to remove it from the well each time. Water supply to a country house from a well using a surface vacuum pump is limited by the suction depth, the maximum value of which is 9 meters. If the distance from the level of the suction pipeline to the intake end of a flexible water pipeline lowered into a well is greater, a surface pump with a remote ejector or a submersible model of the unit is required.
Water supply system with surface pump
The suction depth of the pump depends on the method of laying the water pipeline adopted for water supply from the well, and is proportional to the depth of the trench for laying the water pipeline and the installation elevation of the surface unit. That is, if the floor level of the basement of a country house, in which the vacuum pump and related equipment is located, is two meters below the ground level, then by laying a water supply system and making an insert into the reinforcement of the well shaft in the horizon with a suction pipe, you can get water from the depth up to 11 meters instead of 9.
According to its characteristics, water supply to a country house from a well, carried out at a depth coinciding with the level of the basement, is also justified by the fact that the water pipeline will be located below the soil freezing mark, which means it will not require thermal insulation and heating to prevent water from freezing in winter. For the coldest regions of Russia, the depth of soil freezing reaches 2 meters, therefore, by making a trench a little deeper, which will correspond to the level of the basement floor, which can reach a height of up to 2.5 meters, the owner of a garden property is guaranteed to prevent freezing of water in the pipes.
Clay castle
Clay has always been an excellent sealant and barrier to water
- The well is dug from the outside, freeing 3-4 rings or about the same number of meters, filled with clay, and compacted well.
- The clay should be free of sand and soil to prevent water from reaching the well.
- You can fill the recess with cement mortar, which is prepared in the following way.
- Tools and raw materials are being prepared. Mixing container, cement, sand, electric drill or shovel, water.
- One part of the cement is diluted in a container with water and thoroughly mixed until a homogeneous cement laitance is obtained. Add 3 parts of fine, dry sand to it and mix it just as well with a shovel or drill. If the waterproofing work was carried out correctly and in compliance with all recommendations, then the taste of drinking water will be excellent.
Selecting a material for sealing a joint with a plastic pipe
Firstly, the material used must be recommended for sealing such joints by the manufacturer.
Secondly, the material used must have appropriate technical indicators. This requirement is mandatory and enshrined in SP 28.13330.2017 “Protection of building structures from corrosion” (updated edition of SNiP 2.03.11-85).
How to find valid technical quality indicators for a material?
In the description of the material, we look for the “Technical Indicators” table, and before purchasing, we request a quality certificate for the material, signed and certified by the manufacturer, and look at what is indicated there. So, if the description of the advantages states that the material is waterproof, elastic, and has good adhesion to concrete, metal and plastic, then the table of technical indicators must contain digital values (!) for each of these indicators, for example:
The material for sealing the joint between plastic pipes and concrete must have the following technical quality indicators:
- waterproof (W) – for waterproofing joints;
- increasing the water resistance grade of concrete with the supply of water from the reverse side treated with material and removing a layer of material (from grade to grade or increasing by the number of grades) - to block and eliminate moisture filtration inside the concrete joint;
- frost resistance (F) – to prevent freezing of the applied material;
- compressive strength and especially bending strength - to prevent cracking of the applied material from compressive and deforming external stresses characteristic of joints;
- limited minimum shrinkage (non-shrinkage) - to prevent cracking of the applied material from shrinkage stresses (and the appearance of wedging (fracture) stresses due to expansion of the material is not permissible for all joints);
- adhesion of the material to concrete – for a hermetically sealed connection and to prevent separation of the material from the concrete;
- adhesion of the material to the metal – for a hermetically sealed connection and to prevent the material from detaching from metal pipes or sleeves in concrete, if used;
- adhesion of material to plastic – for a hermetically sealed connection and to prevent the material from peeling off from plastic pipes when waterproofing utility inlets;
- corrosion resistance coefficients for sulfates for the material itself and concrete treated with the material - to prevent salt corrosion of the applied material upon contact with aggressive media, for example, water treatment reagents.
- relative elastic recovery of the material - to prevent cracking and maintain waterproofing during movements at the junction of the plastic pipe and concrete.
Pipelines crossing building structures of structures during their reconstruction
Using Link-Seal Annular Seals
For the passage of pipes through building structures, it is possible to use Link-Seal type annular space seals. This seal is a chain of rubber elements connected by bolts. When installing on a pipe where it passes through the wall, tighten these bolts one by one. The result is a reliable sealed unit.
Installation diagram of Link-Seal in a wall
Flexible sealing with stuffing box
Packing gland
The body of this gland does not have a flanged pressure fitting. A thrust ring and two collars are installed inside the housing. A packing of tarred hemp strands is placed between the thrust ring and the collar. The ends of the seal are caulked with asbestos-cement mass and sealed with bitumen mastic. Such seals are used in low-moisture soils. In dry soils, tow and rags can be used as padding.
Pressure seals are produced according to the standard series 5.900-2