Installation of a faucet in the bathroom is somewhat different from installing a faucet for a kitchen sink, because the pipes in the bathroom can be walled into the wall and only a small part with threads for connecting the faucet protrudes outside. If the pipes are not embedded in the wall, then they run along the walls, and the mixer will be at a distance from the wall.
Let's define the problem more specifically - because two faucets are often installed in the bathroom: one above the bathtub, the second above the sink. So, here we will only talk about the one above the bathtub and above the sink. We will install it together with the sink.
What do you need to know before installing a faucet in the bathroom?
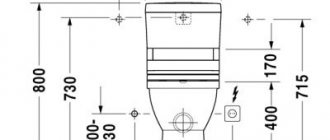
Practically, all mixers have a connecting size of 1/2 inch and a distance between the axes of the tubes of 150 mm plus or minus 15 mm (see diagram below). These dimensions should be taken into account when installing the pipeline, and be sure to measure these distances from the mixer purchased in advance.
If the mixer is rotary, then we choose a place to install the mixer, also taking into account the rotation:
The height of the mixer from the finished floor is 120 cm.
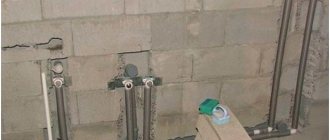
However, you can determine the location for the faucet above the bathtub as follows: temporarily place the bathtub in the place where it should be. Then we draw a line on the wall vertically upwards exactly in the center of the bathtub, select the desired height, usually no more than 30 cm. We drill two holes with a center-to-center distance of 150 mm:
Holes are needed if you need to bring hot and cold water pipes from a room located behind a wall (partition) to the mixer; this is the layout in most apartments where the bathroom and toilet are separated by a wall. Usually the risers are located in the toilet, and the tubes go into the bathroom from there. If you have everything in one room (say, an old apartment with a shared bathroom or a private house where the bathroom is also shared for some reason), then, most likely, you don’t need to drill through the wall. I am hinting that you should proceed from your own situation and not blindly copy. But since this article is only about installing a faucet in the bathroom, I will not tell you here how to install a water supply from different pipes, but will continue on the topic of the article.
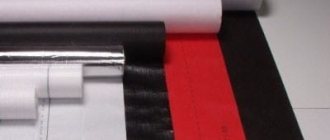
The mixer kit includes gaskets, eccentric bushings and decorative cups:
Things to remember
- Before starting work, you must ensure that the crane is complete. Check for defects in parts and their dimensions.
- Make sure the eccentric dimensions are correct.
- Remember that flax or insulation should be screwed only in the direction of the thread.
- Check the tightness and reliability of the fastening of the insulation. It should not scroll along with the thread.
- Be sure to use a lubricant over the flax. An excellent option is silicone sealant or oil paint.
- First, you need to tighten the eccentric manually, then use the key.
Installation of a bathroom faucet: operating sequence
Let's take a step-by-step look at how to install a faucet in a bathroom. Moreover, we will assume that
We wind tow (flax) onto the small thread of the eccentric bushing along the thread:
After winding, smooth the wound flax with your hand and lightly spread a special sealant:
- and also spread it on the linen with your hand.
Attention! When purchasing plumbing components, you may encounter the following problem: some threads do not have a notch, which is why the tow will slide along the thread when screwing on the second part. So, if there are no notches, we make them ourselves: you can use pliers or a gas wrench to slightly (not too much!) compress the thread until notches appear.
You can use fum tape to seal the threads: take a fum tape, preferably thicker, and wind it tightly along the threads. It is torn off and smoothed by hand. Sealant for the fum tape is NOT needed.
We screw the eccentric into the coupling - into the hole at the pipeline outlet:
Eccentric bushings are needed if the pipeline terminals are not at the same level, or if the center-to-center distance is not 150 mm.
After the required center distance and level are set using eccentrics, all other parts of the mixer are screwed on:
And then we screw on the shower head hose and the shower holder:
That's all for installing a faucet in the bathroom . Nothing complicated, no expensive tools, just wrenches and your hands. Good luck.
Design and coatings
Continuing the theme of design, it should be noted that companies producing accessories for expensive brands offer various design and coating options. Adapters can be made in chrome, brass, gold and copper, and have a matte or glossy finish. The Grohe brand is distinguished by a wide variety of models that are suitable for both expensive and budget plumbing fittings.
Conclusion
So, now you know at what height to install the faucet in the bathroom and how to adjust the center distance using eccentrics , which means you can independently cope with the arrangement of the bathroom in your home. But even if you have questions during installation, ask them in the comments, I will answer them all.
By the way, don’t forget to watch the video in this article, it will probably be useful to you.
Every apartment or house has devices and appliances that you can replace and repair yourself, without turning to a qualified technician for help. Such devices include a bathroom faucet.
As a rule, it becomes unusable due to poor water quality or due to untimely replacement of the cartridge in the main filter.
If any problems occur, you should know how to replace the faucet in the bathroom without damaging the device.
Materials from which eccentrics with nuts are made
The production of eccentrics makes it possible to use the same materials from which the mixers are made, and therefore most often they buy such components in a ready-made kit: if the faucet is made of copper, then the eccentrics are the same. Popular materials used for the manufacture of plumbing components:
- bronze;
- brass;
- stainless steel;
- alloys and steels;
- copper.
Often, manufacturers trying to improve the external aesthetic qualities of a model and increase its service life use a chromium surface coating. In this case, the part becomes matte in color, and its sliding after installation is minimal. In addition, such chrome-plated products are less susceptible to corrosion and moisture.
Common bathroom faucet failures
Damage can vary, but the most common are:
- Water leaking when the tap is closed . The reason for this is damage to the mixer cartridge by small particles that are in the water.
- The threaded connection of the device is broken.
- Corrosion that faucets made of brass alloy are subject to over time.
The last two problems are typical for faucets made in China, because low-quality brass alloy is used to manufacture the device. Therefore, their cost is much lower, in contrast to European equipment, which is made from stainless steel.
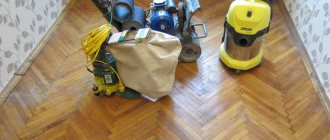
- Necessary tool
Before changing the faucet in the bathroom, it is worth preparing all the tools that may be required so that you do not need to constantly be distracted from the process to search for this or that equipment. Arsenal should be placed close to the workplace.
To replace the mixer you will need the following tools:
- pliers;
- several adjustable wrenches;
- tow or fum tape;
- sealant;
- sanitary linen;
- paranitic or rubber gaskets, ¾ and ½ inch in size;
- graphite gasket former;
- water container.
Most of the listed materials and tools are available at home, and other accessories can be purchased at a specialty store.
- Preparatory work
- To understand how to replace a bathroom faucet, step-by-step instructions are provided.
- Shut off the hot and cold water supply in the water supply pipes.
- Drain the remaining water from the mixer and reduce the pressure in the pipes by opening the taps.
- Once the air and water are completely out of the plumbing system, loosen the large faucet nuts that secure it to the eccentric adapters connecting the plumbing pipes to the faucet.
- Remove the old faucet.
- Pay attention to the condition of the eccentrics - they may need to be replaced.
Why do you need an eccentric?
The range of mixers today is very diverse.
Each mixer has its own technical parameters, differing in design features, appearance and distance between pipes. Often, when installing a mixer, some difficulties arise with its fastening and mismatch of the joint holes. And in such cases, an eccentric for mixers comes to the rescue. Installing eccentrics for a mixer involves screwing one end with a narrow and external thread directly into the water supply system, that is, a water pipe, and the other end with an internal thread serves to attach one of the pipes of the plumbing fixture to it. Some types of faucet eccentrics are made of brass or bronze. If the pipes are made of plastic, then there is no difference what material the eccentric is made of, but when screwed into a metal water supply, the eccentric must be made of the same metal, in this case it is stainless steel. This ensures equal pressure in the middle of the pipe and thermal expansion, which automatically eliminates water leakage.
Video instructions for replacing a bathroom faucet
As a rule, the distance between standard places for pipes in mixers corresponds to 15 cm. In practice, this may not correspond to the indicated figures. Then the inaccuracy can be leveled to the desired size using eccentrics that are released or tightened. Thus, the displaced part of the pipe will take a central or extreme position, thereby increasing the interaxial distance or reducing it.
When the required distance has been selected between the eccentric nozzles, you can begin installing the new mixer. The installed eccentrics must be securely fixed using plumbing flax and a gasket former. To do this, a small amount of flax is wound on the external thread, after which a graphite gasket former is applied, and a sealant can be used. If these materials are not available, it is recommended to use sealing tape.
The eccentrics must be screwed into the pipes with mirror precision. The synchronization of actions is incredibly important, because at the slightest violation the device will take the wrong position and the installed mixer will be skewed. Installation of the mixer is carried out only after the position of the eccentrics has been correctly fixed and the required center distance has been set, which will be equal to the size of the mixer.
The final stage is tightening the fastening nuts. There are also some tricks in this process, using which the installation will be performed more efficiently. To avoid damaging the coating of the nuts that secure the mixer to the eccentrics, it is recommended to wrap them with electrical tape and then tighten them using pliers or an adjustable wrench. Upon completion of the work, the electrical tape should be removed from the nuts.
Knowing how to correctly change a faucet, you can not only get the job done efficiently, but also save money on calling a technician. Using simple recommendations and step-by-step instructions, the mixer will last a long time.
How to choose the “right” eccentric?
Inexpensive faucets made in China or Turkey are often equipped with shiny chrome-plated adapters. The quality of such products usually raises doubts, and deservedly so.
This is due to the fact that, despite their attractive appearance, inexpensive chrome parts also have several negative qualities. During the operation of such products, rust often appears.
But this is the case if it comes to operation in principle, since even during installation work the unreliable eccentric head often breaks off. Therefore, experts recommend that you still purchase an eccentric separately, making sure that it is made of brass and using solid cast technology.
The cost of a product made from pressed brass is too fragile and will break and fall into pieces at any time. Solid brass adapters are much heavier and more expensive. But the characteristic golden color of the eccentric does not at all indicate the quality of the material from which it is made.
How much do eccentrics cost?
It all depends on the brand; the more well-known ones traditionally differ in quality, but at the same time in price. Here is an example of the cost of Italian products with different arm lengths:
- Remer 90 by 40 mm – 410 rub.;
- Remer 90 by 60 mm – 440 rubles;
- Remer 90 by 80 mm – 550 rub.
The Timo company sells the same eccentrics for the mixer and sizes at a price starting from 600 rubles, but together with telescopic reflectors.
It is possible to buy adapters cheaper - from 35 rubles, but the quality of such products has always been in doubt. First you need to find out the thread sizes on the plumbing fixtures; imported manufacturers may have discrepancies.
Types of devices
- Single lever type. The water temperature is adjusted by turning one lever in one direction or another. Instead of the usual valves, it contains a ball element with channels for cold and hot water. By turning the knob you can partially or completely block the desired channel or both at once.
- Double valve type. Contains 2 valves, with the help of which the flow of cold and hot water supplied to the mixing chamber is alternately regulated. The simplest type is valves with rubber gaskets. A modern option is “half-turn” valves, in which there are no rubber gaskets, and the water supply is regulated by a ceramic disc with holes. In the first case, there is a simplicity of design and lower cost, however, there is a need to frequently change gaskets. In the second case, an increased service life is noted.
- Thermostat mixer. Contains containers in which water at a certain temperature accumulates. The main advantage is that there is no need to constantly adjust the water.
Photo 2. The process of attaching and adjusting a single-lever faucet installed on the wall above the bathtub.
Tips and tricks
If your pipeline is made using plastic pipes, then the material of the eccentric in most cases will not matter. But in the case of using metal pipes, it is important to ensure that the fitting is made of exactly the same metal, otherwise, due to different values of the coefficient of thermal expansion, the reliability of the connection will decrease over time, which can lead to leakage.
When installing chrome-plated eccentrics, it is worth wrapping them in several layers of fabric while tightening them to prevent damage to the chrome layer, because even a small crack in the protective layer can lead to rapid corrosion of the metal underneath and the need to replace the product.
It is best to purchase a product made of cast brass - this allows you to simultaneously maintain the high strength and elasticity of the material, which reduces the chances of it being damaged during installation.
Installation
If the fitting shows that the eccentrics are too long, they need to be shortened.
It is better to shorten from the ¾ thread side - it does not hide into the wall. In especially severe cases, both threads are shortened. You need to remember one important rule - the threads must be enough for at least three turns, otherwise shortening is fraught with leaks.
If there is a strong deviation from alignment, it is better to “saw” the eccentrics in place. It is more difficult to guess the final position of the eccentric in advance. Also, replacing the “native” rubber gaskets with silicone ones can help with the solution - they are softer. As a last resort, you can try placing two gaskets in one connection.
Screwing in eccentrics with a gas or adjustable wrench is not very convenient; for this it is better to use a regular open-end wrench, hooking it onto the square transition between the threads. Some products have an internal hex structure - a hex wrench will help.
Most of these products have four edges in the middle. Therefore, it is convenient to tighten them with an open-end wrench. You may need a different key number: in some places it will fit “14”, and in other places the number “17”.
The hardest part is over, all that remains is to screw on the reflectors and the mixer with gaskets. Be careful when tightening the union nuts
– they are quite fragile and can burst if too much force is applied. The tightening force should be slightly stronger than if the nut were pulled with bare hands.
All prefabricated parts of the mixer are twisted together manually, without the use of keys. The assembly of the spout and shower is so primitive that it is not covered here.
This completes the installation. All that remains is to supply water and check the connections for leaks.