Self-leveling self-leveling flooring is one of the best options for flooring in an apartment or country house. Self-leveling solutions are used as a base for other materials or as an independent coating. The mixture for self-leveling floor can be poured in any room from the bedroom to the garage or workshop. The main thing is to choose the right mixtures. Their range today is quite wide and includes coatings with different compositions, surface structures and layer thicknesses. Each of the mixtures has its own characteristics, pouring technology and recommended area of application.
What are they?
There are two groups of self-leveling floor mixtures.
Mineral self-leveling floors
Coatings based on cement or gypsum with mineral modifiers and fillers. By varying the ratio of components, you can change the spreadability and hardening time . The purpose of the mixture depends on the fraction and type of fillers: coarse-grained fractions are used for leveling layers (starting floor), fine-grained fractions are used for a thin finishing coating under linoleum, cork, and carpet materials.
The basis of the mixture is Portland cement (gypsum) and fractionated quartz sand. The dry mixture is packaged at the factory and diluted with water before starting work. The main advantage of mineral floors is their high manufacturability ; they are used in various industries. In housing construction, they are used as leveling mixtures for bases under tiles, linoleum, rolled carpets, parquet, etc.
Polymer liquid floors
Such coatings have a synthetic polymer base. See the most common ones below.
Methyl methacrylate
Coatings based on methyl methacrylic resins have high mechanical, chemical and temperature resistance.
Their surface can be smooth or rough (anti-slip), the colors are varied, and they have excellent decorative qualities.
Performance properties vary depending on the use of various additives: if necessary, hardness, ductility, temperature stability, etc. can be adjusted.
They are resistant to ultraviolet radiation and can be used at different temperatures.
The disadvantages include the need for ventilation when pouring due to the strong odor. Polymerization and development of operational strength in just a few hours can also be considered as a disadvantage: pouring such coatings requires highly qualified specialists, whose work is not cheap.
They are used at industrial facilities in various industries: pharmaceuticals, electronics, aircraft manufacturing, trade, etc.
Suitable for use indoors and outdoors. They are more expensive than polyurethane and epoxy coatings.
Epoxy
The working mixture for epoxy floors includes two components: a base of the required color and a hardener . Floors are applied to a previously prepared base. Layer thickness - from 1.5 mm to 5 mm. In residential premises, transparent epoxy floors are installed using photos, 3D compositions or lighting.
Such coatings look interesting; designers love to use them. Quartz-filled epoxy coatings for industrial premises have increased mechanical strength and a non-slip surface.
Disadvantages: low elasticity, insufficient stability against impacts and a moving base.
Epoxy floors can be installed on any substrate and are hard and seamless. The floors are resistant to acids, alkalis, petroleum products, etc. They are used in chemical and pharmaceutical production, in the food industry, in laboratories, car service centers, etc. Convenient and easy to maintain in residential areas.
We recommend: Adhesive and interlocking cork floors for private homes. DIY installation technology
Cement-acrylic
A combination of cement, polyacrylate copolymer and aggregate. Developed specifically for food industry enterprises with high mechanical loads, large volumes of liquids, treatment with chemicals, steam, disinfection, etc.
The coatings are highly durable - they do not collapse even when cracks appear. Matte surface, anti-slip effect, long service life, chemical resistance, the ability to install on a substrate with unevenness and defects, use indoors and outdoors are the main advantages of cement-acrylic-based floors.
The disadvantages include the complexity of the device.
Polyurethane
Polyurethane is wear-resistant, strong and durable. It is lightweight, holds water well, and is shock and abrasion resistant.
The disadvantages include the need for careful preparation and minimal humidity, as well as increased consumption of materials.
Polyurethane self-leveling floors are often used in individual housing construction, as well as in production, warehouse and other premises.
3D floors
This is the most modern method that is widely used in different countries. The method consists of using a special material with a pattern and a transparent self-leveling coating. Such coatings are exclusive.
We recommend reading: Photos and design of floors made of various materials
Preparation of the solution
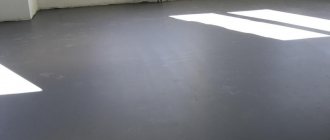
Pouring self-leveling floor
Self-leveling flooring is made from dry mixtures. It has the ability to harden when exposed to water and air.
A thick or thin solution is fraught with unpleasant consequences. The first one dries quickly, the second one spreads. This negatively affects the quality of the coating.
You need to mix in a container, you can use an old bucket. First, water is poured, then the dry component is gradually introduced. The mixture must be thoroughly mixed until smooth. It is better to do this using a drill with a special attachment. For 25 kilograms of dry self-leveling floor you need approximately 50 - 60 liters of water.
After the ingredients are mixed, you need to check for consistency:
- Take a lid, for example, from a bottle of shampoo. The diameter should be about 5 centimeters, height 4.5 centimeters. Remove her bottom
- Place it on a flat, smooth surface
- The mixture is poured into the lid
- It will start to spread. The consistency is normal if the diameter is from 16 to 18 centimeters. If the diameter is smaller, then water should be added, if larger, the dry component should be added.
There is no need to mix a lot of solution. If it starts to thicken, you will have to add liquid to it. It is better to mix a new portion after the previous one is finished.
There are instructions on the manufacturer's packaging, be sure to follow them.
What does self-leveling floor consist of?
The type of self-leveling floor is determined by the type of binder component. The composition of any self-leveling floor includes:
- Mineral and polymer binders
The bases depend on the type of floor and its purpose; it can be cement, gypsum, methyl methacrylic, epoxy, polyurethane resins, etc.
- Fillers
Fillers are needed to give self-leveling floors mechanical strength, hardness, and wear resistance. Fractional quartz sand, crushed stone, and various polymers can be used as fillers. In basic leveling mixtures, the particle size is up to 1.2 mm, in finishing coatings - up to 0.5 mm.
- Special Additives
They are used to impart various properties to the mixture (hardening accelerators and retarders, to increase frost resistance, strength, ductility, etc.).
- Dyes (colors)
Organic and inorganic dyes are used to give the self-leveling floor the desired color.
Compositions
The astringent component of the mixture is mixed with mineral additives.
Many people will decide that everything is simple, just mix the mixture for the floor with your own hands and save money. In theory, self-leveling flooring is not complicated in composition. Moreover, most manufacturers do not hide the elements of the mixture and write them on the packaging.
As mentioned above, there is always one binder component, to which various mineral fillers, additives, additives and, of course, sand are added.
All these components perform their function and are mixed in a certain proportion. And even if you find the proportions and recipe, which manufacturers usually hide, there will still be a lot of fine edges. What kind of sand? Which faction? What to mix and in what order.
In the end, it is unlikely that you will be able to save money. Rather, spend extra on ready-made dry construction mixture.
It is quite possible to prepare less complex mixtures for rough screeds yourself.
What do you need for work?
To carry out work on installing self-leveling floors, you need personal protective equipment and special working tools. To work safely you will need:
- respirator;
- latex gloves;
- shoes with hard soles.
Required working tools:
- Needle aeration roller for removing air bubbles in spilled mixture.
- Electric drill at low speed with a mixer for preparing the working mixture.
- Paintshoes are sandals with metal spikes in which you can walk on a flooded floor. Allows you to perfectly level the spilled mixture in different places.
- Synthetic padding rollers for priming the base surface.
- Squeegee for applying epoxy composition.
- Spatulas for leveling the mixture in corners, near walls and other hard-to-reach places.
- Vacuum cleaner for cleaning the surface.
Features of gypsum mixtures
Gypsum mixture is relevant in rooms with low traffic. The floor becomes thinner and wears out much faster than cement. This is a minus at first glance, but such strength is enough for a bedroom, hallway, living room in an ordinary apartment or house. A floor made of gypsum mixture is not relevant in an office or store, since it will soon have to be replaced.
Gypsum mixtures harden quickly, creating an ideal base, subfloor. This layer needs to be primed because it absorbs moisture well. For the same reason, it is not recommended to use gypsum mixture in the bathroom, on the balcony, in the garage or cellar.
Self-leveling floor calculator
Companies that sell self-leveling floors usually offer a convenient material calculation form on their websites. Using a self-leveling floor calculator, you can quickly determine how many bags of dry mix you will need to level the base. Consumption per 1 sq. meter is calculated for all types of flooring available for sale.
To calculate the material, you need to fill out the proposed calculator form. It indicates the type of self-leveling floor, the minimum and maximum thickness of the layer, the dimensions of the room, and the density of the mixture, which can be specified on the packaging. After a few seconds, the calculator will display the required amount of material and its cost.
We recommend: Atlas Concorde: made in Italy
More on the topic: Online calculator for concrete floor screed
Tips for choosing
Before purchasing the mixture, evaluate your capabilities, both financial and physical, if you carry out the work yourself. To learn how to fill such floors, watch this video:
And a few simple tips to help you decide on a purchase:
- When buying a mixture, you need to know exactly what room it is intended for. A gypsum-based mixture is not suitable for a bathroom or kitchen.
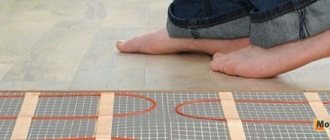
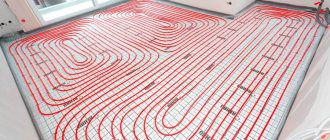
- If all the characteristics of the mixtures are similar and it is difficult to choose a specific one, give preference to the one that allows you to install a heated floor system. This will provide additional opportunities for thermal insulation.
- When mixing the solution, strictly follow the instructions on the package. If you don’t have enough experience with similar work, start mixing in small batches. A frozen solution cannot be diluted again.
The evenness of the prepared floor directly affects the service life of the decorative coating, so you should not save at this stage.
How to pour it with your own hands?
The flooring technology includes several stages that must be strictly followed.
Selection of self-leveling composition
Before pouring the self-leveling coating, the base should be prepared with a special repair compound.
For concrete bases, there are two types of mixtures - cement and gypsum . The former are more expensive, but they are universal and are used everywhere, the latter - only in dry conditions.
A leveling layer thickness of 2–50 mm for cement mixtures allows reducing pouring time. Gypsum compositions make it possible to install self-leveling floors with a thickness of 2–100 mm, while their setting time is much longer.
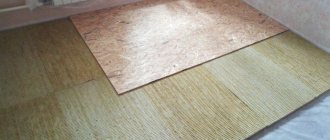
In residential premises there are two options for choosing a mixture: use a cement composition everywhere or, dividing the premises into “dry” and “wet”, use different types of mixtures. For wooden bases, there are special compositions for self-leveling floors.
How to prepare the base?
A very important stage on which the quality of work as a whole depends. The nature of the preparatory work depends on the base material:
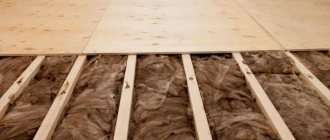
- Wooden base
The surface must be clean and dry. Remove dirt, oil stains, grease. Sand the clean surface to make it rough. There is no need to prime the wooden surface.
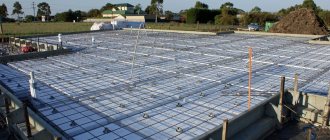
- Concrete or mortar screed
The top layer of old concrete should be removed, the surface should be cleaned, potholes, cracks should be filled, oil stains should be removed, etc. Before applying primer, remove dust with a vacuum cleaner.
Applying primer
Primer of concrete and mortar is required, because... the absorbency of these materials is high. The primer, being absorbed into the base, increases its adhesive ability .
To add roughness, it is recommended to add quartz sand to the primer. To apply the primer, use a spatula or roller.
Preparing the mixture
The container should be large enough to knead a whole bag of mixture. Cooking sequence:
- pour the amount of water at room temperature required according to the instructions into the container;
- pour out the entire contents of the bag and mix thoroughly for at least 3 minutes with a mixer (low-speed drill);
- Let the homogeneous mixture sit for 2 minutes and stir again - the mixture is ready.
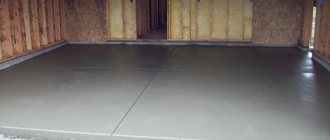
Fill
The floor should be poured immediately after preparing the mixture. The solution at room temperature should be used within half an hour.
Filling can be done at a temperature not lower than 10 degrees. Sequence of work:
- Pour the mixture from the container in several places and spread evenly with a spatula.
- Spread the remaining mixture into the unfilled joints.
- Pass over the surface with a needle roller to remove air.
- The self-leveling layer can be coated with a finishing layer only after 12 hours. You can walk on the self-leveling layer after 5-6 hours.
How to cut the seams of a self-leveling floor?
To prevent linear deformations of the floor, it is necessary to cut expansion joints in the surface, repeating the joints in the concrete base.
To do this, a recess is made in the set coating to a third of the thickness of the polymer layer. It needs to be filled with caulk and sealed with joint compound or caulking cord.
Coating care
Self-leveling floors do not require special care - regular wet or dry cleaning is sufficient. It is better to finish wet cleaning by wiping the floors with a dry cloth. For cleaning, you can use washing vacuum cleaners and steam mops. Disinfection of the floor is done according to the instructions.
We recommend reading: Floor design options in a private home
Decorative design
To decorate the floor, chips, flocks and sparkles are used, which are simply applied over a layer of liquid flooring. Rolling a surface with flocks or glitter with a needle roller creates a textured pattern over the entire thickness of the coating. When the polymerization of the floor is completely completed, it is varnished with wear-resistant polyurethane varnish in two or three layers. Applying varnish to the prepared floor is carried out with any convenient or available tool (brush, roller, spray).
The floor acquires an individual, unique look thanks to the application of various patterns and images on it. For this, acrylic or polymer paints are used. You can simply stick a pattern printed on a thick material onto the floor, which is then varnished. This technology is suitable for any type of floor.
Please note that after applying the self-leveling floor, for 2 days you need to create conditions of a certain constancy of temperature and humidity (close windows and doors, eliminate drafts) until the coating completely hardens.
The video shows how to pour self-leveling floors
Conclusion
Compliance with the sequence of all surface preparation operations, strict adherence to recommendations for preparing the mixture and pouring the floor is a guarantee that the resulting result will be pleasing to the eye and will last for many years.
Base and finishing levelers
Levelers for roughing (basic) processing and finishing (finishing) differ in composition and characteristics.
Basic ones have a coarser texture, a larger fraction, serve to eliminate significant defects and are applied in a thick layer to ensure strength.
The main component of base levelers is most often cement, which provides strength and the necessary adhesion
Finishing agents, in addition to leveling the base and increasing its stability, result in an even and smooth surface due to a more complex and uniform composition.
When carrying out cosmetic repairs, you can level a floor that has minor defects using a finishing screed
Surface preparation
When screeding the floor with a special solution, there is no need to additionally prepare the surface, since the filling is done in a thick layer.
Self-leveling floors require careful preparation and cleaning of the surface.
Arrangement of beacons
Fill the screed, focusing on the beacons. Most mixtures have self-leveling properties under their own weight and do not require beacons.
Using rack or pin beacons when pouring