Concrete screed is used as a rough base for various finishing floor coverings and can be used as the main floor in technical production rooms, garages, warehouses and other premises. To increase strength, it is reinforced with metal mesh or construction reinforcement of a periodic profile. In some cases, water protection is used. The specific features of the concrete screed depend on the operating conditions and purpose of the structure. Regardless of the specifics of the technology for pouring surfaces with concrete, all work consists of several stages.
Concrete screed
Installation of concrete floor screed
Preparatory stage before leveling the floor
Regardless of the method we use to level the floor, first it must go through a preparatory stage.
- The first step is to remove the old coating, if any.
- Next, you need to clean the surface from work debris, construction dust and foreign objects that could interfere with the leveling process.
- Next, the surface is primed.
- After applying the first layer of primer, you need to cover the floor with a waterproofing solution, then apply a second layer of primer, due to which the maximum level of adhesion with the concrete solution is achieved. Or lay down a film to exclude moisture coming from the ground.
Important: “If the room does not have a basement, then you need to lay another layer of insulation in the form of penofol or polystyrene foam, on which a metal mesh is placed on top. If a heated floor system is provided, then it is installed last in the preparatory stage, i.e. after laying the heated floor, the floor screed comes next. When leveling the floor on the second floor, a waterproofing layer is therefore not needed. There is enough primer for good adhesion of the screed to the floor.”
- An edge strip should be attached around the perimeter of the room, which will prevent minor vibrations and help avoid squeaks and other noises. It can be a special damper tape purchased in a store or any foam material, such as penefol.
Features of crushed stone
Crushed stone is obtained naturally or artificially, that is, it is either mined in quarries or crushed rocks. The material is divided by size, which is determined by its fraction. It can be small (5-20 mm), medium (20-40 mm) or large (40-70 mm). Each has its own characteristics:
- Small one copes with heavy loads. This type of crushed stone is popular in the construction of foundations.
- The middle fraction is suitable for self-leveling floors.
- Large ones are quite difficult to compact, since voids form between the particles, reducing strength. Therefore, this option is used only when constructing volumetric structures.
The principle of leveling the floor according to beacons
First, let's figure out what is a beacon in construction? It so happened that metal profiles began to be called lighthouses in construction. In general, this is true, but there is one important caveat: metal profiles are set to zero level. What is a lighthouse by nature? This is primarily a landmark! From this we can conclude that a beacon can be not only a metal profile set at a level, but any device that can be guided by in order to obtain a flat plane at the zero level. Those. a beacon can be a laser beam, the horizon, or a thread with a suspension.
In construction, for the convenience of the process of leveling something, walls, ceilings, floors, beacons are installed to help quickly find a landmark to create a flat, ideal surface, which means they must be rigid, on which you can lean or rely. And most often metal profiles are used for this, which is why they began to be called simply beacons. But in construction, as we found out, a beacon can also be a wooden beam, a frozen mixture (gypsum, plaster), or sheets of plywood, the main thing is that they are set to the zero level.
Now we will define the principle of leveling the floor according to the beacons. Whatever the floor screed, wet, dry or semi-dry, the principle of leveling will be the same. The beacons are set according to the level, and then the floor is filled or filled with the mixture, the mixture is leveled by the rule relative to the beacons, starting from the corner of the room and following to the exit. The mixture hardens and then comes the final stage of leveling. But what specific mixture is and what the final stage of leveling is, it depends on the type of screed, whether it will be wet, dry or semi-dry.
Methods for checking screed before laying flooring
Since the main requirement for the base when laying sports flooring is its evenness, before starting work on linoleum flooring, all flaws on the surface of the screed are identified. Height differences of no more than 2 mm are allowed.
Control is carried out using a two-meter strip applied to the surface of the screed. The measurement is carried out in places of the largest gap between the support points of the rack using a graduated wedge.
If there are bulges and depressions on the surface of the screed that exceed the tolerance, they must be removed by grinding or sealing with repair compounds. Cracks wider than 0.4 mm must be expanded and sealed with epoxy resins.
Laying linoleum is allowed only after the screed has dried to 75% humidity. To measure it, carbide hygrometers, electronic moisture meters or laboratory analysis using a drying cabinet are used. But there is also a simple method without the use of special equipment.
It is enough to cover an area of about 1 m2 of screed with polyethylene, gluing the sheet along the edges. If after 24 hours no condensation has formed under the film or the screed has not changed its color, further work on laying linoleum is allowed.
Installation of beacons for leveling the floor
The floor level in all rooms must be the same. Therefore, it is necessary to find the highest point in the entire room and orient from it, taking into account that the minimum thickness of the screed is 2 cm. We determine the distance between the rows in such a way that it is convenient to level the mortar using the rule. If the length of the rule is 2 meters, then the distance between the rows is 1.5-1.7 meters. The outermost beacon is placed from the wall at a distance of 20 cm. The rest run parallel.
1st method of installing beacons
- Let's take metal U-shaped profiles (guide profile 28x27x0.5x3000mm).
- We cut the reinforcement long, about 15-20 cm.
- According to the markings, we make holes in the floor to a depth of approximately 5-6 cm.
- We insert the cut pieces of reinforcement into the holes and use a laser level to mark the cut location. (you can use a regular building level, but the process will take longer).
- We cut the reinforcement level with a grinder.
- After the racks have been leveled, all that remains is to lay the metal profile on top and the beacons are ready.
2nd method of installing beacons
This method is suitable for places where the floor difference is insignificant (up to 5 cm), and the design of beacons can be made simpler, or rather lightweight. Metal T-shaped profiles or a “beacon” profile are used, also called a “plaster” profile. The profiles are mounted to the floor and leveled using dowels and screws.
Watch the video:
Leveling the walls with plaster according to the beacons.
3rd method of installing beacons
Another way to install beacons is to fix the profiles to plaster or cement mortar. The profiles are laid and leveled and after hardening they are ready to fulfill their intended purpose. This method is considered the most economical and simplest if the floor is leveled with a wet screed.
4th method of installing beacons
When using a dry type of floor screed, logs made of wooden beams can be used as beacons. The timber is leveled using spacers and then fixed to the floor with dowels. There are also special adjusting fasteners and other methods of fixation. You can make a sheathing from timber, which will also serve as beacons, on which sheets of plywood are subsequently placed.
If you are interested in this type of beacon installation, you should find out more about it.
Waterproofing and insulation
In the case of waterproofing on the surface of the base, you can use both rolled materials and bitumen-based mastics. An inexpensive and reliable option would be polyethylene film with a thickness of 200 microns. It is laid on the prepared surface with an overlap of 10-15 cm, the seams should be secured together with tape.
The film should extend onto the walls above the top mark of the concrete screed. Particular attention is paid to the corners of the room. The film cannot be cut, but must be spread over the surface of the walls, secured with adhesive tape.
Natural and polymer insulation can be used as sound and heat insulating materials. These can be slabs of extruded, foamed polystyrene foam or high-density basalt stone wool. For their installation (depending on the material), various types of adhesives or polyurethane foam are used. The sheets are arranged staggered, without direct intersection of the longitudinal seams. The joints must be sealed with a sealing compound.
A layer of vapor barrier made of membrane or polyethylene film must be laid on top of the insulation. Its flooring is also overlapped with joints sealed and placed on the walls.
If you need to significantly raise the floor level in a room and at the same time perform heat or sound insulation work, there is no need to install a screed to the entire required height. You can fill the surface of the base with blast furnace slag or expanded clay to a certain height, and install a cement floor screed on top.
This will not only reduce the load on the floor slab, but also save on concrete consumption, since its cost is much higher than that of bulk materials.
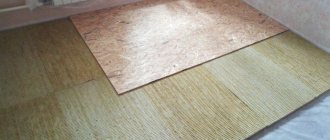
What does dry floor screed mean, its advantages and disadvantages
A dry floor screed is a structure installed on a load-bearing floor base, made of bulk material and flooring.
This type of screed is suitable for residential buildings with normal, moderate and low humidity. When choosing this technology, the time period for completing this stage of work is significantly reduced. A floor made in this way does not bear the load on the supporting structures of the house, since the weight of such a screed is less than that of a traditional “wet” screed. This should be taken into account when performing work in wooden houses.
The following can be used as bulk material:
- Expanded clay (small fractions - up to 5 mm);
- Expanded perlite or vermiculite;
- Crushed slag;
- Pumice;
- Quartz sand;
The thickness of the layer depends on the material and the planned functionality, but should be at least 4 cm. Warmth and sound insulation are felt after 5 cm. Subsequently, flooring is laid on the filler. The flooring can be:
- Plywood with a thickness of 10 mm. (Moisture-resistant plywood class FK);
- Chipboards with a thickness of 18 mm (Moisture resistant, second grade, class “B”);
- Cement particle boards;
- Oriented Strand Boards (OSB);
- GVLV (moisture-resistant gypsum fiber sheet);
- GKLV (moisture-resistant plasterboard sheet);
Unlike the process of installing beacons and leveling the mixture, which by and large do not differ in any way from other types of floor leveling, laying flooring on top of the material is present only in the dry form of the screed. Therefore, it is necessary to tell a few rules that must be followed when laying flooring sheets.
- Laying is done in two layers
- The sheets are mounted with an offset of at least 25 cm in both the upper and lower layers.
- The seams of the layers should not coincide with each other.
- A gap of 1-3 mm should be left between the sheets, 10 mm at the walls.
- The layers are glued together with tile or special glue and secured with self-tapping screws until completely dry.
For ease of installation, tongue-and-groove chipboards are also produced - having a connecting groove and tongue at the ends. After laying the flooring, another layer of waterproofing is laid.
Advantages and disadvantages of dry screed
An undoubted advantage is the possibility of laying communications and fairly easy access to them in case of repairs. The dry screed material has low thermal conductivity. The time of work is not seasonal.
The disadvantages of dry floor screed include moisture intolerance (not suitable for rooms with high humidity levels: baths, swimming pools). If the screed gets very wet, then restoration is useless. When laying, an additional layer of vapor barrier is required.
Sequence of work when using dry screed
- The floor surface is undergoing a preparatory stage.
- Installing beacons using any of the above methods, but the optimal ones are 2,3,4.
- Filling with filler.
- Alignment of the filler relative to the beacons.
- Laying plywood.
- Waterproofing layer.
- Installation of decorative flooring
- Cutting off protruding elements of the edge tape.
Conditions for pouring concrete screed
The production of a floor screed requires certain conditions: the absence of through cracks and deep recesses in the floors, the surface cleared of debris and dust, the installation of heat and waterproofing layers, and proper reinforcement. In addition, the weight of the concrete floor should not place excessive loads on the floors, otherwise damage cannot be avoided. All this needs to be thought through and prepared in advance, and only then proceed to the main work process.
In a new building, surface preparation for screeding is carried out in the following order:
- install drain and water pipes, make wiring;
- clean floor slabs from debris and dust
- mark the zero level of the floor;
- prime and dry the surface.
If the screed is carried out in a private house on an earthen foundation, first the soil is leveled and compacted. After this, the surface is covered with crushed stone, and on top there is a layer of sand of at least 10 cm. For greater shrinkage, the sand is spilled with water and compacted. Next, the zero level is marked and an insulating layer is laid to reinforce the frame.
Ground screed
When repairing the floor in a residential area, you should carefully inspect the old screed: if there are numerous defects and deep cracks, it must be completely dismantled.
Dismantling the floor screed
If the subfloor is in good condition, there are no chips or potholes, it is enough to pour a leveling screed on top.
Leveling screed
Stages of performing a leveling screed
When installing a floating screed, you will additionally need to lay a waterproofing film or roofing felt and secure a reinforcing mesh on top. The areas around the pipes coming out of the floor should be thickly coated with sealant, and damper tape should be applied along the walls. The thermal insulation layer is optional and is laid only if necessary: the insulation is placed on primed floors and covered with film.
Composition of a typical floating screed
What is a wet screed, in what cases can it be used, its advantages and disadvantages
Wet floor screed is one of the simplest and most affordable methods of floor leveling, which can be used in dry rooms and in rooms with high humidity, such as a bathroom or kitchen.
The main component of this method is a solution prepared from cement and sand in proportions of 1 to 3 if the room is intended for residential use and 1 to 4 if the room is planned for industrial use, where increased load on the floor is required. Sand and cement are diluted with water so that the resulting mixture has the consistency of sour cream. You can use ready-made foam concrete mixtures and levelers, and also add plasticizers to the solution, which help make the mixture more fluid and homogeneous and generally improve the quality of the mixture. Accordingly, ready-made solutions and the addition of plasticizers incur additional costs and can significantly increase the cost of this leveling method.
If the height of the wet screed exceeds 4 - 5 cm, the structure should be reinforced. Fiber (fiber fiber) is added to the solution or a metal mesh is laid on the floor before pouring. This process is called reinforcement. This will help to avoid cracks due to temperature changes and the ability of the coating to withstand stronger mechanical stress.
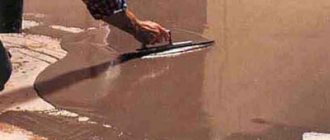
The alignment process itself is no different from others. The finished solution is laid out between the beacons, starting from the far corner of the room and moving towards the door. The mixture poured between the two beacons is leveled according to their level, moving it towards you. As the work progresses, where the solution has been poured and leveled, the beacon should be removed (the need for further use of the metal profile, and also if there is a high probability that the surface may shrink significantly after the water evaporates, and the profile will become higher than the level of the screed. But after After finishing the leveling work with a wet screed, tiles or a self-leveling floor can be laid on the cement floor in the future, which will be considered final leveling and will make the floor level as straight and even as possible.
One of the nuances of leveling the floor with a wet screed is the hardening of the mixture. Within one room, the floor needs to be leveled in one day. Therefore, the work should be done with assistants, while one levels the mixture, the other prepares a new portion of the solution.
You can walk on the finished screed after a couple of days, but it will completely harden only after 2-3 weeks. During this time, it is recommended to cover its surface with plastic film for slow drying. If water evaporates quickly, the surface may crack. An alternative to film is to evenly wet the surface twice a day with a spray bottle.
Advantages of cement-sand screed:
- Price;
- Strength and durability;
- Can be used in any type of premises;
- Ability to level very uneven surfaces.
Disadvantages of cement-sand screed:
- Long curing time.
Sequence of work when using wet screed
- The floor surface is undergoing a preparatory stage.
- Reinforcement of the floor with a height difference of more than 4-5 cm.
- Installation of beacons 1, 3 methods.
- Preparation of cement-sand mortar (adding fiber or plasticizer if necessary).
- Pouring the solution onto the surface.
- Alignment of the solution relative to the beacons.
- Removing beacons.
- Ensure slow evaporation of water. (Cover the surface with film or spray the surface with water).
Indicators of a job well done - uniform gray color over the entire surface, Maximum horizontal deviation - 0.2%, i.e. for a room 4 m long, the height difference should be no more than 8 mm.
Professional recommendations
To make it easier to unload concrete from a concrete mixer, make a small chute. It will not only direct the material to the right place, but will also protect the mechanism from contamination. When unloading the mass from the mixer, do not place the chute on the mesh; the concrete will press it to the base. Place a piece of brick under the gutter, and raise the mesh in this place with small stones. In this position, the concrete will not violate the required distance between the mesh and the base.
Example of a small wooden gutter
If the pouring takes several days, then before resuming it, seal the joints of the old concrete with a cement-sand mortar approximately 1 cm thick. Otherwise, the hardened old concrete will interfere with the leveling of the new one, and depressions will appear on the joint line, which will have to be leveled later.
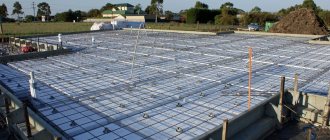
Concrete floor screed
The reinforcing mesh must be torn off from the base, otherwise it will not work. This can be done using concrete; at the same time, by the way, the stability of the lighthouses will increase. Throw a shovel or two of concrete onto each vertical post of the beacon. The quantity depends on the height of the poured layer. Then pull the reinforcing mesh up several times. Due to such actions, the mass will sink under the reinforcing mesh and lift it above the base. In this position, the concrete can completely harden, this will not have a negative impact on the final quality of the pour. The net will always be raised and its correct position will not change during walking. It is not profitable to use special plastic stands to raise the mesh. Thin wire bends a lot, you need a large number of stands. Their total price may exceed the cost of the reinforcing mesh. In addition, it takes a long time to install stands, and during work they may fall spontaneously. To correct them, you again have to waste time.
How to make a concrete screed with reinforcing mesh
For a thin screed, the concrete must be mobile, according to the existing consistency classification, approximately class P4. Not liquid, but mobile. It is much easier to work with, as a rule, there is no need to use an electric vibrator to remove air pockets. To improve the physical properties, plasticizers can be added to concrete.
Mobility of concrete
If the thickness of the concrete screed is within 5–7 cm, raise the reinforcing mesh above the base by only a few centimeters. If it is placed in the middle of the pour, then there will be no effect of strengthening the concrete in bending; the reinforcement will only work in tension. But floor coverings do not experience such loads.
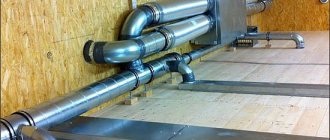
When pouring concrete, do not forget to leave technological openings for laying utility networks. You can use pieces of plastic pipes or make wooden boxes from any scrap lumber.
How to quickly make a concrete floor with dropouts
How to make a lightweight concrete screed with polystyrene foam
Features of semi-dry screed, as well as how to level the floor using this method
A semi-dry floor screed has exactly the same principle of floor leveling as a wet screed. The main difference is the leveling mixture, which introduces certain nuances into the process and gives rise to a number of pros and cons of this method. The solution consists of the same cement and sand, only a minimum amount of water is added, which is necessary only for hydration of the cement. Accordingly, more attention should be paid to this point.
The main feature will be the rapid hardening of the mixture; the solution will need to be used and leveled within an hour. Therefore, the solution should be prepared in portions. We take the same proportions 1:3 / 1:4, i.e. one shovel and cement to three shovels of sand, mix the required amount of mixture for leveling. At the same time, mix water with fiberglass (see the instructions supplied with the additive for proportions).
Then pour the resulting solution into cement with sand just enough so that the mixture becomes the consistency of sticky clay sand. If you squeeze the mixture, the lump should retain its shape without releasing moisture. You can also use ready-made mixtures from well-known manufacturers, which will simplify preparation, but will increase the cost of this method.
The leveling process takes place according to the principles described above, the solution is laid out and leveled according to the rule relative to the beacons. Since the mixture hardens quickly, it is recommended to proceed in two stages, i.e. lay the mixture in two layers. The first layer is laid with maximum compaction, and the second with an emphasis on leveling.
The beacons remain in the structure, you won’t be able to get them out, but you shouldn’t chew on the fact that they will stick out after drying, since the shrinkage of the screed will be minimal.
Another feature of semi-dry screed is that immediately after laying it begins to be grouted with a special grinding machine. This process should be carried out until the screed has completely hardened, no earlier than 20 minutes and no later than 6 hours after installation. During the grouting process, flat feet are used, thanks to which you can move along the screed without damaging the surface, and grinding discs of various fractions are used to obtain a smooth surface.
Also, the main features include that you can level only small surfaces with your own hands, up to 75 m2 in area; in other cases you will need a pneumatic paver.
The final readiness of the surface for further work will occur in 4-5 days.
Advantages of semi-dry screed:
- Obtaining a smooth surface without cracking, high screed density
- Minimum shrinkage
- Cleaner styling process
- Fast curing process
- Relatively inexpensive cost
Disadvantages of semi-dry screed:
- You can level surfaces up to 75 m2 with your own hands (in other cases you will need a pneumatic paving machine);
- Adding a plasticizer for greater convenience in leveling the mixture;
- If the mixing and application technology is violated, it may crumble and creak under the coating;
- Availability of a grinding machine.
Sequence of work when using semi-dry screed:
- The floor surface goes through the preparatory stage;
- Installation of beacons 1, 3 methods;
- Preparation of the mixture;
- Pouring the solution onto the surface;
- Alignment of the solution relative to the beacons;
- Floor grouting;
- Ensure slow evaporation of water.
Main components for the solution
Main components for the solution
Classic concrete mortar contains cement, sand and water, taken in certain proportions. If the thickness of the screed is more than 4 cm, crushed stone is additionally used. To reduce the weight of the screed, special fillers with a porous structure are added to the solution - vermiculite, perlite and expanded clay. These components have high water absorption, and therefore when mixing the solution, water is added in a minimal amount - only to make the mixture plastic and convenient for application. In order for the screed to be of high quality and withstand the expected loads, the ratio of sand, cement and porous fillers must be observed very accurately.
Approximate ratio for ordinary concrete
The strength of a concrete base depends not only on the brand of cement, but also on its mass fraction in the solution. A simple table will help you choose the right ratio of components for the screed.
| Brand of Portland cement | Design grade of concrete | Mass composition of dry concrete mixture, Cement / Sand / Crushed stone | Average volumetric composition of dry concrete mixture, Cement / Sand / Crushed stone | Volume of concrete produced from 10 liters of cement |
| 400 | 100 | 1/4, 6/7, 0 | 10/41/61 | 78 |
| 500 | 100 | 1/5, 8/8, 1 | 10/53/71 | 90 |
| 400 | 150 | 1/3, 5/5, 7 | 10/32/50 | 64 |
| 500 | 150 | 1/4, 5/6, 6 | 10/40/58 | 73 |
| 400 | 200 | 1/2, 8/4, 8 | 10/25/42 | 54 |
| 500 | 200 | 1/3, 5/5, 6 | 10/32/49 | 62 |
| 400 | 250 | 1/2, 1/3, 9 | 10/19/34 | 43 |
| 500 | 250 | 1/2, 6/4, 5 | 10/24/39 | 50 |
| 400 | 300 | 1/1, 9/3, 7 | 10/17/32 | 41 |
| 500 | 300 | 1/2, 4/4, 3 | 10/22/37 | 47 |
| 400 | 400 | 1/1, 2/2, 7 | 10/11/24 | 31 |
| 500 | 400 | 1/1, 6/3, 2 | 10/14/28 | 36 |
You cannot use old-caked cement to prepare the solution: even if the proportions are observed, such a screed will very soon crack or begin to crumble. When preparing for repairs, buy cement last, making sure to check its expiration date. The sand is pre-sifted, because excess impurities and debris also reduce the density of concrete. For the same reason, water for the mixture is taken not from a reservoir, but from tap water or spring water.
DIY concrete
List of tools and materials that will be needed to carry out floor leveling work
In order not to repeat the list of tools in each section, we decided to collect all the tools and combine them into one item. Depending on the type of screed that is suitable for you and your premises, based on the above material, determine a list of necessary and associated materials that will be used to level the floor.
Tools that will definitely come in handy, regardless of the type of screed:
- Laser level;
- Building level;
- Rule;
- Roulette;
- Trowel and spatula;
- Cutter;
- Construction mixer or drill with an attachment;
- Leveling mixture;
- Waterproofing coating;
- Primer;
- Roller and priming solution;
- Construction profile;
- Container for preparing the mixture (bucket or trough);
- Shovel;
- Metal profiles (beacon profile);
- Metal scissors.
To carry out the preparatory stage before leveling the floor:
- Primer;
- Roller;
- Film (200 microns) / Waterproofing solution;
- Broom (construction vacuum cleaner);
- Damper tape;
- Construction stapler.
What to choose?
Granite crushed stone is the most widely used for screeds. It has the best frost resistance, strength and at the same time low weight. In second place is crushed limestone. It is cheaper, but less durable. Other types are not so in demand.
Expanded clay has 13 strength classes. For floor installation, it is recommended to take a brand from P75 and higher.
In general, both materials are suitable for screeding. The main thing is to choose medium or fine particles with good strength, frost and moisture resistance.
Selecting the distance between beacons
Guided by the dimensions of the rule used to perform the work, it is easy to determine the interval between the supporting elements. During operation, the rule must slide along the supporting surface.
To do this it is necessary to provide:
- the interval between supports, which should be 10–20 cm less than the length of the tool;
- parallel arrangement of guides and equal distance between them.
You need to start installing the rail from the wall. The distance will be approximately 10-30 cm
The use of easily deformable materials as guides requires reducing the distance between them to 20–25 cm.