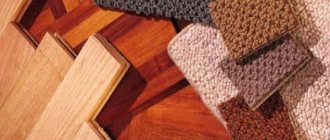
The range of floor coverings is now so wide that it is sometimes very difficult to make the right choice. To understand what to put on the floor, it is important to carefully study all the materials on the market. Each type has specific requirements for installation, conditions of use, and indoor microclimate. How to choose the right material? We'll talk about this in our article.
What to put on the floor
Saving on the rough field
Often the cost of a solution must be considered in its entirety. You need to compare several lines in the estimate at once, and not just one. This way you can cover the floor with an inexpensive laminate. But the cost of m2 must include a subfloor (a strong and level base) and a substrate.
With wooden floors, there are other cost items: in addition to the boards, there is also oil or varnish, sealant or cork backing to protect against squeaks, and fasteners.
But the absence of a subfloor, the pie of which can cost a pretty penny, warms the soul.
Cork
Cork flooring - naturalness and warmth
Such flooring materials allow you to create a truly original covering. The products are made from cork tree bark, so they are completely natural and environmentally friendly.
Among the advantages it should be noted:
- Comfort when walking barefoot.
- High level of sound insulation.
- The coating is non-slip and non-marking.
- The cork is well protected from moisture.
- The material is easy to care for.
- Wide range of colors and textures.
Disadvantages include low mechanical strength and short service life. In addition, cork requires subsequent finishing with varnish, so such floors cannot be called budget.
How to pull together boards
The easiest way is to cut a piece with a groove from the same board.
And use a hammer to adjust the boards to each other. But this method is not for perfectionists. If you have the opportunity and desire, then you can make one of the magical devices.
Device for pulling together boards
In this video, the author demonstrates the operation of this thing: https://www.youtube.com/watch?v=PMEzEffA2-U
Unfortunately, the author did not give the dimensions.
Second device
Andrey Shaiter is famous for his extremely useful videos. And then he turned up the heat. I assembled a device from plywood, tested it and already made a tool from a 25x25mm square aluminum pipe. All sizes are in the video.
A self-builder doesn’t need such thoroughness; it can be made from plywood. It won't be difficult to assemble a couple of these pieces.
In fairness, it is worth mentioning the device from Kreg. This dream of a perfectionist costs 6000 rubles. Ideal angles, drilling and tightening with stops will eliminate pinching and cracking. Suitable for cladding walls, terraces and of course floors.
Dry screed
The technology for making dry screed is simpler. This method makes it possible to obtain results faster than when pouring wet mixtures. Expanded clay is used as a substrate for the finishing level.
Expanded clay backfill Source ad-cd.net
The installation of a floor on the ground begins with backfilling a sand cushion and pouring a rough screed. After the concrete layer has hardened and acquired the necessary strength, proceed to the following stages of work:
- The waterproofing film is laid using the standard method. Strips of fabric are laid in overlapping rows. One sheet overlaps the other by 10-13 cm. The side sections of the film are covered with adhesive construction tape. The edges of the canvases along the entire perimeter are raised onto the wall. The lifting height corresponds to the thickness of the dry screed.
- To create a flat horizontal plane of the floor, plaster profiles are used. Beacons are installed around the perimeter of the room. Their height is determined using a building level.
- Create a pillow from expanded clay. The bulk material is compacted and leveled along the beacons.
- The expanded clay layer is covered with available building material (tongue-and-groove plasterboard, plywood).
- The slabs are covered with finishing material.
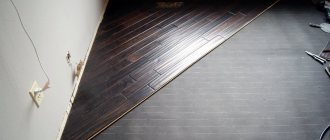
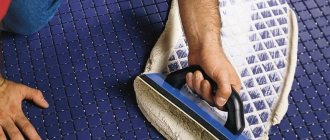
How to cover a wooden floor to avoid problems
In my opinion, varnish is not an option. If it peels off, as in the photo above, then you need to remove it from the entire surface and reapply it. This process is called scraping.
Trick: I recently began to remove a small chamfer from the floor board with a double-dome. After all, it is on the edges that chips occur. This way your floor will retain its original appearance longer.
The second reason is that the varnish makes the surface “plastic”. Yes, she looks like a tree. But to the touch and in essence it is acrylic. Then it’s better to buy laminate. He is more resistant to damage.
The only alternative to varnish may be oil. I like Russian. This is not an advertisement.
By the way, the guys from Doubledom also do not use varnish, but coat it in 2 layers with German Biofa borma or Osmo oil. Here is a comment from their leader:
Good oil costs about +200 rubles per m2. In the basic configuration of the house, the Tex water composition performed well.
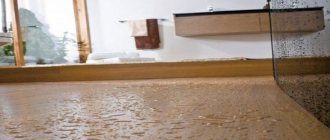
Here are the floors in one of the Double Houses. This is not an oil or a varnish. This is Tex's water composition. The most budget option. Half a year old. But a Labrador weighing about 40 kg caused damage to him with its claws. Therefore, dog lovers need to take this experience into account.
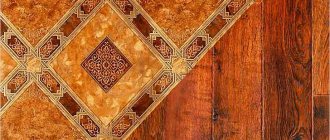
Parquet
Last on the list, but not least, is the flooring option. It is a high-quality and at the same time elite coating. Performance indicators directly depend on the type of wood used in manufacturing, as well as production and processing methods.
Parquet - durability and a feeling of warmth
If we talk about the positive aspects of parquet, it is necessary to note:
- Attractive appearance. Like other products made from natural wood, parquet boards look noble.
- Long service life. If installed correctly and sanded regularly, the coating can last approximately 30–40 years.
- High thermal insulation qualities. In warm regions, there is no need to install insulation under the parquet.
Minuses:
- Susceptibility to various deformations. In the summer season, wood expands and contracts in winter, so expansion joints must be left when laying.
- High price. Parquet is significantly superior to laminate or linoleum in this indicator.
- The need for regular repairs and replacement of the protective varnish layer.
Parquet is one of the best types of flooring, but due to the high cost of the material and work, it has not gained much popularity.
A huge number of different materials are suitable for finishing flooring. Craftsmen even use coins or cardboard to decorate floors. Most products can be installed yourself to save some money on hiring specialists. But there are also those that require qualifications and the use of professional tools.
Benefits of the oil
They won’t describe the advantages here—you can find them online. Very briefly:
- the damaged area can be washed, sanded and re-oiled without redoing the entire floor
- the wood remains to the touch and looks like wood
- “Zhivitsa” is 100% natural. You can work without gloves and respiratory protection. Unless you are prone to allergies to anything and everything. The base is linseed oil. There are no strong odors during work. The oil is washed off in the usual way with soap.
Concrete screed
Before carrying out work, it is necessary to collect information:
- about the composition of the soil;
- about the level of groundwater.
On swampy soils around the building, a drainage system is created to remove soil moisture during the rainy season and active snow melting.
The preparatory layers of backfill are applied one by one after the previous building material has been thoroughly compacted.
Thick layers of sand and gravel are difficult to make dense enough. Over time, the backfill will shrink, which will be greater the thicker the preparatory layers. Therefore, it is better to pour the rough screed directly onto the geotextile fabric. This technology ensures high-quality crystallization of the material.
When concrete is poured over a layer of gravel or sand, the liquid leaves the mixture. The hardening process is disrupted and the strength of the screed is reduced.
Important ! Each previous layer is carefully compacted, and when pouring the screed, the period necessary for hardening and drying the material is maintained. It will not be possible to make a high-quality concrete floor on the ground in one or two days.
The screed cracked due to a violation of the laying technology Source remontik.org
Violation of the manufacturing technology causes:
- deformation, destruction of the lower layers;
- loss of structural strength;
- formation of bumps, depressions;
- cracking of the screed.
Before work begins, hot and cold water and sewage pipes are installed. After pouring the concrete, in order to introduce communication systems into the house, you will have to break the tightness of the structure and break part of the floor pie.
Installation of floors on the ground is carried out in several ways, which differ in process technology and applicable materials. Each method has pros and cons. The choice of technology depends on the foundation, soil, tastes and preferences of the homeowner.
Pouring a concrete screed requires knowledge and skills from craftsmen. During work, “wet” solutions are used. The concrete hardening process takes time. Each new layer of building materials is placed on top of the completely finished previous one. A poorly dried rough screed may burst if the concrete is not allowed to gain sufficient strength.
How to properly coat a spruce or pine board with oil
The floorboard is usually made of softwood. This means that it contains a lot of resin. The resin will prevent oil from penetrating into the pores. On his Instagram, the manufacturer gave a way to properly coat spruce and pine with oil.
Question: I heard that oil is of little use on spruce and pine . There, they say, the resin is in the pores and the oil does not penetrate. Are they lying? ) Tell me how to do it correctly. Are there any nuances or differences from hardwood? Manufacturer's response: Resinous rocks can be treated with gum turpentine before impregnation with oil and all resin pockets can be cleaned. After this, soak in oil. There will be no sense if you do NOT process it, especially such porous wood species)
True, they gave this feature in the context of wooden furniture. But the mechanics and process are the same.
Something else worth paying attention to is the polymerization time of the oil. The surface can be used after 1-2 days. But the final formation of the oil layer will occur after 21 days. Until then, it must be handled with care.
A natural stone
Once this material was the main product for construction, but now it is considered a sign of prosperity and luxury. The fact is that the stone itself is cheap, but its processing requires high-tech, and therefore very expensive, equipment and consumables.
Natural stone - presentable and practical
Among the advantages it should be noted:
- High mechanical strength.
- Resistance to almost any influence (precipitation, sun, shock).
- Almost unlimited service life.
But natural stone also has disadvantages:
- Considerable weight, which makes it difficult to work with; it is not suitable for all floors.
- The stone is cold, so you will have to install a “warm floor” system.
- The installation process will be quite expensive.
- The material requires special care.
How to coat with oil and what consumption?
From one site we managed to get as many as 4 combinations of applying Zhivitsa oil to a wooden floor.
In any case, it would be a good idea to contact the manufacturer. And discuss the scheme and nuances of the coating. They actively respond to email and Instagram. And they definitely have the latest information.
The first combination is oils from the “Standard” line
- 1st layer - Primer oil. Antiseptic (consumption 10-15 m2 per 1 liter of oil);
- 2nd layer – Solid oil with wax (consumption 15-20 m2 per 1 liter of oil);
- 3rd layer – Solid oil with wax (consumption 22-25 m2 per 1 liter of oil*);
- 4th layer – Carnauba wax (consumption 15-20 m2 per 1 piece).
The second combination is professional oils from the “Pro” line:
- 1st layer - Bio Soil (consumption 10-15 m2 per 1 liter of oil);
- 2nd layer – Parquet (consumption 15-20 m2 per 1 liter of oil);
- 3rd layer – Parquet (consumption 20-25 m2 per 1 liter of oil*).
The third combination is oils from the “Standard” “Pro” line:
- 1st layer - Primer oil. Antiseptic (consumption 10-15 m2 per 1 liter of oil);
- 2nd layer – Parquet (consumption 15-20 m2 per 1 liter of oil);
- 3rd layer – Parquet (consumption 20-25 m2 per 1 liter of oil*).
The fourth combination is also “Standard” and “Pro” oils
- 1st layer - Bio Soil (consumption 10-15 m2 per 1 liter of oil)
- 2nd layer – Solid oil with wax (consumption 15-20 m2 per 1 liter of oil)
- 3rd layer – Parquet (consumption 20-25 m2 per 1 liter of oil*)
* Oil consumption for hard wood will be less.
Video description
How to properly create a floor pie for pouring a concrete screed can be seen in the video:
See also: Catalog of companies that specialize in finishing materials and installation of stoves and fireplaces.
Work must be carried out under certain conditions:
- Filling is done at temperatures above +5 degrees.
- The construction site or room must have a roof or canopy that protects from direct sunlight.
Sequence of work:
- Step 1 . First, a sand cushion with a thickness of 20 to 60 cm is poured. The layer is leveled and compacted to the maximum possible density. The backfill is filled and compacted using heavy rollers.
- Step 2 . Crushed stone is poured on top of the sand. Ideally, the layer thickness should be about 20 cm. By tamping the crushed stone, the density of the sand cushion increases.
- Step 3 . The backfill is covered with geotextile. The strips of fabric are laid overlapping by 15–20 cm. An overlap is made on the walls from the side of the foundation strip. A damping tape is installed around the entire perimeter. It provides a decoupling between the floor and the foundation strip.
- Step 4 . A metal reinforcing mesh is placed on top of the fabric and filled with concrete mixture. The rough screed must harden thoroughly. Work cannot be continued until the material has acquired sufficient strength.
- Step 5. Double roofing material is used for waterproofing. The material is laid on a rough screed, then treated with bitumen mastic.
Laying penoplex for insulating a concrete floor Source altpol.ru
- Step 6 . The insulation layer is created from penoplex. Choose brands intended for the foundation. This insulating material is characterized by increased density, resistance to moisture, temperature changes, and the effects of bacterial and fungal infections.
- Step 7 . The next layer is a vapor-waterproofing film placed on the penoplex. The material is laid so that there is an overlap along the entire perimeter over the damping tape on the walls. Its height should be 18-22 cm. The film strips are positioned so that they overlap each other. The sides are taped with construction tape.
- Step 8. A reinforcing fiberglass mesh is laid under the finishing screed. Concrete is poured on top of this material. The thickness of the last layer can be from 5 to 10 cm.
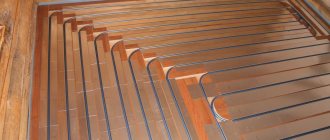
If a warm floor is created on the ground, then before pouring the finishing screed, the system is installed and pipes are laid. Concrete is poured after all commissioning work has been carried out.
Reinforcing mesh with damper tape around the perimeter Source vse-postroim-sami.ru
Classification of linoleum
Linoleum is divided into types and depending on its wear resistance. Guided by manufacturing technology, manufacturers cover the image, which is first applied to a PVC base, with a protective layer on top. The wear resistance of the material depends on the thickness of this layer. The thicker the “shield”, the more expensive the coating. Household linoleum, which has a low level of wear resistance, is usually laid in residential premises; The material is of a semi-commercial type, which is considered to have an average level of wear resistance, which is why it is laid in rooms with average traffic: hallways, kitchens, offices. One is quite rigid, which is why there are no marks left on the surface from heavy pieces of furniture and other objects. Commercial linoleum is endowed with increased wear resistance. For this reason, it is laid in industrial premises, as well as in areas with high traffic. However, please note that these are just general guidelines. In your apartment or house, you may prefer linoleum of any kind. Still, when choosing a flooring, do not forget about its purpose and the load it can withstand. Linoleum classes
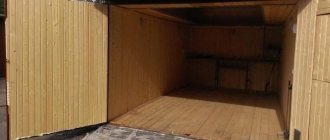
First floor in a private house
Floor pie on the first floor
Consider the following example of a design for the first floor in a wooden house. It does not use logs, and the sheathing is installed directly on the floor beams. This allows you to save ceiling height, makes the scheme simpler and cheaper.
The floor pie of the first floor in a wooden house is shown in the photo.
This scheme is suitable for the first floor above a warm basement, and for floors between the 1st and 2nd floors.
- At the very bottom there are cranial blocks made of 100*25 mm boards. They are screwed to the beams from the bottom. They are needed to construct a subfloor for laying insulation.
- Then there are load-bearing beams 200*50 mm.
- The subfloor made of 100*25 mm boards is laid on cranial blocks.
- A windproof film (vapor barrier membrane) is laid on the subfloor.
- Then insulation is placed between the joists. In a specific example, 2 layers of Rockwool Light Butts mineral wool are used, laid staggered, with a total layer thickness of 20 cm.
- The top of the insulation is covered with a vapor barrier.
- Then the sheathing of the joists is done. In this case, FSF plywood with a thickness of 21 mm is used. It is laid with offset joints.
- Additionally, it is recommended to add counter battens to this scheme to create a gap under the plywood.
Installation technology
If the base is uneven, then it can be leveled using a backfill of sand with a moisture content of less than 4%.
Installation of logs
Laying joists on a flat surface
- Most often, logs are installed perpendicular to the light from the window, so that the boards then lie along it. This will make the gaps between the boards less visible.
- First of all, install the outer joists with a gap of 2-3 cm from the wall. Then intermediate logs are installed.
- The logs are laid on the base without rigid fastening. Their evenness is checked using a level and a 2-meter rod. They all must be in the same plane. In this case, leveling with wooden pads or wedges is not recommended, but adding sand under the waterproofing is acceptable.
- To increase the rigidity of the structure, the logs are connected to each other by wooden jumpers, which are attached to galvanized 4*4 corners.
Note! It is imperative to install an additional joist in the doorway so that it protrudes into each room by at least 5 cm. This is necessary so that the boards from adjacent rooms rest on one base.
Insulation layers
Correct placement of insulation
- If laying takes place on a concrete slab, it is imperative to use a waterproofing layer, especially if the screed is new. For this purpose, roofing felt, polyethylene film, and backfill types of waterproofing are used. They are laid in a continuous sealed layer, with an overlap of 15 cm on the walls.
- To increase sound insulation and reduce the transmission of vibration noise through floors, it is recommended to install logs on soundproofing pads. You can make them yourself from polyurethane, cork backing, soft fiberboard.
- To insulate the floor, a layer of mineral wool or expanded polystyrene can be laid between the joists. Mineral wool also provides a soundproofing effect. Unlike concrete screed, it is not necessary to use high-density insulation materials, since there will be no load on them.
- For additional protection against noise transmission through the structure, before installing the sheathing, a cork backing can be laid on the joists.
- If you use mineral wool, then it must be covered on top with a vapor barrier membrane, such as glassine. This is necessary to protect against moisture ingress and condensation removal. It is secured as the boards are laid on the joists using a stapler.
- After installing the vapor barrier, there is no ventilation gap left under the boards, so it is recommended to screw a counter-lattice made of boards at least 1 cm thick onto the logs on top of it. The floorboard will be attached to them.
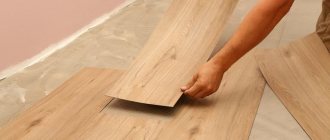
Finished flooring
Installation of finished floor
- A tongue-and-groove floorboard is most often used as the last layer; its price is approximately 13,500 rubles per cubic meter.
- To save money, you can use an unplaned board, but you will have to trim and process it yourself.
- Thick plywood or OSB sheets are also a good alternative. For floor coverings, their thickness should be 15-21 mm.
Why is composition information needed?
Regardless of the basic or final purpose, the mixtures include a similar set of components, these are:
The binding components of foreign mixtures are polymers, due to which the characteristics are improved along with a parallel increase in prices.
The formulas of dry mixtures also include dyes that determine the color of the future floor or base background for applying stencils, hand painting, banner images, etc. To increase the bonds between the hardening components of the self-leveling floor, microfibers are included in a number of self-leveling mixtures. Their chaotic direction firmly connects the ingredients in all possible directions, eliminating the possibility of cracks.
The main component that influences the choice of a mixture suitable for arrangement is its base. Owners who want to install a self-leveling floor with their own hands need to deal with this issue before purchasing the material:
To install heated floors, you will need a leveling mass with increased elasticity, capable of expanding and contracting without forming a network of cracks.
If you want to complete finishing at an extremely high pace, you need to pay attention to fast-hardening products. There are also universal dry materials suitable for rough and final leveling; you can buy a mixture labeled “extra strong” for laying coatings without first strengthening the base. Information about specific properties is available on the packaging.
I was looking for something to cover the worn parquet floor, but in the end I gave up on stereotypes
Of course, it is best to repair the parquet immediately and properly. But this is not always possible. Of course, it is best to repair the parquet immediately and properly. But this is not always possible
What to lay on top without killing the parquet
I reasoned something like this... I’m ready to go for a temporary, cosmetic, but quick and least expensive solution. I put off the big and expensive work of restoring my favorite parquet until later, when I have time, money and energy for it. And therefore, finishing him off is not at all part of my plans. Means?
✅ Maybe laminate? I mean, floating, on a substrate. No, he's outside my height tolerances. The minimum thickness is 6 mm, but it is laid on a substrate 2-3 mm thick. And my wonderful doors have a gap above the floor of about 6 mm. Should I cut good panel doors from below? Well, I do not.
✅ I categorically do not consider linoleum over parquet in rooms. Linoleum over parquet is beyond my strength, it’s mentally difficult. Although its thickness is only 2 mm, and the price is from 300 rubles per linear meter.
Agree, the low-pile Balta ITC Deauville carpet looks very decent. But here it is laid on a base prepared according to all the rules, and not on top of parquet. Agree, the low-pile carpet Balta ITC Deauville looks very decent. But here it is laid on a base prepared according to all the rules, and not on top of parquet
✅ So what remains? Only carpet? And thin. To be honest, I don't really like carpet material. But you can install it yourself. You will need double-sided tape, scissors, and accuracy and determination.
The low-pile carpet has a thickness of 5 mm (+/-). The width of 4 m allows you to do without seams. The price per linear meter of a decent beige coating without a pattern or with a nice modern geometric pattern is about 600 - 700 rubles/sq.m. Fine.
Looking at carpet samples on Yandex Market, I became more and more interested in the idea of carpeting. So, all that remains is the carpet. Or still...
Why is layer-by-layer installation of flooring necessary?
The visible part of the floor on which we walk is only the “tip of the iceberg”, below which there are several tens of centimeters of layers of other materials. All this is done in order to properly make the foundation in a wooden house and provide your home with a comfortable microclimate. Important parameters for any gender are:
- evenness - if the base of the floor is uneven, the floor covering will wear unevenly in different areas,
- high sound insulation - the more comfortable the room is, the less extraneous sounds are heard in it,
- wear resistance, which affects the service life of the coating,
- ability to retain heat.
Secrets of using finishing mixtures
Thin-layer final fill mixtures can be applied over virtually any substrate. You just need to select products in accordance with the manufacturer's instructions regarding compatibility. The priority is still cement and polymer bases.
Leveling proudly appears among the functions of finishing compositions, but since they are mainly filled with a layer of up to 5 mm, it is advisable to exclude gross flaws in the “relief”.
Even if the bumps and depressions can be smoothed out with a leveling mass, there is a strong argument in favor of first eliminating the defects.
Self-leveling floors of different thicknesses will harden unevenly, and strength indicators will vary significantly.
If previously the colorful range of finishing self-leveling compounds was dominated by dull gray and cream tones, now home craftsmen figuring out how to make a self-leveling floor can actively fantasize about their future decor. The result can be a monochromatic color coating with the color specified by the manufacturer, or a 3D version with a unique pattern, covered with an epoxy transparent layer on top.