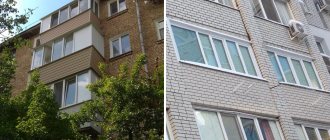
Insulation with plastic panels
The most practical and economical way to insulate a kitchen is to use plastic panels, metal profiles, as well as foam or polystyrene foam. But, before starting repair work, you need to check the availability of the necessary materials, as well as tools.
Such materials and tools include: metal profile, polystyrene foam or polystyrene foam, plastic panels, metal screws, screwdriver, dowels with screws, profile fasteners, drill, stationery knife, construction meter, marker or construction pencil, primer, level, cladding adhesive insulation.
Having the above materials, as well as tools, you can begin insulation and cladding work. The first stage of such work is to clear the room of all things and furniture in order to have access to any point on the wall surface. After this, it is necessary to measure the height and width of the surface that will be insulated. This is necessary to know how long the profiles are needed, as well as their number. Having completed the measurements, it is necessary to cut the profile in accordance with the height of the ceiling.
Insulating the kitchen with panels
What can you do?
On the modern insulation market there are many different products that can be used to seal windows for the autumn-winter period. Among the most popular options it is worth highlighting :
Various tapes . The most common type of cover is paper, which is attached using water or glue.- Scotch . If used correctly, stationery can also be suitable, but painting or reinforced is usually used. This solution is suitable as a temporary solution or for windows with small cracks.
- Self-adhesive insulation . It is considered one of the most optimal options due to its durability and versatility. Its main advantage, which sets it apart from other adhesives, is the ability to open/close windows without having to tear off the coating.
- Self-adhesive foam rubber . A good solution for sealing wide cracks. However, greater thickness can cause poor fit of the opening part to the frame when gluing in the appropriate places.
- Heat-saving film . A suitable option if you need to remove drafts entering the room from the joints between the glass and the frame. As an additional tool, it is perfect when using a self-adhesive sealant or foam rubber.
Important . When choosing insulation, you need to take into account not only its characteristics, but also the parameters of your window. There is a high risk that the hastily chosen product will not be suitable in size, density, adhesiveness or other indicators.
Read about how to seal wooden windows here, and how and with what to insulate plastic windows, you will learn from this article.
How to calculate the amount of material
The number of profiles must be calculated based on the fact that they are attached to the wall in increments of 50 centimeters. Having prepared the material, you need to mark the locations for the holes for fastening and mounting the profiles. To do this, apply a profile on the left side of the surface and mark its position, then repeat this procedure in increments of 50 centimeters. Having marked the installation locations with a drill, holes are made from bottom to top in increments of 30 centimeters on both sides of the profile near each profile. Dowels are driven into the holes and the profile fasteners are secured.
Having completed such preparatory work, a number of profiles are installed to the fasteners, the level of the profiles is aligned with the building level. After this, the surface between the mounted profiles is treated with a primer, glue is mixed and foam or polystyrene foam is glued. This entire structure is sewn up with plastic panels using the same metal screws. Thus, you get a smooth, neat and insulated wall in the kitchen.
Regardless of whether a person lives in a private house or in an ordinary apartment, he wants to be in comfortable conditions, the main one of which is warmth.
However, this is not always possible to achieve, especially if we are talking about an object built from panels.
If the walls do not cope with their task of maintaining a comfortable air temperature, they need to be insulated. Read the article on how to do this.
Tips for use
High-quality insulation of a plastic window significantly reduces the level of heat loss. If after the completed manipulations the level of heat loss still remains high, it will be necessary to adjust the window system, as well as:
- fix heat-saving film on the wall;
- provide electrical heating for the window unit;
- use wool blinds and curtains to decorate the window.
The first option is relevant if, in the manufacture of a plastic window, not an energy-saving, but a regular double-glazed window was used. It involves the use of a thin transparent material that has good heat-saving properties, but does not change the optical properties of the glass. The thin layer of metal included in the film ensures the desired effect is achieved.
Installation of energy-saving film is carried out in the following sequence:
- glass and frame are thoroughly cleaned of existing contaminants;
- double-sided tape is glued around the perimeter of the window frame;
- the film is cut from the roll with a small margin;
- The film is attached to double-sided tape, blowing the film with a hairdryer to ensure sufficient tension.
You should act with extreme caution so as not to damage the canvas and prevent the appearance of distortion and bubbles. If the technology is followed, the canvas will remain invisible.
Installation of electric heating is more complex. It is provided at the installation stage of the window system itself. If this has not been done, you can always seek help from a specialized company that can replace ordinary glass with panels with a built-in electric heating coil.
It is best to carry out thermal insulation work on a warm, dry day. Many thermal insulation materials allow installation work to be carried out at temperatures from +5C. At low temperatures you will not be able to achieve the desired result. In addition, the air temperature in the house will drop significantly.
During operation, you should adhere to the manufacturer’s recommendations, performing a set of maintenance measures in a timely manner. All elements of the door structure should be periodically cleaned of accumulated contaminants. It is necessary to make seasonal adjustments and lubricate the fittings. On sale you can find ready-made aerosols aimed at servicing plastic windows. If they are not available, you should use industrial Vaseline or automobile oil.
By following the recommendations listed, you can significantly extend the service life of the window system and create comfortable living conditions in your home.
When is it necessary to insulate inside?
to insulate walls made of panels inside a house when external thermal insulation has proven to be ineffective . In addition, it is not always possible to carry it out, for example, installation of insulation from the outside cannot be carried out if the house is a panel high-rise, or the walls border technical spaces, for example, an elevator shaft.
Reasons for insulating walls from the inside:
- The apartment is corner. In such a room, a large area of the walls comes into contact with frosty air, which is why it warms up worse and cools down quickly.
- Due to high heat loss, mold begins to grow in the corners of the walls.
- There is no external insulation, or it does not cope with its main task.
- The apartment is located on the ground floor or on the basement, which is why it is always cold in it.
If the panels quickly give off heat, then heating devices will not be able to cope with maintaining a comfortable temperature inside the room. At the same time, costs for heating, gas or electricity will increase. Frozen walls are the source of many troubles, ranging from mold to colds.
When is this not needed?
to insulate panel walls if the building has high-quality external thermal insulation . This means the dew point does not move closer to the living space, and the wall does not freeze.
The dew point is understood as the conditional boundary at which water vapor cools to the condensation temperature. This is especially true during the cold season.
If the cooling is below the dew point, then the process of vapor condensation starts : the windows begin to fog up, and the room becomes damp. However, if the house is built and insulated according to the standards, then the dew point will pass through the center of the facade panel and it will always be warm inside the building.
How to get rid of a draft from under the windowsill
Cold air can come directly from under the window sill board or from the junction of the lower frame profile with the window sill. Both defects indicate irregularities in the construction of the foam seam. In new buildings, installers save foam by filling large gaps with construction waste.
The most correct solution is to dismantle the window sill and reinstall it with careful foaming of the seam. In this case, it is necessary to break the lower part of the slopes and restore them after repair. Therefore, this method is rarely used. To avoid the least damage, we carry out the work in the following order:
- We break the plaster layer under the window sill to a height of 5-10 cm.
- We clean the mounting foam and construction debris from the seam. We leave only the support bars on which the window sill board rests.
- Carefully foam the seam to its full depth.
- After hardening, we restore the plaster and wallpaper.
Foam expands as it hardens. To prevent the window sill from lifting up, we place something heavy on it.
If work is carried out at sub-zero temperatures, you need to use special frost-resistant polyurethane foam.
This method is only suitable for shallow window sill depths. If it is more than 20-25 cm, it is very difficult to reach the frame installation plane. In some cases, the defect can be eliminated from the street side.
- Doors and partitions
How to insulate a balcony door made of wood and plastic: instructions for each type
Materials
To insulate panel walls from the inside, various materials are used. There are many possible solutions. To make the right choice, you need to understand for which panels this or that type of insulation is suitable, what features it has, and more. Here's what you need to pay attention to:
- Minvata . It can be used to insulate panel walls, but it is recommended to use it only as a last resort, for which there are 2 reasons. Firstly, it flakes off, and its particles in a free state can cause harm to health if they enter the respiratory tract.
Secondly, mineral wool absorbs moisture, which over time leads to a deterioration in its thermal insulation properties. The film will not help to cope with this problem; the water will still end up inside. In addition, the installation of insulation will require the construction of a frame structure. If you still decide to use mineral wool, then you need to choose a certified product that is approved for indoor use.
High-quality material retains heat well, meets fire safety requirements, and is lightweight. It is also recommended to cover the layer of wool with particle boards (OSB), and then proceed to finishing. The cost of the material is 580 rubles for 8 layers of mineral wool measuring 1200*600*50 mm.
Regular non-pressed polystyrene foam . It is mounted with glue and additionally reinforced with dowels; a fiberglass mesh is attached on top, which is embedded in the plaster. However, this material also has its drawbacks: it burns and melts, releasing toxic substances into the air, it is fragile and can be damaged by rodents.
Choice of insulation
The choice of insulation should be made, first of all, based on the capacity of your premises. If you don't mind reducing the size from inside the house, you can use materials such as polystyrene foam or mineral wool. It is better for residents of panel high-rise buildings to opt for less bulky structures - thermal paint, foam foam and others.
Consumables and tools
The tools and consumables that will be required during the work differ, depending on the type of insulation .
If installation is carried out from sheet material, it will not be possible to do without the following devices and tools:
When using wallpaper or paint as insulation, some tools, such as a drill or tile adhesive, will not be needed. For some materials, for example, mineral wool, beams will be required to construct the frame.
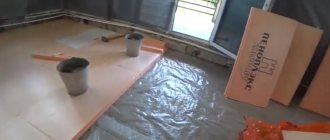
Wet screed device
After securing the reinforcing mesh, we move on to the screed device.
- To simplify the work, buy a ready-made dry mixture for screed (M150 or M200).
- Dilute the screed solution according to the instructions on the package;
- Start pouring from the far corner of the kitchen. To level the solution, use a long rule. To improve the quality of the screed, first install beacons on the reinforcing mesh. Level the beacons in all directions.
After the screed has dried, the beacons must be removed and the grooves from them sealed with a solution.
Screed care
A wet cement-sand screed takes 28 days to dry. For the first three days, it needs to be spilled (wetted) with water and covered with polyethylene.
The use of semi-dry screed technology with reinforcing fiber in the solution does not require spilling and covering with polyethylene. And beacons are not needed for semi-dry screed. True, you need work experience. Read a separate article about semi-dry screed in detail.
Technology
To insulate panel walls inside a house or apartment yourself, you need to follow the instructions. The step-by-step algorithm of actions is as follows :
- Calculate the required amount of material and purchase it.
- Prepare the surface for upcoming work. To do this, the walls are thoroughly dried.
- Remove old coverings in the form of wallpaper, paint and other decor. If plaster has been applied to the wall, it is removed down to the concrete panel.
- Clean the wall from dust and other contaminants.
- Prime the surface using a deep penetration solution. It is recommended to apply at least 2 coats of primer.
- Leave the walls until completely dry.
- Formwork is installed into which layers of insulation, for example, mineral wool, are installed.
- If formwork is not needed, insulation is attached. There is a specialized adhesive for each material.
- Seal the joints with sealant.
- Cover the structure with slabs or other finishing material.
Important ! You can start insulating walls only in summer or early autumn. During the cold season, this work is not done.
If it blows around the perimeter of the sash
The reason for the swelling may be that:
- windows are not set to winter mode;
- the rubber seal has become unusable;
- The clamping mechanism has become loose.
To prepare the window for low temperatures, you need to adjust the lower and upper hinges, and also move the locking pin to the desired position.
Step-by-step instructions for replacing the seal if it is unusable will be as follows:
- Remove the window sash so that the design features do not restrict access.
- Remove the old seal on the frame and sash and replace it with new contours.
- Be sure to glue the rubber bands together at the joints so that gaps do not form later. Avoid the formation of “accordions” and overlaps.
The clamping force can be adjusted on the upper and lower hinges using a No. 4 hex wrench. If you rotate the hex clockwise, the sash will be pressed against the hinge, and counterclockwise, vice versa. A video on the Internet will tell you how to do this correctly.
If it blows along the edges of the slopes
The main reason for such a draft is a damaged assembly seam. Even with the best-quality installation, this can happen after 5-10 years. To fix this problem, you need to disassemble the slopes, then apply foam along the seam and reinstall the slopes.
You can additionally insulate the slopes inside:
- polystyrene foam - this is the most affordable material that even a beginner can work with;
- foamed polyester - it is resistant to moisture and can provide additional heat and sound insulation, but care must be taken to seal the joints in the slopes;
- mineral wool - for plugging seams, it is not inferior in quality to previous materials, but you need to work with it in a respirator so that its particles do not irritate the mucous membranes, getting into the eyes and respiratory tract.
It is important not only to insulate slopes from the inside, but also from the outside. This will help protect the polyurethane foam from drying out, the doorway from fungus, and also make the temperature in the house warmer.
Difficulties and errors
When insulating panel walls, novice repairmen often make the following mistakes :
- They begin work in the cold season.
- They do not pay enough attention to the quality preparation of the wall.
- The glue is applied incorrectly (it is applied to the slabs along the perimeter in the form of strips about 4 cm wide, and dotted along the rest of the surface).
- The seams between the insulation are left empty.
- Install the insulation on an undried wall.
Consequences of errors
Mistakes made during the process of wall insulation lead to serious consequences:
- If the walls are cold or poorly prepared, the glue between the insulation and the wall will dry out quickly, which will impair its adhesion. As a result, the entire structure will be unreliable, and there will be a risk of mold and mildew growing.
- If the glue is applied to the insulation incorrectly, the material will deform, bending in one direction or another.
- If the seams between the slabs are not filled with sealant, cold bridges will form in the wall, through which warm air will escape.
- If the wall is wet, then soon a fungus will appear under the insulation.
Self-leveling floor
Cement-sand screed does not have a “mirror” surface. Therefore, to perfectly level the screed, after it has dried, you need to pour self-leveling, self-leveling floors.
A self-leveling floor will be superfluous if you are planning to lay tiles, and even more so if you are making a heated floor with tiles.
A simple self-leveling floor is poured to a thickness of up to 3-4 cm, a finishing self-leveling floor is poured to a thickness of 1 mm to 1 cm.
There is nothing complicated about pouring a self-leveling floor.
- Make the solution according to the instructions on the package;
- Fill the floor from the far corner of the kitchen. The entire kitchen must be flooded without interruption in one day;
- The self-leveling floor is leveled with a needle roller. One trick: when working with a needle roller, do not remove the roller from the solution and work with the roller for at least 10 -15 minutes.
- The self-leveling floor takes 2-3 days to dry.
The subfloor is ready, you can move on to finishing it.
©Remont-kuxni.ru
Other section articles: Repair of floors and ceilings in the kitchen
- No entries found
Table of minimum heat transfer resistance values for some regions of Russia
| City | Required heat transfer resistance according to the new SNIP, m2 °C/W |
| Moscow | 3,28 |
| Krasnodar | 2,44 |
| Sochi | 1,79 |
| Rostov-on-Don | 2,75 |
| Saint Petersburg | 3,23 |
| Krasnoyarsk | 4,84 |
| Voronezh | 3,12 |
| Yakutsk | 5,28 |
| Irkutsk | 4,05 |
| Volgograd | 2,91 |
| Astrakhan | 2,76 |
| Ekaterinburg | 3,65 |
| Nizhny Novgorod | 3,36 |
| Vladivostok | 3,25 |
| Magadan | 4,33 |
| Chelyabinsk | 3,64 |
| Tver | 3,31 |
| Novosibirsk | 3,93 |
| Samara | 3,33 |
| Permian | 3,64 |
| Ufa | 3,48 |
| Kazan | 3,45 |
| Omsk | 3,82 |