A hand-held electric tool such as a milling cutter can be successfully used to perform various types of processing of wood products. With the help of this equipment and a set of working attachments, you can not only decorate the surface of a wood product, but also qualitatively prepare a furniture façade or door for installation by using a router for cutting in locks, door and furniture hinges. Of course, you can perform the procedure for selecting grooves in a wooden product manually (using a regular chisel and hammer), but when using a router, the productivity of such an operation increases significantly, and the quality of the final result also increases significantly.
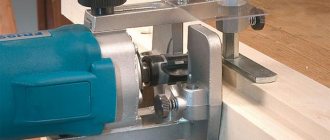
Making a recess for the lock using a router placed on a special device
Nuances of choice
When choosing tools and cutters, you should pay attention to several points.
First of all, you need to consider the frequency of use of the router. If the amount of work is small, you can choose inexpensive models. If you purchase a tool for frequent or professional use, it is best to take a closer look at more expensive and branded models. Often, cutters are sold in sets that are designed for specific types of work.
Regarding the selection of cutters, the following factors must be taken into account:
- the material from which the equipment is made;
- soldering quality;
- thermal strength;
- type of connection between the shank and the cutting part;
- size compatibility between tool and cutter;
- shank size;
- blade position.
When choosing equipment for a tool, you should inspect the cutters to check the quality of soldering and eliminate defects. The soldering of the equipment must be made so that the router does not lose its longitudinal stability during long-term processing
This is especially important if you have to work with hard wood.
Let's pay attention to the solder. The highest quality brands are PSr40 or PSr37.5, which contain increased levels of copper and silver
Additions in other brands usually contain nickel, which negatively affects the strength of the connection between the cutting part and the shank.
The characteristics of the base metal are divided into 2 types:
- designation HM - classified as high-speed, used in working with soft wood, but can be used in processing aluminum;
- designation HSS - made of hard metal alloy, used in working with hard wood, bronze, metal and plastic.
If possible, it is better to choose products with the HSS designation. They are more expensive than high-speed cutters, but the characteristics of such cutters are much better. The connection between the cutting part and the shank should under no circumstances be made by welding.
A fairly simple and important detail that you can forget about when checking is the dimensions. The equipment must be suitable in size for the tool. In the set, the router is equipped with collets or bushings with which the cutter is secured - the size of the selected equipment depends on their parameters. The size is indicated in millimeters or inches. The blades can be positioned at an angle or parallel.
This leads to physical difficulties during the work process, and the surface will need to be sanded. It follows from this that it is best to use equipment with vertical blades for preliminary work, and use inclined blades at the final stages of work. A good, high-quality cutter will not cause problems in operation and will not become dull during the first uses. As for choosing a manufacturer's brand, it is best not to purchase cutters from unknown manufacturers. Beginners and amateurs should consult with the seller or read reviews of brands before making a purchase.
Setting up the router
Inserting loops with a router begins with setting up the tool. The device itself will perform the entire operation if you set the necessary parameters on it in advance. In particular, it is necessary to set the required engine speed. And also set the desired processing depth.
To do this, you will need to bring the tool to a neutral position:
- Place the router on a hard and level surface.
- Loosen the feed pin lock.
- Lower the cutter to the level of the supporting surface.
- Set “0” on the processing depth scale.
- Secure the pin.
Professional router Source routerforums.com
How to disassemble the door handle of a round type interior door
The method of dismantling round door handles for interior doors may differ depending on the design features of the fittings. The most convenient are products that have two tightening screws. In this case, it is easiest to dismantle it yourself. To do this, you need to unscrew the fixing elements and remove the mechanism.
However, there are situations that require great effort. Mechanisms that are more complex from a constructive point of view are dismantled in several stages. On modern interior doors, round parts equipped with a button and various decorative elements are quite often found. The function of such covers is to hide the mounting screws. How to remove the handle from the interior door in this case?
To remove the round handle, you must first remove the outer part of the device
In order to dismantle the handle with the button and decorative overlays, it is first necessary to remove the outer part of the mechanism, which is attached using a special button. Next, you need to eliminate the linings that hide the retaining elements.
If the handle is damaged, it can be repaired. How to repair an interior door handle? First of all, you need to find out the nature of the damage. Based on this information, the necessary instructions are selected and the mechanism is rehabilitated. It is recommended that before dismantling the old handle, you determine its type and study the design features. To eliminate the round handle mechanism, experts advise reading the more detailed instructions.
https://youtube.com/watch?v=CPZAOlJomtg
The procedure for carrying out work on inserting door hinges using this device.
We install the door leaf horizontally on the edge.
Advice.
To prevent the door from falling, I insert it into homemade stands, which I made in advance from scraps of the MDF door frame and pieces of OSB.
The stand can also be made from a piece of table top (38 mm).
Attach the template to the door using two clamps.
Advice.
In order not to scratch the door, it is necessary to install rubber or fiberboard gaskets between the clamp and the door leaf.
Important!
You also need to lay a piece of fiberboard (2-2.5 mm) or a fragment of a ruler between the template limit and the door.
This gasket gives us in the future a gap between the door and the upper/lower transverse door frame.
When transferring the template to the loot stand, the spacer is removed (watch carefully at the very end of the video)!
note
, I limit the movement of the template using two slats. Rail for stop 50×20×580 mm - with the top loop. Rail for limiting 30×10×1500 mm - with the bottom loop.
This rail is attached to the first one using two 25x3.5 mm screws.
Advice.
In order not to change lanes every time, I first cut in all the upper ones, and then all the lower ones - it’s faster.
In principle, you can embed loops in a simpler way. Using this template, embed only on the doors, and simply transfer the markings to the frame and embed with a router, using the same stop that comes with the kit.
I also practice this if I need to assemble, say, two door blocks, but if there are more, then only with a template.
Advice. In order to accurately set the milling depth, I place one half (card) of the canopy between the router table and the wooden base.
After running it with a router, we get a recess for the hinge. In the corners, I use a chisel to clean out the corners.
At first glance, this work seems like there is a lot of hassle, but believe me, from my little experience, this is not so. Using this device, I hung it in a week without straining 25
door blocks. I’m finishing up on this topic and will be preparing to write the next one, so subscribe to new articles. There are a lot of plans, all that remains is to find time to implement our plans.
Installing the door leaf involves attaching the hinges, which are holders. To carry out the work without damaging the door, experts recommend using special templates. In addition, each door is equipped with a lock, the installation of which can also cause problems for an inexperienced technician. A lock template can make installation much easier. What kind of equipment is this and how to make it yourself, read on.
Briefly about the main thing
To cut a lock with a router or hang hinges on a door, you need to choose the right tool. It is best to use a simple submersible model, since the combined model is heavy. This will create certain inconveniences, especially if there is no experience in such wood processing.
Using a router to cut in fittings is easy. But the process is greatly simplified if there are special templates. Having placed the device in the desired place, all that remains is to set the required processing depth on the tool and install it on top.
When working, you need to carefully monitor the process in order to notice overload in time. It can occur if the wood structure is too hard. Then you just need to reduce the speed of the tool using a special switch on the body.
Ratings 0
Overview of species
A set with a router may contain a cutter, which is equipped with protectors and rods for performing the same type of work. The convenience of a manual router is that, if necessary, you can buy various types of sets of wood cutters that cut the required holes quickly and easily.
There is a huge range of cutting tools available for sale. They can be purchased at specialized construction stores or at the construction market. According to their purpose, cutters are divided into groups. For example, a spiral cutter will be needed to make a round hole in an interior door for mounting a handle. The classification is truly impressive; there are even devices for making lining.
According to their design, cutters are divided into the following types:
- with replaceable cutting edges;
- monolithic;
- prefabricated
Grooved
Based on the name, it is not difficult to guess that the main purpose of this cutter is to make grooves on wooden surfaces. You can also make recesses, grooves and recesses using a groove cutter. To embed a locking device into interior doors, you will have to use this particular type of cutter during the work process. For the best quality of work, you will need a groove cutter that is ideal in length. It will help to make the optimal recess at the end of the door.
There are 3 types of slot cutters:
- structural – will help to make such types of connections as “swallow tail” and “P” type groove hole;
- straight – mainly used in processing straight grooves;
- fillet – produces decorative carvings.
To produce grooves of different sizes, it is necessary to change the equipment to a larger size or adjust the router.
Edge
An edge cutter is used for making various carved elements and patterns on the area of the material being processed; it will also help in making the edges of products.
There are 4 types of edge cutters:
- straight – used in work using templates;
- edge cutter with a disk shape - this type has high accuracy and is used when making rebates;
- horizontal edge cutter – used for decorating edges;
- shaped type of edge cutter - will help in processing baseboards, facade frames and panel edges.
Almost always, this type of equipment is equipped with a bearing, which allows processing of ends and edges.
Curvy
Figurine cutters are used for cutting out various decorative elements on furniture and doors. Milling cutters of this type are equipped with a bearing - this allows you to work not only with straight workpieces, but also with a curved edge, which is very convenient.
There are 2 types of figurine cutters:
- horizontal;
- vertical.
In turn, the horizontal view is divided into 2 more types:
- one-sided;
- double sided
The difference between the devices is that single-sided cutters process the edge on only one side. Double-sided ones are designed for simultaneous processing both from above and from below. Vertical figurine cutters are used for deep milling of panels and are used to create skirting boards.
Tools required for tapping
It’s good if there are a few additional tools that may be needed during the work. These could be files, a set of drills, a tap for cutting threads.
To assemble the door latch (lock), you will need to prepare all the necessary materials and components. These include:
- Two handles. You can give preference to any shape (round, L-shaped and other types).
- Fastening elements (screws for connecting cylinder mechanisms).
- Cylinder mechanism complemented by a spring.
- Crossbars.
- Two sockets to hide the cylinder device.
- A measuring device (for example, a tape measure).
- Pen, felt-tip pen or pencil for making marks.
- Drill.
- Stationery knife.
- Masking tape.
- Chisel (size 0.1 and 0.2 centimeters).
- Drills (feather 2.3 centimeters, regular 0.2 cm).
- Crown (dimensions depend on the thickness of the door leaf). The most commonly used are 5 or 5.4 centimeters.
- Hammer.
For convenience, you can use a special tool for inserting the lock.
This is a list of tools required for high-quality installation of a door lock. If certain components are missing, you will need to purchase them or rent them for a while.
To make it convenient to work and not have to constantly be distracted by holding the door, it is better to secure the door leaf.
Installing hinges using a template
The door hinge template is suitable for both regular and concealed hinges. The necessary tools and instructions for using the device are exactly the same.
Tools required for tapping
So, to install a hinge on a door you need to prepare:
- template purchased or made independently;
- milling cutter In the absence of a router, the notch can be made with a regular chisel. However, this will increase the time required to insert the loop;
- drill;
A machine to facilitate the work of inserting door hinges and locks
- screwdriver or screwdriver. If you have a screwdriver, the process of fixing the hinge on the door leaf or jamb is easier;
- soft brush. The tool is designed to remove chips accumulated during work. This operation is recommended to be carried out regularly, as this helps to increase the accuracy of the work;
- chisel;
- roulette;
- the loops themselves. For a door leaf no more than 2 m high, 2 hinges are sufficient. Fastening elements are included in the hinge kit.
Complete set of door hinge upon purchase
To install furniture hinges, you will need a special attachment for a router that can cut round holes.
Instructions for inserting
Before you start inserting door hinges, you need to determine what distance of hinges on the door is most optimal:
- it is required to retreat at least 20 cm from the edges of the door leaf;
- If in the marked area there are any errors in the integrity of the door leaf, then the hinges can be moved 2-3 cm in different directions.
Loop insertion is carried out according to the following scheme:
- the door leaf is fixed to the floor using special clamps or other auxiliary devices. If the hinges are replaced, the door must first be removed. Fixing the door leaf contributes to the accuracy of further work;
- on the end part of the door leaf, the location of the future location of the hinges is marked, taking into account the requirements stated above;
Designation of places for installing hinges on the door leaf
- A template for marking the loops is attached to the location where the loop is installed. The hole between the restrictive pads must correspond to the dimensions of the hinge being installed;
Loop dimensions that must be transferred to the template
- Using a router, the main layer of the door leaf is removed. When working, the milling machine must be positioned strictly vertical to the door leaf. Any distortions will lead to errors during installation;
Arranging a niche for a door hinge
When removing wood, consider the thickness of the hinge and the fixing rod. If you make a minimal groove for the hinge, this will limit the functionality of the fittings. If the recess is too large, the hinge will be weakened and will not be able to securely hold the door leaf.
- the removed chips are removed with a brush for the next stages of work;
- The loop is tried on the prepared place. Detected defects in the operation of the router are removed with a chisel. The loop must fit neatly and accurately into the niche prepared for it. Any deficiencies may lead to the hardware becoming inoperable;
Refining the niche for the hinge with a chisel
- At the next stage, the locations of the mounting bolts are marked. To do this, place the loop at the intended location and use a pencil (marker) to mark the required areas. To insert hidden hinges, holes for fastenings are marked after simply attaching the hinge from the outside to the canvas. There is no other way to mark;
- The holes for the bolts are drilled. Pre-drilling simplifies further installation and reduces the possibility of chips and cracks forming on the door leaf;
- the loop is fixed with a screwdriver or a regular screwdriver of suitable size.
Securing the door hinge to the door leaf
The second part of the hinge is installed on the door jamb in a similar manner.
The entire process of installing door hinges using a special template is presented in the video.
A template designed for installing door hinges can simplify the work several times and reduce the number of possible errors that may lead to the need to replace the door leaf. The device can be purchased in a store, which is most preferable for professionals who insert hinges daily, or you can make it yourself.
To make a template yourself, you will need 2-3 hours of free time and a small amount of materials. At minimal cost, you can make a device for yourself that will come in handy more than once during repair work.
How to choose a milling fixture
Experts note that it helps speed up the work process several times. Moreover, the prepared niche turns out much smoother and neater than when using hand tools. When reading reviews, you need to immediately find out whether both of these parameters are provided or not. There are different types of locking devices, but they do not replace each other - so this point is worth paying special attention to. The vertical, also known as submersible, device allows you to select grooves of arbitrary depth.
Please note: this tool is useful for securing not only locks, but also door hinges. If you want to make the edges of a recess more aesthetically pleasing, an edging (sometimes called edging) device comes to the rescue. Experts prefer to use a combined device. It combines both functions and eliminates the need to move two heavy machines to each site. However, the cost of such equipment will naturally be higher.
At home, it is better to use a specialized router. At the same time, it does not require particularly high power; on the contrary, it will only unjustifiably increase the weight of the machine. But the option of adjusting the rotation speed of the cutter is very valuable for amateurs. It will help you complete all planned work more accurately. Important: in a good machine, such a switch is placed in a safe place (even when working, you can stretch your hand there without fear) and allows you to regulate the speed of rotation smoothly, and not stepwise.
Read also: Shapes of axes and their purpose
Another significant factor is how far the cutter can extend beyond the clamp. Usually this indicator is illustrated by numbers in the model name, and is expressed in millimeters. But it’s still worth reading the technical documentation to eliminate errors as much as possible. In addition, you need to look at whether it will be convenient to use the router.
This is determined by:
network cable length;
location of knobs and other controls;
list of functions performed.
Before purchasing, you should start the machine. If it is of high quality, the head should move completely freely. The slightest distortions and backlashes are unacceptable. The less noise the better. Also worth looking at:
Is there a wide view of the working surface?
is there any additional lighting provided?
Are there auxiliary attachments, holders, etc.
The procedure for inserting a lock
Marking
To make it more convenient to work, it is advisable to position the door leaf horizontally. The base must be sufficiently solid to prevent its displacement and vibration. As a rule, interior doors are made with a decorative coating, which is easily scratched, so you definitely need to put something under it.
The lock is installed from the end of the canvas and, naturally, in the center. This point must be found and marked, focusing on the existing risk. For the convenience of further work, it is buried (for example, with the tip of an awl), since this is where one of the lock fixing elements (a self-tapping screw) will be installed.
Next, you need to mark (also in the center of the end part of the canvas) the location of the latch.
Any lock is equipped with two handles that are attached to its “body”. You need to measure the distance from the strip to the hole where they are located, and then transfer this to the door leaf. In other words, you need to mark the points for drilling it under the door handles (on both sides).
Wood sampling
First, holes are drilled for the lock handles. As a rule, a feather drill, even the largest size, has a slightly smaller diameter. This is where a crown comes in handy.
Advice
When purchasing a lock, you must immediately purchase a corresponding crown based on the size of the handle rims.
Drilling must be done carefully; an electric drill (you can also use a powerful screwdriver) should operate at low speed. Craftsmen recommend first going through the hole about halfway, and then starting from the opposite side until you get a through hole.
Next, the crown is replaced with a feather drill, and the holes for the latch are also carefully drilled.
Lock assembly
First, the latch and the bar covering it are installed. Its outline is drawn on the end of the canvas, after which the entire mechanism is removed again. In order for the door to close freely, the strip must be recessed into the door leaf (installed flush). It is easy to sample the material with a narrow chisel and knife. When the mounting socket is ready, the mechanism is installed and secured using self-tapping screws (points are first marked by drilling shallow holes).
All that remains is to put the handles on and secure them.
Preparatory work
Before you insert the lock into the interior door yourself, you need to perform several preparatory operations:
- remove the door from its hinges;
- carry out markings;
- reposition the lock tongue.
Removing the door from its hinges
It is easier to install a lock on a removed door. The operation is simple if you know what type of loops it is:
- removable;
- one-piece.
Therefore, removal work must begin with determining the type of loops. If they are removable, then the operation is carried out in the following sequence:
- the door opens 90o or more. It is important here that when lifting the door leaf does not rest against the door frame;
- decorative caps and overlays are removed from the hinges;
- loosen the adjusting screws, if any;
- a durable long object is inserted into the gap between the floor and the canvas: a pry bar, the handle of an agricultural implement, a crowbar, an ax, etc.;
You can remove the doors using a special jack.
- the canvas rises until the loops disengage.
It is better to do the work together - there is no risk of the door falling to the floor. Assembly is carried out in reverse order. Door leaf with one-piece hinges is easier to remove:
- doors open;
- Decorative decorations are removed from the hinges;
- Use a screwdriver to unscrew the screws from the jamb or door side.
Marking
Marking when inserting a locking mechanism is necessary for several reasons.
First, decide on the location of the lock. For a wooden door, it does not matter at what height the insertion will be made, but for doors made of MDF, the location of the lock is extremely important. It's hollow inside. To install the locking device, a special beam, small in length, is attached to the housing. Any attempt to drill a hole outside the beam area leads to damage to the canvas.
MDF door diagram.
Secondly, the holes for the handles must match the cutout for the latch.
Therefore, all marking work begins with determining the height of the handle: it should be within 90-100 cm from the bottom edge of the canvas. To do this, use a tape measure and a pencil to mark the horizontal axis of the lock on the canvas. Experts consider the optimal height to be 97 cm.
The location of the locking mechanism in height is determined.
Using a square and pencil, a horizontal line is drawn through the marked point to the edge of the door leaf, after which it is transferred to the end.
Using a square, the desired height is transferred to the end of the door leaf.
Further actions depend on the type of locking device.
Marking for a round lock. Let us immediately note that if you have a professional tool, a plastic template is attached to the horizontal line, according to which all operations are performed.
When doing the work yourself, a paper diagram template, which is almost always included in the package, will help with further marking. It bends and is applied to the end and side of the door. Marks are made with a sharp object for the holes to be drilled.
An attentive visitor will notice that there are two marks under the handle: 6 and 7 cm. This was done for different doors. For a wooden panel, the mark is placed further - the hand will not touch the box when opening/closing. For doors made of MDF - at a distance of 6 cm. The requirement is dictated by the size of the timber for the lock. In the castle itself, this approach is built into the design.
Template for installing a round lock.
At the end, the mark is placed exactly in the middle. If there is no template, it is not difficult to set 6 or 7 cm marks under the holes using a square along a previously drawn line.
The distance to the handle is measured.
Alternatively, you can attach a latch to the side of the door and mark the drilling location through the hole under the handle.
The location of the handle is marked.
Marking for a flat lock. There are no templates for the flat lock body. Here you have to do everything yourself, and slowly, to avoid mistakes. Marking is performed in the following sequence:
- at the end of the door is the middle. Marks are placed in several places;
- A vertical line is drawn along the marked marks. The intersection with the horizontal line (drawn earlier) will be the center of the locking mechanism;
- The lock body is placed on the end so that its center is at the crosshairs of the vertical and horizontal lines. A shift of a few mm down or up is not critical;
The boundaries of the body are marked.
- The bottom and top of the body are marked with a pencil;
- using a pencil and a square, the lower and upper boundaries of the mechanism are transferred to the side surface;
- There are points for drilling holes for the cylinder and handle. You can do this in two ways:
- place the body on the side of the canvas and mark the centers of the handle and cylinder with a pencil;
- Using a square, take the required dimensions on the body and transfer them to the door.
The locations of the latch and handle are located.
Marking by size.
Rearranging the lock tongue
Lock mechanisms can be right or left. This is determined by the position of the tongue: its beveled side should be in the direction of closing the door. Most manufacturers take this point into account and make it possible to change the factory design for a specific door by turning the tongue 180o. The operation is performed differently, depending on the manufacturer:
- USK. Using pliers, the pawl is pulled out of the body until the rectangular shape changes to a round one. After this, the tongue turns over in the desired direction;
- "BONAITI". Here the pawl is pulled out completely from the body and then placed on the desired side. But first you need to move the latch located next to the larva;
- "MORELLI". It’s even easier to change the location of the pawl at the locks: remove the lock and completely push the pawl into the mechanism body until it clicks. The tongue will pop out already upside down;
- MVM. The model has a little trick. You can change the position of the tongue when the lock is closed - the pawl is pulled out, turned over, and put back in place.