The joy of buying an apartment passes quite quickly and is replaced by more pressing questions: where to get furniture if there is no money? In particular, this issue is especially acute for the kitchen: the amount of all kinds of utensils simply needs to be stored somewhere, not to mention the fact that all of this needs to be used. Today we’ll look at the process of creating a kitchen from plywood with your own hands - on a budget, not too difficult and quite practical. Go!
1. Real case from practice
2. Drawing and calculations
3. Prices
4. Photos of homemade kitchens
5. Video
Making a headset
The main operations that you will have to perform when making furniture from plywood are assembling the frame, hanging doors and installing shelves and drawers.
Plywood is a fairly durable lumber, so there is no need to use timber when assembling the frame. But first you need to mark the place for fasteners - screws or confirmations, depending on the option you choose. Next, take a special stepped drill, with which you need to make holes with threaded and non-threaded parts, as well as a recess for the Euroscrew head. If you use a classic screw, it is enough to perform countersinking using a drill of a larger diameter.
To create a connection on the front side, minifixes are used. Then you won’t have to waste time installing decorative plugs, but if they are missing, you can use Euroscrews. Before finally fixing the fastening joints, the ends must be treated with silicone sealant.
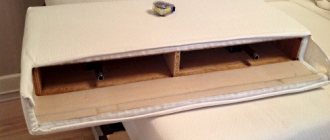
The first day. Facades
It took me several days to work. The first one started with cutting plywood for the facades. Sheet thickness - 10 mm.
Cut plywood for facades
I did almost all the work using a circular saw, and where small parts were needed, I used a sawing table.
In addition to the canvases, narrow strips were also cut out for decorating the facades. I decided to chamfer the front side so that our kitchen would look decent. This was done with a milling cutter at 45 degrees. I attached decorative parts to the canvas using glue and, in order not to wait for them to set, I shot them with a hairpin.
Fixed decorative strips on the facades
The back side of the doors was also processed with a milling cutter to make it not only beautiful, but also tactilely pleasant.
Furniture should not only be beautiful, but also tactilely pleasant, so I chamfered the back side
The finished facades were covered with inexpensive acrylic paint, which is intended for work in kitchens and bathrooms. And since the project was initially planned to be inexpensive, I chose inexpensive paint. At first, the result disappointed me. But after applying several layers of coating and sanding, I was very pleased. The facades turned out to be glossy and beautiful in color. Then they were coated with acrylic varnish. In general, working with acrylic compounds is very convenient: they dry quickly, and the whole job took me about two hours.
Working with acrylic compositions is very convenient and fast - especially when there are so many assistants
Master class from old furniture
Bird feeder made of plywood.
with your own hands. 500 photos, drawings, instructions If you have a 1971 chest of drawers or any other Soviet furniture at your dacha. Know that its strength will withstand the daily play of more than one child. But, of course, their appearance is no longer modern at all.
For example, such a grandmother’s cabinet turns into a fast food outlet.
Add lots of lettering and color and your child will squeal with delight.
And here’s how a similar cabinet has been transformed.
We had a chest of drawers like this.
I couldn’t even imagine that it could be turned into this miracle.
And now, my dears, we will make a kitchen out of chairs! Yes, you heard right, it turns out to be very interesting children's furniture.
A simple stool can be transformed into a kitchen island or stove.
The sides are great for ladle pans.
Or kitchen towels.
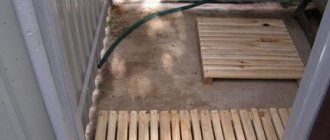
Have a small garden ladder lying around? We select, skin and send to work!
A stool from the fashion store IKEA has become miniature children's furniture.
And for those who find it easier to sew rather than glue and paint. Therefore, resourceful housewives came up with covers that imitate the kitchen.
Very convenient - take it off and wash it or put it away altogether when the child grows up.
Many pockets will replace shelves and will also help to properly store dishes.
Before I forget, I’m showing you another idea for a repurposed chair.
I know that many will be interested in the textile option, so I want to show you what measurements need to be taken before calculating the fabric consumption.
You need to measure the height of the backrest, width and length of the seat.
We sew the pieces of fabric together. For ease of fixation, I suggest using ribbons.
Well, then you need to sew on the pockets.
Glue another piece of fabric onto the Velcro, which will act as an oven.
We sew circles of contrasting fabric - this will be our slab.
Well, my dears, today the article turned out to consist more of pictures
but it’s important to pick up the idea and be inspired by it. I think that I was able to surprise you and give your daughter a homemade children's kitchen, at least in the future
My youngest daughter’s favorite toy, a plastic kitchen, broke and she began asking me to buy or make a new one. My wife suggested a link
to a cool post on the website dom.ya1.ru about homemade children's kitchens from IKEA furniture. This home economics site, despite leaving Yakutsk, continues to be supported by Nadya Tayakhova, the creator of the ya1 portal and a longtime friend of our family. The post inspired me to make my own children’s kitchen, but at the same time I had to come up with technical solutions myself.
Doors
Sliding barn-type interior doors made from lining have a number of advantages:
- Fits harmoniously into most interior solutions. A door painted white will decorate a Scandinavian or eco-style kitchen; a slightly darkened or aged door will be suitable for a loft.
- They save space, and when open they also add more air to the room.
- Suitable for closing non-standard size openings.
- They have a spectacular appearance.
In combination with massive forged fittings, a lining barn door becomes a real highlight of the interior. It has both the charm of rustic charm and stylish brutality.
The use of wood in decoration and decoration adds comfort and environmental friendliness to the kitchen interior. The lining treated with protective impregnation will last for decades, and if the interior becomes boring over time, the board can be painted or aged.
Where to buy high quality plywood for making kitchen furniture
Do-it-yourself chicken coop photos and drawings for 10 and 20 chickens
Today, the domestic market is overflowing with a diverse assortment of plywood of various quality characteristics and costs. A novice craftsman is often at a loss with the choice of material, because it is quite difficult to visually determine the parameters of plywood.
Professionals have learned from their own experience that you need to take the purchase of sheet material seriously and give preference to trusted stores that are direct representatives of large Russian wood raw material processing plants.
Advantages
DIY bed: drawings, diagrams, dimensions. instructions with photos and step-by-step guide
Even with little carpentry experience, you can cope with the task. Making a kitchen with your own hands will allow you to:
- Reduce the cost of the headset several times (at least 2). The difference is especially noticeable if, due to the features and layout of the kitchen, a standard set of furniture is not suitable, you need to make it to order;
- Create an individual design scheme that best meets the functional requirements;
- Make a unique set, give it an original shape;
- Be confident in high quality assembly at minimal cost.
Luxurious wood-effect corner kitchen with dark countertops
At the same time, you will need to spend time developing drawings and diagrams for making a kitchen set with your own hands, choosing the material, and the manufacturing and assembly process itself. It is necessary to have skills in working with tools - this guarantees quick results.
DIY kitchen set with beautiful top drawer fronts
Toy kitchen from an old nightstand
To make a toy kitchen with your own hands you will need:
- an old bedside table, preferably with drawers;
- CD or DVD discs and red plastic pieces - 4 pcs.;
- paint of several colors;
- light bulbs with wires;
- furniture fittings (canopies, handles, hangers with hooks, etc.).
Stages of work:
- The bedside table and all its elements must be cleaned of the old coating and sanded with sandpaper.
- Cover all the elements of the future kitchen with multi-colored, cheerful paint, delimiting the work areas: the stove will be located on one side, the sink on the other.
- Assemble the kitchen. Build an opening oven door under the stove, and leave drawers under the sink, which will be useful for storing various things, such as cutlery. Additionally, furniture facades can be decorated with individual decorative elements on an adhesive base in the form of flowers, vegetables and fruits.
- Screw the handles onto the drawers and oven door.
- Make a tabletop out of plywood with your own hands, cutting four holes in it for the burners and one large hole for the sink. Install it in the kitchen.
- Use disks and red plastic pieces to assemble burners and attach them to the hob. Mount light bulbs under the glass of the burners.
- Round handles for kitchen furniture can be used as stove switches. Connect the knobs and light bulbs of the burners using wires.
- Insert a stainless steel bowl of the appropriate size into the hole under the sink. Install a faucet next to the sink.
- Attach a hanger with hooks to a vertical surface and hang toy kitchen accessories on them.
The children's kitchen is ready. As a result, you should get it approximately as shown in the photo.
Read also: How to choose and sew Roman blinds for the kitchen?
Partition for zoning
The interiors of large kitchens or dining rooms combined with a living room require mandatory zoning of space. You can play with lighting, color, wall decoration, or build a partition from clapboard. In the kitchen interior it performs several functions at once: decorative, zoning, and can be used as an additional surface for decoration, flowers or dishes.
From the lining you can build a low bar counter, a light-transmitting slatted structure or a solid partition.
How to make a kitchen out of plywood
Often, apartment owners, when choosing furniture for their kitchen, cannot find the best option: the finished products offered for sale do not fit in size and configuration, and a custom-made set costs a lot of money.
Making a kitchen out of plywood with your own hands is a simple and inexpensive way to furnish your apartment with high-quality and practical furniture.
At the first stage of preparation for creating new furniture, it is necessary to create a sketch of the product and determine the exact dimensions of the set. Based on this, draw up an accurate drawing of the kitchen.
Often sets for storing kitchen utensils consist of several modules (3-4 cabinets). Example of material calculation for one module (85*65*50cm):
- Side walls (2 pcs.) 85*50 = 0.42 m2
- Shelves (3 pcs.) 65*50=0.33 m2
- Table top (1 piece) 65*65 = 0.36 m2
- Rear wall (1 pc.) 85*65=0.55 m2
- Facade (1 piece) 85*65=0.55 m2
- Basement facade 65*5 =0.32 m2
- Total plywood sheets – 2.53 m2
- Beam for shelves (4 pcs.) 50 cm
- Timber for tabletop (2 pcs.) 65 cm
- Total timber 3.2 m
- Self-tapping screws 30 pcs.
- Loops 4 pcs.
- Handles 2 pcs.
Material selection
High quality plywood is the key to successful completion of work and long service life of a homemade kitchen
When choosing sheet material, you need to pay attention to the following parameters:. 1 Variety
To make furniture, you should buy first-grade plywood made from selected wood. Such a slab does not have gross manufacturing defects or natural flaws on its surface.
1 Variety To make furniture, you should buy first-grade plywood made from selected wood. Such a slab does not have gross manufacturing defects or natural flaws on its surface.
2 Mark. For the manufacture of furniture, environmentally friendly plywood of the FK brand is used, made from peeled wood veneer and resin adhesive.
3 Degree of processing. For all front, side panels and shelves, a perfectly smooth plate (Ш2) sanded on both sides is used; for the manufacture of the back panel, a sheet processed on one side (Ш1) can be used.
4 Dimensions. Furniture plywood is produced in standard sizes (1220*1220,1500*1500,1525*1525 mm), thickness from 3 to 30 mm. For making a kitchen, a 10-15mm slab is considered optimal.
5 Manufacturer. The domestic building materials market offers a wide range of glued materials from various producing countries.
It is recommended to give preference to plywood manufactured at Russian wood processing plants: this material is made from high-quality wood raw materials in full compliance with all GOST requirements.
Making kitchen furniture from plywood - step by step
After the preparatory work is completed, you can begin the actual production of kitchen furniture from plywood, following the following procedure:
- 1 Apply images of parts and places of their fastening to the surface of the slab. Furniture made of plywood
- 2 Cut the sheet into the necessary elements, cut the timber.
- 3 Sand the edges of the parts with coarse sandpaper or a drill with a sanding attachment.
- 4 Putty the places of chips and cracks with acrylic mixtures (if necessary).
- 5 Coat the workpieces with antiseptic agents and drying oil to increase the moisture resistance of the material (apply the liquid in two layers, let dry completely).
- 6 Assemble the frame from timber.
- 7 Secure the walls, table top and facade.
- 8 Place fastenings with putty or cover with plugs.
- 9 Apply sealant to the joints.
- 10 Cover the furniture with final finishing products (varnish, PVC film, etc.).
- 11 Secure the fittings.
Kitchen measurements and design project
Before making furniture from plywood, it is recommended to take measurements and then draw up a sketch of the set based on them. Then you will have confidence that the furniture will be of high quality and reliable. But the main reason why you should start making furniture yourself is the individuality of execution.
In the process of creating a drawing of a kitchen set, it is necessary to take into account ergonomic indicators, the height of the housewife, the size of the kitchen space, as well as the wishes of family members.
Stage No. 1 - kitchen measurements
When taking measurements of the kitchen, it is imperative to include projections, niches and communications in the final results. All this must be depicted on a sheet of graph paper, observing the pre-selected scale. Don't forget about high technology - there is no need to waste time drawing a drawing by hand if this can be done using computer programs for creating 3D sketches.
This No. 2 is drawing development
On a sheet of graph paper you need to draw a draft version of the future look of the kitchen made of plywood, and show in it the locations of household appliances. Next, you should decide the size of the furniture sections - cabinets, shelves and drawers. Having displayed all the details in the project, it is necessary to remember that kitchen furniture must meet the requirement of ergonomics.
Information with recommended sizes for various elements of the kitchen set will help you with this:
- For drawers, the optimal width is 30–40 cm;
- There should be a spacing of 30 cm between the plywood shelves;
- For shelves, the same width is maintained as for the cabinet - 36 mm (for the frame, 18 mm plywood is used);
- The distance between the upper and lower tiers is 45–65 cm.
Summing up
Preparing materials, furniture diagrams and drawings, and directly assembling a kitchen from plywood is a painstaking but interesting task. The headsets are durable and beautiful, the release of harmful substances is minimized. Self-manufacturing of the design allows you to take into account the nuances of a particular room and the individual characteristics of family members. If the set is a complex structure, then the table can be assembled in 1 day. Try to start with this to understand how plywood behaves and what skills will be required to make more complex structures.
How to make a kitchen out of plywood
There are samples made from beech, mahogany, and tropical trees.
In order to competently purchase the plywood we need, we need to understand the classification of this material.
This information is detailed in the documents:
- GOST 3916.1-96 “General purpose plywood with outer layers of hardwood veneer.”
- GOST 3916.2-96 “General purpose plywood with outer layers of softwood veneer.”
Let's select from these standards some information that will help us navigate when choosing it in stores (at bases) of building materials.
Typical plywood sizes
- FC: 1525x1525, 1500x1500 mm, thickness 3, 4, 6, 8, 9, 10, 12, 15, 18, 21, 24, 27, 30 mm.
- FKM: 1220x2440 mm, 1250x2500 mm, 1525x3050 mm, thickness 3, 4, 6, 8, 9, 10, 12, 15, 18, 21, 24, 27, 30 mm.
- FSF: 1220x2440 mm, 1250x2500 mm, 1525x3050, 1525x1525 mm, thickness 4, 6, 8, 9, 10, 12, 15, 18, 21, 24, 27, 30 mm.
- Typical dimensions of laminated plywood: 1220x2440 mm, 1250x2500 mm, 1500x3000 mm, thickness 4, 6, 9, 12, 15, 18, 21, 24, 27, 30 mm.
In this particular case, we choose plywood for the kitchen - FC (moisture-resistant plywood, with urea adhesives), grade 1/2, with thicknesses of 18, 12 and 6 mm.
You should not waste time and money searching only for Finnish plywood (for example, the Finnish concern UPM or other “foreigners”).
Plastic lining is a cheap, high-quality option
PVC differs from wood not only in price, but also in practicality. Spending on consumables will be significantly reduced - plastic does not rot, does not suffer from fungus and mold, has a pleasant appearance, and a smooth surface. The only danger for this material is temperature, so the wall behind the gas stove and near hot pipes must be covered with ceramic tiles or other material.
A metal mounting frame is better suited for plastic. It is more expensive than wood, but lasts longer; it is easier to level due to the fastening features. U-shaped brackets securely hold the metal guides. The distance between the fasteners is 50 cm. For a 3x2 m room you will need 7 vertical guides plus 35 mounting brackets (for horizontal installation of the lining).
Plastic is easier to care for; a damaged fragment can be easily replaced without dismantling the entire wall. The service life of plastic trim is 4-6 years. The main disadvantage of plastic panels is their low impact resistance. The plastic breaks under light loads; the mounting frame may be damaged by a strong push or blow. You can't lean on such a wall.
Necessary little things
To make a girl feel like a real housewife, the children's kitchen should be supplemented with various little things. You will definitely need toy dishes, plastic cutlery, washcloths, and washed detergent containers. Also, a playroom can be supplemented with towels, napkins, oven mitts, and an apron. In the process of arrangement, you certainly need to consult with your child. Children's imagination will allow you to fill the kitchen with necessary and interesting things that will decorate the design.
Detailed master class on how to create a play kitchen on video.
Thus, with a little effort, you can build a kitchen for your child at home using improvised materials. Don't limit your flight of fancy. Involve your baby in the process, and then the creative process will become even more entertaining and interesting. Take your toy creation seriously. After all, a craft created with your own hands, and even in tandem with younger assistants, will become a real source of pride for all family members.
Care Tips
Despite the practicality and relative durability of the material, the lining needs special care.
- Despite special impregnations, wooden lining cannot be moistened with water to avoid deformation and swelling of the board.
- Do not use aggressive cleaning agents or detergents. If a serious stain appears, you can gently go over it with a soft cloth and a weak solvent. For varnished surfaces, you should use a cotton swab or cotton swab; you need to treat the stain very carefully so that the solvent does not remove the varnish along with the dirt.
- Any lining is lightly wiped with a soft damp cloth.
- Once a year it is recommended to treat the surface with protective agents (waxes, varnishes). Before doing this, the boards must be cleaned and dried thoroughly, sweeping away the dust with a soft cloth or brush.
- The clapboard trim should be positioned so that fresh air flows to them - if possible.
- In the apron area, it is better to place the boards vertically to prevent moisture from accumulating.
Kitchen furniture made of plywood (drawings and diagrams)
Furniture for the kitchen area made from plywood sheets is famous for its long service life, impeccable appearance and environmental friendliness. Before you begin creating a drawing, you must carefully measure the space. This approach allows the master to be confident that the end result will be reliable and high-quality interior items.
The thickness of the plywood sheets used depends on the upcoming load on the part and its purpose.
When creating a layout for a future kitchen, it is important to take into account the wishes of the household, the growth of the housewife, the functionality and ergonomics of the furniture set. The sketch shows the dimensions of bedside tables, cabinets, shelves and drawers, facades
Technological clearances must be taken into account so that all modules subsequently look flawless.
To make a durable frame and shelves, 18 mm thick material is used. For a façade, a thickness of no more than 12 mm is sufficient.
Next, materials, tools and necessary accessories are prepared in sufficient quantity. After this, you can begin marking the furniture components on sheets of plywood, cutting and assembling. In the process of such actions, it is necessary to remember about safety precautions and the features of the products indicated in the drawing.
The doors of wall cabinets, which are fixed using stiffening ribs, can be made of plywood 6 mm thick.
Today it is possible to make a huge amount of kitchen furniture from this material. For example, dining tables and worktops, cabinets with shelves, cabinets with drawers, creative chairs and much more. All these interior items have one thing in common - the ease of creating them with your own hands.
It is recommended to start making plywood furniture with the simplest designs, gradually acquiring and improving the skill of working with this material.
Prices
The calculations do not include the cost of tools and deliberately do not indicate the necessary list; prices are indicated with a reserve. Thus, the lower tier of the direct kitchen is 3 sq.m. will cost about $40 because:
- The sink cabinet does not require a back wall and a countertop (for a sink cover)
- It is possible to combine several cabinets into one - less plywood will be required
- You can refuse to buy timber in favor of furniture corners
- It is not necessary to close the base
- Prices for accessories vary greatly
- You can easily find much of this list in your garage/dacha/at your neighbor’s house.
How to make a kitchen out of plywood with your own hands?
As I understand it, the question is about a kitchen set. Making a kitchen with your own hands is a very difficult task, and if you do not have the necessary experience in making furniture, then coping with such a task will not be easy at all. In this case, we will not be talking about independently developing detailed drawings indicating the shape and size of each part of the headset with an interesting and original design. In this case, you can only order cutting of all the necessary material for the kitchen in a specialized store, buy all the necessary components, including fasteners, handles, metal or plastic holders for utensils, and then try to assemble and install the set yourself. Such a set will cost you much less than a ready-made store-bought one and will best suit your preferences, because it will be made according to the size and shape you ordered. But even in this case, when ordering a cut, you will need to draw up a schematic drawing of the headset and indicate the dimensions.
With completely independent production you will need:
- take careful measurements of the kitchen space into which your set will subsequently fit;
- decide on the configuration of the furniture ensemble;
- make a detailed drawing indicating all the required dimensions of the components of the headset;
- purchase all necessary consumables and all components (fasteners, handles, shelves, holders for utensils, etc.);
- if the humidity of the plywood is high, dry it out and only then use it for making furniture;
- mark and cut all the parts of the headset (this can be done using a jigsaw);
- coat all plywood components of the kitchen unit with a hydrophobic compound;
- begin the detailed assembly of kitchen furniture (the parts are fastened together using the fastening devices you have chosen; holes of the required diameter are made using an electric drill);
- after assembling each piece of kitchen furniture from plywood, carefully process the end sides of the plywood (they can be covered with a special edge, which can be bought at a specialized hardware store; or you can carefully polish all the end cuts - this is all according to your preference);
- after assembling all the items, the plywood walls of the furniture are coated with a paint and varnish composition (you can simply use colorless varnish, this will emphasize the natural structure of the material);
- after the furniture has dried, it is installed in its place - the cabinets are hung to the required height (for this, special fasteners are used - dowels, selected based on what material the walls are made of (brick, concrete, wood, etc. - each material corresponds to a certain type of dowel);
- After hanging, it is better to fasten the cabinets together - this will make the suspended components of the kitchen set more reliable and durable;
- After installing the furniture, install the internal components of cabinets and tables (I mean installing shelves, dryers, etc.), attach handles to each door set.
Kitchen sets made of plywood, which is one of the most environmentally friendly materials used to make furniture, look very natural and harmonious in the kitchen. Judge for yourself by looking at the photo below:
By the way, in the photo the kitchen countertop is made of plastic. For such a light furniture frame of plywood tables, this is perhaps the best option. Moreover, plastic can now be selected to imitate almost any texture - it could be wood, stone, etc.
Plastic tabletops can be cut out yourself from a whole piece of plastic, or you can order a cut at a factory, here, in any case, it’s up to you to decide. It’s just that when installing a sink and hob yourself, certain difficulties may arise, and it won’t take long to screw up the material. It’s better not to take risks if you’re not sure that you can handle it without a hitch, because it should be almost a jewelry job with a precise fit.
Well, now, probably, the entire process of manufacturing and installing the kitchen set is completed.
All that remains is to rejoice and be proud of your creation.)
To illustrate the process of making a kitchen set yourself, here is a short video:
Kitchen made of plywood: joining parts
Scheme of plywood screed with eccentric fasteners.
The most important stage in assembling furniture is joining pre-prepared parts into a single structure. Plywood, unlike other building materials, is attached to each other without any additional parts (such as hinges, corners), which saves both money and time on assembly.
You may be interested in: Self-connection to the network of an induction cooker
Assembly steps:
- On the 2 panels that need to be joined, the intended holes for connection are drawn with a pencil.
- Then, using a regular electric drill, holes are drilled in both parts.
- A sealant is applied to the drilled holes, which will protect the joints from moisture entering there, which often leads to the detachment of parts.
- Using screws or self-tapping screws, 2 parts are connected and tightly pulled together.
A special feature of this assembly is that veneer (plywood), unlike other wood materials, does not crumble, break or grind down when drilling holes, so there should be no problems when joining the parts.
Required tools and materials
What to do first:
- After drawing up a kitchen project, you need to decide on the type of connection for assembling the furniture frame: tongue and groove or tenon connection.
- Decide on the types of connecting fasteners: glue, self-tapping screws, confirmations, or all together.
- Selection of necessary accessories: handles, latches, clamps, hinges, etc.
Tools for making kitchen furniture.
At this stage, a drawing of the cutting of the selected plywood sheets is carried out to determine their quantity before purchasing.
It is recommended to entrust the cutting of plywood sheets to professional furniture makers on specialized computer-controlled machines for cutting fiberboard or plywood sheets. Almost all major furniture companies provide such services. These machines immediately mill the edges of the loose material.
To produce and assemble kitchen furniture from plywood, you will need the following tools:
- tape measure or construction folding meter;
- water or installation level;
- electric jigsaw, hand-held power saw;
- electric drill;
- a set of ordinary and specialized drills, countersinks;
- hammer;
- a flathead and Phillips screwdriver of different sizes and a screwdriver (preferred);
- knife.
Selection of materials and tools
After you have finally decided on the appearance of your kitchen set and determined all the sizes of individual elements, you need to think about the type of fastenings for cabinets and shelves. For furniture with a plywood frame, a tongue-and-groove joint is usually used. The second type is more reliable, and connecting such parts is easier and faster. But to make a tongue and groove, special tools (milling machine) are required. You can get by with a hand cutter, but such work requires a certain skill.
Dimensions diagram for assembling and installing kitchen units.
A way out of the situation may be to order all the furniture parts for the kitchen to be cut to your measurements in a specialized metalworking workshop. They can also produce tongue and groove connection parts. But then the final cost of your headset can increase significantly.
In addition to the type of fastening, it is necessary to select additional fastening elements. Typically the following materials are used:
- nails;
- screws (self-tapping screws);
- confirmations (Euroscrews or Eurobolts);
- minifixes;
- wood glue.
To make furniture for the kitchen with your own hands, you usually choose fastening with screws with additional reinforcement of the fastening units using glue. This method is the most accessible and cheapest.
When assembling a kitchen set yourself, you will definitely need the following tools:
- a plunge-cut saw with a guide, a hacksaw for wood, a jigsaw with a set of saws for working with plywood;
- electric drill and drills intended for forming nests for furniture screeds, countersink;
- a set of carpentry tools (chisel, chisels, plane);
- auxiliary equipment (hammers, mallets, pliers, screwdrivers).
Profile diagram for mounting wall cabinets.
Don't forget to prepare your measuring tools. You will need a construction tape measure (it is better to choose one with millimeter divisions), squares and a construction level.
If you order the production of furniture parts in a workshop, you can get by with a minimal set of tools. And don't forget about the necessary accessories. You should not put off purchasing it until later, because without the dimensions of the holes that will be needed, for example, for installing handles, it will not be possible to accurately make blanks for assembling furniture.
Individual elements
After you measure the dimensions of your kitchen, calculate the number and sizes of furniture elements you need. It is worth considering the size of the built-in appliances, kitchen sink and stove. Don't forget to take into account protruding architectural features of the walls such as corners.
But it must be taken into account that access to the nodes must remain. It may be needed, for example, during repairs.
The depth and height of floor cabinets must be calculated taking into account the dimensions of the countertops. And when designing the side walls of furniture, it is worth taking into account the thickness of the doors.
After the general sketch is ready, you need to draw up a drawing of each typical furniture element. For example, for floor-standing cabinets with drawers, the diagram shown in Fig. 2.
Tools for making kitchen furniture.
Moreover, such a drawing should be drawn up in two projections: from the side and from the end. Remember that the more detailed the diagram is, the fewer mistakes you will make when making and assembling kitchen furniture.
Particular attention should be paid to corner wall cabinets. They are the most difficult to assemble yourself
It makes more sense to develop several types of project first. At the same time, you can take into account different options for opening doors: vertical, horizontal and combined. And only then choose the type that will be optimal (this depends on the overall appearance of the set and the location of individual furniture elements in it). An example of such a cabinet is shown in Fig. 3.
When drawing up a project, do not forget about the design of the doors themselves. For hanging cabinets, it is wiser to choose hollow elements made of thin plywood mounted on stiffening ribs. They are lightweight and will not create additional load on the fastenings. Floor cabinets can be made from solid and fairly thick sheets.
Bathroom
A toilet or bathroom can also be finished with clapboard, but only on the condition that it is impregnated with a water-repellent composition. Otherwise, such an interior will very quickly lose its original appearance. The use of lining in toilet rooms is also encouraged only if the area is large enough. Do not forget that installing boards greatly reduces the area of the room. Ideal if the bathroom is combined. In other cases, it is better to limit yourself to plastic panels that imitate natural clapboard boards.