Laminate is a fairly popular material, which, if chosen correctly and properly installed, will make the floor in the room neat and even, imitating natural wood. So, in this article you will find everything you need to know about the characteristics and choice of this material; The technology for laying laminate flooring for its different types will also be given.
Laminate laying technology
About the advantages and features
The advantages of this flooring include ease of installation (often you can do it yourself) and relatively low cost. Therefore, if you give preference to laminate, you can save a considerable amount, since you will not have to involve specialists in the work. In principle, even a person far removed from repair and finishing work can handle the installation. Of course, if you follow the step-by-step instructions. Which, in fact, is what this material is dedicated to.
What do the images on laminate packaging mean?
On a note! The installation procedure itself is associated with other stages of floor finishing, such as choosing a suitable material and preparing a rough base. Some points will be omitted in the article, because they are already covered in other publications (links are provided below), where everything is described in detail. Well, let's get started!
Pros and cons
Of course, before choosing a laminate installation method, you need to weigh all the pros and cons of a particular technique. This will allow you to understand whether this or that technology is suitable in a particular case, and whether it is advisable to use it to renovate the premises. As for installing flooring without thresholds as a single sheet, there are also advantages and disadvantages, which we will consider in more detail.
Advantages of the technology:
- visual effect. The space is visually enlarged, looks aesthetically pleasing and impressive within any interior style;
- no obstacles. It is easy to trip over a high threshold, especially if it is poorly secured to the floor surface. A single floor throughout the apartment eliminates such problems;
- ease of care. Dust and dirt gradually accumulate under the thresholds, which are not so easy to get rid of. Threshold-free installation of the coating will facilitate cleaning and reduce its duration.
Disadvantages of technology:
- labor intensity. It is difficult to carry out installation on your own, especially if you lack knowledge in this area. In order for the work to be completed without errors, and for the flooring to last for more than a dozen years, you will have to involve professionals;
- no warranty on material. Flooring manufacturers insist on the need for thresholds. Their absence is considered a violation of the requirements for the operation of lamellas. Consequently, if one or more panels are cracked or deformed, the manufacturer of the product has every right to refuse further warranty service to the client;
- geometric instability. The high pressure to which the laminate is subjected due to non-threshold installation causes rapid failure of the panels, the appearance of gaps between them, and the appearance of a strong squeak when walking on the canvas;
- complex repair. If you need to replace one or more panels, there is a possibility that you will have to dismantle the floor in the adjacent rooms, starting the subsequent installation of the material from scratch.
Of course, a single canvas will cost more than a regular floor. This is due to the fact that this method will require much more labor, and besides, laying laminate flooring throughout the entire apartment without making mistakes is a complex task, which not every specialist can handle.
First you need to carefully level the concrete base, because even the slightest changes in height can negatively affect the integrity of the material and significantly reduce its service life. During the rainy autumn period, the air humidity increases. Since the laminate has a certain moisture absorption index, it will gradually expand. To prevent the lamellas from swelling, you need to calculate the cross-section of the gaps, which will compensate for the expansion and leave the coating even and smooth, regardless of the time of year.
How to choose the right laminate?
Understand the main thing: flooring does not need to be chosen based on its decorative qualities . You should take into account the characteristics of the room where installation is planned, what the load on the coating will be and the degree of its use, etc.
When choosing a laminate, you need to take into account the specifics of its future operation.
Also take into account the fact that the material for living rooms should not emit formaldehyde or, alternatively, produce minimal emissions (E1). If the laminate will be laid on top of a warm floor, then make sure in advance that it is intended for this.
Note! There are other rules for choosing a laminate, which you can familiarize yourself with in this article.
Expert opinion
Afanasyev E.V.
Chief editor of the pol-exp.com project Engineer.
Buy material for the entire area of the room at once, and with some reserve (the latter will depend on the installation method and is necessary because the slats will definitely be cut during the process).
Laminate flooring sizes
Step-by-step instructions on how to install laminate flooring using the deck (direct) method
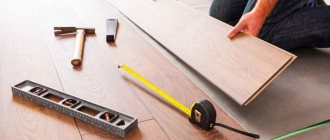
The first step is to measure the distance between the walls using a tape measure or laser level. Depending on the length and width of one panel, calculations are made of the approximate number of sheets required to cover the floor of the entire room. It should be taken into account that many rooms do not have even 90° angles.
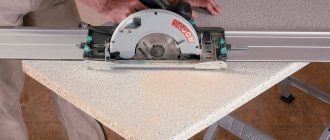
In the case when the last panel extends beyond the room in its length, it is trimmed using:
- circular saw;
- jigsaw;
- Bulgarian
The pattern, if necessary, is selected at the stage of trimming the first row and is maintained by the step of sheets in the process of covering the entire floor. In order not to confuse the cut slabs, they should be labeled with white chalk.
Types of laminate deck laying schemes
Laying the first strip of coating on the floor begins from the doorway parallel to the wall and perpendicular to the window from which the main lighting comes.
When choosing the direction of the joints of the laminate sheets, it is necessary to take into account the angle of incidence of the sliding light from the window opposite the entrance. Thus, maintaining a beautiful appearance and hiding frequent rows of joints with possible inconsistencies in the pattern on the floor. In the gap between the walls and panels, wooden wedges 10 mm wide are installed along the entire perimeter of the room.
The covering sheets are connected by special grooves. The panel of the second row is brought to the lock of the first row at an angle of 30° and snaps into place. Once the fully laid second row meets all requirements, each board is hammered and fully secured to the first strip.
Thus, the laminate is laid directly to the last row. The last strip of sheets often does not correspond to the width of the space allocated for it on the floor, therefore, the laminate will have to be cut on all sides. Finally, all wedges are removed and the baseboard is installed.
TOP 3 laminate manufacturers
| Photo | Name | Rating | Price | |
| #1 | Tarkett | ⭐ 97 / 100 | More details | |
| #2 | Kronospan | ⭐ 95 / 100 | More details | |
| #3 | Quick-Step | ⭐ 92 / 100 | More details |
Quick-Step
pros
- warranty service life – 25 years;
- large selection of decors;
- There are models for wet rooms;
- no burnout observed;
- secure locks.
Minuses
- chemical odors are felt;
- marriage is common.
Quick-Step laminate
Kronospan
Kronospan laminate is produced in Russia and has a German level of quality, and also meets the highest European standards. The Russian buyer really liked the product.
Kronospan
pros
- simple installation;
- decent technical characteristics;
- excellent price/quality ratio;
- environmentally friendly and harmless to health;
- abrasion resistant;
- a wide range of.
Minuses
- there are unreliable locks;
- There are defective lamellas.
laminate Kronospan
Tarkett
The Tarkett company produces various floor coverings: laminate, parquet boards and linoleum. During the existence of the company, it has taken a leading position and entered the top five world leaders in the production of floor coverings.
Tarkett
pros
- a wide range of;
- high strength and reliability of layer connections;
- long service life;
- reliable lock;
- easy to install and operate;
- affordable price.
Minuses
- It is not advisable to use in places with high humidity;
- low sound and heat insulation.
Tarkett laminate
Types and markings of laminate
Modern types of laminate, presented on the markets of Russia and the former CIS countries, have a thickness of 7 to 12 mm, a length of 1.2 - 2 m and a width of 180-190 mm. The main indicator for it is the abrasion class - it can be AC-3, AC-4, AC-5, AC-6. Previously, these classes had values of 31, 32, 33, 34, with AC-5 corresponding to class 33. It is better to choose the most wear-resistant laminate: class AC-4, AC-5 are quite suitable for the home.
All modern laminate is equipped with Click or G5 locks or their modifications. The G5 lock is one of the most modern locks and is loved by all experts. There is a plastic locking bar inside the lock. It snaps into place when the tenon fits into the groove, requiring little force. There is laminate with and without chamfers. The outer front surface of the flooring has a very wide selection of decorative patterns, which are located under the protective top layer.
How to prepare a rough foundation?
Let's start with the fact that laminate can only be laid on an extremely flat floor (a maximum difference of 1-2 mm per 1 linear meter is allowed). There should be no protrusions at all, otherwise the coating in these places will soon begin to crunch and creak. In addition, the base should not sag (if we are talking about a wooden floor), because this can cause the locking joints to become deformed, which, in turn, will cause obvious problems. Also, wooden floors should be treated with an antiseptic.
As for the floor, it is recommended to treat it with a deep penetration primer before finishing. It is better to use a primer mixture that has an antiseptic effect.
Before installation, the floor must be thoroughly cleaned of debris and dust (use a vacuum cleaner).
Important points to keep in mind
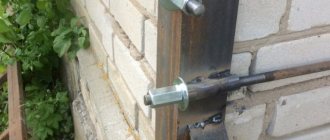
And these points are quite simple to understand - you need to maintain the maximum possible gaps from all fixed elements of the floor: walls, pipes and other obstacles for free “swimming”.
The gaps from the walls should be maximized, and the “drying out” of the laminate should also be taken into account - in my humble experience, shrinkage of the flooring happens more often than expansion. For large gaps, the gap should not come out from under the baseboard when the covering is reduced. A regular PVC skirting board with cable duct covers 20-25 mm, therefore, the optimal gap will be 10 mm. — 10 for expansion to the wall and 10 for reduction until it comes out from under the baseboard.
No exceptions should be made when making indentations from the walls everywhere. In particular, this applies to doorways: usually the door trim is much thinner than the baseboard and covers a smaller gap, so some installers leave virtually no gap where the door trim joins the floor. It is not right!
If you do not leave the necessary gaps in local places, making indents in others loses all meaning.
The right solution would be to organize recesses in the walls, in places where doors and extensions are installed. Then there is room for the canvas to “maneuver” and the seams will not be visible under the casing.
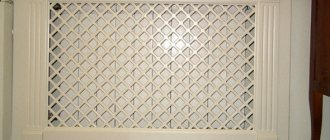
Indents are also made where pipes exit the floor, the same as from the walls! You should not seal these gaps with any sealants - again, the point is lost. Non-aesthetic gaps near the pipes are closed with special decorative contours, or, in extreme cases, with dismountable plumbing reflectors.
Which underlay should I buy?
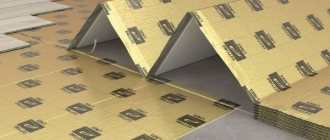
When laying, a special substrate must be used. It is needed to level out minor floor defects and to eliminate the risk of friction of the lamellas on the rough surface. In addition, it also provides additional heat and noise insulation, which is more important for city apartments.
Installation of the laminated coating is carried out on a thin elastic substrate
There are many types of substrate, not only in thickness, but also in material. Cork is the most suitable substrate, but it is expensive. Foamed PET sheets are cheaper, as are thin polystyrene foam sheets. Sometimes the substrate must have a foil layer (for example, when laying an IR film floor).
Important! Don't even think about using old carpet as underlayment! You cannot lay laminate on it!
It is also worth mentioning that laminate does not tolerate high humidity, so it should be protected from the floor. A primer partially copes with this, but in ground-floor apartments and in rooms under which there is a basement, it is recommended to additionally use a vapor barrier. You can use a special vapor barrier membrane, but thick PET film (about 100 microns thick) will also work.
On the ground floors or on floors located above an unheated room, it is better not to neglect the vapor barrier
On a note! If the floor is located above a heated room, then you can do without a vapor barrier.
When using a modern substrate that is already a vapor barrier (for example, “Tuplex”), it is important to ensure the tightness of the joints. Ordinary film should be laid with an overlap of 15 cm and subsequent sizing of the joints with tape. The backing is laid end-to-end, but the seams also need to be taped.
Roll of TUPLEX backing
Where to start laying - what it depends on
Where and where to start work is determined by a number of factors. Here are the main ones:
- The presence of chamfers or embossing on the tiles. Textured or chamfered laminate is laid across the room so that the light falling from the window emphasizes the relief.
- Assembly method. The transverse direction complicates the bypass of heating pipes, reducing the strength and performance characteristics of the material due to the need to create cuts on individual elements. In such cases, the longitudinal direction is chosen.
- Arrangement of furniture in the apartment. Heavy structures such as a bed or wardrobe can lead to rapid wear of the lamella lock. Care must be taken to ensure that several legs do not fall on one lamella. Either an accurate calculation or placing the tiles diagonally will help here.
- Intensity of use of the room. In rooms with high traffic, the parallel arrangement of lamellas due to increased load along the locks due to continuous walking leads to creaking. The problem can be solved by placing the tiles diagonally.
Preparing the necessary tools
To lay laminate flooring you will need the following:
- roulette;
- jigsaw;
- spacer wedges;
- construction (or, alternatively, stationery) knife;
- pencil;
- hammer (rubber/wooden);
- breaker (you can use a pry bar instead);
- wooden block;
- square
Tools used when laying laminate flooring
Calculator for calculating the number of laminate boards per room
Go to calculations
What will you need for installation?
It takes 3-4 hours to lay laminate flooring in a room with an area of 15–25 m2 on a finished base. This type of coating refers to “floating floors”, which are not rigidly fixed to the base from below, but simply lie on it without fastening. Therefore, you just need to lay out individual laminate lamellas on a screed or flooring made of wood boards, connecting them firmly to each other.
To lay laminate flooring you will need the following tools:
Nothing particularly specialized is needed to install the coating in question. No special skills are required for this. Most home craftsmen can handle this tool without any problems and correctly. Installing interior doors with your own hands can still cause difficulties. With a laminated finish flooring, everything is much simpler.
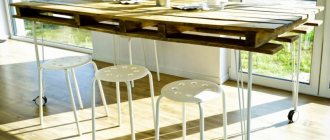
Laminate in the interior
In addition to the lamellas of the laminate itself, in order to lay it on the floor, you will also need a plastic film for waterproofing. Plus, you will need a backing made of cork, foamed polyethylene or other similar material. The purpose of this lining is to increase sound insulation and distribute the load from individual laminate flooring strips to the base.
It is not recommended to neglect laying the substrate. It is provided with all step-by-step instructions from laminate manufacturers. If you don’t put it in, you can immediately forget about the coverage warranty.
Flooring options
Instructions for installing coverings with “Click” locking systems
Step 1. It is recommended to start laying from the far corner. The protruding wide element of the locking connection should “look outwards”. Place the lamella in the corner, use wedges to set the required deformation gap. Alternatively, wedges can be installed after laying the entire first row.
The board is laid in the corner
Step 2. Place the groove of the second into the lock of the first lamella. Install it at the desired angle (this should be indicated by the manufacturer in the instructions).
The groove of the second board is inserted into the end lock of the first board.
Step 3. It is important not to allow any distortions - both in the direction and in the width of the lamella.
Warp in width
Directional skew
Step 4. Also, after snapping, the edges of the slats should match exactly. In our example, an angle of 15 degrees is required for engagement.
In this example, an angle between them of 15° is required to engage the locking parts of the boards
Step 5. Next, simply lower the lamella to the floor so that the mechanism works.
After this, the attached board is simply lowered onto the floor plane
Step 6. If you need to cut the board (as in the example), then it is better to mark for cutting right on the spot.
It turned out that the next board in the row should be shortened
Step 7. Rotate the lamella 180 degrees in both planes. Place the edge that will not be cut against the spacer wedge next to the wall to allow for the required gap.
The board rotates 180 degrees in both the longitudinal and transverse planes
Step 8: Next, draw a straight line along the cutting line using a square.
The cutting line is drawn
Step 9 : Trim. It is better to use a jigsaw, although in a pinch a hacksaw will do (as in the photo).
Cut in progress
Step 10. Turn the cut board over and insert it into the lock of the previous one.
The cropped fragment is inserted
Step 11. Lower it down in the same way as described above. If everything was done correctly, the fragment will fit perfectly into place.
With proper marking, this fragment will fit perfectly into place with the required gap from end to wall
On a note! If the trim is longer than needed, you can use it to start the second row.
If the remaining trim has a length greater than the minimum allowable, then it can well be used as the first board of the second row
Having previously installed the wedge, lay the board close to the finished row so that it touches it along its entire length.
It is laid out from the beginning of the row (with a wedge installed)
To make it clearer, here is a cross-section of the profile of the boards prepared for mutual engagement in the lock
Step 12. Assemble the entire second row according to the principle described above.
The entire strip of the second row is being assembled
Step 13. Raise the entire strip to the required angle so that the tenon fits into the groove (assistants may be required). Then lower the strip while pressing it forward. As a result, the lock should work.
If everything is level, then the lock should work along its entire length.
Step 14. Collect all remaining rows in the same way.
Laminate installation process
Step 15. If you come across heating pipes, proceed as follows. Start with markings. Place the lamella against the wall (with a wedge) and draw a transverse line that corresponds to the axes of the pipes.
There may be heating pipes near one of the walls.
Step 16. Connect this board to the laid strip, move it towards the pipes and mark lines that correspond to their centers.
2 more lines are planned
Step 17. Where the lines intersect, make holes (their diameter should be 2 cm larger than the diameter of the pipes). Use a core drill for the job.
Drilling locations
Step 18. Make a continuous cut along the drawn transverse line. Separate from the lamella a piece with a pair of cut semicircles.
A fragment with two semicircular cutouts is separated from the board
Step 19. Assemble the entire row of covering, starting from the heating pipes.
Next, the entire row of laminate is installed, starting from the pipes
Step 20. Coat the ends of the cut piece with glue.
The ends of the cut fragment are coated with glue
Step 21: Place the piece in place and support it with spacer wedges.
The fragment is installed in place and propped against the board with a wedge from the wall
Step 22. After this, install decorative frames for the passage of pipes (they are sold dismountable).
Installation of collapsible decorative round frames for pipe penetration
Step 23 You should end up with something like this.
This is what this node should look like in the end
Step 24. We should also talk about the installation near the door frame. It is better not to cut the laminate along its contour (it will look unsightly, because the baseboard is not installed here), but to make a groove in the lower part of the box for installing the lamella.
The best way is to cut a groove on the bottom of the box for inserting a laminated board
Step 25: Once you have cut the groove, you may notice that it will not allow the slat to be raised for winding. But this problem can also be solved.
The groove is cut, but it does not allow the board to be lifted in order to move it along with the row being laid
Step 26. First, insert the lamella that will fit into the groove into the lock, then slide it flush against the wall. Then assemble the entire row (without this lamella). As a result, a slight gap is formed.
First, the board, which should fit into the groove of the door frame, is inserted into the lock, and then moved close to the wall
Step 27. On the last lamella of the laid strip from the lock at the end, cut off the protrusion that “looks” vertically with a chisel.
Using a chisel, on the last board of the laid row, the vertically facing protrusion is carefully cut off from the end lock
Step 28 Apply a bead of glue to the edge of the lock.
After this, a strip of glue is applied along the edge of the lock.
Step 29. Slide the outer lamella back so that it meets the coated end. When the glue dries, the connection will be very strong.
And all that remains is to move the outer board back until it joins the glue-coated end of the laid one
Step 30. When laying the last row, you will most likely have to cut the boards to width. Carry out the markings on site.
Sooner or later, the turn of the last row comes
Step 31. Turn the lamella 180 degrees along the longitudinal axis, rest it against the spacer wedges. Draw a cutting line along the edge of the previous row.
A cutting line is drawn exactly along the edge of the working surface of the previous laid row.
Step 32. Install the first board of the last row.
The first board of the row is ready
Step 33. Trim the other boards in the same way and assemble the entire strip.
All other boards in the row are trimmed in the same way.
Step 34: Finally, remove the spacer wedges along the “dead end” wall. Also add wedges around the perimeter (they are no longer required). All that remains is to install the skirting boards without connecting them rigidly to the slats.
At this point, the installation of the laminate flooring can be considered complete.
Video - How to properly lay laminate flooring
Table. Instructions for laying coverings with “Click” locks without an assistant.
| Steps, photo | Description of actions |
| Step 1 | Start laying the first row. There shouldn't be any difficulties here. |
| Step 2 | Move the entire row towards the wall, installing the wedges described above to maintain the deformation gap. |
| Step 3 | Prepare the boards for laying the second strip. |
| Step 4 | Since you don’t have assistants, you will have to assemble the entire row one lamella at a time. Start with the starting board - slide it into the lock at the required angle. |
| Step 5 | After that, lower it to the floor. |
| Step 6 | Lay the next board. Connect it in the end lock, for which you move it as close as possible to the first board. |
| Step 7 | Due to the fact that the lock has not yet been inserted along the length, such a protrusion is visible (see photo). |
| Step 8 | A gap along the longitudinal seam is also visible. |
| Step 9 | Now lift the lamella to the desired angle. |
| Step 10 | Move its right end forward as much as possible so that the gap there disappears. |
| Step 11 | Keeping the right edge pressed, lightly hit the ridge on the end with your left hand. As a result, the lamella should engage. |
| Step 12 | When the gap disappears, lower the board to release the lock. |
| Step 13 | Take the next board. Start with the end connection. |
| Step 14 | Wind the lock by lifting the lamella and press the right edge tightly. |
| Step 15 | Short punch with your left hand. |
| Step 16 | As a result, the lock should work. |
| Step 17 | Here is another photo of the process, but from a different angle. Same end connection. |
| Step 18 | The lamella needs to be raised, pressing the right edge as much as possible. |
| Step 19 | Left hand strike again. |
| Step 20 | At the end, the lamella must be lowered for the lock to finally work. Proceed in the same way until you have laid all the covering. |
On a note! This is an effective, but disparaging method for laminate flooring, which should only be used in a desperate situation.
Recommendations
Laminate flooring should be laid in compliance with the following simple rules:
- Before installation, the lamellas must lie in the room in a horizontal position for at least a day to cool down or warm up to room temperature.
- Laying laminate flooring is only permitted on dry substrates. If a concrete screed was originally made, then laying the coating is permissible only after it has completely dried.
- Before starting work, the rough foundation must be thoroughly swept so that there are no pebbles or other debris left on it. If you leave them under the laminate, sooner or later the substrate will tear first, and then the coating itself will be damaged.
- To identify differences in the subfloor, you should use a long rule or level - the slightest deflections will be visible in the gaps that appear.
- It is best to lay the planks away from the window so that the seams along the locks are less visible in daylight.
- Compensation gaps 8–10 mm wide should remain between the walls and the laminate. Without them, the laminated coating, during thermal expansion, will rest against the wall surface and rise like a mound in the middle of the room.
- To prevent the slats from moving during installation and closing the gaps along the walls, spacer wedges should be placed. Then they clean up.
- Compensation gaps must also be made in the middle of the room if the coating is more than 10 meters long. Afterwards, these seams must be closed with decorative thresholds made of plastic or metal.
- The substrate and waterproofing should be glued with tape at the junction of their individual strips. At the same time, you cannot nail this sublayer to the rough base with nails or screw it with self-tapping screws. Gaps are not allowed here.
- The first row is laid against the wall with a tenon, for which it is pre-cut so as not to interfere.
If the walls are uneven, then special attention should be paid to placing spacer wedges and laying the first row. The smoother the first slats are laid out, the more reliable the connection of all the remaining slats will be.
If you strictly follow the given step-by-step instructions and recommendations, the laid laminated coating will last for many years. There is nothing particularly difficult about its installation. In order to figure out how to choose the entrance door to an apartment and then install it, you will have to use your head completely. With the floor finish in question, things are not so scary.
Step-by-step instruction
Click connection
The installation sequence will be as follows:
- We measure the distances between the walls to understand how many panels are needed and how much trimming the panels will have to do at the walls on each row.
- If the rows of laminate are laid with a 50 percent shift of panels, then it is better to provide the first and last panels in the row with the same length. Thus, the finished base, due to its symmetry, will look more aesthetically pleasing and more complete.
- The first strip of laminate should be laid in the far corner. Wedges 10 mm wide are inserted between the panel and the wall.
- The panel of the next row is brought to the panel of the previous one with the side equipped with a lock at an angle of 30 degrees. To latch the panel you need to insert it and press down. The entire row is laid in this way.
- Next, the next row is laid. If the panel fits tightly, then it is knocked down with a rubber mallet.
- Such operations are carried out until the entire floor is laid.
How to design difficult places
How to lay laminate flooring is theoretically clear. If you already have laminate flooring, you can practice on a small area - then it will become clearer. But there are always some problem areas in the rooms that you don’t immediately understand how to fix. In any case, there are two such areas - pipes and the door frame. How to lay laminate in these places so that you can’t find fault? In principle, this is not difficult. You need a ruler, a drill with bits, a hacksaw and pads that will close the gap at the pipes.
There's no need to do that
Connection to the door frame and threshold
In order for the laminate to lie nicely and without gaps near the door frame, it is advisable to lay it with the frame already installed. If you haven't installed the doors yet, you have time to get started while the laminate is curing. When installing the box, you need to make it a little shorter - the saw blade should fit between it and the floor. If the box is already standing, you can trim it.
How to beautifully design a joint with a door frame
When laying, the laminate is slipped under the racks, so there will be no gap. But how to design the joint between a laminate and another coating is a whole separate topic. And if the doors open onto a tiled corridor, there are additional methods for joining laminate and tiles. The simplest and most obvious is the threshold. They come in different varieties, so there are already a lot of options here. If you don’t like the thresholds at all, there is a cork compensator. It's almost invisible.
How to beautifully bypass pipes
The second difficult place to decorate beautifully is the pipe exit from the floor. We cannot live without heating and there are pipes in almost every room. Let us remind you once again: there must be a gap of at least 5-7 mm around the pipe. Having placed the board against the wall, mark the middle of the pipe with a pencil at the required distance. We measure the diameter of the pipe, add 2 cm to this value (at most 1.5 cm), we get the diameter of the hole that needs to be drilled in the laminate. It is difficult to find a drill with such a diameter, but a “crown” type attachment is possible.
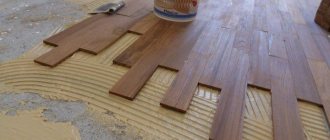
How to go around pipes with laminate if they are on a short part of the board
After making a hole (or two, if necessary), draw a straight line through the center of the holes and cut off part of the board along it. We install the laminate, insert the cut piece behind the pipes. If everything is done as it should be, great. We coat the joint with glue (universal, for wood) and install everything completely. And we close the gap with overlays. They are available in wood color, white, black, and shiny. There are plastic or metal-like ones. In general, options are possible.
If the pipes are on the long side of the laminate
If the pipes fall on the long part of the laminate board, the technology changes slightly, but the essence remains the same. You just need to cut out the area in the form of a trapezoid.
Source
What type of fastening is it suitable for?
There are two types of fastening. The method and type of installation depends on this indicator. Each type of fastening implies the presence of a groove on one element and a tenon on the other. The only difference is their appearance and method of connection.
- Click . Quite a simple connection method. So named because of the characteristic sound during connection. For installation you only need the components and your own hands. Laying occurs as follows : install the first board, then bring the next one at an angle of 45 degrees, insert it into the groove and snap it into place. If necessary, you can tap the board with the back of your hand.
- Lok . The next method is somewhat more complicated than the previous one. It also assumes the presence of a groove and a tenon. Only they are slightly different. If in the first version the groove is adjusted so that the tenon fits into it easily, then this is a tight connection. Therefore, for installation you will additionally need a rubber mallet. It happens as follows : the boards are laid sequentially, then you need to precisely adjust their position, then insert the tenon into the groove and hit the board with a mallet so that the tenon fits tightly into the groove.
For the deck look, both types of locks are suitable. But locks like locks are better suited. It will be easier to lay them using the deck method, because in boards with this type of locks, longitudinal locks are first connected, then longitudinal ones.