Not everyone knows about the features of bathroom lighting, what the pitfalls are and how to properly ensure safety. First of all, protection from moisture is very important in this room. And it is not surprising, because such a lamp is, first of all, an electrical device, the operation of which is associated with certain risks. And the humidity level in the bathroom is always high . Moreover, even in the case of high-quality modern repairs, it is not possible to overcome excessive humidity, so the contacts must be protected so that the lamps are safe, durable and functional. So, today we will talk about lamps for the bathroom, consider their types and selection criteria, and also do the installation yourself. But first things first.
Spotlights for the bathroom
Note! Lighting fixtures for the bathroom must be waterproof - there is no place for ordinary light bulbs and primitive sockets. But the average consumer, alas, does not always understand all these subtleties. As a result, for a room where temperature/humidity changes are constantly observed, and steam is often more like a curtain, ordinary lamps are purchased. Except that the power is greater, and the dimensions are smaller. However, this approach is fundamentally wrong!
The bathroom is a room with high humidity levels
Installation of light sources in PVC ceiling
When planning, selecting and installing lighting devices, consider several nuances.
For good illumination of rooms with a height of more than 2.6 meters, ceiling lamps are installed in increments of no more than 1 meter, and the distance from the wall to the first device is no more than 0.6 meters. Point light sources illuminate the space below them in a cone with an angle of only 30˚. Before installing ceiling light sources, prepare a layout diagram. This will help you clearly plan the wiring, calculate the number of devices and cable length, placement and type of switches.
To install lamps on your own, you will need to prepare:
- lighting devices in the estimated quantity (plus 1 or 2 pieces in case of replacement);
- wire, length is checked with the diagram;
- terminal blocks;
- electrical tape;
- switches.
Installation of lamps
When choosing spotlights for installation in a plastic ceiling, please note that the power should not exceed 40 watts. Otherwise, there is a risk of plastic heating, deformation and the release of toxic fumes
LEDs or halogen lamps are selected taking into account power and illumination. The wire for plastic is fireproof, multi-core. The terminal blocks connect the wires well, but they need to be checked approximately every two years.
The wire is fixed in the places where the lamps are installed, at the point of the proposed hole, in the panel we make a loop of 10-14 cm wire. For convenience and reliability of fixing the wire on the frame, use plastic latches or clamps. Do not over-tighten to avoid damaging the braid. After pulling the wire, the ceiling is covered with plastic panels.
Use a wood bit to make holes. The diameter must match the size of the lamps - less than 4 mm of the diameter of the front ring. The standard diameter is 58-74 mm. When planning the installation location, weigh everything carefully, since it is difficult to correct the consequences of making a hole.
Making holes in PVC panels
https://youtube.com/watch?v=AqFCVOLHCPU
Wiring diagram
You need to make a wiring diagram before starting work; this will help you calculate the cable length, as well as think about the location of sockets and junction boxes. In addition, it is important:
- Calculate the number of ceiling lights. One element usually covers from a meter to one and a half spaces. For good light, they can be placed every 50-60 cm, the maximum distance is no more than a meter. The distance from the walls is at least 30 cm.
- Determine the exact position based on the width of the PVC panels. It is better if the lamps stand in the middle of the elements, it is much easier to make holes. When narrow panels are used, on the contrary, you need to make holes at the joint so as not to weaken the surface too much.
- Wiring is done as usual. It is better to make grooves in the walls, and use special fasteners with clamps on the ceiling. Lay parallel to the walls, turn at right angles, do not run the cable diagonally or cross it. Attach firmly, leaving enough margin to pull out the ends and connect to the lamp.
Electrical wiring diagram.
Important! Before starting any wiring work, turn off the electricity.
It is better to draw a diagram on paper, this will make it easier to carry out calculations and correctly plan the position of the elements. It is convenient to make marks with chalk on the ceiling or with a construction pencil.
Spot location rules
True, in order to squeeze the maximum aesthetic appeal from the mounted panel, you need to know the basic rules for the safe placement of spots on a stretch ceiling. Let's try to list below those that are considered basic:
- if the spots are located along the wall, then maintain the minimum distance required for high-quality light dispersion - 20 cm. If you ignore this recommendation, you will not be able to get the level of illumination you want from the mounted lamps;
- the recommended distance between spots is from 30 centimeters, the optimal one is determined by local need and the type of stretched panel;
- parallel placed spotlights visually lengthen the room - this can be successfully used for rooms that need some visual correction;
- a rectangular arrangement is ideal for small and narrow rooms, but most often requires support in the form of “heavy artillery” - a weighty chandelier in the center;
- if you use spots in connection with stretch ceilings made of ordinary PVC film, then the maximum permissible power for halogen lamps is up to 20 W, for a satin panel a little more - up to 35 W;
- the exact number of lamps is always determined by the type of light pattern in the room, but one spot can illuminate no more than 2 m2 of free area. This figure must be kept in mind when drawing up a plan for the placement of spotlights on a suspended ceiling.
Lighting power
For a bathroom, the power of lighting devices is important. Low-voltage models are suitable for the room.
- The power of standard lamps should be 20-30 W/m².
- Requirements for halogen lamps – 23-28 W/m².
- For daylight devices, a power of 6-9 W/m² is sufficient.
The choice of lamp brightness also depends on the color scheme of the room. Finishing in light colors requires less power; dark colors require more intense lighting.
Systems with high power lamps are installed with grounded contacts. It is optimal to place such devices near the doorway, because... the risk of water entering the area is minimal.
Basic rules for placing spotlights
There is only one rule here - do not place lamps closer than 15 cm to the seam of the stretch ceiling. Because if you do otherwise, there is a high risk of damage to the tension covering during installation.
Otherwise, there is complete freedom of action, but if you want to maintain at least some geometry, then it makes sense to adhere to rule number two - do not place the lamps closer than 20 centimeters to each other.
And, if the exact distance is not your case and you want to depict chaotic chaos on the ceiling, then rely solely on your taste.
And yet, before making holes in the stretch ceiling, it is better to carefully draw circles with chalk on the surface itself, in the place of the intended points. This way you can see it much better than drawing on paper. It’s always the same in the picture, but in reality everything looks completely different, and you can’t fix the hole!
Better spend an extra half hour, draw everything and look carefully at what comes out. As a rule, after such a sketch, the desire to experiment with asymmetry instantly disappears.
Connection diagrams for 220 V
Some spotlights operate on 12 V. To supply them with power, you need to install a converter (they also say a transformer or driver). With the development of technology, spots have appeared that can operate from 220 V. This scheme is at least a little simpler, because recently it is more often necessary to connect spotlights directly to the network, without converters.
The use of recessed lamps allows you to obtain uniform lighting. In addition, you can choose a beautiful placement of spotlights on the ceiling
Serial connection
This scheme is easy to implement, it requires few wires, but spotlights can be connected in series only in a relatively small number - five or six pieces. The main disadvantage of this method is that the lamps will not glow at full strength. Another drawback: if one lamp fails (burns out), all lamps stop working because the circuit is broken. To restore functionality, you have to check each one.
Scheme of sequential connection of spotlights
The circuit is very simple - the phase sequentially bypasses all lamps, and zero is applied to the output of the last one. The circuit with the junction box and switch is located below.
Electrical wiring when connecting spots in series
When working, be careful: a phase must go to the switch, which then goes to the lamps. Zero (neutral) - goes directly to the last lamp in the chain. This is important for the correct operation of the circuit and also for safety.
If you have a three-wire wiring, in addition to zero and phase, there is also a protective ground wire, it is taken directly from the ground block and fed to each of the lamps to the corresponding terminal. You can take the ground from a nearby outlet or on a switch.
Scheme of sequential connection of spotlights to a two-key (double) switch
The practical implementation of this scheme is more convenient not with a cable, but with wires - after all, one wire constantly breaks, bypassing all the lamps, and the zero wire goes in a whole piece from the junction box to the last lighting fixture. But we repeat once again - this type of connection is almost never used.
Parallel connection diagrams
When connected in parallel, all lamps will shine at normal intensity, which is why this scheme is more popular even though more conductors are required. To connect any number of built-in lamps (even with LED lamps), use a non-flammable cable VVG ng 2*1.5 or 3*1.5 (a three-core wire is used if the wiring is grounded). It is possible to use VVG ng ls cable (non-flammable with reduced smoke emission during combustion), but this is optional. It can be round or flat = it doesn’t matter, but non-flammable is a must, especially if you have a wooden floor.
Methods
Parallel connection can be implemented in two ways:
- a pair of wires goes to each lamp (beam);
- daisy chain connection - when both wires alternately go to the lamps, and are fed further from the output.
Two ways to parallel connect spotlights
Daisy chain connection
Let's look at the diagrams. The figure below shows how to route the wire using the daisy chain method. A cable comes out of the junction box, it goes to the first lamp, another piece of cable is connected to the output of this lamp, which stretches to the next lamp. This is how all lamps are connected.
How to connect spotlights in parallel
Physically it looks like the photo below. Several lengths of cable connect the luminaires one after the other.
This is what it looks like if you do it on a suspended or suspended ceiling
If you want to divide the lighting fixtures into two groups, they are connected to a two-key switch. The circuit becomes somewhat more complicated, but only because the number of wires increases.
With two key switch
An example of implementation can be seen in the video. You can use other terminals, but the method itself is shown well.
Radial
With a radial connection, each lighting fixture has its own piece of cable. The method is expensive in terms of cable consumption, but more reliable in terms of operation: in the event of a breakdown, only one lighting point does not light up. In this case, it makes sense to stretch the cable from the distribution box along the ceiling to the middle of the room and secure it there. From this point, start pulling cables to each recessed lamp.
Pay attention to the picture on the right. It shows that wires diverge from the phase wire to the lamps and separately from the neutral wire. Since a lot of wires converge in one place, you need to choose a reliable method. If the wires are single-core and there are not very many lamps, you can make a twist, but then you will need to crimp it well with pliers and then weld it. Not the easiest way and the connection turns out to be permanent. But reliable. The second method is simpler: install a connector with the required number of inputs on each cable conductor and connect the wires to them. You can use Wago terminal blocks for the corresponding number of connected wires. They are reliable, easy to install, but cost a decent amount (it’s better not to buy fakes).
Parallel connection - cable to each lamp
Another option is regular terminal blocks with screw connections. They are cheap and quite reliable, but on the side where the cable will be connected, you will have to put jumpers on all the terminals involved. This will supply voltage to all wires.
This way you can use screw terminal blocks
Despite its high reliability, the method is rarely used - the costs are high, and it is problematic to efficiently connect a large number of wires at one point.
Features of the selection of lamps for suspended ceilings
Stretch ceilings are different, and so are lamps. The most key point in selecting spots for a stretch ceiling is not their visual appeal and size, but their power. You should “dance” from it, since there is a high probability of damage to the coating due to heat.
But a melted stretch ceiling cannot be repaired, you understand. So, be careful at this moment so that it doesn’t cause excruciating pain later.
What types of suspended ceilings are there: film (PVC) and fabric. Moreover, both the one and the other option do not tolerate strong heat, but the fabric one is a little more stable. In addition, if you heat up the film ceiling too much, in addition to rapid deterioration, you will daily receive a portion of formaldehyde vapor into the air, since it is released at temperatures above 70 degrees.
So, what then is the optimal possible power for spotlights?
For fabric ceilings:
- Halogen – up to 35 W
- Incandescent lamps – up to 60 W
For film ceilings:
- Halogen – up to 20 W
- Incandescent lamps – up to 40 W
There is also another great option - LED lamps. Their cost is slightly more than those mentioned above, but:
- last much longer;
- There is no way they can melt the ceiling;
- since they emit almost no heat at all.
But there is also one small point here: in order to “start” these lamps, you need to connect them to a special adapter, which not only heats up, but literally “burns”. Therefore, under no circumstances place this device on the ceiling itself, under the film!
It is better to place it somewhere on the wall, in a corner, behind a curtain. This will be even more convenient for you, since adapters periodically need repairs, and disassembling a suspended ceiling for this purpose is not fun for the faint of heart, to put it mildly.
Apart from this, we have nothing more to add. You are free to choose absolutely any design and size of spots, based solely on your taste and wallet.
Installation of thermal ring
Then you need to glue the thermal ring of the required size.
It is made of heat-resistant ABS plastic (standard thickness - 2mm). This material can withstand temperatures of up to 100 degrees for a short time.
The ring performs two functions:
protects the canvas from the thermal effects of lamps
Sometimes, for powerful and bright light spots, it is necessary to glue two rings at once so that the lamp body does not touch the ceiling and similar troubles do not occur.
This primarily applies to lamps with halogen bulbs.
LED lamps are less susceptible to this. Their heating temperature usually does not exceed 60 degrees. For a stretch ceiling this is not a dangerous temperature.
acts as mechanical protection
That is, it allows you to cut a hole in the ceiling so that it does not come apart.
Therefore, it is important to evenly apply glue (Cosmofen, Contact, etc.) along the entire contour of the ring. There should not be a single un-glued area left
At the moment when you press the ring, you do not need to move your finger along it, otherwise it may slide along the glue. It's enough just to press it and that's it.
Next, carefully pierce the canvas with a stationery knife and cut out a hole. In this case, it is better not to leave anything unnecessary, since otherwise the film of the canvas will touch or cover the radiator of the light bulb, impairing its cooling
If you have a huge lamp, then do not forget that you cannot cut an arbitrarily large hole diameter.
It is always limited by the ratio of the thickness of the web to the force of its tension. For example, for a small area of 4m2 (2*2) and a ceiling film thickness of 2.5mm, the maximum possible hole will be 8cm.
But most lamps of square or other shapes fit into round fittings without any problems.
Square thermal rings do not come in all sizes, and also have a slightly different installation principle.
The size of the hole in the embed should be a couple of millimeters larger than the outer size of this “thermal square” so that it seems to fall into the embedded and does not deform the ceiling from tension.
Principles and selection criteria
During a room inspection, measurers can offer several dozen options for the placement of spotlights on a suspended ceiling. Small lighting bulbs can be combined with chandeliers or LED strips. All these combinations will result in a huge number of design options, so it’s worth taking technical aspects into account.
Area and layout
First of all, you need to keep in mind the size of the room, its purpose and the coefficient of natural light in the room
It is important to remember that you can reduce the brightness using additional switches or a combination of several lamps, but it is impossible to increase the illumination. Installation specialists will help you calculate a favorable light level
physical characteristics
Spot lamp models are most often built into the ceiling or installed in close proximity to it. In this case, heat release indicators are taken into account. Tension models in which PVC film was used will not withstand a load of more than 40 W. Fabric models cope with the heat emission of 60 W bulbs. Halogen lamps reduce the permissible parameter to 20 and 35 W. These values are extremely important, because they allow you to increase the service life of the ceiling.
For very spacious rooms, experts recommend installing a chandelier in combination with spotlights. The latter act as a room divider into zones and create comfort and a pleasant atmosphere. The chandelier will provide the required level of lighting when necessary.
Design Features
If the design of suspended ceilings with spotlights does not involve the installation of a full-fledged chandelier, then it is worth considering the option of installing elements with external fastening. This will solve the issue of thermal conductivity and increase the permissible power.
It is recommended to additionally equip halogen lamps with a dimmer. A special device for smoothly adjusting the light is not suitable for energy-saving lamps, since the models will periodically turn off completely and quickly fail.
A master measurer will be able to accurately calculate the required number of lamps. The basic standards look like this: one chiseled lighting element should account for 2 m2 of ceiling space. This means that for a room of 25 m2 you need to install about 15 lamps. But the standards can be adjusted, since it all depends on the model, power, type of ceiling, room, combination with other elements and level of natural light.
How to install spots yourself
Installing lighting fixtures in a suspended ceiling is very simple.
Step 1. You need to run electrical wires to the places where the lamps will be placed. And this must be done before installing the ceiling.
Step 2. After completing this stage, work on the holes for the spots. Cut them into the ceiling. It is best to use a circular saw for this. Then connect the wires and insert the lighting fixtures, to do this, squeeze the clamps and bring them to the top. When you place them in the holes, the latches should be released. This way the lamp will be securely fixed in place.
Installation of spotlights in a suspended ceiling
Step 3. Screw in the incandescent bulbs. Halogen bulbs need to be handled differently than standard incandescent bulbs. First install the plug-in connectors, and then insert the lamps into the luminaires. For fixation, use locking rings; manufacturers supplement each set of lighting fixtures with them.
Step 4. Don't forget about protection; work with fabric gloves. It is not recommended to touch the glass of halogen lamps with bare hands, as the products may prematurely lose their functionality.
How to markup
Since you will have all the spot spots inside, it is not surprising that the lighting angle of the room will be limited. Near the lamp it reaches 30 degrees, and then, at a short distance, the light dissipates. To avoid shadows and keep the room flooded with bright light, place the lighting fixtures so that the light streams intersect. This trick will ensure that the room is illuminated evenly. For example, the room has standard-height ceilings, then you should retreat 60 centimeters from the edge of the wall. Place the spots at a distance of 1 m from each other.
Popular placement options for spotlights
Apply marks before starting work. They are easy to make using pieces of electrical tape. Cut two small strips and stick them crosswise in the place where you plan to install the lamp. Repeat the action, the number of stickers should correspond to the number of lamps.
Once you've made your markings, look at the placement of the marks. This must be done after the crosses are evenly distributed across the ceiling. Take a tape measure and measure the distance between adjacent marks. Make adjustments if necessary.
Do not place lights where two panels meet. When the marking is completed, you can move on to the next stage.
Marking the ceiling for lamps
How to make holes for spots
To make holes, prepare the following tools.
- Buy an electric drill. If it is not there, use a regular screwdriver.
- Prepare the crown. it should be made of wood. Focus on the diameter of the spots, usually it is 6.8 centimeters.
Insert the crown into the electrical appliance and use it to cut holes. If there is no crown, then the circles will be harder to make. In this case, buy a wood or metal drill. You will also need a utility knife.
Drywall crown
Draw a circle of the required diameter. It should be slightly smaller than the diameter of the outer part of the lighting fixture, then the lamp will not fall inside. Drill a hole using a thin drill bit. Use a utility knife to remove burrs on the surface of the material. When all the holes are ready, you can move on to the next stage.
Correct placement of lamps
Before attaching the lamps, you need to decide on their location. There are several functional areas in the bathroom, each of which takes into account:
- room size;
- color of walls and ceiling;
- presence of window openings.
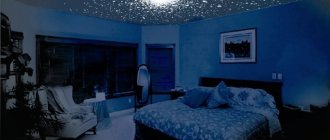
Bathrooms in multi-storey residential buildings are small in size, but have great functionality. As a rule, such rooms contain a shower stall, a washing machine, and a sink with a mirror and shelves. But even with an acute lack of space, lighting in the bathroom should be multi-level. For example, several built-in ceiling lights can set the overall background, and adjustable wall sconces will add light near the mirror with the sink.
Properly lighting a larger room is more difficult. You will either have to use your own imagination, or trust a special company engaged in lighting and bathroom design.
It is worth noting that there are many options for organizing lighting in a large bathroom. However, today the most relevant is three-level lighting, which involves the placement of lamps of different types at different distances from the floor.
The overall luminous flux is determined by ceiling lamps. Built-in models in bathrooms with plasterboard and suspended ceilings look practical and modern. They can form geometric shapes or be located above the most popular places: shower stall, front door.
Local (spot) lighting in the bathroom is formed by wall sconces or spots located near mirrors or along the perimeter of the room. They are connected from a separate switch and used to obtain greater light output.
The third level serves as decorative lighting and is necessary to create a relaxing, intimate environment. These can be ready-made LED light sources built into a shower stall or bathtub. Or projects made on the basis of RGB LED strips, allowing you to set the brightness and color of the radiation according to your own mood.
Conclusion
Lamp systems will help create a cozy, warm atmosphere. It is important to determine the type, power, and color scheme of devices in order to organize light in the bathroom.
The devices are multifunctional and create lighting sources and help in interior decoration. Before making lighting, it is necessary to develop diagrams, think through the security system of devices and wiring cables.
When arranging lighting in the bathroom with your own hands, you must follow safety precautions during installation work. The bathroom is the most dangerous place for electrification, which can be protected by protective grounding.
When conducting wiring, a hidden system is used. Sockets are placed at a safe distance from water supplies. In the future, careful operation of the devices is required.
Why should you use LED lamps?
Compared to other artificial lighting sources, LED lamps deserve the highest rating. Their superiority when organizing lighting in the bathroom is in the following points:
LED lamps are completely interchangeable with all known types of light bulbs, as they are manufactured for all types of sockets. Taking into account this fact, switching to LED lighting in a bathroom that has already undergone a major renovation will not be difficult. The temperature of the body of a high-quality LED light bulb does not exceed 80°C, and the body of the lamp itself with such a lamp remains cold or barely warm. As a result, overheating and subsequent yellowing of the ceiling sheet are eliminated. You don’t have to be afraid to use any type of spotlights. In addition to the usual standard voltage of 220 V, light sources are commercially available that are designed for a voltage of 12 V (safe for lighting rooms with high humidity). LED lamps can be produced without the use of glass and, unlike incandescent and halogen lamps, do not explode when switched on at high voltage. Based on personal taste and the color of the interior trim, you can choose LED lamps with the most suitable shade of white light. The high efficiency of light sources based on LEDs has made it possible to reduce the size of LED lamps and luminaires
Compact and at the same time bright lamps not only emphasize style, but also save space, which is important for small bathrooms.
Which provides protection from steam and moisture
The moisture-proof lamp is equipped with additional gaskets and seals that prevent water from getting inside.
You can find out the degree of protection of a lamp by the protection index – IP, which is indicated in the labeling. IP is a two-digit European humidity standard. The first number indicates the degree of protection of the device from the ingress of dust and solids, and the second is responsible for the ingress of moisture.
Dust protection:
- IP – 0: the lamp is not protected from dust;
- IP – 1: the lamp is protected from large particles larger than 5 cm;
- IP – 2: protection against particles larger than 1.2 cm;
- IP – 3: average value that protects the lamp from particles larger than 2.5 mm;
- IP – 4: protection against foreign bodies larger than 1 mm;
- IP – 5 and IP – 6: this is ideal protection against dust; with these values, foreign bodies do not get inside the lamp.
Moisture protection:
- IP – 0: no protection from moisture;
- IP – 1: protection against drops of water and condensation falling from above;
- IP – 2: option for the bathroom, drops do not fall into it at an angle of 15 degrees;
- IP – 3: protection against drops falling at an angle of 60 degrees;
- IP – 4: protection against any splashes;
- IP – 5: protection against drops and jets of water;
- IP – 6: resistance to sea salt water;
- IP – 7: resistance to immersion in water to a depth of 1 m;
- IP – 8: perfect tightness, moisture does not enter even at great depths.
The choice of one or another lamp is determined by the humidity zone in the bathroom.
Children's room
A children's room is an ordinary room for you, but for a child it is a whole world. This is a bedroom, a playroom, and a work area all at once. Therefore, it is most logical to delimit specific zones with spotlights. The work area, where the child will do homework, read, draw or write, as well as the play area should be very well lit - this is where as many spotlights as possible should be concentrated. They can be placed, for example, at an angle. This option is also suitable for the living room, where the emphasis is, for example, on the recreation area. But in the place in the baby’s room where the bed is, there may be fewer light bulbs.
How to choose the best option
The appearance is selected in accordance with the decoration of the ceiling and the entire room. For example, when choosing plastic panels that match the tone, the switched-off lamps will become almost invisible, while with a contrasting one, on the contrary, they will stand out noticeably. A more modern interior will suit a chrome-plated external part, a classic one - gold-plated or with pendants.
If the room is low and the ceiling has no noticeable differences, it is better to place overhead models that lower the ceiling height less. And in a spacious room, place the PVC panels a little lower and embed built-in models; the overall look will be more harmonious.
How to cut a hole for a lamp on a suspended ceiling
What we need:
- thermal ring
- glue
- knife
- small screwdriver
Depending on the manufacturer, tread rings can be clear or white and can be made from a variety of materials. You should not save on them; a difference of 2 rubles may later result in a replacement of the canvas. The main burden of removing heat from the lamp falls on the thermal rings.
The diameter of the ring should be selected correctly. It should not fall into the hole in the installation platform. But also, the protector ring should not be too large and extend beyond the edges of the mounting cup of the lamp. Usually the cut-in diameter is written on the box with the spot.
To fix the thermal ring on the canvas, a special glue from the cyanoacrylate group is used. For example, such as Cosmofen or even regular instant in 3g tubes.
When applying glue to the tread ring, be careful. Don't overdo it and overfill. Excesses protruding from the outside of the ring can be noticeable, especially if the diameter of the lamp just overlaps them. Whereas the glue that comes out inside is not so dangerous
It is important to position the ring correctly on the ceiling - there will be no second chance. If the ring is pressed tightly to the film, fixation occurs almost instantly
After the glue has completely dried after 3-5 minutes, check if the ring is holding well. It should be firmly and securely glued along its entire length. If there are any omissions, they must be eliminated. A drop of Cosmofen on the end of a screwdriver will help with this. You can easily remove dried glue from a screwdriver with a knife.
Then, as we are convinced of the reliability of the reinforcement of our future hole, we can move on to the next step. You need to cut the film right under the ring. You should not leave the fringe of the canvas inside. This will allow you to easily install the lamp in the future. Use only sharp knife blades!
Marking
We make the first markings on the base, when we have not yet sheathed or plastered anything. The task is to determine the point of organization of the output according to the project. We recommend marking all these places on the rough surface.
Circles or crosses, no matter how
A couple of points. To find the center of the room, you can find the intersection of the diagonals on the floor and use a plumb line to move the point to the ceiling. If we have a row of several lamps, then for uniformity of lighting, the outermost ones are placed from the side walls at a distance equal to half the distance between the lighting fixtures inside the row. For example, to calculate the location of 3 lamps, the following formula will be applied: B/4 : B/2 : B/4, where B is the length of the wall.
Spotlights in the interior:
Now let's move on to specifics and use real examples to see how they can be arranged. As we have already said, a schematic picture is very different from reality, and you can see this by looking at our selection of photos.
Kitchens
Usually, the question of how to arrange lamps in the kitchen is not too complicated. The room is, as a rule, small and there is no point in placing lamps around the perimeter or in some figurative way.
Practicality is important in the kitchen, which means you just need to “blow” the lumens over the work areas: countertop and table.
There are no other functional places in the kitchen. True, if you have a large one, with an “island” and other unusual elements, then be sure to take into account their presence and do not leave it without lighting. A gloomy kitchen is a gloomy sight.
Bathroom
In the bathroom you need to illuminate the bathtub itself, the sink, and the rest is optional. In general, bathrooms are rarely particularly large, therefore, for a standard 3 - 4 squares, 5 small lamps arranged in a circle are quite enough.
Living room
Particular attention should be paid to the placement of spots in the hall, since the style and general appearance of the room directly depends on this. Spot lighting alone is not enough here, for one simple reason: it will look boring
It is better to combine spotlights with other lighting fixtures, and it is advisable to place them in tiers, in special ceiling niches, which must be done in advance, at the stage of planning the ceiling itself.
Living rooms in which zones are separated from above, using differences in the ceiling, look very interesting. For example, above the sofa there is a tier, above the dining table there is a circle with spots, etc.
Bedrooms
Spots in the bedroom are a matter of business
But in this room, more than in any other, it is important to remember about glare
If the stretch ceiling is glossy, then you shouldn’t bother with spotlights at all. For a rest room, glare is an aggressive and irritating thing that will interfere with sleep.
In this article we have covered everything and even more on this topic. We hope that after reading our material, the placement of lamps on a suspended ceiling is no longer a problem for you!
Requirements
The lamps, fixed at the same level with the ceiling surface, according to their technological parameters, have a 30-degree lighting angle. Therefore, to create brightness, they must be installed at intervals of up to a maximum of 1 meter, and the distance from the last lamp should not exceed 60 cm to the wall. Provided that the ceiling height in the room is standard - 2.5 meters.
To create sufficient brightness for lighting the room, preliminary calculations are made so that the intersection of the corners of each spot is at a certain height, taking into account the height of the furniture and the configuration of the suspended ceiling.
How to correctly connect a lamp in the bathroom ↑
Often the ceiling is made of seamless plastic panels. They are attached to a wooden sheathing (or sheathing made of metal profiles). The distance from the base (concrete floor) to the sheathing should be such that the hidden part of the lamps fits there.
In those places where the installation of light sources is planned, the panels are cut with a construction knife. The holes should be of such a diameter that the uneven edges of the plastic are covered with a decorative overlay. The cable cores are connected to the terminals of the device, which is fixed to the ceiling using spring latches.
The light is fixed
Another finishing method involves the use of moisture-resistant plasterboard. This is possible in rooms with good ventilation. Drywall is attached to the sheathing at the required distance from the base. Holes are cut in it using a bit and an electric drill. They come out with smooth edges. Installation of lighting elements is carried out similarly to the method described above.
Making holes
The third finishing method is using stretch film made of polyvinyl chloride. All preparatory work is carried out in the same way as in the case of finishing the ceiling with plasterboard and plastic. But at the light installation stage you will need special plastic rings. Their diameter corresponds to the diameter of the hidden part of the body. The rings are attached to the film, which is cut through with a sharp knife
Proceed with caution: accidentally touching the film with the sharp edge of a knife can damage the ceiling. Thick plastic rings are necessary to ensure that the spring latches hold the point securely
It is advisable to install LED lamps: they practically do not heat up and are not dangerous for polyvinyl chloride film.
PVC film ceiling lamp
Installing a lamp in the bathroom can be done independently if the owner of the house is familiar with the nuances of electrical installation work and the basics of electrical engineering; if not, then it is worth inviting specialists.
Which light bulbs will not harm plastic?
To prevent the material from melting from close contact with the lamp, it is better to choose energy-saving or LED lamps. The latter are also convenient because they turn on at full power immediately. In addition, when using a dimmer, the brightness of the lighting is adjusted.
Diodes operate on a current of 220, 12 or 24 Volts. The first option connects directly to the network, and for low-current ones an adapter is required. It is better to install low-power lamps - 12V - in a ceiling made of plastic panels. Their impact on the material is minimal, and therefore such products are completely safe and more durable.
Plastic panels
One of the popular materials used for finishing ceilings is polyvinyl chloride (PVC) panels. They have their advantages and disadvantages, but the main advantage is that they allow you to embed light sources. We’ll talk about how to do this and how to arrange the lamps in this article.
Plastic is an inexpensive type of finishing for ceilings. Installation of PVC panels does not require special skills, and anyone who owns a tool can install a plastic ceiling at home with their own hands.
The range of PVC panels makes it possible to choose products to suit your taste, harmonizing with the interior of the room. The choice of plastic coverings is wide; they are available in various types:
ceiling-mounted, lightweight and elastic, but requiring careful handling during installation; wall, hard and heavy; glossy, varnished; with thermofilm decor; textured like wood, marble, etc.;
Plastic panels are made in various sizes, take this into account when purchasing materials
An important advantage of plastic is its moisture resistance; it can be easily washed by any means. Installation of plastic panels is carried out in bathrooms and toilets; they are used to decorate loggias, verandas and saunas
Plastic options are available with a beautiful coating and texture, and the panels will decorate even an expensive interior.
Plastic panels
PVC boards differ in how they decorate the surface with a pattern. Simple and economical - white, smooth, without a specific pattern and plain. Coating options of other colors and textures are available, which are applied in two ways:
- transferring the ornament from the thermal film base to the PVC panel, this method is simple and economical;
- direct printing, allowing you to obtain a high-resolution design with a rich color gamut. It is done on special equipment.
What to pay attention to before starting work
It should be noted that most suspended ceilings are made from materials that burn.
The following types of surfaces that have this disadvantage can be listed:
- plastic panels;
- canvases that are needed to create suspended ceilings;
- panels for the production of which MDF was used.
That is why you should not forget about fire safety. When installing wires, make sure that they are securely connected.
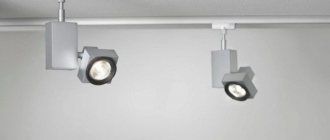
Types of spotlights
Use heat-resistant wires that will not burn. This is especially true if you are installing halogen or conventional incandescent lamps rather than LED ones. The fact is that they greatly heat the space around them. Wires must be resistant to heat. If you choose a product that does not meet the requirements stated above, the insulation may be destroyed. This often leads to short circuits and fires.
When buying lamps in a store, pay attention to their power. The larger it is, the more intense the heating of the wires will be. Be sure to take this point into account when designing your lighting system.
Be sure to take this point into account when designing your lighting system.
How to choose a wire
Industrial companies supply different brands of wires to the market, but you must find those products that strictly comply with safety requirements.
Buy a wire with the following characteristics:
- resistance to high temperatures;
- non-flammability.
RKGM wire has proven itself well; this brand is in demand among specialists. Copper wire, heat-resistant. The product has two layers of insulation. The wire does not burn, it is heat resistant. The outer layer of insulation is represented by varnished fiberglass winding, and silicone rubber was used to make the inner one. This made it possible to give the inner insulation layer special strength.
This wire can be used when installing lamps in a sauna or bathhouse, since the product performed well at temperatures from -60 to +180 degrees Celsius.
What to consider when choosing devices?
In the process of creating a design project, it is necessary to select the optimal model of the lamp, taking into account the characteristics of the room, the design and texture of the finishing materials.
For example, built-in models are not suitable for arranging a bathroom with a ceiling made of a monolithic concrete slab. In this case, it is better to use overhead fixtures or ceiling fixtures in the form of chandeliers.
In an effort to create a stylish interior and a comfortable environment, special attention must be paid to the choice of lighting equipment. In this case, it is necessary to take into account the design, characteristics, dimensions, lamp power, methods of mounting the electrical appliance and the need for additional structural elements
When arranging a spacious room, designers advise focusing on traditional lighting solutions that will fit perfectly into the interior
If the bathroom is large, then a beautiful chandelier will look organic. But spot models, correctly and evenly distributed throughout the ceiling space, will allow you to create a stylish interior that takes into account current trends.
When choosing lamps, the following factors must be taken into account:
- room area and distance between lamps;
- zoning of the room, the need to highlight separate areas;
- instrument level;
- interior style direction;
- color scheme of walls, floors, furniture and plumbing;
- the presence of mirrors, tension structures, ceramic tiles and other surfaces that reflect light.
Before you begin installation work, you need to think through the layout of the light sources and the nuances of cable routing. Some models offered by manufacturers in the assortment require the creation of special conditions.
The quality of products directly affects their service life. Expensive branded models of built-in or surface-mounted lamps compare favorably with cheaper ones. They are of higher quality, wear-resistant, and therefore retain their aesthetic appearance for a long time.
In an effort to create a stylish and original interior in the bathroom, we must not forget about safety. Electrical devices intended for installation in rooms with high humidity must have a maximum degree of protection, which corresponds to the IP65 marking.
The bathroom is divided into zones with different humidity levels. The bright blue area is exposed to maximum splash water.
When arranging rooms with high humidity levels, certain rules must be followed.
The following recommendations will help you organize safe room lighting:
- You can only use moisture-resistant electrical appliances with a degree of protection of IP24;
- in areas of high humidity, install low-voltage devices up to 12 V;
- use lighting devices of protection class 2 near the bathtub or shower stall;
- it is desirable that all metal parts are made of stainless steel or have anti-corrosion properties;
- Light bulbs and other heated parts of electrical appliances must be equipped with protective covers or shades.
You should also remember about the features and properties of light rays. So, next to the washbasin it is better to use lamps with a softer yellow light. Otherwise, the mirror will reflect rather pale skin, which will prevent you from applying makeup correctly.
Our recommended article will familiarize you with the rules for choosing color temperature and the nomenclature designations of lighting devices, which allow you to select an LED light bulb in accordance with this important characteristic. Proper lighting should be bright, soft and diffused
This will highlight the colors of the interior elements and finishing materials and create a cozy atmosphere.
Proper lighting should be bright, soft and diffused. This will highlight the colors of the interior elements and finishing materials and create a cozy atmosphere.
For a bathroom with dimensions of 5x2 m, 2 lamps of 60 W are sufficient. You can use 2 lamps spaced on the sides, but in this case the mirror will require additional lighting. You can get acquainted with guidelines for selecting lighting devices for the bathroom in an informative article, the content of which is entirely devoted to this issue.
What is needed for installation
The following elements will be needed from the material: spotlights; lamps; supply wire; terminal blocks or sleeves for connecting wires; insulating heat shrink, electrical tape; switch.
It is advisable to select lamps of the same type for each type of lighting. According to the type of design, the lamps themselves are purchased in the required quantity
It is important to strictly check the presence of a reflective layer along the cone at the base of the base for incandescent lamps and the technical characteristics in accordance with the requirements for the lamp
For suspended ceilings, 40 W lamps are used; more powerful ones will significantly heat the suspended ceiling material and can lead to structural damage or even a fire. Halogen and LED versions of lighting elements are selected according to the power and spectrum of the light produced.
The wire is selected depending on the material from which the suspended ceiling is made. So for drywall, which is a fire-resistant material, a regular two-core or three-core wire VVG-2(3)x1.5 is suitable. For materials such as MDF or plastic, it is necessary to select a fireproof version of the RKGM wire.
The wire must be soft, that is, each core is represented by many small veins united under one insulation. To connect wires and connect lamps to them, you can use special terminal blocks, which are sold at any hardware store.
However, the bolted connection is serviceable. You will need to check the tightness of the clamping bolts at least twice a year. Otherwise, at the point of contact, the terminal blocks and wires may begin to heat up and char. A more reliable and durable option is fixation using copper or tinned copper sleeves.
It is necessary to protect the connection points using electrical tape or using a special heat-shrink tube to insulate the supply wires.
Materials for installation of lamps
Before you begin installing the luminaires, check for the presence of:
Lamp with ready-made mounts; Electric drive; Lamps (it is important that they match the base of the lamp); Sleeves or terminal blocks for connecting wires; Standard electrical tape; Switch for lamps. When purchasing a lamp in a store, select lamps of the same type
For example, you know that you won’t have enough power from the main chandelier and will have to buy several more small spotlights for it: choose options from one collection. This way you will avoid inconsistencies in design and it will be easier for you to start installing lighting
When purchasing a lamp in a store, select lamps of the same type. For example, you know that you won’t have enough power from the main chandelier and will have to buy several more small spotlights for it: choose options from one collection. This way you will avoid inconsistencies in the design and it will be easier for you to start installing the lighting.
Be sure to check if they have a reflective layer on the special cone of the bulb. Check their compliance with the technical characteristics of the lamps.
The lamp power should not exceed 40 watts. If you choose this power, the lamp will not overheat and the drywall around it will remain intact. LED and halogen lamps are better suited for this purpose: you just have to select them according to their emission power.
Also pay attention to the selection of wires, and it is better to consult with specialists on this issue when purchasing. If your ceiling is plasterboard, then 2-wire VVG-2x1.5 is perfect
Don’t forget to purchase terminal blocks from a specialized store: you will need to keep an eye on them even after installation is complete.
Over time, they heat up without maintenance, so it is necessary to periodically tighten their bolts
Do not forget to purchase terminal blocks from a specialized store: you will need to monitor them after installation is completed. Over time, they heat up without maintenance, so it is necessary to periodically tighten their bolts.
Tools
To install ceiling lights with your own hands, you will need the following tools:
- drill;
- distribution boxes;
- cable of selected length;
- screwdriver;
- construction knife;
- pliers;
- terminal blocks.
Some of the listed tools are usually found in every home.
Tools for installing lamps
Which lamps are best to use in the bathroom ↑
Incandescent lamps are gradually becoming a thing of history. The reason is not only their high energy consumption: during operation they become very hot, which is dangerous for plastic. High temperatures cause it to turn yellow and a fire is possible. The dimensions are also not in their favor, because of which they have to lower the suspended ceiling sheathing low.
Compact energy-saving fluorescent lamps heat up less, but their high cost is not justified by their service life.
The variety of shapes allows you to choose an option for any interior
Halogen devices are a glass bulb with an incandescent filament placed in it. Inside the flask there are bromine or iodine vapors that prevent the tungsten filament from burning out. This increases the service life of halogen lamps.
LED lamps are assembled on the basis of LEDs - semiconductor devices. They do not heat up, which means they are the most economical and optimally suited for the bathroom. They are currently the most expensive, but as demand increases, the price goes down.
LED dots are the most economical
It is preferable to use lamps operating on reduced voltage. To do this, a 220/12 V step-down transformer is installed under the suspended ceiling. The power of the transformer is selected in accordance with the total power of all lamps (plus some reserve is needed).
Installation is recommended using a step-down transformer
What are the features of the material
PVC panels differ in a number of characteristics, so before installing lamps in such a ceiling, you need to understand the features of this option:
Plastic is not afraid of moisture and even with prolonged exposure to water does not deteriorate and does not change properties. But at the same time, mold may appear on the surface if the room has poor ventilation and moisture does not evaporate. Service life more than 10 years. PVC remains reliable for a very long time when used indoors. It is not suitable for open air due to the fact that changes in temperature and humidity, as well as ultraviolet radiation from the sun, make the plastic brittle in just 2-3 years. The panels can be installed with your own hands in just a couple of hours. To do this, you need to assemble a frame from a profile or a wooden block, and then secure it with staples, screws or liquid nails. This is the cheapest finishing material today. At the same time, you can buy panels of different widths and colors, which will allow you to decorate the ceiling the way you like. The surface is susceptible to impacts, which causes the PVC to crack or break. Therefore, you need to handle the ceiling with care; if you press hard when installing the lamp, a mark may remain there. The work must be carried out carefully. You can cut plastic with a hacksaw or a construction knife, which simplifies the work
The main thing is to do everything carefully so as not to damage the surface or leave marks on it. PVC is afraid of high temperatures. Components have been added to the composition that prevent the panels from burning, but at the same time they easily melt and deform from constant overheating
Because of this, lamps need to be selected especially carefully; models with incandescent lamps cannot be installed; halogen options are also undesirable. LEDs are best because they don't get very hot even when used for a long time. Panels of large width can sag under the weight of the lamps if they are located in the middle. If necessary, you need to place platforms under the ceiling made of suspensions and plastic so that the clamps are held on them. It is better to choose light lamps so as not to do unnecessary work.
LED lights are best suited for PVC.
How to correctly calculate the required number of lamps
Before making the correct selection of the number of lamps for the room, you need to decide on the type of light sources used. Their number will depend on this.
To perform the calculation you will need the following data:
- room area;
- type of lighting sources installed in the room;
- the presence of windows in the room and their installation location;
- methods for zoning room area;
- interior design, as well as the purpose of the room.
An example of calculating the number of light sources is given in the table.
| Room | Standardized quantity for incandescent light bulbs, W/m2 | Normalized number for diode light sources W/m2 |
| Bathroom | about 20 | 2-3 |
| Living room | 22 | 3 |
| Corridor | 12-16 | 1-4 depending on the purpose |
| Bedroom | 15 | 2 |
| Children's | 60 | 6-10 |
For a room with an area of about 20 square meters, you will need approximately 10-13 light sources. To ensure a more convenient arrangement of lamps, it is recommended to select an even number of lamps.
It is better to choose more light sources, since spotlights emit soft lighting, it will not harm a person.
Connecting point models
Twelve-volt light models are connected via a transformer. The connection is parallel. To calculate the number of sources, you need to find out the power of the transformer.
Conversely, purchasing a transformer begins with calculating the number of point sources and finding out their power. The transformer power is calculated with a reserve.
Position light sources
Before placing lamps in the bathroom, it is recommended to determine the number of functional spaces. The wide rooms have several levels.
- wash areas with a sink and mirror are designed;
- area for water treatments with shower or jacuzzi;
- space for changing clothes and placing things.
Small built-in lamps with a gentle light also illuminate furniture structures - shelves, cabinets, cabinets.
The location of lighting fixtures at the ceiling level depends on the size of the room
It is important to calculate the dimensions of the room in order to determine the best layout, but which arrangement is more harmonious will also depend on the design solution. Lighting can be represented by 1 lampshade or a complex combination of lamps of different types
Combining lighting systems at different levels is popular. The basic principles of bathroom design involve lighting the work area, which includes a mirror, washbasin, and shelves.
Preference is for unobtrusive soft light. Lower lighting often serves as interior decoration. Such lamps are placed 40 cm from the floor or on the lower surface and under interior items. It is possible to place light sources on the steps and under the podium.
Washbasin and mirror lighting
The middle level includes the installation of lighting fixtures above the bathroom mirror and washbasin. The requirements for the devices are to create natural light, a clear image on the glass surface - without distortion or shadows.
Experts recommend hiding lighting fixtures in white or matte lampshades so that the radiation is soft and diffuse.
The optimal arrangement of devices is on the sides of the mirror or along the perimeter. Any type of lamp can be installed. It is better to avoid devices under the mirror, because... they create glare on surfaces.
Bathroom vanity and mirror lighting
Shower or bath lighting
The shower or bath area requires additional lighting to create a cozy atmosphere. Specially designed luminaires for wet environments are suitable.
The structures can be designed in the form of sconces. Lamps are also placed in the center or spotlights are mounted in rows. The system of overhead lamps will help to visually expand the space and increase the level of illumination.
Bath lighting
Functions and purpose
Lamps built into furniture are the main trend in modern interior design. Foreign furniture makers can no longer imagine new models without additional lighting. Russian designers are not yet ready for large expenses, but in domestic collections you can increasingly see illuminated cabinets and shelves.
Spot lighting is designed to place accents, highlight beauty and illuminate the necessary places in your room. Furniture can be called not only those lighting fixtures that are located in interior items, but also additional spotlights in arches, niches and on ceilings.
Spotlights can play the role of both primary and additional lighting. If furniture lamps are used as additional ones, they usually soften the harsh shadows that appear when the main chandelier is operating.
Advantages and disadvantages of LED lamps
The continuous increase in the cost of electricity forces us to think about saving. Replacing incandescent light bulbs with LED ones reduces costs by 10 times.
There are other advantages:
- compactness;
- no soot;
- fast ignition (without warming up);
- long service life;
- low sensitivity to voltage changes;
- ease of installation;
- high quality (if you buy products from a popular manufacturer);
- environmentally friendly.
LED lamps have an attractive appearance, but they are more expensive than all others. If you purchase cheap Chinese-made products, the quality of the glow and service life will decrease.
Disadvantages include exaggeration of some advantages:
- the real service life is not 10-11 years, but 3-5 (taking into account the degradation of LEDs);
- narrow directionality of the light beam, requiring the installation of a large number of lamps;
- the need for expensive drivers and cooling systems.
The costs of reconstructing lighting systems are not reimbursed in any way. Those who have begun to use LEDs in residential premises claim that it takes some time to get used to their glow.