In this article we will look at options for how to build barbecues with your own hands from metal: dimensions, photos and drawings, as well as step-by-step instructions included! Let's talk about the advantages of such structures, as well as the properties of the steel from which they are made. Below we present four master classes in detail.
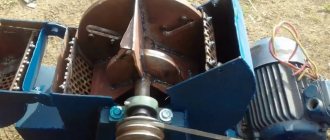
- First of all, we’ll tell you how to make a barbecue from a gas cylinder: photo instructions with explanations will prevent you from making mistakes during installation. We will use a standard 50 liter cylinder;
- The second chapter provides instructions for installing a barbecue from a 200 liter metal barrel;
- Next, we will discuss the standard portable type design made of 5mm heat-resistant steel. A drawing of a metal grill with dimensions is also included; we specially made it for this master class.
- In conclusion, we will tell you how to build a portable camping sheet grill from 3mm steel.
You will learn how to make from metal
Advantages of metal barbecues
A metal brazier has a number of advantages. Their main ones include:
- strength and reliability;
- low cost. The cost of creating such a design is significantly lower than products on sale;
- mobility - simple and easy to install and transport around the site.
- freedom of creativity. Since you make this product yourself, you can decorate it the way you want;
- durability. Such a grill will serve you for decades with proper use and reinforcement of the bottom of the structure;
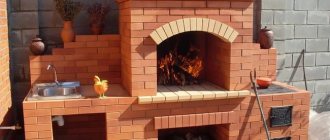
General structure of a barbecue oven with a cauldron
A cauldron is a round cauldron made of cast iron. Aluminum cauldrons are undesirable; they burn out quite quickly and do not hold the correct temperature.
For cooking over a fire, it is better to use a cast iron cauldron - it holds the optimal temperature well.
You can cook anything you like in a cauldron on site, but the optimal dishes are pilaf and cauldron kebab. It is difficult to prepare them in an ordinary kitchen - the odors are too unpleasant and intense when the oil is heated.
In a brick oven with a cauldron, the container is directly heated from the flame
A brick oven with a cauldron is universal: if you remove the cauldron, you can fry shish kebab; if you try to lay out the round tray evenly and neatly, you can use it as a tandoor; If the round hole is covered with a cast iron sheet with burners, they can be used to fry in frying pans and cook in pots.
By removing the cauldron, you can adjust the strength of the fire using cast iron burners
Characteristics of heat-resistant steel
In this block we suggest that you familiarize yourself with the characteristics of heat-resistant steel. It is from this that we propose to make a grill (third master class), because... structural integrity and resistance to deformation over time is the main task. The second point is to ensure that the steel rusts for as long as possible.
As suitable metals, we suggest considering the characteristics of 2 grades of heat-resistant steel: 09g2s, 15khsnd (nl-2). In addition to their heat-resistant qualities, they have a number of advantages:
- take a long time to rust;
- In stores you can buy thicknesses of 2mm, 3mm, 4mm, 6mm. In general, this thickness is enough to implement the project (15HSND (NL-2) only 6 mm or more). A metal thickness of 6mm is suitable if you want to make a solid stationary grill (it is heavy);
- Excellent for cutting and cooking.
09G2S - interpretation and properties of steel
09GS2 is a low-alloy structural steel with an increased endurance limit. This brand is widely used for welding steel structures, including suitable for barbecues. Use this grade of steel if you want to make a portable one.
09G2S
On sale you can find sheets with a thickness of 2 mm, which is ideal for portable grills and barbecues. However, nothing prevents you from making a stationary barbecue from steel grade 09G2S. For a more detailed understanding of the heating properties, we suggest studying the table below.
| Pace. tests, °C | σ0.2 (MPa) | σB (MPa) | δ5 (%) | Ψ (%) |
| 20 | 300 | 460 | 31 | 63 |
| 300 | 220 | 420 | 25 | 56 |
| 475 | 180 | 360 | 34 | 67 |
Decoding of steel 09G2S is carried out as follows:
- 09-0.9% carbon component;
- G- Contains manganese;
- 2 – manganese 2%;
- C – silicon, less than 1%.
15HSND (NL-2) - interpretation and properties of steel
Steel 15HSND (nl-2) has excellent physical properties when exposed to high temperatures and is resistant to overheating. This quality allows it to be used when cooking thick-walled structures, including barbecues.
15HSND
This steel is more suitable for stationary structures than for portable ones, due to its thickness - at least 6 mm. How 15HSND (NL-2) behaves at elevated temperatures can be seen in the table
| Pace. tests, °C | σ0.2 (MPa) | σB (MPa) | δ10 (%) |
| 20 | 370 | 620 | 20 |
| 200 | 370 | 590 | 15 |
| 300 | 360 | 610 | 11 |
| 400 | 375 | 590 | 14 |
| 500 | 300 | 365 | 17 |
15HSND is deciphered as follows:
- 15 – 0.15% carbon
- X – Chrome 0.6-0.9%
- C – Silicon 0.4-0.7%
- N – Nickel 0.3-0.6%
- D – Copper 0.2-0.4%
If you have not yet decided which of these grades of steel should be purchased for making a metal barbecue, rely on the price in your city and the availability of steel for sale.
Carry out preparatory work
Before starting the main stage of work, you need to properly prepare.
- Decide on the type of installation. Will the structure be stationary or portable? Basically, metal barbecues can be easily transported and installed anywhere;
- Decide where you will install the structure. At the same time, it doesn’t matter whether it is a portable or stationary installation; in any case, the heat from it can harm your vegetation, trees, or other elements on the site.
- The dimensions and photos of a do-it-yourself metal grill are well known. Basically they are within the following limits: width - from 50 to 120 cm, and depth - from 15 to 20 cm.
These barbecue sizes are optimal. They allow you to place a grill, several skewers and coals inside. At the same time, the latter do not affect the product that is being prepared.
Cooking methods
The main difference between a barbecue and a tandoor is the method of cooking:
- the grill is used for frying;
- tandoor - for baking.
Due to the difference in cooking methods, we get differences in finished dishes:
- Food in barbecues is cooked in the heat from coals, for which the barbecue is fanned from all sides, in a tandoor - from the evenly heated walls of the oven. Due to longer contact with fire, the meat in the grill dries out, and sometimes it can burn, while in the tandoor, due to the uniform heat, the meat remains juicy.
- Food cooked in tandoor retains maximum nutrients and vitamins. The open fire of a barbecue “depletes” the composition of the products.
- Meat cooks faster in the tandoor: the kebab will be ready in 10 minutes, and on the grill in 20.
How to make a grill from a gas cylinder: photo instructions!
This design is based on a 50 liter gas cylinder. Its length reaches 96 cm, which allows you to easily place 9 skewers in it. If you want to learn how to make a barbecue from a propane tank with your own hands, follow these steps:
- prepare the necessary tools and materials;
- design the look of your future barbecue;
- prepare the cylinder for cutting;
- cut the balloon;
- install the cover;
- make a stand;
- make holes for skewers, as well as ventilation;
- paint it.
How to make a barbecue from a gas cylinder: photo instructions with your own hands
Tools and materials
To make a barbecue from a gas cylinder we will need tools and materials:
Tools:
- Bulgarian;
- welding machine;
- drill;
- adjustable wrench;
- chalk;
- ruler..
Materials:
- old propane tank;
- handle with wooden insert;
- rivets;
- professional pipe;
- corner;
- band.
Drawing, project, diagram
Now you need to prepare drawings of the barbecue with your own hands from metal in the photo. Take a ruler and chalk and mark cutting lines on the balloon according to the dimensions given. The dimensions of the barbecue made from a gas cylinder in this project should be as follows:
- The length of the gas cylinder is 960 mm.
- The standard height (and in our case, both height and width) of the gas cylinder from which we make the project is 290 mm. We cut out the lid exactly in the middle - 145 mm.
- cut length – 884 mm;
- number of holes for skewers – 9 pcs, 5x11 mm each;
- handle dimensions – 260 mm;
All other data is presented in the drawing.
Legend:
| # | Description |
| 1 | Gas cylinder |
| 2 | Lid |
| 3 | Lid handle |
| 4 | Hole for skewers |
And two more tips:
- Leg height. The average height of a man is 175 cm, a woman is 162 cm. Take this into account when setting the height at which the propane cylinder grill will be located. We recommend using a leg height of 80 cm.
- Steel thickness. As mentioned earlier in the article in the paragraph “Characteristics of heat-resistant steel”, it is advisable to use from 2 to 6 mm, depending on the purpose and type of steel.
Preparing the cylinder for the barbecue (pumping out the gas)
First, we need to prepare the balloon itself for cutting. Usually there are gas residues in old cylinders that need to be removed. To do this you need:
- Open the valve and place the cylinder on its side. if gas comes out of it, wait until it comes out completely.
- Unscrew the top part of the faucet using two gas wrenches. After this, some more gas should leave the cylinder.
- We connect a hose with water to the cylinder and open the water. We wait until it is completely filled.
Step-by-step instructions on how to make a grill from a propane cylinder
After the container is completely filled with water, you can start cutting the metal:
- We install a barbecue cover from a propane cylinder. To do this, we completely cut it along the previously outlined lines (as in the drawing).
- We drill holes in the lid and cylinder with a drill, after which we fasten it using corners and then with rivets.
- We weld the handle with a wooden insert so as not to get burned
- We make a stand. To do this, we take 4 parts of professional pipe, each measuring 15x15x800. Also an 850 mm corner, a 1750 mm strip, and two more parts of a 15x15x280 pipe. Next, we bend two parts of the strip, 450 mm each, to the shape of the cylinder, and cook. We weld two pieces of 280 mm corrugated pipe from below to our frame for stability. We connect the corrugated pipe with an 850 mm angle at the top and the rest of the 850 mm strip at the bottom. A do-it-yourself stand for a barbecue made from a gas cylinder as in the photo is ready.
- Make holes with an 8.5 mm drill in the base of the cylinder for ventilation.
- Make holes for skewers. On the front side 5x11 mm, this is the best option. From the back side, use an 11 mm drill.
- For more convenient movement and operation, weld the handles on both sides. We would also recommend welding the shelf on the right side.
We improve and strengthen
To strengthen it from the inside, we also recommend welding steel sheets along the edges at the junction with the top cover.
As for improvements, here you are free to do whatever you want, don’t be afraid to experiment. You can add a small table in front of the grill from a propane tank, make another small grill next to it and turn the whole structure into a wonderful smokehouse.
Barbecue smokehouse from a gas cylinder
Another “upgrade” to your barbecue could be strengthening the place on which the barbecue grill and itself are placed. To do this, we recommend that you read our other article on this topic.
You can also make such barbecues with a metal roof - photos will be presented at the end of the article.
Examples of barbecues from a gas cylinder
We hope that after reading this article on building a homemade barbecue from a propane tank, you discovered a lot of new and useful things. We wish you good luck with your construction!
And as usual, we’ll finally attach to you a photo gallery of examples of barbecues made from cylinders from professional summer residents.
Standard models
The standard models sold by the retail chain are similar in design and have approximately the same dimensions.
Standard sizes of barbecue grills made of iron
| Model/Parameters, cm | Width x Depth x Length | Overall height |
| Mini | 25x15x35 | 35 |
| Standard | 25x15x40 | 40 |
| Standard 2 | 30 x 20 x 50 | 50 |
| Status standard | 29.5 x 20 x 45 | 40 |
| Classic | 36 x 15 x 60 | 70 |
Small-sized collapsible kebab makers, with removable legs, made of thin metal 0.5 - 2 mm. Among the listed models, the classic grill 36x15x60 cm has the most spacious roasting pan. Wall thickness - 2 mm. You can place 8 - 9 skewers with 8-10 pieces on each.
Standard models are designed to be universal, and this is their main advantage. They can be used in the country, on the river bank, or taken on a trip.
The undeniable advantages of barbecue makers are:
- laconic design;
- convenient transportation;
- easy and quick assembly;
- attractive price.
However, not all of the listed advantages are important for the owner. For example, if the owner uses the device only on the site, the service life and appearance of the product are more important to him than the weight and ability to disassemble it.
Minuses:
- thin metal;
- insufficient size of the fryer;
- short legs;
- inconvenience of operation;
- fragility of the structure.
Therefore, the device must be selected individually, based on the principles of its use.
Barbecue diagram with dimensions
At the same time, there are time-tested and proven barbecue designs with the correct dimensions, which should be guided by and adjusted to the ideal.
The right grill will be easy to use and will last a long time.
We build a barbecue from a barrel with our own hands
To build a barbecue from a barrel with your own hands, you first need to familiarize yourself with its dimensions and characteristics.
Metal barbecue barrel 882 mm long, 595 mm in diameter. As a rule, such 200 liter barrels have the following characteristics:
| Name | Meaning |
| Corrugated diameter, mm | 595±3 |
| Height, mm | 882±3 |
| Inner diameter, mm | 571,5+1,0 |
| Material | Cotton sheet |
| Case metal thickness, mm | 1,0 |
| Thickness of metal bottoms, mm | 1,2 |
| Weight, kg, no more | 20,2 |
Now let's move on to building the grill. In this case, a drawing of a metal barbecue with dimensions will not be needed, since there is nothing complicated in installing such a structure. The technology is the same as in the case of building a barbecue grill on wheels. We take a metal barrel and make markings using a long ruler or board, as shown in the photo.
Using a 6 mm drill, we make 4 holes on each side. Please note that you must have bolts with the same diameter. We'll attach the lid hinges here later. The dimensions between the holes depend on which hinges you use. Measure the distance directly on site.
We cut with a fine-toothed grinder along the already marked line.
The lid will occupy about a quarter of the entire circumference of the homemade barbecue from the barrel.
Having cut out the lid from all sides, we take it out of the barrel.
We'll use a metal grinder to smooth out the metal where we cut.
The next step is to insert the screws and nuts into the hinges into the pre-prepared holes so that the lid can open and close. Fixation is shown in the photo.
Now it's time to make metal grill legs with your own hands. We take an old iron corner and mark two 170 cm sections - these will be our legs, which we can attach to the barrel without using a welding machine.
Next, we bend each 170 cm segment in the middle, having first made a cut.
As a result, we will get a leg 85 cm long - quite comfortable for average human height (keep in mind that the legs are not perpendicular to the ground at 90 degrees). When making such barbecues with your own hands from metal, the dimensions in the photo will be very helpful.
To attach the legs to the barrel, place them as shown in the photo and drill 3 holes with an 8 mm drill. One on top and two on the sides of the barbecue. Don't forget you must have 8mm bolts.
We insert a screw with a nut and washer into the hole, thus fixing the resulting leg. We screw a screw into the remaining holes and a nut.
To make a handle, take a small block and drive two self-tapping screws into it at both ends. We also drill two holes in the lid. Next, the handle with self-tapping screws is attached to the barrel lid using screws and washers. Dimensions can be made by eye. If you can’t by eye, take a 170 mm distance between the holes. Now all that remains is to make the mesh, and your DIY barrel barbecue grill will be ready!
Next you need a grill mesh. To install the mesh at the correct height in the barrel, its width must be 25 centimeters. Let's use wire cutters and bite off the piece we are interested in.
Next, we roll it in half with pliers and you can put it on the grill. The height will be sufficient for frying meat, fish, sausages or vegetables.
Then everything is as usual. We light the wood, cover it with a lid, and wait for the coals to appear. Then we can insert the nets and start cooking on your barbecue from a metal barrel!
Bon appetit!
We invite you to look at other photo options for a barbecue grill made from a barrel.
Making a barbecue from heat-resistant steel
It's time to consider the third option for a do-it-yourself metal barbecue. This time we use a steel sheet 5 mm - 0.6 sq.m., angle 50 - 270 cm, corrugated pipe 15x15 - 3 meters, bolts 4 pcs M8x50, 8 nuts M8 and 8 washers D-8.
The first step is to make a drawing of the barbecue. The design parameters will be as follows:
- width 600 mm;
- length 300 mm;
- height 200 mm;
- total height with legs 800 mm;
- the distance between the slots for skewers is 60 mm.
- You can see all other data in the diagram below.
Drawing with dimensions
Next, we mark out a drawing of a metal barbecue using a square and cut it with a grinder. This configuration is quite enough to cook 2.25 kg of meat in one go (based on 250 grams per skewer).
Removing burrs
We combine the side plates of a simple metal grill and make tacks using a welding machine.
The next step will be to mark for future ventilation holes. We will drill in three iterations – 5 mm, 8 mm and 12 mm, gradually increasing the cut diameter.
Drill with a d5 mm drill
Drill with a drill bit d8 mm
Drill with a drill d12 mm
We mark the slots for the skewers and then cut them out with a grinder. The distance between the slots in our case is 60 mm. Let's make 9 cuts 8 mm deep.
We assemble the walls using tacks.
Boil it.
We weld the arms and legs. We use pre-prepared 15x15 corrugated pipe and corners.
Total height 80 cm.
This is the job done! We invite you to watch a video of a barbecue with your own hands.
The simplest dismountable metal grill
The simplest barbecue can fit into a regular umbrella cover, for example! Well, if you don’t want to replace the umbrella cover, then sew a new one.
The dimensions of a simple collapsible portable barbecue are as follows:
- crossbar length 500 mm;
- leg length 450 mm;
- crossbar width – 30 mm;
- width of legs – 10 mm;
- steel thickness – 3 mm;
To make a collapsible barbecue with your own hands from metal, follow the instructions.
- You will need a 1m strip of sheet steel for the crossbars, as well as 4 strips for the legs. All sizes are already indicated above.
- We cut the meter strip with a grinder into two parts of 50 cm each. We mark a distance of 60 mm and make slots for skewers of 5-6 mm.
- Drill 2 holes in each crossbar to which we will attach the legs. Diameter = 5mm, margins from the edges are 10-12mm.
- Future legs of a portable barbecue should be sharpened on one side to make it easier to drive them into the ground.
- Drill a hole with a diameter of 5 mm with a distance of 15 mm from the edge. This is where we will attach the rivets.
- Next we rivet the holes. For more details on how to do this, see the diagram below.
- If you don't want to make rivets, you can easily get by with nuts and bolts. However, in this case, over time they will unscrew, and you will have to constantly tighten them.
- As soon as you secure all the parts of the two crossbars, a simple metal grill is ready! Sew a cover and take it with you to nature, on a hike or wherever your heart desires.
The grill is driven into the ground with a hammer next to the fire pit
You can cool it in water, or just wait.
Conveniently rolls up into a single structure
The sizes are very attractive for taking with you on a hike, fishing or just in nature
More details in the video from the authors of this barbecue.
Adviсe
In addition to the usual calculations for making a barbecue, you can use the additional tips given below to design a real recreation area in your country house or home area.
- If the length of the barbecue is planned to be more than 100 cm, then in this case it is recommended to equip the structure with additional legs. This will give greater stability.
- The metal grill can also be equipped with wheels. This will allow you to easily change its location on the site if necessary.
- A canopy can be constructed over barbecues and fireplaces. In this case, you can cook barbecue even in bad weather. If you also equip benches, plant flowers and shrubs, then this place will become the real heart of the garden plot, where in the evenings you can just sit by the fire, listen to the birds singing, and look at the starry sky.
- The design of a conventional metal barbecue can be additionally equipped with places for storing firewood, skewers, water and pokers. This will add additional charm and some charm.
- Cast iron is considered the best material for making a barbecue. It is very strong, durable and holds heat well. This will save on coal. In addition, it can be additionally decorated with forged elements.
- When choosing the location of a barbecue or hearth, you must be guided primarily by safety rules and not place the structure near buildings (the distance should be more than three meters), next to flammable objects, under trees, near fences, fences, gazebos.
- A stone hearth is best made from natural elements. But in order to build it in compliance with all building codes, rules, standards and technologies, it is better to resort to the help of qualified mason builders.
- It is better to cover a metal barbecue made by yourself with fire-resistant paint. This will make its appearance more aesthetic and significantly extend its service life.
- It is better to make slits for skewers on a roasting pan at a distance of 5 to 8 cm. This distance will allow you to easily turn each of them over without touching the neighboring ones.
- Before using the barbecue for the first time, it must be calcined, that is, light a fire in it, in order to get rid of all the harmful substances accumulated during construction.
- Near the hearth you can equip a small reservoir, pond or alpine slide. This will allow you to create a complete ensemble of a suburban recreation area.
It should be noted that the correct grill should always be made according to generally accepted standards, which must be slightly adjusted to individual requirements.
In this case, the meat will be cooked immediately in sufficient quantity, will not burn or dry out regardless of the cooking tool, the fuel material will be used efficiently and economically, and the heat will not escape into the air.
In addition, there is currently a wide selection of building materials that will be suitable for its manufacture, be it metal, steel, cast iron, heat-resistant brick or natural stone.
When decorating a barbecue, you can implement any ideas and projects, be it a small mobile fireplace, a stationary brazier or even a brick oven in your garden. Subject to compliance with building standards and fire safety, the result will only please the eye.
A real corner for cooking and relaxing with family and friends will become a favorite place to eat and spend time, relax and recharge with positive energy.
How to paint a grill and protect it from corrosion
Now let's answer the question of how to paint a metal grill. It is necessary to paint the installation after completion of all work, preferably with acrylic paint in a can (protection in the form of gloves, a respirator and special clothing is required) or heat-resistant varnishes KO/08, KO/815. This stage is the final one. It solves several problems:
- The design is given a complete look - using a beautiful-looking barbecue is more pleasant than using a tattered one.
- Heat-resistant metal paint for barbecues will protect the structure. As a result, the corrosion process will slow down.
- Since the paint creates a smooth surface, the process of cleaning a homemade metal barbecue from soot after use is simplified.
How not to make a mistake when choosing?
If you have decided to have a barbecue cauldron on your farm, you first need to answer a few questions:
- How often will it be used?
- Will it be installed permanently or will it be kept in the garage just in case?
- Are you interested in its durability and how many years are you planning to use it?
- Is its design important?
- What is your priority: cost, weight or result (delicious dishes)?
Even after answering the proposed questions, a person will still choose the grill that he likes with its shape: a minimalist - simple geometry, a creative person - with additional forged or cast parts.
The cost of the first and second options may differ several times, but in any case the purchase will justify itself. The main thing is to update the device after purchase according to all the rules and in the presence of guests.
It should be borne in mind that modern developers and manufacturers of barbecues initially assume that ready-made charcoal will be used in the cooking process. With active, almost daily use, such as at recreation centers, metal barbecues serve safely for more than ten years, and no visible damage is observed.
Barbecues with a metal roof: photos and advantages
Having used one of the step-by-step instructions and built a metal grill for your dacha, you need to think about the roof for it. The roof will perform several important functions:
- Protection of a metal barbecue from any external influences, which in turn will not lead to rapid rusting.
- The ability to use the installation in any weather – sunny and stormy.
- Having built a lantern on the roof, it will be convenient for you to fry meat in the dark - nothing will burn!
- A structure with a roof has a much more solid appearance than just a free-standing structure.
There are several types of barbecue canopy, we list: Several types of covering can be distinguished when constructing barbecues with a metal roof. Photos will be presented below.
- Metal gazebo with barbecue, made of brick or other material;
- Polycarbonate canopy;
- A roof welded to the frame (you can also add a countertop, sink, etc.).
We invite you to look at barbecues with a metal roof: photos of several options below. And if you want to do it yourself, then read the article about installing a canopy from corrugated pipe and polycarbonate yourself; this knowledge will help you make a roof for a barbecue.
In this article we looked at how to make a metal grill in four ways:
- using a 50l gas cylinder;
- from a metal barrel 200 l;
- made of heat-resistant steel 5mm;
- made of 3mm sheet steel.
We hope our master classes were useful, and you can easily make a metal grill with your own hands!
What design elements are required?
L.B.: For a barbecue to be considered correct, several nuances must be taken into account.
An ideal fryer should not be hollow, otherwise you can forget about uniform temperature distribution and well-cooked kebab. The best option is a grate , with slots or a grate at the bottom of the roasting pan.
Brazier with grate
The slots or holes will provide:
- A uniform flow of oxygen into the coal mass, which will support their combustion and create uniform heating over the entire area. Moreover, an excellent result will be obtained regardless of weather conditions (for example, wind), which seriously complicate cooking in barbecues with perforated walls.
- Removing ash through grate openings. The only thing you need to provide is a box for collecting it.
- Easy temperature control. A metal flap covering part of the slots or grate will allow you to achieve optimal cooking conditions.