Here you will learn:
- Design Features
- Principle of operation
- Making homemade Buleryan
- Drawing for assembling the furnace, materials and tools
- First steps
- Making an afterburner
- We complete the assembly of the base
- Making a chimney
- Final stage
Buleryan solid fuel stoves continue to gain popularity. They are characterized by high efficiency and the ability to quickly warm up rooms. Consumers can purchase ready-made units or try to assemble a Buleryan stove with their own hands. There is nothing complicated about this, because in its design it resembles the most ordinary pyrolysis potbelly stove. The only differences are in the housing, which is equipped with efficient tubular convectors.
Design Features
Assembling a Buleryan stove with your own hands is really very simple. But only for those who know how to handle tools and iron, and also have an understanding of the structure of solid fuel stoves. There are no particular structural difficulties here, but you need to remember that working with iron requires special care - it is not as malleable as wood. But as a final result, you should get an excellent heating unit that will delight you with quick warm-up and long-lasting combustion.
The Buleryan stove, assembled with your own hands, is a traditional solid fuel unit that runs on wood using a gas generator circuit. That is, the wood burns here, releasing pyrolysis products, which are sent to the afterburning chamber and burn there with secondary air. Combustion products go up the chimney, escaping into the atmosphere and partially falling out in the form of condensation - we will tell you how to get rid of it with just one movement of the hand.
Our Buleryan potbelly stove consists of the following parts:
- The main combustion chamber is spacious, roomy, the firewood lies directly on the convection pipes;
- Afterburner chamber - located above the combustion chamber, it is a perforated or solid sheet of iron that separates the upper quarter of the entire internal volume;
- Tubular convector - a set of curved pipes, most of the area of which is in direct contact with firewood, coals and combustion gases;
- A loading door with a small blind flap through which firewood is loaded into the Buleryan oven, made by hand. It also allows you to regulate the access of oxygen to the combustion chamber;
- A chimney with a slide damper and a chamber for collecting condensate - ensures the removal of combustion products and collects condensed combustion products for their subsequent removal.
Also in the design of the furnace there are tubes (injectors) for supplying secondary air - it is needed in the afterburning chamber for combustion of pyrolysis.
It was the simplicity of the Buleryan convection oven (also called the Breneran oven) that gave it its well-deserved popularity.
Operating rules
A homemade long-burning boiler, Buleryan, has a simple structure, but to achieve better results in terms of efficiency and long service life, you must adhere to some simple rules:
- Only dry fuel is used for combustion: briquettes, pellets, firewood, wood chips, etc.
- After operating the stove, the ash should not be completely removed each time; its layer protects the bottom from burning.
- Do not use wet firewood; plaque forms on the walls of the boiler and chimney, which reduces the efficiency indicator.
- To achieve maximum efficiency indicators, you need to close the damper throttle and the blower door to enhance the convection process.
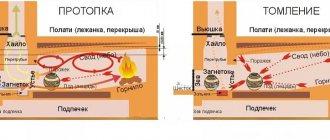
Principle of operation
It is this unusual appearance that makes the Buleryan stove so extremely effective.
In order for you to experience all the delights of the Buleryan stove, we will tell you about its operating principle. We have already said that the pyrolysis reaction is used here. The burning of wood with a limited supply of oxygen looks like smoldering with the release of pyrolysis products. Entering the upper afterburning chamber, they ignite and burn, releasing a large amount of heat - combustion is supported by small injectors built into two convection pipes.
The blower and gate valve are responsible for maintaining the pyrolysis reaction. They are responsible for limiting the supply of oxygen and slowly removing combustion products. Thanks to this, the heat is almost completely sent to the heated rooms.
Many users are wondering whether a potbelly stove or Buleryan is better and what to give preference to. The efficiency of a potbelly stove, including a pyrolysis one, will be lower. To increase efficiency, it will be necessary to retrofit it with additions that create convection. But the potbelly stove still won’t be able to catch up with the Buleryan stove, no matter how hard you try. Buleryan is the most efficient and advanced stove today, with an extremely lightweight design.
Buleryan during mining is not a solid fuel stove. But you can assemble it yourself, using a similar scheme, by building a homemade burner into the loading door (we wrote about assembling such a burner in our reviews). It is also possible to purchase a ready-made burner. But such a scheme will be justified only if you have access to inexpensive supplies of this simple fuel.
Sequencing
Pipe sections are bent to the required diameter. The size of the firebox, and therefore the burning time, depends on the number of pieces, but there is no point in making a very “multi-tube” battery: its efficiency will be deplorable. Therefore, as in the original, we take 6-8 pieces.
They need to be captured somehow. Some people use safety auxiliary strips for this, while others make a frame into which they insert blanks and then weld them.
An external frame can be used to assemble pipes
Since grates will still need to be welded to the assembled pipes, you can immediately weld the corners in these places, which will serve as the frame. Then lay the grate and partition on them.
After the skeleton is assembled, mark the strips of metal and weld them so that only a third of the pipe remains on top.
Metal strips are welded between pipes
Now make/buy grate bars. If you are going to make the grate bars yourself, it would be better not from reinforcement, but from strips of metal. Ideally, they should have a triangular cross-section (top down) or trapezoidal. It is better not to secure the grate tightly - this part most often requires replacement. Therefore, it is advisable to weld a metal corner inside on which you can lay them.
Make an upper partition from a sheet of metal. The sidewalls have a complex configuration: you have to cut out semicircles for the pipes. It’s easier to first cut out the patterns from cardboard, fit them, and then transfer the shape to the metal. The length of the partition does not reach the door by ¼. Cut holes in the plate of at least 7% of the total area. Weld it in place. Please note that the seams must be sealed.
Cut out the back wall. It's also easier to transfer it onto the cardboard first. Make a hole for the chimney pipe. The chimney begins in the upper fenced off part, separated by a partition. Don't miss. Weld the back wall (the seam is sealed).
Now you can start making the front wall and door. This is one of the most difficult parts to manufacture. We cut out the front wall in the same way as the back one. Now we make a hole for the door. Here it should be located closer to the grate, but above it. The diameter of the door, in principle, should be as large as possible to accommodate large logs. To the edge of the hole, weld a strip of metal about 10 mm thick perpendicular to the area of the front wall. This will be a side to ensure a tight fit of the door.
The front wall and door are one of the most complex components (click for pictures)
Now let's make the door. Its diameter is slightly larger than the cut hole. Along the edge of the disk and slightly retreating from it, we weld two strips of metal (or rings from a pipe of suitable diameter) approximately 15 mm high. Their location should be such that the welded strip on the front wall passes between the two strips on the door. We lay an asbestos sealing cord in the gap between the strips.
Now let's start making the throttle. The diameter of the throttle body is 22-25 mm. Its length is about 100 mm. Find a piece of pipe of suitable size. In it, at a distance of 4-5 cm from the edge, we make two holes located radially. We insert a metal rod into these holes and bend it on one side - this will be the throttle handle. We cut out a circle of metal, slightly smaller in diameter than the body pipe. This is a damper. We insert the damper into the body and weld it to the rod. The result is an adjustable damper.
The throttle/blower is attached to the door in the upper part (click to enlarge the picture)
We attach the finished throttle to the door. We make a hole in its upper part and weld it. Now all that remains is to install the hinges and the lock. Having hung the finished door, we check the quality of all seams.
In the same way as a slide damper, we make a damper for the chimney. The only difference is that they use different
The chimney resembles the letter “T”; a damper is installed in the part adjacent to the body
diameters and a 90o sector must be cut from the damper. A horizontal section of chimney pipe up to one meter long emerges from the stove. A second section is welded to it so that the structure resembles the letter “T”. Insert the damper into the part adjacent to the body. The sequence is similar to making a throttle valve: two radial holes in the body, a metal rod through them, weld the valve to the rod, bend one part of the wire to form a handle.
Gate valve at the furnace outlet
Now all that remains is to weld the stand: for effective operation, the stove must be at a height of at least 25-30 cm from the floor, although many people have it directly on the pipes. But in this case, a non-combustible base-pedestal made of brick is required. Here you can choose for yourself: either make a stand from pipes, or build a brick block (according to the company’s recommendation - in four rows of bricks laid flat on clay mortar).
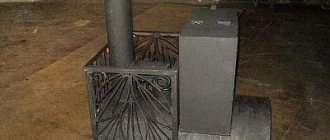
This is what the finished oven looks like
And these are the stand options recommended by the manufacturer of the original stoves
The design of the stove and the sequence of actions when making Buleryan with your own hands is illustrated in the video below.
This option is an excellent way to heat greenhouses. It is also useful in warehouses or other industrial premises: it quickly, within just a few minutes, reaches the specified mode (20-30 minutes) and heats up a room of 20 square meters in 40-50 minutes.
Making homemade Buleryan
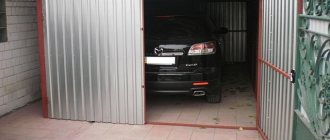
This furnace has a wide range of applications. It is suitable for heating residential buildings, country houses and utility rooms. If you need a good stove for the garage, Buleryan will be a worthy solution - fast-acting and effective. Literally 15-20 minutes after ignition, a comfortable and warm atmosphere will be established in your garage.
The Buleryan stove, made by yourself, will delight you with its ease of operation and unpretentiousness to fuel. However, the logs for it must be dry (preferably no higher than 15% humidity), otherwise the pyrolysis reaction will occur with difficulty. Increased humidity of firewood also leads to a large amount of condensation. Let's see how to assemble it with your own hands.
Best models
Original Bullerjan models are capable of efficiently heating rooms from 100 to 1200 cubic meters:
- Klondike HB-100, capable of heating rooms up to 100 cubic meters. Price – from 10.5 thousand rubles;
- Klondike HB-150, designed for heating rooms up to 150 sq.m. Price – from 13.5 thousand rubles;
- Klondike NV-200 stoves provide heating of 200 cubic meters of air. Price – from 14 thousand rubles;
- Klondike HB-400 on one tab for 8-10 hours and heats a room with a volume of up to 400 sq.m. Price – from 19.3 thousand rubles;
- Klondike HB-500 effectively heats a room with a volume of up to 500 sq.m. within 10 hours. Price – from 23.7 thousand rubles.
HB-100 is ideal for garages up to 100 sq.m.
Drawing for assembling the furnace, materials and tools
We present to you a drawing with dimensions that we will use as a guide when assembling the Buleryan stove with our own hands.
Detailed diagram of the Buleryan stove.
During the development process, you can make your own changes if they seem necessary to you. For example, nothing prevents you from fitting a ready-made door here, so as not to have to worry about assembling it yourself. Along with the drawing you will need the following tools:
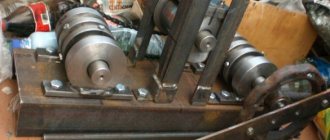
- Hydraulic or manual pipe bender;
- Welding machine;
- Angle grinder for cutting steel;
- Grinding disc for correcting welds.
Next we prepare the materials:
- Pipe with a diameter of 60 mm for the manufacture of a convector (heater) - the drawing shows pipes with a diameter of 50 mm, but then the convection will not be so intense. In this case, we advise you to focus on the area of the heated room;
- Sheet steel with a thickness of at least 4 mm - from this we will cut intermediate plates, as well as the front and rear walls;
- Chimney pipe with a diameter of 100-130 mm;
- Metal pipe to create a choke (blower) on the loading door;
- Hinges for the loading door, as well as a secure lock with a secure handle for opening and closing it;
- Materials for creating a slide damper - another handle with a small piece of sheet steel to block the chimney clearance;
- Metal pipe with a diameter of 15 mm for injection pipes.
An asbestos cord is also useful to seal the door. Don't forget to choose good electrodes for welding metal parts.
You will also need thick cardboard, from which it is very convenient to make patterns for later cutting out metal - this way you will save time and nerves. By the way, some craftsmen make Buleryan stoves with their own hands from a square pipe. It turns out a little scary, but overall it works.
What you need to make a convection oven
To make a durable stove that will last for a long time, it is necessary to use thick sheets of metal. It is recommended to buy steel that is designed specifically for the production of boilers. Its main advantage is heat resistance. It is available in specialized stores. Additionally, prepare the following materials:
- steel sheets (parameters 1000*2000 mm);
- heat-resistant steel 6 mm (size 400*700 mm);
- sheet for blanks 3.5 mm (it will be used as a valve);
- thick-walled pipe;
- a small piece of metal tube;
- reinforced hinges, which are used for mounting the hatch (fuel is loaded through it);
- metal rods;
- asbestos cord.
Sometimes used gas cylinders and other containers are used as the main chamber. But the material will not be able to withstand high temperatures. To make a convection oven, you need to take pipe benders that can bend thick rods. Additionally, a welding machine, a grinder, discs for cutting and stripping metal, an electric drill, drills of different diameters for steel, a hammer and a tape measure are used.
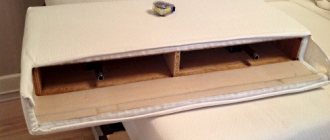
Asbestos cord
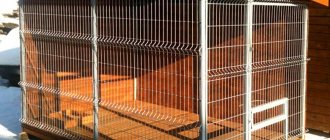
Door with flap
First steps
First, we need to make the frame of our entire Buleryan stove - it is an interweaving of curved pipes that form an air heater and the future firebox. Use a pipe bender and bend them to a radius of 225 mm. The length of each pipe is 120 cm - this is more than enough. The pipes are welded together with metal strips to create a stable base for our stove. There should be no holes on the sides, otherwise smoke will penetrate into the heated rooms.
Making an afterburner
The next stage of making a Buleryan stove with your own hands is creating an afterburner chamber. To do this, you need to take sheet iron and make partitions from it with recesses for the air heat exchanger.
Next, we weld the partitions from the inside to the pipes so as to separate about a quarter of the internal volume (or as indicated in the drawing). Please note that these partitions go to the rear wall, and they do not touch the front wall (secondary air injectors are welded into the first two pipes).
Pyrolysis products will end up here. And the combustion products will go to the back wall, where the chimney of the Buleryan stove is located.
Let's move on and check all the welds - they should ensure the tightness of the entire structure.
Checking the welding machine
The main tool in the manufacture of a furnace is a welding machine. First you need to make sure it is working properly. If you have minimal experience in such work, we recommend that you first practice on training seams. At the final stage of assembling the stove, you will have to scald it around the entire perimeter. You need to be prepared for this. In addition, do not forget to check the metal and pipes for weldability. Materials may need to be replaced.
We complete the assembly of the base
Now we need to cut two pieces from sheet iron that form the back and front walls of the Buleryan stove. But don’t rush to weld them - they still need work. In the back wall we make a hole for the chimney, focusing on the diameter of the chimney pipe.
After this, we move on to the front wall - here we need to make a hole for the insert. The door is made from a piece of pipe with a diameter of 350 mm. And here you will have to suffer.
The whole point is that the door should tightly close the inlet of the firebox. We weld a part of a pipe with a diameter of 350 mm to the front wall of our Buleryan stove, which we assemble with our own hands - it protrudes slightly, as in the picture. Next, we make the door itself - it will be double-layered, the inner part will go inside the loading hole, and the outer part will cover it from the outside.
We make a hole in the door of the Buleryan stove for the choke. Its dimensions are indicated in our drawing. It is a small section of pipe in which a damper rotates on a metal loop - it should completely block the gap. To prevent the loop from rotating under its own weight, we press it with a spring. It is also necessary to make a reliable lock to secure the loading door.
Fiddling with doors, throttles and dampers when assembling a Buleryan stove with your own hands is the most problematic, because working with small parts is always more difficult than working with large ones. But if your hands grow from there, you will cope with the task relatively quickly.
Classic stove design
In order to make a homemade unit, you should carefully understand its design and understand the principle of operation. An all-metal product consists of a minimum number of elements. The basis of the furnace is a cylindrical firebox with curved metal tubes tightly adjacent to its walls. On the front side there is a door for loading fuel and a device that allows you to regulate power and set different combustion modes. In the firebox itself there is a secondary combustion chamber and an outlet pipe to which the chimney is connected.
To increase the efficiency of such a furnace, it is imperative to ensure high-quality thermal insulation of the smoke channel. Ordinary mineral wool is perfect for this (a layer of ≥ 3 mm is sufficient). Do not forget that to supply air to the combustion site, you should install a ash pit. It would be useful to install a small ash pan. The double rear wall also improves the efficiency of the device. A number of models have a two-layer oven body.
Making a chimney
If you think that the chimney for the Buleryan stove, assembled with your own hands, is a piece of pipe, then you are completely wrong. We will make a T-shaped chimney with a slide damper for our stove.
Unlike a throttle, the gap here is not completely blocked, but only 3/4 of the maximum diameter of the chimney - this is exactly the damper that will need to be cut out and installed in the outlet (horizontal) pipe.
We weld a vertical section to the horizontal chimney pipe of the Buleryan stove. Smoke will escape through its upper part, and condensation will accumulate in the lower part (it will definitely happen). To make getting rid of it more convenient, weld a ball valve to the bottom. Just one movement of the hand - and all the accumulated condensate will drain into a previously placed container, as we promised earlier.
Recommendations for use
- The chimney pipe for your stove should be assembled in the opposite direction relative to the movement of exhaust gases, which practically reduces to zero the likelihood of wood resins leaking through it during operation. The latter in this case will return to the chimney and burn out in it.
- Comply with fire safety requirements when arranging the installation site of the stove and the surrounding area.
- Be sure to provide for the possibility of simplified installation/dismantling of the chimney for regular cleaning of resins and soot deposited on the walls.
- The Buleryan stove must be configured according to your preferences.
- Remember to periodically inspect the top of the chimney to remove any resin build-up that appears.
- The optimal furnace mode is empirically selected, which is characterized by maximum combustion time and minimum degree of clogging of the smoke exhaust pipe. To operate the unit in the specified mode, the channel must be cleaned at least twice a season.
- Before putting firewood into the firebox, it is advisable to pre-dry it over the stove.
- In addition to logs, to save money, it is recommended to add briquettes made from sawdust and wood chips to the firebox.