Step-by-step photo instructions: how to make a playground with your own hands. Tips, drawings, videos.
You can make a full-fledged children's playground with a slide, stairs, balcony, rope, manhole and swing with your own hands. The following guide will help you with this. It contains many detailed photographs, so there will be no problems with the manufacture of structural elements and their installation.
DIY playground
Basic designs
First you need to choose a suitable place for it. It should be:
- clearly visible from home so that children’s games can be monitored;
- safe, located away from wells, reservoirs, and electrical equipment. And also from the beds that kids can trample in the excitement of play;
- spacious enough to accommodate everything planned.
If there is not much space, the gaming complex is made compact by combining several elements into one. For example, look, you can build a house on high supports, adding a ladder on one side, taking into account a slide on the other, and making a sandbox underneath it.
Advice! This arrangement of the mini sandbox will solve two more problems: it will protect the sand from rain and excess dampness, and the kids from the scorching sun. In any case, its long-term exposure must be limited by arranging this attractive element in the shade of a tree, equipping the model with an umbrella or canopy.
Sandbox
This is the simplest design that every parent can make. The traditional option is a square or real rectangular box made from boards. By showing a little imagination and changing the shape, the sandbox plan can be turned into a boat, a car or a house.
There are several nuances in making this game element:
- Having marked a place for a sandbox, you need to remove the fertile layer of soil and stones from it so that other weeds do not grow through the sand;
- so that water does not stagnate in the sand, then the area is deepened to 20-30 cm, an exit is made in the middle - a pit and covered with gravel, and the bottom of the sandbox is made independently with a slight slope towards the pit;
- it can be covered with geotextiles or film, immediately making slits in it for water drainage.
Attention! The easiest way is to connect the sides inside the sandbox using corner bars. Additional rigidity of the installation design will be given by triangular gussets in the corners, which will also serve as comfortable seats for children.
Thinking about how to make a playground with your own hands from scrap materials in the yard, look: to make a sandbox, it is not necessary to develop and use new building materials around it. For this, log cuts, crumbs left over from the construction of a bathhouse, or old car tires are suitable.
Some stumps, properly treated with protective impregnation, are simply dug in around the perimeter of the sandbox and tied along the inner contour with tarpaulin or plastic tape.
Tires are used differently depending on the size. If you have a large wheel from a tractor or truck, first just cut off the inside of it, then sand the cut or put a garden hose cut lengthwise on it.
And small-diameter tires are preferably cut crosswise into 2 or 3 medium-sized pieces and dug into the ground vertically or laid lower, in the shape of a flower, fastening the individual elements to each other. The result is soft sides that are pleasant to sit on and perhaps not get hurt on.
Advice! Children's sandboxes often become a latrine for their own and neighbor's cats. Therefore, to protect them you need to build a cover or sew an awning.
Swing
If there is no mature tree with thick branches on the site, and there are no poles on which to hang the swing, small supports (pillars) with a crossbar are built for them. The material for them can be steel pipes, wooden beams with a cross-section of at least 10x10 cm, or logs of the same or slightly larger diameter; they can be purchased at any construction store.
The main thing is to ensure the stability and fastening of the supports, for which they are buried 50-80 cm into the ground and the foundation is concreted.
A swing seat can be bought or made from a variety of materials, not only wood, but also metal.
For example, from the same old car tires, a plastic chair without legs with linoleum or a steel hoop. The easiest way is to braid it with strong ribbons or belts. And for the little ones, it is better to make a soft, free seat by wrapping the chair hoop with several layers of foam rubber and sewing a fabric cover.
The swing is hung on chains, slings or a strong active rope. To prevent them from fraying and squeaking, carabiners are attached to them, which are attached to rings or hooks on the crossbar.
Such fastening will allow you to remove the swing during rain and winter and bring it into the house, hanging it from a hook in the ceiling, a horizontal bar or in an open doorway.
Balancers and spring rockers
Children sometimes build such rocking chairs themselves by simply laying a board across a log and rubble lying on the ground. The design turns out to be quite inconvenient, homemade and unstable, but it “works”. And if you are already deciding how to make a playground with your own hands from scrap materials at the dacha, then you will need to improve it by making a support of a suitable height and securing the board to it using a hinge or partially an ordinary long bolt, threaded through the holes in the support and the block to a depth , screwed to the board from below.
Something similar can be made inexpensively from a short board attached to half a tire. Depending on its diameter, you will get a rocking chair for one or two children. The main thing is to seriously polish the wooden parts and make comfortable handrails for the child to hold on to while rolling the ship.
When equipping a playground, not only car tires are used, but also shock absorber springs and plastic are used to make rocking chairs popular with children. But for this you need such an attribute as a welding machine and experience working with it in order to firmly secure the spring base.
To do this, dig a hole in the ground, install an artificial metal frame with a plate with anchor bolts welded to it, and fill the hole with concrete.
Flanges are welded to the spring itself on both sides. The lower flange is bolted to a metal plate in the concrete base, and the upper flange is used to secure the rocking chair. It can be cut out of plywood into any shape and the wood chips can be painted.
Transport and funny figures
- When planning how to make a playground with your own hands from scrap materials at home, you should not forget about its design. Fixed equipment is no less interesting for children than slides and swings, as it allows them to come up with stories for different games.
- Boys will most likely be interested in vehicles, which are not difficult to make, even without special tools. The main thing is imagination, creativity and a set of colors in bright shades. Here are just a few ideas:
- A train with carriages made of logs and wheels made from thin cross-sections is an excellent option for the garden. If you cut a circle out of plywood and draw a funny face on it, you will get a very funny train simulator;
A racing car, climbing wall, motorcycle or truck can be made from several tires dug into the ground, connected by pieces of boards and decorated with a real steering wheel and headlights;
A boat with sides cut out of plywood, installed on 4 springs, will not be dangerous - this is only one of the options for creating a vehicle that sways with any movement and creates the illusion of a real journey.
Girls will be happy to play with figurines of animals, cartoon characters and simply funny characters that they can invent together. And here the same materials are useful: plywood, boards, logs, tires, plastic bottles and cans. All this scrap can be given a second life with just a little modification.
For example, you can dig a tire halfway into the ground, attach a muzzle and tail of any animal cut out of plywood on it, and paint the whole or part of the structure.
An old basin placed on a stump will turn it into a fungus, round frame boulders can perfectly become beetles or berries, it is easy to “grow” a palm tree from several plastic bottles, and it is advisable to make a caterpillar from a vacuum cleaner hose.
Sport equipment
- School-age children no longer play in the sandbox or ride in toy cars; they need more active entertainment. And this needs to be taken into account before you build a playground with your own hands at the dacha for preschool children.
- Many existing buildings are quite amenable to alteration and modernization. For example, instead of a slide slope, you can install an inclined or vertical wooden climbing surface, attaching special hooks to it and making slots for arms and legs. And instead of a swing, hang a rope and a rope ladder, a basketball hoop from the crossbar, or turn the supports into a football goal.
- A great idea for this age is an obstacle course that is very popular. And again, the main building material can be old tires, a trampoline that is dug into the ground at different heights, secured on posts or suspended on chains between strong posts with railings.
The strip can be extended by using a log installed on supports, inclined planes, a labyrinth, a tunnel made of barrels laid on its side without a bottom, a bungee, or suspended platforms with optimal thickness.
- In addition, do not forget to install benches on the site for relaxation and quiet games. A small table wouldn't hurt either. Although this furniture is also easy to make from boards or stumps of different diameters and heights.
- Those who like to draw with crayons will love the smooth sheet of plywood, painted with chalkboard paint and mounted at a convenient height for ease of use. Targets nailed to a tree or fence will allow you to practice your accuracy when shooting with a bow, a pistol, or even a slingshot.
- Take care of yourself too - find a cozy place for a sun lounger near the playground, where you can sit with a book or knitting, placing blankets nearby and not letting the children out of sight.
What is better to buy
If you wish, you can do a lot yourself. But when it comes to how to make a playground with your own hands at the dacha, then it is better to buy some things. This applies to both individual game elements and their components:
- Swimming pool for kids. For small children, it is better to buy a small inflatable pool. It is safe - even if you fall on the sides, it is impossible to get hurt. The water in it warms up quickly, and it can be changed and washed frequently.
- Slide. This is one of the most difficult structures to make yourself with many elements: a slope, stairs, platform, fences. The most difficult thing is to make a safe ramp with good sliding properties. Plywood, even treated with varnish, quickly becomes unusable in the open air, metal gets very hot in the sun, and linoleum, which is often used to cover an inclined plane, wears out and spoils the appearance. Therefore, it is advisable to install a special plastic ramp. It can have different lengths and configurations, so the dimensions of the entire structure are initially adjusted to it.
Wooden slide with a plastic slope Source 1090983.ru
- Trampoline. This rather traumatic equipment, so beloved by children, must withstand a certain load, which is impossible to calculate on your own. Trampolines should be purchased with a fencing net or special handrails.
- Climbing wall hooks. They must be durable, easy to grip, with a rough but not traumatic surface, and high-quality fasteners. For inclined low climbing slides, it is allowed to make homemade holds from wood or other suitable materials. But for high vertical walls it is better to buy them.
Homemade climbing wall with wooden hooks and notches Source sport-marafon.ru
Sometimes it can be difficult to decide how to make a children’s playground in the country if the area is small and it is not possible to place everything that the child dreams of. In addition to play structures, children usually want to have their own secluded corner - a house in which they can store treasures, hide, and relax. But it is he who takes up a lot of space.
This problem is solved by making a house not on the ground, but on a tree or on high supports, under which a sandbox is built. But such a complex design requires experience and a decent set of tools, which not everyone has. A children's tent, which can be folded and put away if necessary, would be an excellent solution.
Game tent-house Source logikasporta.com
You can do everything else yourself or hire a specialist and give him a clear plan - where everything should be located and what it should look like.
Do-it-yourself playgrounds in the country
A multifunctional summer cottage allows you to create comfortable areas designed both for relaxation for adults and for organizing useful activities for children during the week.
At the planning stage, it is important to consider the basic equipment of the playground, taking into account age characteristics, where everything will be located, and the individual preferences of younger family members.
Projects and drawings
To make the final decision on where to equip a playground and how to arrange it, you should calculate the optimal area of the future structure. A drawing is being developed, thanks to which it will be easy to mark out the arrangement of the site.
This parameter per child depends on age. Information:
- under 7 years old - 8-9 m2;
- 7-12 years - 13-15 m2.
Important! Given this dependence, additional space should be provided if the site and entrance are initially created for the younger age category. For example, you can temporarily lay out a common lawn there.
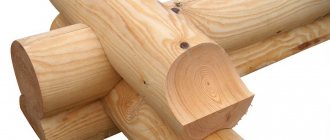
Original objects made of logs and wooden blocks
Play areas, sandboxes and areas of the children's playground can be delimited by various elements, including wood. And then other welding attributes will not be needed. For example, secure and decorate small logs dug in according to the markings. Colored chocks of different heights are an excellent idea for running along “stumps”, the distance between which should be calculated for children’s steps.
They can be dug in one line or under the left and right legs alternately. It doesn’t matter to children how such a barrier is made; it is important for them to know that it is comfortable and beautiful.
Toddlers have highly developed possessive instincts, so they often quarrel over the right to own a toy or play area. For these purposes, colored stumps delimit the sandbox into several separate areas - according to the number of children.
Low posts are used by children to lay out “paskas” from molds.
Crafts from car tires
Tires or old bald rubber are an opportunity to build a system of playground objects with your own hands.
The easiest way is, as a rule, to build a small sandbox for one child from unnecessary rubber from a “heavy truck”. It is better to place it in the shade, since there is nowhere to place the “mushroom” or canopy. You can shade the descent with a fabric awning or an old beach umbrella, changing the location depending on the shade.
Step-by-step instructions for creating a sandbox:
- prepare a site for a sandbox (it is better to build on a prepared base - paving slabs or lawn grass);
- mark a circle almost the size of the tire and remove the turf layer;
- you need to secure the tire to the ground with stakes or slate nails;
- Cover the bottom of the resulting reservoir with a tarpaulin and fill the level with sifted sand;
- paint the outer surface of the sandbox in a bright color with harmless, quick-drying paint;
- To monitor the sandbox, arrange a lid to cover the sand from rain or the ingress of cat and bird excrement (you can get by with oilcloth with weights at the ends). They are very reliable.
Art objects made from tires are an original decoration for a children's playground. In combination with plywood boards, this is the most affordable material for placing recognizable figures in the form of:
- animals and birds;
- fairy-tale characters;
- favorite toys;
- cartoon characters.
The most popular tumbler walls are made from two tires of different sizes, which are completely mounted one above the other. For health reasons, voids are filled with plywood. Using paints, they paint the sundress and the face of the toy.
Like a tumbler, there is a way to make, repair and decorate a matryoshka doll or a teddy bear, and place a barrel with the inscription “Honey” next to it. There can be several objects of different sizes. For example, three different bear figures, as in the fairy tale “The Three Bears”. “Masha and the Bear” is a good plot for crafts made from tires, but other ideas are also suitable, it helps develop imagination.
No less popular themes are white swans, which can be cut out of turned-out tires and covered with white paint.
On the edges in the center you need to make wings (or leave them without cuts), and on the wrapped end they draw a bird’s face, as in the photo on the site.
- You can make a turtle out of tires by covering it with green and brown paint. One tire is needed for the base of the sculpture, the other is cut into 4 parts to make the legs. It is better to cut the head out of plywood and secure it near the base. This way nothing will happen to her.
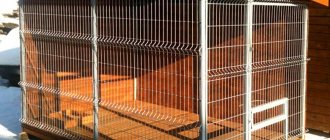
- Bald rubber is an excellent material for fencing a playground or constructing all kinds of labyrinths and galleries, cars, tents. If you cover a covered gallery made of tires with a camouflage net, you will get a good training ground for little scouts who love such games.
Selection of materials
Most often, edged boards or timber are used for the podium. For outdoor structures, hard and durable tree species such as oak, ash, alder, pine or larch are ideal.
But wood is quite expensive. If you don’t want to spend extra money, you can make a “deck” using construction pallets. If the house was recently renovated, then they definitely should have remained on the site.
The most expensive option would be to use decking boards. It is made from larch and impregnated with special antiseptic agents. They protect the wood from rotting and insects from entering the wood. The floor surface has a ribbed base, which prevents slipping during rain.
There are special grooves on the back side that allow the boards to “breathe”.
Instead of boards, you can use garden parquet, which has previously been heat-treated. This parquet is made in the form of small tiles that are very easy to attach to each other. The parquet is laid out on a flat surface, for example, on compacted earth or a sheet of central carbon fiber.
But it is worth knowing one important point: this design does not tolerate frosty weather and snow. That is why the parquet will have to be dismantled before the onset of cold weather and taken home.
If you still like the boards, then you need to select them according to the following parameters:
- width – from 75 to 150 mm;
- thickness – not less than 40 mm;
- the length is selected in accordance with the previously developed plan.
Particular attention should be paid to the width. If it is too small, the boards may crack when fastening.
A board with a large width may begin to change its appearance due to high humidity and exposure to temperatures.
Specialized stores sell boards with a length of 2 to 6 meters. They need to be selected in such a way that there are as few joints and waste as possible. If the width of the podium is 2.5 meters, then it is more logical to purchase five-meter boards. If 1.5 meters, then three or six meters.
There is no need to deliberately try to lay out boards of the same width. Different sizes add chic and originality to the podium.
As for the cross-section, it must have dimensions of at least 100 by 100 mm.
Before starting work, it is imperative to treat all lumber with protective agents. The logs are additionally lubricated with a non-absorbent impregnation, which protects the wood from harmful influences.
Pay close attention to the ends, as these are the most vulnerable places near the joists.
There is no need to paint the boards in advance; it would be more logical to do this after making the flooring. Then it will be possible to paint all the ends and guide beams, and not just the flooring itself.
Helpful advice!
Purchase all materials in excess. During work, something may break or you may make a mistake in the calculations. Spare materials should always be available.
Where to place plastic containers?
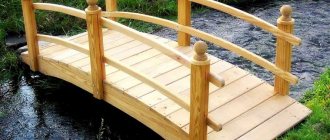
This is a fertile material for exciting games, competitions and structures on the playground, built with your own hands without fabric. The straight wooden bridge will certainly be appreciated by young bowling fans. To do this you will need a dozen white plastic bottles filled with water or sand.
It is not necessary to knock them down with special heavy balls; a football or basketball ball will do just fine.
Another idea for developing coordination and accuracy is to cut the containers to half. They can be hung on wire and thin rope or nailed to a wooden fence. The essence of the game is to hit these containers with a small ball. Not only plastic bottles will do, but also old mugs and tin cans.
Setting up a ramp for children
It is quite possible to build a children's slide for a private home with your own hands, you just need to take into account a number of points:
- use environmentally friendly materials;
- ensure reliable stability of the structure.
Before painting the slide, make sure that the paint materials do not contain elements harmful to the health of children.
House
A tree house is every child's dream. A children's playground with an unusual house full of secrets will become every child's favorite place. Building a house is not so easy.
To do this, you need to buy the required amount of materials and make drawings. You won’t be able to build the structure alone, so find an assistant. You can connect the house with a ladder and a slide. Below you can place a swing and a sandbox.
Play area fences
Of course, it is not necessary to fence the playground, but a small fence will only make it more beautiful. You can make a fence from available materials. Even ordinary plastic bottles can decorate a space. You can make beautiful animals out of them or paint them in different colors.
A wooden fence will look unusual. Paint each block or log a bright color. Make a beautiful door. Entrust your child with creating drawings that will decorate your entire area. How to make a playground with your own hands?
A difficult question to which you will definitely find an answer. Create a play corner for your baby and he will say “Thank you!”
Video description
An example of such a rocking chair, made from several short bars and a long board, is shown in the video:
Something similar can be made from a short board attached to half a tire. Depending on its diameter, you will get a rocking chair for one or two children. The main thing is to sand the wooden parts well and make comfortable handrails for the child to hold on to while riding.
Rocking balancer for two Source i.ibb.co
Placing elements on the site
The area of land required for construction depends on your wishes, age and number of children. Usually this is a square corner with an area of 8-10 square meters. In such a site, the arrangement of elements can be very diverse.
Most often, a slide in combination with swings and other equipment is located in the center, a sports corner and some creative elements like a drawing board should be located in the corner near the fence.
The rectangular area is a little more complicated; there the elements will most likely have to be installed in a row, one after another. You also need to remember about safety, especially if you have more than one child. Due to the circumstances of a large family, you cannot place a swing next to the sandbox.
Making the flooring itself
To begin with, logs are laid out on a place prepared in advance, strictly according to the diagram. The average flooring has the shape of a rectangle. Once the logs are ready, you can begin laying the boards themselves.
They should be located across the joists, and the distance between the transverse supports should be about 100 cm.
All necessary details and exact calculations must be written in your plan.
What to use as fasteners
As for fastening, choose what you like best. Self-tapping screws and nails have their positive sides that you definitely need to know about.
Nails
The main advantage of nails is their affordable price. Also, you don't need a screwdriver to work. If the owner of the site has the necessary skill, then the work will go very quickly. But you need to be extremely careful with nails.
Hammer blows leave dents in the wood that do not disappear over time.
As for the disadvantages, the design turns out to be non-demountable. If you want to disassemble some parts, it will be very difficult to do. Boards that are too dry may begin to crack when nailing. To prevent this from happening, you need to drill guides on the boards in advance so that the nail fits in easier.
Self-tapping screws
Ordinary black self-tapping screws are not suitable for street flooring. They must have a protective golden coating. Such self-tapping screws cost much more than nails, but they are the best at fastening boards together. This design can be easily disassembled if repairs or expansion of the area is needed. Self-tapping screws are screwed in using a screwdriver or drill.
How to mount correctly
Fastening should always start from the end board. If it is adjacent to the house, then you need to leave a small gap for ventilation. If you have a deck instead of flooring, then the edge of the board should extend slightly onto the joists.
The boards are attached to each other in two places. Be sure to indent from the edges, somewhere around 2 cm.
If this is not done, the boards will begin to bend over time. Experts recommend laying the wood so that the annual rings point down.
Over time, the tree will begin to shrink or expand due to weather conditions. Leave a small gap between the boards, about 4 mm. This way the wood will “breathe” and the remaining rainwater will quickly drain from the flooring.
Options for decorating the area
A children's corner can be decorated in completely different ways, everything also depends on you and your child, on your wishes, creative ideas and imagination.
The area around the perimeter can be planted with flowers or you can create some thematic figures and place them in different places of the site, the bright color of the main buildings will also be a decoration, they can be covered with different bright colors or with a coating in the same style, there are no boundaries.
Design ideas
The design of a playground depends on creative ideas, the volume of plans, style, materials used and the time that the owner is willing to spend on this event. It is better to coordinate all steps with the children; they should highlight the details that they like and what can be improved, because the main thing is that they have fun and comfort.
Since children are often bored at the dacha, the main idea of creating such a children's corner is to provide children with a fun and interesting activity, which means that everything should be decorated in an interesting and colorful way.
Absolutely everything can be combined on the site, and ideally all the main elements of entertainment should be built. If there is not much space, then you can install only the most interesting and important things for the child, for example, a swing and a sandbox, a slide and a sports corner, and so on.
The interests of the child should be taken into account not only in the placement of buildings, but also in the painting of these very elements.
For example, for a boy you can paint everything in protective colors, for a girl you can paint flowers on the elements. It is also important to decorate the site with additional elements and figures made from tires, pallets and other improvised means.
How to decorate a podium
When the main work on arranging the flooring is completed, you can begin decorating. Initially, the podium is given the desired color using tinted oils, paints, impregnations or varnishes. It is advisable to use paints and varnishes that do not create a slippery glossy film on the surface of the wood.
If you want to bleach wood, there are suitable ready-made products already created in production.
They can easily be replaced with a solution of slaked lime (only a weak concentration), which will additionally protect the wood from mold.
Did the flat flooring not seem very impressive to you? Then cut round holes between the joists and place flowerpots in them or plant decorative low-growing shrubs.
But you just need to think about such decor in advance, at the stage of creating a drawing of the podium.
Wooden podiums look very impressive, into which shrubs and trees growing on the site are inscribed. When laying the supporting structure, logs are installed around the plants. They just leave free space for their growth and development, and when covering with boards, they make a “window” in the podium.
Under no circumstances should the frame be mounted to the trunk. A tree swaying in the wind can easily damage the decking.
If there are large stones and other natural objects on the site, then you can arrange a flooring, repeating their shape around the perimeter.
Geotextiles that protrude beyond the perimeter of the podium are cut and sprinkled with pebbles. Ornamental plants are planted along the edge, boxes or flowerpots with annual flowers are installed. The high podium is sewn up along the bottom with a board, which is nailed to the ends of the joists.
Wood is not the most durable material for constructing a playground or garden paths on a site. But proper processing of the material will allow the tree to be used for a very long time. And delight with its natural aesthetic appearance and warm, comfortable surface.
From pallets
Euro pallets are used to deliver large goods. You can find different types of pallets in the backyards of supermarkets, as well as on construction sites. They have a standard width (1200 mm), and the length depends on the type of cargo. There are quite long ones (up to 2600 mm), they carry doors with transoms.
Dried wood is used to make Euro pallets. It is designed for stowing cargo, the weight of which can reach up to 1800 kg (steel doors and windows).
Therefore, it is irrational to throw away such ornamental material; it can be converted into wonderful garden furniture from pallets. Recipients of goods pay for the removal of containers, so they will gladly give away the pallets and pay less for wooden structures.
Using Euro pallets, you can make several crafts that will be useful on the playground:
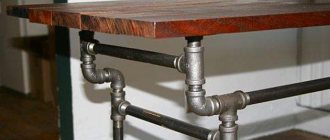
- a table at the base of which the flooring is used. All that remains is to raise it to a comfortable height and fix it so that it stands more stable;
- a small sofa will become a comfortable place where you can lounge in the fresh air;
- a toy storage cabinet may have drawers;
- ladders and stepladders allow children to climb;
- small gazebos, pergolas and other garden products;
- even a small pool;
- garden furniture.
Video description
Look at what a complex and interesting obstacle course can be made from the simplest materials: construction pallets, logs, rope and bars:
Don’t forget to install benches on the site for relaxation and quiet games. A small table wouldn't hurt either. This furniture is also easy to make from boards or stumps of different diameters and heights.
Those who like to draw with crayons will love the smooth sheet of plywood, painted with chalkboard paint and fixed at a convenient height. Targets nailed to a tree or fence will allow you to practice your accuracy when shooting with a bow, a pistol, or even a slingshot.
Take care of yourself too - find a cozy place for a sun lounger near the playground, where you can sit with a book or knitting, without letting the children out of your sight.
Interesting ideas
In addition to traditional figurines or devices for games, they create unusual and sometimes unexpected crafts.
Big board
A drawing board is created from sheet material. You can draw, write and play on it. If several people participate, then everyone draws their own hero.
Climbing wall
For training future climbers, a climbing wall is made. The ascent is carried out along different routes.
Children's kitchen made from old furniture
Garden furniture, which is not in demand in city apartments, is taken to the dacha. It can be used to make items for children's kitchens.
Chair swing
The seats from the chairs will serve as a children's outdoor swing. We need to figure out how to secure the ropes.
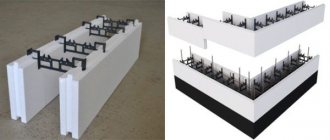
Houses made from plastic bottles
Today there is a trend to reuse plastic containers. Bottles are very creatively used to decorate courtyards in cities, summer cottages, and playgrounds in kindergartens. With your own hands you can make a wonderful playhouse for children.
Bottles should be tied with strong twine, creating a wall panel or part of a fence. The frame of the building itself is made of wooden piles or metal pipes.
Sometimes craftsmen use cement mortar to fasten the eggplants together. Then the container is laid horizontally.
Swimming pool and sandbox made from car tires
A skilled craftsman manages to make “candy” out of any garbage. By using old tires you can create a wonderful DIY playground! Photo of the original sandbox, in the construction of which the baby himself takes part - only one option for their use.
If you cut off the inner bends of the tire, lay the bottom with film or fill it with cement, you can get a miniature pond. In the summer, when it’s hot, not only kids, but also adults can swim in it. However, you should remember that water quickly deteriorates in the warm season, so it needs to be changed quite often.
Tire swings and carousels
Since you can make a playground with your own hands from scrap materials, practically reducing financial costs to zero, everything will be used, even old car wheels. Craftsmen use them to build original benches in recreation areas, imitating a car. And tires can make wonderful swings.
You just need to choose a stronger tree, a strong enough rope and learn how to tie real sea knots, which will guarantee the safety of children. You can use metal chains or braided wire bundles.
A children's playground, created with your own hands from available materials, will not only be functional, but also beautiful if its design is consistent with the general style. To do this, the master must use bright colors and use various details.
For example, carousel swings that imitate a motorcycle or ATV look creative.
Craftsmen resort to making swings in the form of animals, cutting them out of tires and connecting the parts with bolts. If you think of an option where the top part of the carousel can rotate, then the kids’ joy will know no bounds.
Sculptures made from trash
Sculptures will help you create a unique design. The master chooses fairy-tale creatures or fantastic animals, aliens or cartoon characters as prototypes. The frame of the sculpture itself is made of wire, which is coated with clay, plaster or cement.
Since it was decided to make a playground and its top (roof) with your own hands from scrap materials, bright small details are stuck on top of the figures: take caps from yogurt or mineral water bottles, parts of broken toys, checkers and buttons.
Scattered parts from the Lego constructor will also be used.
Even fragments of dishes can be put to use: they will become material for decorating a sculpture. However, you should be careful here: they need to be immersed deep enough in clay or cement so that the sharp edges cannot injure.
- Old basins are easily transformed with paint into strange turtles. And the bowls, mounted on tree stumps, imitate giant mushrooms.
- Metal dishes laid out in the grass or along paths, painted red and covered with black circles, will become fantastic ladybugs.
- And plastic bottles make cute piglets and hedgehogs, funny and amusing.
Making a staircase
Making the stairs
While the concrete hardens, we are busy arranging the stairs. Cut the timber to the required length. The design of the staircase is extremely simple: 2 stringers and steps. We make the steps not too high - the playground is still for children.
We tighten the stringers using hairpins. We fasten the steps into the recesses and additionally fix them with self-tapping screws.
Making stairs
We dig in support pillars for the future staircase. We maintain the required slope. Let's make it not too cool. The procedure for arranging the supports remains the same as in the previous section.
Making stairs
Let's try on the stairs. We level it, attach it to the base and fill the supports with concrete. Painting the stairs.
Making stairs
Next we make the railings. To do this, we set up vertical posts made of timber, attach them to the stairs, and then secure the handrails. We make the top handrail from a board and fasten it at a height of about 90 cm, fix the second handrail approximately in the middle between the top railing and the stairs. To make it, we can use timber 5x5 cm, 5x2 cm or another similar section.
Finished ladder