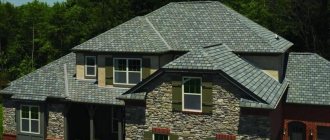
In modern construction there are many types of pitched roofs. One of them is a gable roof. It is quite simple to construct and economical if the amount of material is correctly calculated. In this article we will look at what parts a gable roof consists of, the features of its design and installation.
Design Features
Most often, a three-slope roof consists of two main trapezoidal slopes with a third adjacent to them, which has the shape of a triangle. This type of roofing is especially convenient for those who plan to build a house with a terrace or veranda. Very often, a three-slope roof is used in attic construction, then the third slope is often made in the shape of a triangle with a beveled top, this makes it possible to install a dormer window on the main pediment. A distinctive feature of the roof is the connection of three load-bearing elements at one point. Because of this, the design of a gable roof is a little more complicated than a gable roof, so it is necessary to carry out all the calculations professionally.
Building a roof
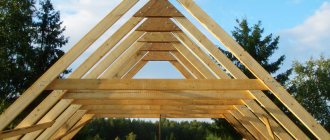
A three-pitched roof is slightly different in design from a gable roof; the difference lies in the placement of two slanted rafters, they make up the hip slope and the structures that support the rafters.
Sloping rafters are longer than side rafters and for this reason you need to take longer and thicker boards or combine standard material.
Roofing device
The design of a gable roof consists of the following mandatory elements:
- A ridge that is mounted at the junction of the upper slopes.
- Roof slopes. At the client’s request, ventilation is installed on the slopes to ventilate the under-roof space.
- The rafter system, which is the frame and forms the shape of the roof.
- Drainage system.
- Roof safety elements such as snow guards or roof fencing.
Sealing the valley
To make the work easier, assemble scaffolding and make a ladder for walking on the roof. To protect the surface of metal tiles from damage, cover stubborn materials with a soft product. Use linoleum for this. Sealing steps:
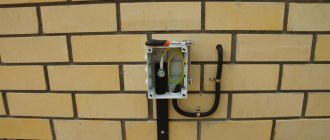
- Make a line on the wall - along it you need to process a groove for installing the metal part of the sealing. To cut through brickwork, use a grinder with a diamond blade designed for concrete, not ceramic. The last element has slots with which you can remove dust.
- Clean the wall from dirt, attach a waterproofing tape (LG) on a bitumen base. Work at above-zero temperatures, pressing the LH tightly to the plane, avoiding pockets or gaps. New LGs can stretch and compensate for design changes.
- Cover the tape with the valley. Install the rolling in the groove (SH), attach the second end of the self-earth to the metal tile. To increase the tightness, the groove must first be filled with sealant and the valley inserted. Fix the element to the wall with metal dowels. It is not recommended to buy large hardware; in such places the load is small.
- Remove the ladder, insert the ridge, screw it to the covering with self-tapping screws.
When using bitumen shingles, the process is simplified. There is no need to cut the metal, soft shingles bend well, and excess parts are separated with a mounting knife. For such coverings, a continuous sheathing is made of slabs or plywood.
Get a calculation of your construction
Answer our questions and our specialists will make a calculation for you.
We have a great offer for you! Thank you for taking the survey!
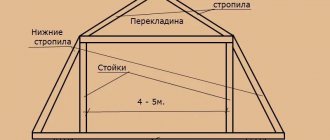
Composition of the rafter system
The reliable foundation of the roof is the rafter system. This is an integral part of the entire roof, consisting of many elements connected to each other, due to which the structure achieves the necessary strength and rigidity.
Basically, the rafter system consists of the following parts:
- Mauerlat is the basis of the entire roofing system. It is considered the foundation of the roof, as it supports the rafters.
- The rafter leg or rafters are the skeleton of our roof. Determines the angle of the roof and holds the entire roof.
- Runs. They connect the rafter boards together. There are two types: ridge and side.
- Puff. Connects the opposite sides of the Mauerlat together and serves to enhance rigidity.
- Rack. It transfers the weight to the tie and is located in the center of the rafter system under the ridge.
- Struts. It is installed at an angle to the rafter legs to prevent them from bending under their own weight, thus increasing rigidity.
- The bench is a part of the mauerlat beam located on the inside of the partition. Central posts are mounted on it to support the roof ridge.
- The sheathing is the final part of the rafter system. Basically these are boards or beams that are attached perpendicular to the rafters.
Important! If you are planning to install a soft roof, then a solid base is made of moisture-resistant OSB-3 boards.
Advantages and disadvantages
The disadvantage of a gable roof is that the load on the frame is not symmetrical.
Due to the small size of the attached premises, it is easier to construct such a roof than a hip roof. The costs of materials and time resources are reduced. The use of such a design makes the structure memorable.
There are also a number of controversial issues. Asymmetry gives an uneven load on the base of the room and on the wall structures. Although it is partially mitigated by the main building, the likelihood of increased pressure on the side elements remains.
Before work, you should make sure that the foundation of the adjacent room is strong enough to cope with the loads.
It is necessary to pay attention to the strength of fastening elements and introduce additional supports. Otherwise, the design is similar to other roofs - it can be made warm or cold, and lighting fixtures can be installed.
Types of rafter systems in gable roofs
Among the huge variety of types of pitched roofs, three-pitched roofing is most often distinguished in the construction of extensions, verandas, terraces, garages, winter gardens and other structures that are adjacent to the main house. Let's consider the main ones:
- The three-pitched roof of an extension to a house looks very advantageous if, according to the design, it is connected to the main roof. It is not advisable to make such a roof separately for an extension, since it is quite complex in its execution.
- The gable roof looks very nice on houses with a terrace. Today, such design solutions are gaining popularity, since having a wonderful place to relax is the dream of every person.
- Often, a gable roof can be seen on houses with a veranda or winter garden. The peculiarity of this building is that one of the walls can be glazed, but the process of installing the roof is no different.
- You can also notice the gable roof above the porch. Although a canopy over a porch can hardly be called a separate roof, home owners often prefer this particular solution, as it allows the porch to fit into the overall appearance of the house.
Cellar under the house basement
As mentioned above, this type of storage for root crops and vegetables has a number of significant disadvantages. But installing basements under the floor in private homes is still very popular. So it would be wrong not to note this as an option for arranging crop storage.
Such a storage facility does not require significant excavation and carpentry work - there is no need to erect walls, make drainage or dig a pit, but this is only if the height of the underground is at least 1.5 m.
If you have an underground of the required depth, then you just need to equip a place under the house for storing root vegetables and vegetables in such a way as to prevent rodents from accessing them and to provide additional ventilation for the underground so as not to open vents under the house in winter.
Let's briefly look at the option of constructing an underground space under the house, in which it was not initially planned to store root crops and preserve them in the underground of the house.
To do this, you need to decide where it is more convenient to place the entrance to the underground - this can be done in the kitchen or hallway. In the floor (A) you need to make an entrance (B) under the floor of the house. And mark the future entrance to the underground on the floor.
Marking the floor for the entrance to the underground
To cut a place in a wooden floor for a passage into the underground, you need to drill a hole (B) with a diameter of at least 10 mm, this is necessary so that the jigsaw file (D) fits freely into the hole and only after that can you make a cut to the required width. Usually the entrance (manhole) to the underground is arranged in the following dimensions: width - 60 cm, length 50 cm. But these are not mandatory dimensions and each owner makes the entrance (manhole) to the underground of his choice.
Cover in the floor to enter the underground
Having cut the boards, we fill the sides of the floor joists (B) with thrust bars (A) and make a cover for the entrance to the underground. The dimensions of the hatch cover should be 2 mm smaller than the dimensions of the entrance opening to the underground. Before you start arranging the space in the underground for vegetable storage, you need to make a floor (flooring). The floor can be made of wood (B) - from boards 30-40 mm thick or concreted (D).
Construction of an underground space under the house
When the floor is ready, start finishing the walls. To do this, you need to make a sheathing of bars (A) with a section of 30x20 mm. You can put a film under the bars that will serve as waterproofing.
Note:
In
principle, waterproofing is not required, because the underground is well ventilated and the air humidity remains normal, on average 80%, as in the underground, where there is no space for storing vegetables and root vegetables.
Having made the sheathing, you can line the walls with waterproof plywood (B) or boards (lining) and whitewash or cover them with two layers of antiseptic. To make it easier to go underground, you need to make a ladder (B); you can get by with a straight removable ladder or a stationary one. As it shown on the picture. The staircase has an inclination angle of approximately 45° and has wide steps (step width 15-20 cm). Next, proceed to arranging compartments and shelves (D).
Shelves can be placed near the wall, making them stationary. The size of the shelves and their number depend on how many cans of preserves, etc., you plan to place on them. Compartments for storing root crops and vegetables must be separated from each other by a partition (D).
For example: 1 – compartment for storing potatoes; 2 – compartment for storing cabbage; 3 – compartment for storing seed potatoes.
The compartments can be made either from boards with a solid shield (E) or from metal mesh (G), preferably galvanized. If there is no galvanized mesh, then the iron mesh must be painted with oil paint or red lead. The height of the compartments should be no more than 50 cm, this is necessary in order to make it convenient to put and remove root vegetables, and also this layer is optimal for storing potatoes, it is more convenient to sort it out if the potatoes rot. The width is not fundamentally important, and you can make the width of the compartments at your discretion.
Note:
O
tsek - a place for storing potatoes, or this place is also popularly called a notch (mainly in the sulfur regions of the Russian Federation).
Attention! When choosing a place under the floor to arrange storage for vegetables and root vegetables, please note that a mandatory condition is the presence of a through vent from the underground to the street. This is necessary to ensure not only ventilation and drying of the underground, but also to maintain both the temperature regime in the underground and to maintain optimal humidity
Calculation of a gable roof
Before purchasing material and starting construction, it is necessary to make correct calculations. To do this, you can use an online calculator or seek help from a professional. If you decide to make the calculation yourself, then you need to correctly measure the dimensions of the roof - the length and width of the slopes. The width is measured at the ridge or eaves overhang, and the length is the distance from the eaves to the ridge. To find out the number of sheets in a horizontal row, you need to divide the useful width of the roofing material by the width of the slope and round up.
Example: the resulting value is 9 meters, the useful width of the metal tile is 1.10 m, which means we divide 9 m / 1.1 m and get 9 sheets in a horizontal row.
The number of sheets in a vertical row will depend on the length of the slope; manufacturing plants do not recommend installing roofing sheets longer than 6 meters. In this case, the length of the slope is divided into equal parts and an overlap is added.
Example: the measured length of the slope is 7 meters, divide this length in half and add an overlap to the first sheet, usually it is 15 cm. It turns out that in a vertical row we will have sheets of 3.65 m and 3.5 m
Important! Carefully read the technical characteristics of the roofing material manufacturer!
Work execution algorithm
Work begins with the preparation of materials and bases for attaching the Mauerlat. After this step by step:
- Actions are taken to fix the support beam to the load-bearing walls (with a mandatory waterproofing layer for dissimilar types of materials). The method of attachment depends on the material of the walls; in most cases, mortgages fixed with bolts are used for these purposes.
- Vertical supports are installed (if any), in particular, beams holding the ridge girder.
It is recommended to install at least one such beam at the end of the ridge, the second - near the wall of the gable or adjacent house. Fastening is carried out using braces, after a thorough check of the vertical, after which the structure is strengthened with struts. - Installation of diagonal and row rafters is carried out , supported by the Mauerlat and ridge beam.
The elements are cut out at the bottom according to proven templates, with a margin of 20-30 mm for joining and mandatory treatment of the cut edges with antiseptics and drying. The longest outer rafter, if possible, is installed first, then the corner and row legs. - Other frame elements are mounted - extensions and reinforcements . Each is fixed at a pre-calibrated angle with at least two galvanized nails or placed on metal corners. This stage takes a long time to complete, not least because of the small size of the elements and their large number.
- The frame is sheathed with lathing according to a pre-selected pattern, which in turn depends on the type of roofing.
- All layers of the cake (warmed or cold) are laid, including the coating itself.
- Work is underway to install overhangs .
The exact order depends on the method of ventilating the gable roof; in permanent residences, waste is removed through a ridge or aerators in the upper zone. In cold extensions, the roof is often made open, the overhangs are simply protected from wind and precipitation.
Read about how to build a classic hip roof here.
The process of constructing a roof with three slopes
The construction of a gable roof begins with the block or brick walls of the future house; a mauerlat made of 50x100 or 100x100 timber is installed on them and secured with twisted wire or brackets. After this comes the rafter system, all wooden elements should be treated with antiseptic agents, as well as antipyrines.
Due to the special complex joint of the ridge unit, where two rafter legs and a ridge purlin are connected, it is very difficult to install it, so it is better not to skimp on installation and entrust this task to a specially trained team of installers. Then they lay insulation, if it is an attic roof, a waterproofing film or a membrane that is attached with an overlap. Don’t forget to leave a gap to ventilate the under-roof space from condensation.
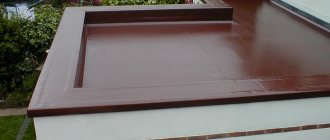
Massive option
It is logical to use a powerful seamless reinforced concrete slab as the basis for the roof being used. Such a slab can be poured over a metal profile sheet. You should immediately add special modifiers to the concrete (sold in hardware stores), which make it waterproof.
Next, the roof over the heated residential space must be insulated. To do this, first a layer of vapor barrier is laid on the concrete slab. This could be, for example, a roll of material impregnated with bitumen, glued with mastic.
As insulation, you can take two layers of rigid extruded foam, which is glued to the vapor barrier with construction adhesive. By varying the thickness of the insulation layers, we form a slight slope to drain water.
The formation of the slope ends with a reinforced concrete screed. You can make grooves in it to give the rainwater the desired direction. We add a modifier to the concrete and cover it with water-repellent paint (this can be found, for example, in the arsenal of pool builders).
On top of this inclined surface you can assemble a horizontal flooring from antiseptic boards coated with a good varnish. Rainwater should flow between the boards through grooves in the concrete screed into the drainpipe. In winter, snow can be removed from the decking without fear of damaging the waterproofing.
Laying roofing material on a gable roof
Before installing the roofing, eaves strips, abutments and valleys are installed, then gutters are attached. Next, a waterproofing film or membrane is laid. The roofing decking of a gable roof is laid parallel to the eaves with an overhang of 50 mm, which descends into the gutter. The sheets are laid from right to left, overlapping the first sheet.
If the installation is done the other way around, from left to right, then the first sheet is placed under the second. The roofing covering is securely fastened to the sheathing with roofing screws 4.8x28 or 4.8x35 at the rate of 6-8 pcs. per 1 square meter. And at the end of the installation, ridge and end strips are installed.
Important! It is necessary to move along the sheets during installation in soft shoes, stepping into the deflection of the wave at the locations of the sheathing.
Have you made a gable roof of a house with your own hands? If yes, then tell us about your experience in the comments.
How to make the correct calculations?
Since they decide to install the extension with their own hands to an already built house (otherwise it would have been built along with it), you will need to make a drawing yourself. The required dimensions are easily calculated: according to the length of the house wall and the desired width of the extension.
In this case, the calculation of the roof requires compliance with special conditions. Namely: depending on the roofing covering, the angle of inclination is determined. It must be said that the strength of the structure depends on this value:
- if the slope is insufficient, precipitation will linger on the roof of the veranda, weigh it down, and increase pressure on the beams, walls, and foundation;
- if the slope is excessive, the roof may suffer during strong winds (its area and degree of windage increase).
The minimum slope angle has the following values:
- 5° for 2-layer roofing felt,
- 6° when choosing ondulin,
- 11° for soft roofing,
- 12° for profiled steel decking,
- 14° when choosing metal tiles,
- 15° for 3-layer roofing felt,
- 22° when choosing tiles, slate.
The maximum slope slope for all materials is 60°. However, it is better not to adhere to this parameter and take average values: 20°-35°.