Using putty, you can significantly improve the aesthetic and technical characteristics of the surface of a wooden or concrete floor, increase its resistance to external influences and, in the case of a wooden floor, maintain a unique wooden texture for a long time. Floor putty is used to eliminate defects that appear during the operation of the floor, as well as for high-quality preparation of the base for decorative finishing. How to choose the composition and do the job correctly? We'll tell you in this article.
Floor putty
Is it acceptable to use gypsum plaster for the floor?
The basis of a durable floor is a screed - an intermediate layer between the floor slab and the finishing coating of tiles, laminate, parquet, linoleum or other material.
It is performed with the aim of leveling the surface, giving it rigidity or a certain slope, improving thermal insulation and sound insulation. The choice and service life of the finishing coating depends on the quality of the screed. Today, some craftsmen practice leveling the floor with gypsum plaster. But if you want to independently prepare the surface for laying flooring, you need to weigh the pros and cons of using this material. Is screeding a floor with plaster always a profitable and rational solution, or is it better to give preference to other materials?
Types of screeds
There are two ways to level the floor surface:
- Wet screeds - cement-sand mortars, self-leveling floors or levelers and gypsum plasters. To create a layer up to 35 mm thick, it is necessary to install beacons.
- Dry or prefabricated - using chipboard, plasterboard or thick plywood. They are laid on a dry layer of fine expanded clay or wooden logs.
The choice of screed type depends on the floor material, the number of storeys in the building, the condition of the floor, the purpose and location of the premises.
Gypsum plaster for floors: features and disadvantages
Based on the main binding component, dry mixtures are divided into cement and gypsum or anhydrite. Cement mortars are universal; they can be used in any premises and for outdoor work. Self-leveling floors are easy to use, easy to apply and have an affordable price. Leveling with gypsum plaster is only suitable for dry rooms.
Gypsum-based mixtures are environmentally friendly, more plastic and harden faster than cement ones, but have the following disadvantages:
- absorb moisture - cannot be used in damp areas;
- their strength is much less than that of cement-based compositions;
- over a large area can cause significant shrinkage;
- when exposed to heavy loads, they crack and crumble;
- generate dust during operation.
How to make the right choice?
Can you be 100% sure that your upstairs neighbors won’t flood you, a pipe won’t burst in your house or apartment, a radiator won’t leak, or a child won’t turn over a bucket of water on the floor while cleaning? Surely all the answers will be negative! This means that leveling the floor with gypsum plaster is not an acceptable option for you.
To create a strong and durable screed 2 - 3 centimeters thick, we recommend using a traditional cement-sand mortar. And to eliminate small level differences and unevenness, self-leveling self-leveling floors are perfect. Gypsum plaster for the floor is not the best solution, but it is great for finishing walls and ceilings! Its use makes it possible to mask all unevenness and create perfectly smooth and even surfaces.
Gypsum plaster for ceilings and walls absorbs excess moisture, and releases it when the temperature rises, thereby maintaining a favorable microclimate in the premises. Don't forget about the advantages of this material when you make repairs!
Added: 01/21/2019 16:39:00
Varieties of putties for different types of base
| Photo | Name | Rating | Price | |||
| Putty for working with concrete | ||||||
| #1 | Gypsum mortar | ⭐ 98 / 100 | More details | |||
| #2 | Cement mortar | ⭐ 96 / 100 | More details | |||
| #3 | Acrylic mixture | ⭐ 95 / 100 | More details | |||
| #4 | Epoxy composition | ⭐ 95 / 100 | More details | |||
| #5 | Waterproofing solution | ⭐ 92 / 100 | More details | |||
| Types of putty for working with wood | ||||||
| #1 | Water-based putty | ⭐ 91 / 100 | More details | |||
| #2 | Solvent putty | ⭐ 90 / 100 | More details | |||
| #3 | Oil solution | ⭐ 93 / 100 | More details | |||
| #4 | Polymer-based composition | ⭐ 96 / 100 | More details | |||
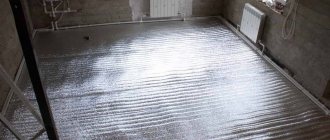
Leveling the floor with expanded clay
Expanded clay has excellent thermal insulation characteristics, and therefore it is often used for arranging heated floors. Before pouring the screed, it is necessary to clear the base and install beacons. The process is carried out in two ways:
- Pouring sand-concrete mortar onto expanded clay. First, the base is covered with expanded clay, and then filled with a mixture of cement and water. After it dries, they begin pouring sand-concrete mortar. The screed takes three weeks to dry, and it needs to be sprayed with water daily.
- Pouring a mixture of expanded clay, concrete and sand. Expanded clay is thoroughly mixed with water in a construction mixer, then sand and cement are added. The resulting mixture is spread on the surface and leveled. Without waiting for it to dry, a concrete screed is poured on top.
Choice depending on the type of base
One of the main criteria for choosing a putty is the type of surface you will be working with. This can be wood (boards, plywood, parquet, fiberboard or chipboard), gypsum fiber sheets or concrete. To work with the latter, cement putty with a waterproof effect is used. With its help it is possible to produce a very durable surface.
Parquet putty
Each type of base requires special qualities from the putty. So, for working with wood, the composition should be:
- Plastic throughout the entire stage of work.
- Do not form cracks on its surface after drying.
- Create an organic combination with paintwork finishes.
When working with chipboard, the working composition should not shrink. This quality is typical for acrylic, latex and silicone putties. Oil and adhesive compositions successfully cope with large cracks.
Two main advantages of Rotband
The first advantage is a thick layer at a time. Rotband plaster can be applied to the surface in a thick layer of up to 50 mm without the spraying stage. That is, if you need to level the wall by 4-5 cm, place beacons on the wall and plaster it with Rotband mixture in one pass.
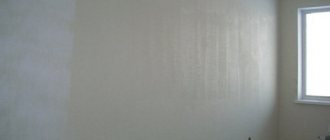
The second advantage is that no puttying is required. With high-quality mixing and repeated tightening, you will usually get a smooth wall, which, after covering and simple grinding, does not need to be puttied.
Note: The gypsum mixture can be applied in several layers, waiting for the previous layer to dry completely. This allows you to level walls (ceilings) with unevenness of more than 50 mm.
Preparation of working tools
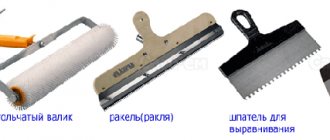
To carry out puttying work, you will need to purchase some tools to make application easier and get the most even, smooth surface:
a fairly wide brush with soft bristles or a roller, with which the façade surface is primed;
Maklovitz brush
Rollers for priming walls
a construction mixer or electric drill with an attachment for high-quality mixing of the putty mixture;
Construction mixer
Several spatulas of different sizes allow you to process large areas of the facade, as well as corners or hard-to-reach areas.
Spatulas
Construction mixer price
Construction mixer
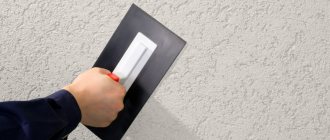
If paint is to be used as the final finishing of the facade, then the surface must be absolutely flat and smooth, so a well-dried layer of putty will need to be rubbed with a special fine-grained mesh.
Mesh for grouting putty
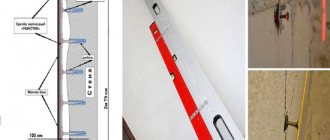
Methods for determining floor level unevenness
A laser level is used for this. By placing it on the highest part of the floor, we determine the horizontal line along which we guide when leveling.
If the differences in height reach up to 2 cm, then the previously made screed should be filled with concrete mortar, which, when spread over the floor, will level out all the unevenness. If unevenness exceeds 2 cm, this technique is not suitable.
First we remove the old coating. After cleaning it from debris and dust, we make a mark with a laser, along which we level the floor. If there is no electron laser, we use another method. We find the highest floor level near the wall, and make a mark 6 cm above it. Then we draw a straight line along the entire surface of the walls at this height.
Next, using a rope or thick thread, we make a cross on the floor, stretching it from the mark on one side to the opposite. When the rope touches the floor, raise the mark by 3-4 cm.
Putty material according to component composition for concrete surfaces
Indeed, with skillfully selected and high-quality putty, you can level any surface and mask even the largest cracks. Based on the component composition for these purposes, you can select the following types of putties:
- Cement;
- Lime based;
- Oily;
- Adhesive;
- Varnish;
- Polymer nature or acrylic.
Often they try to improve the standard formula with the help of polyester and polyurethane additives, as well as other components that, to one degree or another, improve the quality of the finishing material. Puttying can be carried out with both liquid and thick compositions.
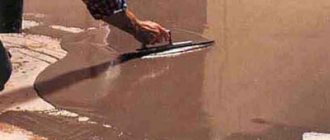
The first type is represented by self-leveling compounds, which are used exclusively to treat concrete surfaces. Such mixtures are distributed over the floor under their own weight, filling the cavities of the cracks, creating a perfectly smooth canvas. This technique is also called “solid putty.”
Late 50s
At the end of the 50s of the last century in Germany, the plaster mixture was prepared individually at the construction site.
Each batch was different from the previous one, which negatively affected the quality of the finish. Possessing unquestioned authority among gypsum specialists, engineer Winkler promised to erect a monument to someone who could stop the flow of complaints about multi-layer plaster, replacing it with single-layer plaster.
Then the KNAUF company developed the composition of a plaster mixture for interior work and launched it on the market in 1962 under the name “Rotband”. Over the past 55 years, many good gypsum plasters have appeared on the world market. The Rotband recipe was improved over time, and gradually it became the most popular material of its kind.
Not so long ago, in the early 90s, there were no ready-made modified mixtures for rough finishing on construction sites in Russia. Workers on site prepared plaster compositions, just like their German colleagues in the middle of the last century. Despite the fact that each master, as a rule, had his own secrets, it was difficult to obtain a guaranteed high-quality result using such technology.
Waterproofing putty mixture
A special feature of the mixture with increased moisture-resistant properties is the possibility of using it as an independent coating, which will be beneficial with a limited budget for repair work. The composition of the putty includes urethane components, a dry base mixture, a hardener, targeted additives and dispersion emulsions.
Penetrating waterproofing compound Ceresit CR 90 Crystaliser (25 kg bag), bag
Most often, waterproofing putty is used when carrying out renovation work in bathrooms, steam rooms and showers.
The main advantage of the material is that there is no need to wait for the base to completely dry and the ability to work on a wet layer.
Price for waterproofing putty
Leveling floors under laminate
How can I level a concrete floor under a laminate? In this case, it is best to resort to grinding the base surface. This method is the most inexpensive and simplest. Processing with a grinding machine can only be done if the difference in height is no more than 5 millimeters. After sanding, the surface is cleaned with a vacuum cleaner and primed.
How can you level a laminate floor if the differences in height are large? It is best to resort to using a cement-sand screed. It is poured onto the previous screed or directly onto the ceiling. When using this leveling method, it is necessary to clean the base surface and lay a waterproofing layer. A reinforcing mesh can be installed on top. Also, when using a cement-sand screed, beacons are placed, which are fixed using alabaster mortars.
Is it possible to level the floor with underlayment? It is believed that a substrate can be used if the difference in height is no more than 7-8 millimeters. This leveling method is also used in cases where the laminate is laid on top of linoleum.
Important! It is customary to lay the substrate perpendicular to the laminated panels. This way you can best compensate for unevenness of the base surface and achieve high sound insulation rates in the room.
As a substrate you can use:
We choose the best option in terms of cost and timing
| Comparison table of different alignment methods | ||||
| Characteristics | The screed is wet | Semi-dry screed | Dry screed | Self-leveling mixtures |
| Maximum laying area per day by a team of workers, sq. m. | 50 | 250 | 100 | 50 |
| Costs for workers, rub. sq. m. | From 500 | From 400 | From 650 | From 1000 |
| Drying and shrinkage, days | 14–28 | 1 (on average up to 8 hours) | Not required | Up to 30 |
| Load resolution, after how many hours | 72 hours | 12 | Immediately after installation | 24–72 |
| Where can it be used? | Any premises | Any premises | Rooms with humidity up to 60% | Due to the high cost and characteristics of the material, they are recommended only for rooms up to 10 m2 |
Wondering how to level the floor in an apartment? As a comparative analysis of methods shows, semi-dry screed is a universal, technically correct and easy-to-implement option. It forms smooth surfaces with minimal deviations, made with your own hands quickly and with little investment. This is confirmed by the popularity of this method of eliminating base floor defects among professional builders. But they know very well how long it takes and how much it costs to level the floor in an apartment using each solution.
Leveling a wooden floor with sanding
Sanding is one of the most labor-intensive, but at the same time effective, methods of leveling the base. You can scrape by hand, but due to the high labor intensity and low efficiency of such work, we will not consider manual scraping.
So, mechanical scraping.
Leveling the surface of a wooden floor by scraping involves removing the top worn layer
Preparation for scraping
First you need to remove all the curtains, cover the existing furniture with protective film or polyethylene, otherwise everything will be covered with fine dust, which cannot be avoided during the scraping process. It is necessary to remove all carpet buttons from the floor surface and recess the nail heads deeply.
Important: when operating the scraping machine, you must wear noise-protective headphones and a respirator to prevent damage to your hearing and pulmonary tract. Hands should be protected with thick gloves.
How to sand a wooden floor
Tip: if any board is damaged, you can simply turn it over and install it in the same place. Simply replacing the board will result in differences in the color of the floor.
Of course, each method has its own advantages and disadvantages, so when choosing, you should be guided by both the specific situation and your own financial capabilities. Only by carefully weighing the pros and cons of each method can you make the final choice and get a truly high-quality result for many years.
First steps. Slab countertops
Sano published a blog entry in Furniture made from slabs, solids, and various differences, October 6, 2021, blog entry
The first attempts to make something from the brought slabs. Although there may be some attempts, the material costs money and the right to make mistakes is as much as there is money in your pocket. Train at your own expense, as they say.
Therefore, each board is carefully inspected and tried on; the proverb about measure seven times is in action.
The work itself is not tricky, creative, there are several boards and they need to be selected so that they look beautiful and there is no overspending. All sizing and trimming is done with the minimum possible removal of material, simply sawed off a little here, cut a little there with a chisel.
Is it possible to level the floor with a rotband?
The concept of “finishing work” includes a list of related operations from painting walls to laying tiles. All of them are carried out only on a carefully leveled wall surface.
Modern methods of leveling walls are divided into two groups. Depending on the technology and materials, a distinction is made between dry (using plasterboard structures) and wet (correction of the surface with a building mixture) methods, each of which has its own characteristics. In order to choose the most suitable method, it is necessary to measure the unevenness with a laser level, a plumb line or a regular level. Potholes and depressions ranging within five millimeters can also be eliminated using putty. Irregularities of about 3-5 centimeters? Then you should purchase a building mixture. Differences of more than 5 centimeters are best leveled using drywall.
Content:
- How to level walls with plaster?
- Plaster application technology
- How to level walls with putty?
- How to level walls with rotband?
- Frame method of leveling walls with plasterboard
How to level walls with plaster?
Immediately before leveling the walls, it is necessary to carry out a number of preparatory work:
- dismantle outdated finishing materials;
- evaluate the surface that needs to be plastered.
The wall should not crumble or delaminate. Often, when working on old plaster, after the first layer has completely dried, defects are discovered that were previously invisible.
The key to success is compliance with three conditions:
- thorough surface preparation;
- correct choice of building mixture;
- presence of accurate beacons.
To level the brickwork, it is recommended to use a cement mixture. The cost of this plaster mixture is relatively low. It is possible to apply a fairly thick layer of material, which is important when finishing brick walls. It should be noted that when applying a layer of more than 2 centimeters, it is necessary to use a plaster mesh to reinforce the composition.
To plaster a smooth concrete wall, you will need gypsum-based wall leveling mixtures. Quartz microparticles included in the material make the wall a little rough. But first, be sure to prime the surface. Reinforcement is performed with a polymer mesh with a cell size of 5×5 mm.
Many people are interested in what mortar to use to level concrete walls. To plaster concrete with a rough surface, gypsum or cement compositions are used. A primer is also required, but without adding quartz.
When processing foam concrete surfaces, predominantly gypsum mixtures are used. Preliminary deep penetration primer is required.
Tongue-and-groove slabs, which are used for the construction of partitions, should be plastered with a gypsum mixture over a regular primer.
The next step after assessing the surface and preparing it for applying the plaster mixture will be the location of the beacons.
Installation of beacons
In construction, beacons are usually called a kind of guides for controlling the leveling of a surface using liquid mixtures. As beacons for plaster, a perforated profile is used, the width of which depends on the volume of the mixture applied. For beginners, it is better to use purchased beacons, the beauty of which is that they do not need to be removed after work and to mask the recesses left after removal.
Beacons are installed on vertical strips of quick-hardening mortar or mixture that will be used for plastering. The distance between the beacons is determined taking into account the size of the rule (it should rest on the edges of two beacons and not slide off).
Plaster application technology
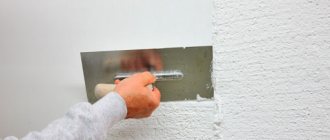
In the gap between the beacons, with a trowel and the “falcon”, a “target” is thrown - an excess amount of the mixture. A falcon is a tool with a handle that vaguely resembles a trowel, but with a base size significantly larger than the base of the trowel. Specialists use a trowel to scoop up the mixture from the “falcon” and dump it between the lighthouses. The use of this tool can significantly increase labor productivity, because there is no need to return to the container with the solution every time. This means that the time spent on leveling is also reduced.
Then, as a rule, the solution is evenly distributed from bottom to top. In order to immediately apply a thicker layer of plaster, make a rough outline without leveling it. After the rough layer has dried, they begin to apply the finishing mark. The finishing mark is also leveled using the rule.
How to level walls with putty?
The surface is also primed before leveling with putty. Puttying the surface with your own hands is not a difficult task. It should be taken into account that this method is not always suitable, since it is possible to level the walls for painting with putty only with small differences in “heights”. In other cases, putty will be the final stage of a multi-step process.
To carry out puttying, you will need wide and narrow spatulas, as well as a cuvette with a flat bottom. The consistency of the mixture should be such that the cone formed by stirring with a stick retains its shape. Over time, the putty thickens, so it should be periodically diluted with water or primer. The mixture of the required consistency holds well in a vertical position without slipping off the spatula.
Properly prepared putty is placed in a cuvette and covered so that it does not dry out. A small amount of the mixture is applied to the wall surface using a spatula in strokes. Next, using measured horizontal and vertical movements, level the applied putty to a thickness of one or two millimeters, holding the spatula at an angle. It should be noted that the greater the angle of inclination of the spatula to the surface, the smaller the thickness of the mixture layer remaining on the surface will be. For convenience, the spatula blade is fixed with the other hand.
After the mixture “sets,” it must be lightly washed using a primer. This is done in order to remove sagging and various irregularities. The first layer, after complete drying (at least 24 hours after washing), is treated with sandpaper to smooth out roughness. If necessary, you can apply a second layer, but before that you need to prime the previously putty surface. Applying a second coat without primer may result in cracking as moisture is absorbed into the previously applied filler. After a day, the surface is sanded again with sandpaper wound on a board or small block.
Calculation of cement mortar
Before puttingty, it is important to calculate the mixture. It allows you to preliminarily estimate the required amount of mortar for finishing the floor. You can get the value using an online calculator or a manual method. It is necessary to know in advance the floor area, thickness and number of applications and the average consumption of the mixture.
To get the final value, you need to multiply the floor area by the layer thickness and the average flow rate. For a floor of 10 sq. m with an average consumption of 2.8 kg per sq. m and a layer thickness of 1 millimeter, the parameter will be equal to 10x2.8x1 = 28 kilograms. If the number of approaches is 2, then the resulting number is doubled.
To calculate using an online calculator, enter all data into the form and click the “Calculate” button. The final value shows the required number of kilograms of the mixture or bags, if the manufacturer’s packaging is known.
You can calculate the amount of cement mortar using an online calculator
Manufacturers offer a wide range of putty solutions that meet modern standards and operating requirements. The choice must be made depending on the type of finishing coating, the functional purpose of the floor, and the operating characteristics of the room.
Have you puttyed the floor? What putty mixture did you use? Share your experience in the comments.
Walls
Leveling walls with plaster is required in almost every case of major repairs or construction. Plaster often acts as a finishing decorative layer, but most often it serves as a base for wallpaper or tiles. But in any case, its main task is to level the walls and without certain skills it is quite difficult for a beginner to cope with this. The article will discuss the nuances of choosing a high-quality mixture, as well as the sequence of all stages of work.
Content:
Dry mix Rotband
Rotband is a brand of universal dry plaster mixture based on gypsum from the world famous manufacturer Knauf, which produces products of the highest quality. All products are certified and comply with Russian GOST standards and DIN (German Institute for Standardization) standards; they also have all the necessary sanitary and epidemiological conclusions and fire safety certificates. This is especially important for those who care about the health of their family and do not want building materials to have any negative impact in the future.
Application area
Knauf Rotband is a dry plaster based on gypsum with additives that provide increased adhesion. It is recommended for use in rooms with normal humidity, as well as for the kitchen and bathroom. Due to its properties, it can be used on almost any surface of walls and ceilings with a conventional solid base: brick, concrete, cement plaster, polystyrene foam and fiberboard. The manufacturer especially recommends the use of Rotband for smooth concrete surfaces of ceilings and walls.
Technical characteristics of Rotband
- Layer thickness: for walls 5-50 mm, for ceilings 5-15 mm.
- Consumption: about 8.5 kg/m2 (with a layer of 10 mm)
- Amount of water per 30 kg: 18-20 l
- Time to use the finished mortar mixture: 20-25 minutes
- Drying: from 7 days (depending on room conditions)
- The maximum fraction size is no more than 1.2 mm. Strength: compressive >2.5 MPa, and bending >1.0 MPa. Density in solid state is approximately 950 kg/m3.
- Packaging - paper bag with packing of 30, 25, 10 and 5 kg. Shelf life 6 months (if packaging is intact).
Why Rotband?
When choosing plaster, the manufacturer is undoubtedly important, as a guarantee of quality. The Knauf company has already been mentioned; it is known to everyone, even people quite far from construction and repair.
- Rotband has undoubted positive qualities that distinguish it from other gypsum plasters:
- Made from environmentally friendly natural mineral - gypsum, it does not contain any harmful impurities.
- Easy to make and use. Detailed instructions on the packaging of the Rotband dry mixture will help you prepare and apply the plaster yourself. Suitable for both experienced craftsmen and beginners.
- Versatility. Does not require subsequent puttying, as it creates a smooth, even surface suitable for high-quality painting.
- Quick to use. Rotband dries quite quickly (cement plaster dries in about 30 days, gypsum plaster - 7).
- Due to its hygroscopicity, the material “breathes”, providing a favorable climate in the room.
- It has good water-holding ability, does not delaminate or crack even when applied to porous substrates that absorb moisture well.
- Gives freedom of creativity, allows you to create decorative elements, textured surfaces, and also perform restoration work.
Rotband is very popular among contractors performing repair and finishing work due to its practicality and ease of use. However, we cannot fail to mention the shortcomings identified by customers when working with the mixture.
- Price. This plaster is in the middle price range. Its opponents claim that there are plasters on the market with similar qualities, but at a significantly lower price.
- Possible shrinkage of the material. Although this point is still controversial, since shrinkage of the material or cracking can occur due to improper mixing or application technique. The manufacturer claims that its plaster does not crack, even when applied in a thick layer.
Cost of leveling walls with rotband
Before starting repairs, it is worth calculating the cost of leveling the wall with Rotband plaster. The average price of a 30 kg package in Russia is 360 rubles. This amount is enough to plaster 3.5 m2 of surface. Take, for example, a room with a total area of 16 m2. Ceiling height 2.5 m, length 6 m, width 2.7 m. The area of all walls in the room is 43.5 m2. Thus, to plaster a room with a layer of 1 cm, with an average package consumption of 3.5 m2, a little more than 12 packages of Rotband are needed. It is very convenient that the manufacturer packages the mixture not only in large bags, so if a little is not enough, you can buy additional packaging weighing 5 or 10 kg. In total, the cost for a room of 16 m2 will be 4,320 rubles for 12 bags of 30 kg each, plus 200-250 rubles for additional packaging. In this case, only the plaster mixture is calculated, not including tools, primer and additional materials.
Making your own putty
You can make putty yourself. Craftsmen offer several recipes:
- Sifted chalk is mixed with gypsum in a 2:1 ratio with the addition of PVA glue. The mixture acquires a viscous, thick consistency and is used to level concrete bases. When working with large surfaces, sawdust is added to the composition. This putty dries in no less than 2 days.
- Sifted chalk is mixed with acrylic varnish. In this case, the putty acquires a paste-like consistency.
- Floors in rooms with high humidity are leveled with oil-based compounds. To do this, chalk is mixed with drying oil in a 2:1 ratio and additives are added to accelerate the hardening of the putty.
- When working with wooden surfaces, a composition of wood dust and varnish with an oil base is used.
- The original moisture-resistant composition can be obtained from old linoleum. To do this, the material must be finely chopped and poured with acetone until the linoleum dissolves.
- A durable composition can be obtained by mixing cement and varnish.
- An analogue of acrylic putty is made by mixing the following substances in a metal container set on fire: rosin (200 g), ozokerite (400 g), yellow ocher (400 g). The latter is added when the first two components are melted. This composition is used exclusively hot. Purpose – putty on chipboard and wooden surfaces.
Ozokerite
Note! All work on preparing putty yourself must be carried out using personal protective equipment. It is advisable that the room is well ventilated.
Individual protection means
How to make putty
Wood putty. Prepare PVA glue and small sawdust. Take out a small container to prepare the solution. Place sawdust in a container and fill it with glue. Stir everything thoroughly until it reaches the consistency of thick sour cream. Let it dry for 15-20 minutes. The putty is ready.
Concrete putty. Prepare chalk and drying oil. Take out a small container. Mix chalk and drying oil in a container. Stir everything thoroughly until the sour cream becomes thick, let it set a little and dry. The putty is ready.
Putty for painting. Prepare a 15% glue solution, drying oil, turpentine, laundry soap, chalk, and casein paint. Prepare the container. Dilute casein paint with water and heat to a temperature of 60 degrees, then strain through a sieve and pour in drying oil, and then chalk soaked in water, laundry soap and turpentine.
The same putty can be made from a slightly different composition. To do this, instead of casein paint, use glue on the same base. First, mix dry powder materials: chalk, pigment, laundry soap. And then add liquid materials: casein glue, turpentine, drying oil, varnish. Stir everything thoroughly and let it brew until it reaches a viscous consistency.
Select the color of the putty pigment depending on the paint with which you will cover the surface, so that spots and stains do not appear on the wall. To choose the right color and percentage of pigment in the putty consistency, apply it to a small area of the wall, let it dry and cover it with paint on top.
Application technology
The main task of the puttying process is to prepare the floor surface for covering the base material. Preparation is aimed at eliminating irregularities, processing seams and crevices.
To seal the holes, several layers are applied. If the depression is deep, then after each layer you need to wait for it to dry completely. The final application must be done carefully, since as a result the coating and the putty layer must be at the same level. When all the irregularities have been repaired and the composition has dried, the base is cleaned with sandpaper. Applying a thick layer of leveling mixture affects the appearance of the finishing coat: the putty may bleed through the varnish or paint.
It is not difficult to completely level the floor with your own hands if you do it in stages.
Leveling steps:
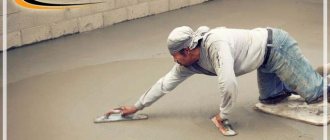
preparatory work. They consist of cleaning the base from dirt and dust. Before directly applying the first layer, the floor surface must be perfectly dry; puttying process
The composition is applied with a special spatula; it is important that the layer stands out slightly on the surface. This is done to avoid rapid shrinkage of the material; grinding can be done by using a special machine
This option will greatly simplify and speed up the work; if some unevenness remains in the form of pits, then they are treated with another layer of putty. The steps are repeated until the floor is perfectly level.
Modern craftsmen use putty based on tile adhesive to level the floor. The technology of work is as follows: first, the mixture is poured into large recesses, small ones are sealed with a trowel, after which the process of stretching the solution is carried out in the direction from the thickest layer to the thinnest one. To eliminate possible defects, it is necessary to repeat the movement several times. This method of applying putty is effective before tiling the floor surface.
The process of puttying the seams of gypsum fiber sheets has its own characteristics:
- The compound is applied to the joint between the laid materials with a spatula. At this stage, the places where the screws are fixed are treated with the composition. Before drying, the remaining solution is removed;
- the protrusions will be grouted;
- puttying the external corners of gypsum plasterboard is combined with laying a special metal profile;
- After all stages of applying putty, the surface of the sheets is primed.
What types of putties are there for concrete?
Puttying is divided into basic and finishing, respectively, so are putties. However, there are also universal ones, they are suitable for any operations and the most suitable option for repair work.
Manufacturers provide customers with dry mixtures, to which water is added immediately before the process, or a paste-like material, ready for use.
Polymer putty for concrete floors is a mixture of water, sand, marble dust or cement with the addition of plastic. Additives that increase plasticity allow better bonding to the base, increase the elasticity and water resistance of this building material.
This putty is ideal for installing self-leveling floors and is good for waterproofing swimming pools, guaranteeing a minimum of leaks. The environmentally friendly material from which this building mixture is made is suitable for work in children's institutions, hospitals, and offices.
When choosing putty in a store, you need to take into account the properties of the contact material; they should be similar. Otherwise, swelling and delamination of the surface are possible. Prices for ready-made pasty building mixtures are higher than for dry mixtures, 5 kg of which can be purchased for 200 rubles.
See also:
When choosing putty in a store, you need to take into account the properties of the contact material; they should be similar. Otherwise, swelling and delamination of the surface are possible.
In order to make the right choice of floor putty, you must first understand what kind of coating surface you have. First, it should be noted that the putty can be basic, that is, it is used to level out the main unevenness with the first layer...
In order to make the right choice of floor putty, you must first understand what kind of coating surface you have. First, it should be noted that the putty can be basic, that is, it is used to level out the main irregularities with the first layer.
Putty is a construction mixture based on water, bulk materials and a binder with all kinds of polymer additives that improve its properties and color pigments. It is intended for filling cracks at the joints of various types of platforms...
It is not always possible to completely replace the old floor with a new one. However, what should you do if multiple unsightly defects, cracks, potholes, nail holes, and voids appear on its surface? In this case, you can repair the floor without extra effort and financial investment. It is enough to simply putty it, and then carefully cover it with paint, varnish or other coating.
Is it possible to putty wood floors or is this type of work only available for wood surfaces? It is possible and necessary. Video tutorials posted on the Internet, as well as the recommendations given in this article, will help you understand the issue of how to putty a floor.
Waterproof materials for bathrooms and swimming pools
Wet areas require materials that will not absorb water and deteriorate. This is a putty based on cement, epoxy resin and special waterproofing.
Epoxy fills deep cracks well, voluminous voids and the screed turns out smooth with a hard film. Preparation of a two-component solution requires strict adherence to proportions. It hardens quickly, after 30 minutes you can’t fix it. It suited us under the screed floor in the kitchen.
It was planned to lay tiles on the concrete floor in the bathroom and toilets. In the hallway, a heated floor system was installed under the ceramic flooring. The cement putty met its characteristics.
Expensive waterproofing putty was used in the pool. Additional components are selected in such a way that they bind the cement, and it does not absorb water at all, being in it for years. It is important that the composition can withstand alternating moisture and dry conditions without compromising strength.
conclusions
In conclusion, we can conclude that the putty mixture for concrete is the most versatile material, thanks to which, without much effort, you can quickly eliminate any defects that appear in the form of cracks, irregularities, and bumps.
But it is necessary to choose the right putty, based on the characteristics of the surface being treated. In Sevastopol, you can find the necessary type of putty in any department of stores intended for construction work. We also recommend that you read the article about tile adhesive Ceresit cm 11.
Application rules
To make the coating look more natural after treatment, you need to follow certain conditions when working:
- It is necessary to cover all the cracks in the wood outdoors at a temperature of at least five degrees Celsius, otherwise the composition will turn out to be too viscous and will not be able to fill the cracks and crevices well. Air humidity at this moment should exceed 75 percent.
- The surface to be treated must be well prepared in advance - clean all the voids that will be filled with the mixture, wipe off the dust with a damp cloth, remove the old varnish coating if necessary and clean the surface with sandpaper.
- The putty should be applied with a stainless steel spatula or a simple plastic spatula.
- If you need to fill a large crack with a diameter of one centimeter with the mixture, then it is better to putty it in several layers at once, allowing each previous layer to dry well. The thickness of each layer should not be more than 2-3 millimeters. Drying time directly depends on the composition of the putty (it is best to study the instructions on the package).
Sealing cracks with cord
This method has been known for a long time and is used to seal cracks not only between floorboards, but also when repairing walls, when a piece of synthetic cord is selected in accordance with the size of the hole. The use of this option not only solves the problem of how to seal cracks in a wooden floor, but also helps to get rid of creaking floorboards.
The following materials should be prepared: cord (hemp rope), PVA glue (carpentry), sawdust, putty. The rope is completely lubricated with glue and a mixture of sawdust, adhesive and putty is made.
The cord is placed on the crack, laid inside so that it is 2-4 millimeters from the top of the floorboard. This distance is filled with the mixture with a small margin on top, since the putty composition shrinks during the drying process.