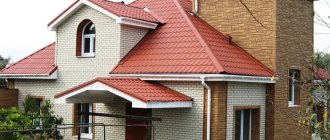
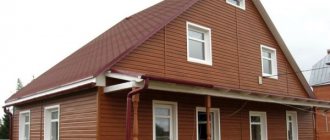
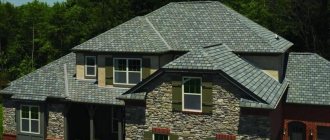
Facade thermal panels for exterior decoration of a house are a modern material that has a number of interesting properties. With its help, you can update the appearance of your home in a very short time and make it significantly warmer. The appearance of these panels is very interesting - they imitate brick or stonework, and quite reliably. Today we will learn the structure of this amazing material, analyze its pros and cons, and also see how it is installed.
Facade thermal panels for exterior decoration of the house
Properties and characteristics of thermal panels
Let's start with the most interesting thing - the characteristics of the hero of our review. What is his highlight, and is there any point in getting involved with him? Here's what we know:
1. It consists of several layers, each of which performs its own functions. We will analyze the detailed structure a little later, but for now we will say that there are usually three or two layers: the base, thermal insulation and the decorative part.
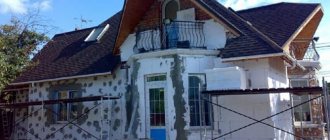
Instant transformation of an old building
2. The panels have a very low level of thermal conductivity.
3. Depending on the type of insulating material involved, such panels can significantly improve the soundproofing characteristics of the room.
4. The material is quite durable and dense, which allows it to be used even in harsh atmospheric conditions. It withstands static and small shock loads well.
Facade thermal panels
5. Manufacturers of such panels promise a maximum service life of thermal panels of 50 years. At first glance, this is a lot, but let’s not rush to conclusions, since this does not apply to all products, and a number of questions also arise that simply need to be answered, which we will do in the next chapter.
6. The material is inert to the biological effects of bacteria, fungi and insects.
7. Temperature changes are not scary for it - the operating temperature range is huge (-170 / +170 degrees Celsius), it can be called extreme.
Clinker thermal panel - front view
It would seem that this is almost an ideal material for finishing and insulating a house, but buyers are reluctant to purchase it, and there is a simple explanation for this.
Pros and cons of thermal panels
So, we have become familiar with the characteristics of the material, these are definitely its advantages, but in most cases these are just numbers that mean little to the average user. Let's now look at the real advantages and disadvantages noted by home owners who have chosen thermal panels for their decoration.
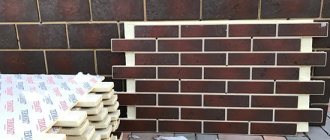
The embroidered thermal panel is externally indistinguishable from brickwork
Let's start with the positive points:
1. First of all, people note the ease of installation. The products are light in weight and have a large area, so the work goes quickly. The material is easy to lift and cut. The panels have locking joints, due to which they are easily joined and held securely.
2. The panels really do a good job of insulating facades. Their use allows you to protect walls from freezing and move the dew point outside. How effective such insulation is can be determined by comparing the type of insulating material used.
3. The products are resistant to moisture, they are waterproof, but water can still penetrate under the finish if the installation is poor.
Products are resistant to moisture
4. The light weight of thermal panels is also important because the load-bearing walls of the building will not experience strong additional loads.
5. The decorative side of the material also does not react to water, practically without absorbing it, and is not destroyed by ultraviolet radiation, which allows the panels to retain their original appearance for many years.
6. Caring for the panels is exactly the same as for ordinary clinker bricks, that is, you can immediately forget about the need for periodic processing and cleaning - a worthy plus.
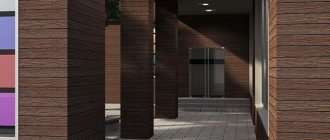
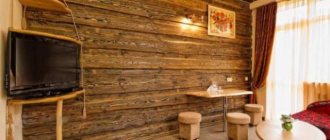
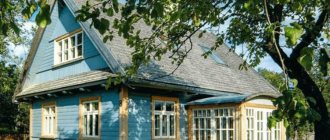
7. The panels are presented in a good assortment. To suit your taste, you can choose options that imitate brick, stone, log or block masonry.
The facade of the house is completely ennobled with thermal panels
So why are thermal panels used so rarely; are their shortcomings really so significant? Actually, yes! There are few of them, but two of them are very serious:
- The main reason is the high cost of the panels. Compared to competitors, the price difference can be two or even three times. What's the point of saving on building materials for your home when you'll immediately spend money on expensive panels? That's right, it makes little sense, so it's easier to make the walls thick with real high-quality cladding.
- The second point is the already mentioned service life of the panels. The promised 50 years are quite realistic, but on the condition that no one touches the panels. Here we mean rodents who will happily make themselves a warm home in polystyrene foam. No matter how hard you try, they will find a loophole, and then the thermal protection of the house can be seriously damaged. In general, the point is controversial. It is worth considering that the promised deadlines are forecasts of technologists, and, as it seems to us, even marketers. The panels appeared on the market about 10 years ago, so nothing has been tested in practice yet.
- Installation requires smooth walls or a level frame. Not to say that this is a complete drawback, but it’s worth keeping in mind.
Installing thermal panels using a dry method is a quick and uncomplicated process
Prices for various facade thermal panels
Facade thermal panels
Video - Advantages and disadvantages of thermal panels
Varieties
Panels for cladding external walls can be:
- single-layer, presented in the form of decorative tiles without additional layers;
- made in two layers - front and cement-bonded or glass-magnesite;
- three-layer - with an additional layer of insulation.
The first and second options are used to make the walls decorative. They are attached to the surface with glue. Clinker tiles for facades with insulation are considered the best option for protecting walls and giving them aesthetic appeal.
The cost of clinker with insulation is much higher than the price of decorative tiles. However, in the first case, the buyer pays for a functional material that provides thermal insulation and decorativeness, which ultimately turns out to be more economical.
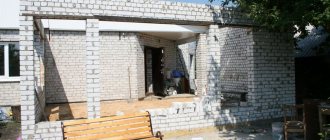
Cladding with clinker panels with insulation. The basis of the material is ceramic, which indicates its fragility. It is necessary to work with it carefully, excluding the possibility of strong impacts. Complex installation of panels is carried out in stages and includes:
- surface preparation with the removal of decorative elements and parts of communication systems, cleaning of old finishes;
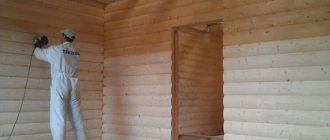
- treatment with antiseptics and primers;
- arrangement of the base for cladding;
- installation of clinker tiles.
Details about the composition of thermal panels
What are thermal panels usually made of? There are two varieties - two-layer and three-layer. Let's look at them in order.
Double-layer panels
Double-layer panels are an affordable type of such material. It is based on extruded polystyrene foam, on top of which decorative elements are glued. It is the insulating part that gives rigidity to the entire structure.
Double-layer thermal panel based on polystyrene foam
This material has the following properties. Service life is 10-15 years (again, provided there is no external influence). The material is not resistant to aggressive environments, which can cause it to deform.
Flammable - when ignited, the flame spreads very quickly and produces a lot of acrid smoke.
Such panels should only be used for installation on a flat base, since their rigidity is not enough for installation on a frame.
Three-layer panels
We actually described three-layer thermal panels when we talked about the advantages of this material. At the base they have an OSB panel, which significantly increases the strength of the material as a whole. In the middle there is a layer of polyurethane foam - this material is also quite strong and dense, along the entire perimeter of the panel there are locks formed on it, which were not there in the previous version - this structure allows you to avoid the appearance of cold bridges. The insulating properties of such panels are higher than those of their analogues.
Structure of three-layer thermal panel
Finishing layer
Both panels have a finishing layer. Usually this is clinker, which, by the way, can be glazed, or polymer elements made mainly of acrylic. Both options have a long service life, easily withstand weather conditions and look beautiful, however, clinker still looks more natural and richer, which is why it costs much more.
Also, artificial stone, ceramics, porcelain stoneware, plastic, metal, and sometimes wood are used as materials for the front side of the panel. The latter panels are very rare and difficult to find for sale. Models for decorative plaster, the role of which is played by glued marble chips, look interesting.
Variety of appearance of facade thermal panels
Interesting to know! To seal the seams between the panels under plaster, a special paste is used, the same color as the panels themselves. If you don’t look closely, you get a completely monolithic surface.
What are clinker panels with insulation?
It is a decorative multilayer tile material with an inner layer of polyurethane foam and marble chips. The three-layer design makes it possible to achieve the most effective protection of the facade from negative climatic factors and ensure good thermal insulation of the walls.
The outer side of the panel acts as a decorative component, presented in the form of stone or brickwork. Excellent moisture resistance and strength are provided by ceramics, which is the basis of clinker.
The production of the material involves placing the front part of the product in special molds, followed by filling the voids with liquid adhesive thermal insulation. Over time, it becomes solid, and the entire structure becomes solid.
The high-tech manufacturing method eliminates the risk of panels delamination. Low-quality material may delaminate over time because production equipment and manufacturing technology did not meet standards. Reliable thermal panels do not have this drawback; they are distinguished by a tight connection of the insulation with the outer ceramic layer.
Difficulties in choosing thermal panels
Like any other material, thermal panels can vary significantly in quality. This depends, first of all, on the components used by the manufacturer and the manufacturability of the manufacturing process. Let's try to give some advice to those who have decided to acquire similar “clothes” for their home:
Tip #1. The manufacturer of the material is very important. Today, the market offers products from many companies, including Russian ones. Which one should you give your preference?
Traditionally, European companies are the market leaders in this segment. They have a complete production process, including all stages - from raw materials to the finished product. In Europe they monitor quality jealously, since the standards of the European Union are modern and more demanding than ours.
You can find a wide variety of facade thermal panels on the market
Almost all manufacturers from Russia, in fact, are not engaged in this very production. The fact is that these companies purchase all the elements abroad, and at their own facilities they only carry out gluing. Actually, they are responsible for it. If there is a defect, it will be almost impossible to make a claim against such a manufacturer.
However, in fairness it should be said that there are reputable companies that work according to all international standards, and there are no complaints about the quality of the goods they produce. These include: Termozit, Plitprom, Regent, Forland, Forska, Ermak.
Ready-made facade thermal panels with yellow clinker tiles
The products of the company Unique Multi Block stand out . This manufacturer does not assemble. All stages of production take place in Russia. The thermal panels produced are of very high quality.
Tip #2. If you decide to buy polystyrene foam panels, then carefully inspect the material - it should not crumble. The seams between the front elements should be even, and the insulation granules should not come out too much, as this will significantly complicate jointing.
High-quality thermal panels
Tip #3. Try not to buy panels with plastic as cladding, as it does not initially look attractive, and over time it can fade in the sun. The optimal solution in terms of price, appearance, quality would be panels with ceramics and artificial stone.
The front part of the thermal panels is made of polymer materials - it doesn’t look very attractive, but the price is low
Areas of application
Clinker panels are used for cladding buildings - private houses, country houses, industrial facilities. You can also use the material to improve structures in local areas and interior decoration. Clinker without insulation is used to add decorativeness to frame buildings, suspended facades with an internal thermal insulation layer, outbuildings, warehouses, and garages. That is, for cladding objects that do not require insulation.
Clinker panels with insulation are used mainly for cladding private houses and buildings, providing excellent protection from the cold. Reliable thermal panels can be used in regions with windy, cold and hot climates.
Installation of thermal panels
We have already mentioned that there are two types of installation - frame and frameless. It makes no sense to divide their description into two parts, since, in essence, they are not much different. Therefore, let's first look at the principle of fastening the panels, and then, separately, let's look at how to set up the frame, if necessary.
Table 1. Installation of thermal panels.
| Photos, steps | Description |
Step 1 - docking order | So, it’s not difficult to understand how individual panels are connected to each other. Protruding rectangular elements are inserted into matching grooves. In this case, each panel is individually attached to the wall of the house. The elements are assembled from left to right. The panels can be laid either in a checkerboard pattern or in a row. |
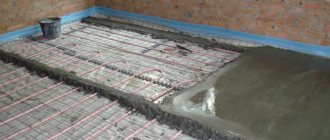
Step 2 – cutting beacons from polyurethane timber | If the wall is uneven, then beacons are installed under the panels at the joints. They must be made of polyurethane foam with a density of at least 120 kg/m³. The use of wood or metal profiles from plasterboard is not recommended, but such a recommendation does not make sense if the panel is three-layered with a rigid base. |
Step 3 – cutting panels | Where the panels adjoin window and door openings, corners of the building, they must be cut. An angle grinder with a diamond disc is used for this. For a high-quality corner joint, a good electric tile cutter with a top-mounted motor will also come in handy. Trimming the insulation is done with a regular hand hacksaw. You can also trim the edge of the tile at 45 degrees with a grinder, but this is difficult, and there is always a risk of chipping. |
Step 4 – connection device | Continuing the formation of the outer corner, it is necessary to make a vertical groove in the polyurethane foam part of the panel using a stationery knife in order to obtain space for the mounting foam in the joining area. |
Step 5 - first row of cladding | A base profile is installed under the first row. A layer of polyurethane foam is applied on top of it under each panel, as shown in the photo. Then the first, previously prepared panel is placed on the left corner of the building. The element is installed with the necessary outlet to ensure a high-quality connection in the future. |
Step 6 - Attaching the Panel | On the front side of the panel there are holes through which it is attached to the wall of the building. It is extremely important to install fasteners into each hole without missing any holes. Fastening is carried out using dowel screws type DK. Interesting to know! Fastening with self-tapping screws without bushings and nails is strictly prohibited. 1. Using a hammer drill, the panel and wall are drilled to a depth 2-3 cm greater than the length of the dowel. 2. The dowel is installed by hand - you can carefully tap it with a rubber mallet so as not to accidentally damage the clinker elements. 3. Then, using a hammer, the dowel head is recessed into the panel until it fits into a special dish-shaped socket, which is located inside the panel. 4. Next, a spacer element (screw) is installed, which must be screwed in until it stops. |
Step 7 - Filling the Holes | It is recommended to fill the holes remaining from the dowels with mounting foam to avoid the formation of cold bridges through the metal screw. |
Step 8 – Filling the Cavities | Then the cavities formed at the horizontal and vertical junction of the panels are foamed. If this step is skipped, the insulation effect will be significantly reduced. It is also necessary to foam the interpanel connections. |
Step 9 – grouting the joints | After installing the panels, all seams must be sealed. For this, various grouting compounds are used to increase the system’s resistance to adverse weather conditions. The color of the grout is selected in accordance with the color of the clinker. The composition is applied with a gun strictly between the tiles, after which it is embroidered with special devices. Attention! Grouting of joints is prohibited at air temperatures below +5 degrees. |
We would like to note that precise joining of panels in the corners may not be necessary if additional decorative elements are used.
Installation on a frame involves placing vertical posts at the locations of the mounting holes. Installation of the sheathing is carried out using the classical method.
- A plane is determined, and the first elements - corner posts - are placed along it. They are attached, like other parts, to direct hangers, and strictly vertically.
- Next, a thread is pulled tightly between them from above and below, which will mark the plane and make it easier to align the remaining racks.
- Then verticals are placed to form the slopes of door and window openings.
- The remaining distance is divided with the necessary steps, the remaining racks are set.
- The panels are installed using dowel screws.
Installation of the panel with dowel screws
Expanded polystyrene panels can be attached to dowel screws, but subject to mandatory foaming, since the panel can be torn off very easily.
Prices for popular models of screwdrivers
Screwdrivers
Advantages of finishing material
Thermal panels are quickly installed - a house can be covered in 2 - 3 days.
Warm facade panels have the following advantages:
- almost zero thermal conductivity;
- strength, density and rigidity, working to insulate the facade;
- simplicity and speed of installation;
- small dimensions;
- vapor permeability - no condensation or high humidity.
The high price is compensated by quick installation and long service life. Self-assembly is possible, which will help save costs on installers.
Disadvantages of use
Despite the abundance of advantages, the material also has its disadvantages:
- The structure is heavy, so strengthening of the façade and foundation is required.
- Fragility during transportation and installation. If a tile falls from a small surface, there is a high probability of cracks.
- Difficult to prepare before installation.
- Despite the favorable cost in comparison with separate insulation and facade cladding, the material has a fairly high price. Production technology makes thermal panels practically inaccessible to the average developer.
DIY making
Before starting work, you need to understand the structure from which the future material will be created.
Thermal panels are made of three layers : facing, metal profile and insulation:
This procedure
will prevent the panel surface from chipping and cracking.
This layer can be created in different colors. The production of terpopanels is carried out as follows:
When exposed to steam, the tiles increase significantly in size. When heated, the mold is completely filled. After this procedure, the tile is ready.
You might be interested in an article on how to make fence posts with your own hands.
Necessary equipment for panel production
Equipment is the main part in making terpanels with your own hands.
Flexible stone manufacturing technology
The production of natural flexible stone requires a lot of labor. Most often it is produced immediately at the site of sandstone extraction - in a quarry. Experts cut off a thin layer of sandstone and glue it onto a textile base. The resulting material is expensive. The price per square meter starts from 3,500 rubles. Not everyone can afford such finishing, and there are few places left with sand quarries in Russia.
That is why there are two ways to develop a business - buying natural sandstone cuts or producing flexible stone yourself. The latter option is more suitable for obtaining a cost-effective and high-quality finishing material. As a result, large investments will not be required to purchase equipment, and the price of the material will not be so high.
Technology for the production of flexible stone from artificial components:
This technology is simple and does not require special skills or large labor costs. Production can be organized on an area of 30 m².
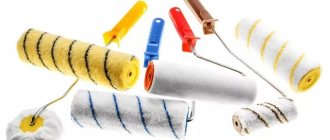
Required Tools
Another significant advantage of thermal panels is that there is no need to use special equipment. You can easily handle the installation yourself.
Here's what you'll need for this:
- marker for marking the facade;
- building level;
- screwdriver;
- hacksaw;
- hammer;
- sealant;
- perforator;
- grinder and diamond disc;
- trowel for applying adhesive composition.
Video description
The following video clearly shows the thermal panels "Belan"
This might be interesting! You can clearly see about high-quality thermal panels from the manufacturer on the website.
We look at quality
When purchasing panels, you must carefully inspect the base material - there should be no crumbling. The front elements must fit well and have even seams between them. The insulation should not protrude too much at the edges.
We think about tomorrow
It is not recommended to purchase panels with an external plastic finish. Plastic itself is not attractive enough to decorate the facade of a house. Let's add to this its significant drawback - susceptibility to ultraviolet radiation. As a result, the panels gradually fade and lose their original appearance.
Thermal panels, the price of which will correspond to their quality and appearance, are models finished with artificial stone or ceramics. You shouldn’t chase cheap polymer materials that don’t look very attractive.
When the result looks more expensive than the money spent Source belanrus.ru