Niche design options
The resulting portal also allows you to implement many interesting solutions:
- Installation of shelves. You can make removable or portable options.
- Placement of a painting or bas-relief. To achieve this, the space is made more open and the appropriate exterior decoration is selected.
- Illuminated glass insert device. To enhance the effect, a pattern is created on the base, which is illuminated in different shades.
- Installation of a mirror covering with decor in the form of electric candles.
The main thing is complete harmony with the style of the room; the fireplace should create an atmosphere of calm and set the mood for relaxation.
How to sheathe a pipe?
Drywall is a unique material; lightweight structures made from it are widely used in interior decoration. Often a chimney is installed above the fireplace portal to give greater authenticity, as well as to decorate the plumbing pipes. If the box will contain water pipes, they must be painted or tested for strength in order to prepare them for conservation.
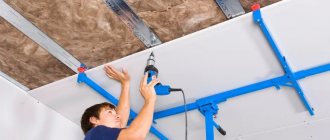
The top slab of the fireplace or floor is mounted on the base of the first contour of the frame according to the markings. The same contour of the required size according to the drawing from a metal profile is mounted on the ceiling. Then these floors and ceilings are connected by vertical guides, which are reinforced with stiffeners. The chimney frame is finished in the same way as the portal body. The presence of a decorative chimney will add rustic features to the interior. Decorating a fireplace in a rustic style will look very nice.
The optimal location of the fireplace with chimney is angular. There is enough space to create an imitation of a real firebox.
Fireproof plasterboard can serve as a frame for a real fireplace when it is necessary to lighten the weight of the structure, but the decor requires large volumes.
To build a box around an existing chimney, it is better to invite a specialist. A number of conditions must be observed to insulate materials from high temperatures and ensure safe operation of the structure. The chimney pipe itself must be insulated with mineral wool and air gaps between the structural elements must be maintained. The reward will be a structure that will add solidity to the interior.
Direct assembly of the main frame
When compared with other furniture options, the TV niche has a separate assembly structure. The only similarity is that it has a main element and additional details of a special figure that have a formative function.
The assembly process itself is carried out as follows:
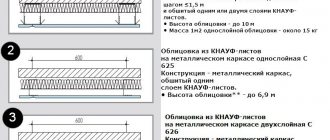
1. Installation of guide profiles. The most advantageous option for optimal load is 50 mm.
2. Approximately 4 rows of guides are nailed to the rough version of the plane, and in the case of continuous sheathing - to hidden plasterboard profiles.
3. An ordinary small podium is mounted at the foot.
4. If there are side columns, it is recommended to duplicate the guides, between which it is necessary to insert special jumpers of the required length; they will be the ones who will determine the depth of the excavation.
There are several profile connection options:
- with the help of bent wings”;
- use of “crab”;
- using a special insert that serves as a possible profile extension;
- The best option is cutters.
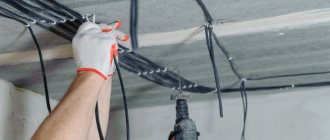
One more point should be taken into account: before sewing the frame, it is recommended to lay all the wires in the internal plane of the structure.
How to make it yourself?
Let's get acquainted with a detailed description of the construction of the simplest structure for those who want to make a fireplace portal with their own hands. Let's look at the step-by-step instructions for installing the box. You will need to stock up on the following materials: metal profile, drywall, brushes, metal mesh, serpyanka, self-tapping screws, dowel nails, a knife with removable blades.
You will need graph paper, a building level and a plumb line, a triangle with a right angle.
- The first step is to determine where the fireplace will be located in the room. We choose the form and function: for installing an electric heater or bio-fireplace, for arranging shelves for decorative items or placing a TV. The height, width, complexity and structural content of the frame depend on these tasks.
- The next step is to complete a scale drawing of the future structure. The drawing shows the diagram of a frame made of a metal profile or wooden bars. In the absence of experience, it is better to take a ready-made project as a basis and make the necessary changes to it. As an example, here is a drawing of a classic portal. The sizes are standard and can be varied as desired.
- Based on the finished drawing, the required amount of profile and drywall is calculated. For complex designs, life-size patterns are made from paper or foam and tried on the wall. A diagram of the portal is drawn on the wall and floor using a pencil according to the pattern and adjusted if necessary. Using the adjusted pattern, parts are cut out from plasterboard.
- Proceed with the installation of the frame. To do this, you will need drywall profiles, self-tapping screws and dowel-nails. The profile is cut into pieces of the required length and the frame begins to be mounted on the wall along the marking lines. The upper guide, the decorative firebox cover and two lower horizontal guides are connected to the vertical posts. The profile frame of the parapet is also made on the floor.
- The next step is to install the façade frame, securing it with transverse strips. When making arched elements, you need to make cuts in the side parts of the profile in 2 cm increments. After this, slightly bend the profile with your hands. If the strength is insufficient, stiffeners are added from sections of the profile. All stages of work are controlled by a building level and plumb line to avoid deviations from the vertical. The parts of the stiffeners are regularly measured and ensured that their location is strictly at an angle of 90 degrees.
This will ensure proper load distribution and will contribute to good performance of the future design.
- After assembling the frame, the electrical wiring is placed. Install switches and sockets. The wires are insulated with corrugation and secured to the wall in places that will then be covered with drywall. For convenient and safe use, sockets and switches are mounted in visible, accessible places. Electronics for controlling LED lighting from the remote control are also located here.
- Start covering with plasterboard. The parts are cut out using a construction knife: the outer part of the cardboard is cut on the front side, the rest is broken. Curvilinear parts are cut with a special hacksaw for drywall. The finished parts are screwed to the frame with drywall screws, which are fastened at a maximum interval of 15 centimeters. A homemade fireplace box is considered prepared.
- The edges of all joints are cut at an angle of 45 degrees to a depth of 0.5 centimeters and glued with sickle tape. Serpyanka is glued to a special putty for drywall. Then one or two coats of primer are applied. After drying, the top layer is leveled with putty to hide defects from self-tapping screws and sickle strips. Dry putty is rubbed over with a metal mesh manually to prepare the fireplace box for finishing.
Two ways to make a false fireplace
We build a fireplace from plasterboard
To build a fireplace from plasterboard we will need:
- profiles;
- plasterboard sheets;
- self-tapping screws;
- screwdriver;
- glue;
- putty;
- decorative elements.
First, we create a drawing and calculate the volume of materials. When planning, you should remember that the appearance and dimensions of the future structure depend on the area of the room. You should not make a fireplace too large for a small room; it is better to install a corner false fireplace, which will also solve the problem of unused space.
Frame made of metal profiles
The location for the future fireplace has been chosen, now you can begin installation. To do this, we make markings on the wall and install a frame made of metal profiles. For stability, we connect the frame elements with transverse jumpers. We check the evenness of all edges of the finished frame with a level and proceed to cutting the drywall.
Next, we proceed to covering the frame with plasterboard. The screw caps should not stick out, so we recess them slightly. After assembling the structure, we seal the joints with putty. First of all, we process the seams, screw heads and corners. We prime everything on top.
Covering the frame with plasterboard
False fireplaces made of plasterboard can be painted or finished with other materials: tiles, artificial stone or stucco.
It is advisable to finish the inside walls of the portal with magnesite or foil thermal insulation
Pseudo-fireplace from old furniture
This option is considered the cheapest. It allows you to create a chic false fireplace from old unnecessary furniture. To work you will need:
- old wardrobe or sideboard;
- Sander;
- plywood sheets;
- jigsaw;
- putty;
- acrylic paint;
- decorative elements (stucco, stone).
A fireplace can be made from old furniture
Remove the doors from an old cabinet or sideboard. Using a screwdriver and self-tapping screws, we cover the facade of the cabinet with plywood or plasterboard so that we get an imitation of the firebox and firewood. If the surface of the sideboard or cabinet is polished, then we process it with a grinding machine to roughen it. Next, we proceed to prime the walls, which, after drying, we putty and level. We paint the surface with acrylic paint and glue decorative elements. The corners can be trimmed with artificial stone or brick.
Now we make the combustion hole. To do this, place a yellow or red LED strip at the bottom of the firebox (along the perimeter) and lay out shells, pebbles or colored sand.
Preparing the base
Considering that fireplaces are fire hazardous equipment, preparation of the floor and adjacent walls should be provided before covering the fireplace with fireproof plasterboard.
Floor preparation
The fireplace insert has a significant mass. Plus is equipment with an increased fire hazard. Therefore, at the first stage, a concrete base is prepared:
- The portal is marked on the floor.
- The formwork is being installed.
- The base is primed and filled with concrete.
- After hardening, a podium is laid out (4 rows of brickwork). Then install metal corners under the firebox.
- Lay the final level of masonry.
The whole process is carried out strictly according to the level. A misalignment of the foundation and podium will cause problems with the quality installation of the firebox.
Preparing the wall
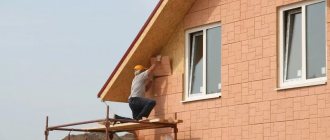
The simplest option is when the adjacent wall is made of aerated concrete, foam concrete blocks or bricks. In this case, it is plastered and whitewashed. If the adjacent wall is made of flammable materials (logs, beams, etc.), then the following work is performed:
- Treating the wall with fire retardant compounds.
- Fastening a foil-coated basalt slab to a metal profile. A ventilation gap is required between the wall and the facing slab. The dimensions of the protective screen should be 500 - 600 mm larger than the dimensions of the future furnace.
- Fixing drywall, which is puttied, and clinker or porcelain tiles are laid on top.
Other options: asbestos board, magnesite. If the equipment will be installed in a corner, the joint between the walls is treated with a special fire-resistant sealant.
The same thermal insulation is also applied under the chimney. You should know that the gap from the fire-resistant wall to the rear surface of the firebox must be at least 100 mm, from the combustible surface - at least 700 mm.
The final touch: fireplace decor
A decorative portal on the wall or in the corner of the room can be supplemented with candle flames by installing a bio-fireplace with real flames in the firebox or by placing a heater there, stylized as burning logs. In any case, an artificial hearth will look no worse than a real one, and can perform the functions of a decorative element in the interior even better. After all, to light a fire you will not need either wood or coal, which can stain the carpet or floor.
It is not enough to just build a fireplace with your own hands from plasterboard. It is also necessary to decorate the finished structure. A few photos will help you choose the desired design style and make a reliable frame suitable for a specific interior.
The sufficient strength of gypsum board allows you to decorate the hearth even with materials such as imitation wild stone and tiles. Tip: the easiest way is to buy ready-made stucco molding from polystyrene foam.
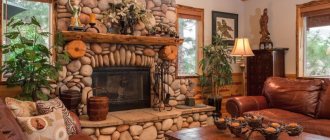
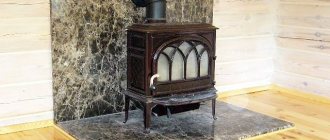
Fireplaces for a rustic-style interior (photo in Fig. 3) can be covered with light tiles that reproduce the surface of rocks. Before finishing, cover the surface of the gypsum board with putty for better adhesion of the tile adhesive. Installation of tiles is carried out according to general rules:
- stick the elements;
- dry;
- perform grouting and jointing (if necessary).
The tiles are fixed in the same way. For interiors in bourgeois style, you can find tiles that imitate tiles in trade organizations. Such fireplaces can be complemented with stucco molding painted in shades of paint on the tiles.
Interior products: polyurethane molding
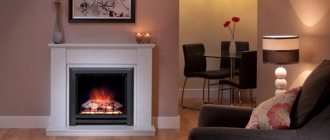
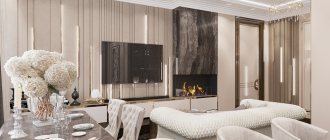
The greatest scope for imagination is provided by the classic style. Polyurethane foam and plastic moldings, baseboards, and stucco moldings allow you to create masterpieces in the Rococo and Baroque styles, as in the photo (Fig. 4), turning your apartment into palace apartments. This design of fireplaces should be approached very responsibly, trying to combine the appearance of the hearth and other furnishings.
Depending on whether you plan to use the fireplace as a decorative element, or whether you want to receive some heat from it on winter evenings, it’s up to you to decide, but you can choose to imitate different types of flames. The portal looks elegant, in the firebox where the bio-fireplace is installed. Such design will 100% comply with fire safety rules.
How to light a fire in a fireplace?
You will probably think that lighting a fireplace is the easiest task - throw in a couple of branches, papers, bring a match and here it is - beauty. In reality, everything turns out differently. The first fire can tell you a lot.
After manual construction, if you suddenly doubt the effectiveness of your miracle fireplace, call a specialist to the site for an assessment and initial heating
Otherwise, there may be a strong risk of ignition if installed incorrectly, as in the 2021 American film “Manchester by the Sea,” where the main character inadvertently burned down the entire house by throwing in a couple of extra firewood. There are other pitfalls that may emerge after a short time
Still from the film Manchester by the Sea (Manchester by the Sea) burning house
There is no need to rush things when it comes to the finish line. Your efforts may be ineffective, so read one of our articles in advance on how to properly light a fireplace.
In conclusion, check out this funny video of a Dalmatian and a horse having fun against the backdrop of enchanting flames - relaxation is guaranteed.
https://youtube.com/watch?v=UTxsZn7ZVkg
What is a false fireplace and its features
The name of the structure made from lightweight materials speaks for itself; a false fireplace is a well-decorated portal that lacks a chimney and many of the real attributes of a firebox. The combustion process can be supported only with the help of candles or can be painted on the back wall, and the atmosphere itself is created by various additional elements.
The main advantage is the ability to use available tools and minimize construction costs. Creative focus and imagination will allow you to do without the involvement of specialists. Any niche in the room that is at eye level is suitable for installing a fireplace window.
.gif" />
.gif” />Types and best design secrets. Fireplace in a plasterboard wall
You can arrange “fake fireplaces” in different ways. Common and popular types:
- Corner
- Fireplaces hidden in wall niches. Most often they have the parameters of the originals
- Protruding straight structures
- Figuratively carved fireplaces, completely painted or pasted on the wall
The materials used also differ. The most commonly used sheets are plasterboard, plywood or chipboard.
The designers' ideas also differ from one another and emphasize individuality and personal vision. In this direction you can create real masterpieces.
The choice of finish, design, and style depends on aesthetic preferences, the availability of free space around the fireplace, and the amount of financial investment. But the latter does not always indicate beauty or practicality.
Expert advice will tell you how to decorate a fireplace made of plasterboard, but you will have to make the final decision yourself.
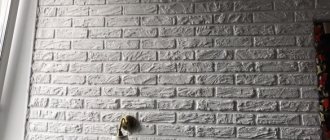
- It is recommended to make the portal simple, without any special finishing tricks. In general, traditional sealing of seams, painting or pasting with film or tiles is sufficient. Ideally smooth walls look beautiful in combination with the curves of fiery tongues
- The foot in the form of a step, lined with artificial stones, will perfectly highlight the basis of the composition and serve as a stand for large and small accessories.
- A shelf is a type of fireplace composition with a small protrusion that has a practical purpose. A plasterboard fireplace in the interior becomes a storage place for aromatic oils, lamps, and candles
Dry firewood is a significant decorative element. White birch logs laid out on a metal grate with bottom lighting will remind you of romantic meetings. A live fire from candles will also decorate the living room well. For greater safety, it is easier to use closed lights.
.gif" />
.gif" />
Step-by-step instructions for making your own from plasterboard
Creating a portal for a fireplace from plasterboard with your own hands is not a difficult, creative, and interesting task. Materials for it are sold in almost all construction stores; tools can be bought or rented.
A plasterboard fireplace is a portal in the shape of a real hearth, but the structure remains hollow inside.
Deciding on the interior design
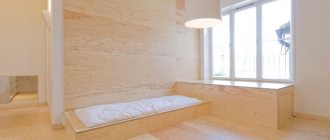
At the very beginning, it is recommended to decide on the design of the structure - the object should optimally fit into the existing interior design. It will be a “antique” fireplace decorated with stucco or covered with silver paint in a high-tech style, a simple minimalist design in white color or covered with imitation brick in a loft style. Sometimes the object is lined with flexible artificial stone, or covered with a film to imitate marble, granite, onyx and other stones.
In appearance, such a portal, with appropriate finishing, is no different from a traditional solid fireplace.
Choosing a suitable location
The fireplace can be installed in any convenient location. A niche in the wall, a free corner, just an empty, flat wall or a large protrusion (at least a meter wide) on it is suitable for it. The product is hung from the wall, placed in the middle of the room, and mounted on a pedestal. The installation site is leveled and freed from all unnecessary things.
Drywall frames are used for arranging decorative portals and for placing an electric or bio-fireplace inside the structure.
We make drawings with dimensions
After creating a preliminary sketch, you need to depict the view of the hearth from different sides to determine what details are needed. Afterwards, full-size drawings are transferred directly to the material.
Building a decorative or conventional portal for a fireplace with your own hands is a fairly simple technological process.
We create a full-fledged project, layout
For a more accurate idea of what the finished fireplace will look like, a miniature mock-up is created. Any scale is acceptable - one to three, one to five, one to eight, etc. The project notes the overall dimensions, thickness of parts, cut of the internal part and other important points.
A frame is erected from a metal profile or wooden blocks, and the top is covered with plasterboard according to the pattern of the structure.
Necessary tools, materials
To work you will need:
- screwdriver;
- perforator;
- ruler;
- iron tape measure;
- square;
- building level;
- a simple pencil;
- jigsaw;
- sheet of drywall;
- metal guides;
- self-tapping screws;
- PVA glue;
- putty;
- finishing coating.
Tools you will need for your work.
Preparation, marking
Before installation begins, the installation site is marked, indicating the location of the support strips, top shelf, and extreme side points. Average dimensions of a pseudo-hearth for a room with an area of 10-16 square meters. m.: height 770-90 cm, width 100-120 cm, depth 25-45 cm.
The thickness of the drywall is selected based on the required load-bearing load.
Frame assembly, installation
Installation of the product begins with the installation of pedestal supports. Later, horizontal jumpers are attached to it. Afterwards the main part is installed
It is important to maintain the parallelism of the supporting parts with each other - otherwise the distortion of the structure is inevitable
Drywall is the basis for any finishing material.
We make the arch of the fireplace chamber
The “insides” of the fireplace structure are assembled separately. If the portal is arched, to create it you will need flexible perforated profiles that are laid along the contour of the already cut parts.
Heat-resistant plasterboard is an excellent material for bio- and electric fireplaces.
Sheathing
After installing the frame, the fireplace is covered with plasterboard. Self-tapping screws are used for this - they should be screwed in so that the caps are slightly buried in the material and can be easily puttyed, completely hidden from view. On such a flat surface it is easy to apply a finishing coating and glue three-dimensional props.
The shape of the portal depends on the chosen design style.
Portal cladding
It is possible to finish a plasterboard structure with a variety of materials. These are ceramic tiles, various paints, decorative plaster, self-adhesive films with images of bricks or fancy designs. All kinds of ornaments and hand painting are also acceptable.
The advantage of decorative and electric fireplaces is that their construction does not require paperwork for a building permit.
Decorative finishing of the fireplace: 8 materials for facing the fireplace photo
It is better to buy tiles with a margin of 10-15%, and you can purchase not only standard format products, but also corner elements. Installation does not require special skills or the use of specific tools: Tiles are the most popular way to decorate a home. You cannot use ordinary tiles - they will not withstand high temperatures. As a rule, the following types of ceramic tiles are used for facing a fireplace: Many manufacturers offer both base and finishing plaster. The first is applied in a layer of 10 mm, intended for rough finishing and preparing a flat base. The finishing layer is applied with a thickness of 3 mm. This is not even finishing in the traditional sense of the word.
In this case, there is no question of installing some kind of facing material on top of the fireplace. The brick from which the fireplace is constructed is finished accordingly. This is both the simplicity and complexity of the method.
- resistance to high temperatures, the ability to “breathe with the fireplace;
- high heat transfer and the ability to accumulate heat, which increases heat transfer;
- moisture resistance, frost resistance, resistance to sunlight;
- ease of care;
- durability;
- environmental friendliness, no odors when heating;
- chic appearance and ample choice.
The frame should be sheathed with plasterboard. This is a lightweight material that lends itself well to cutting. He is easy to work with. The technical characteristics of the material are such that it is used not only for decorative purposes, but also for the construction of non-load-bearing partitions, suspended ceilings, wall cladding, to create columns, arches and other structures. High-quality plasterboard sheets, made in accordance with GOST, are durable and can withstand additional weight.
The dimensions of the fireplace in the apartment must correspond to the overall space of the room in which it is located. Large fireplaces are suitable for a large room; small designs will look appropriate in a small room. A false fireplace is often installed in the hall, living room, kitchen, bedroom and even bathroom.
It is sometimes used as a TV stand. The fireplace, depending on the interior of the room, can be decorated in a classic, modern, rustic, English, or hi-tech style. For heating structures, the most rational choice is metal fireboxes.
A wide selection of similar products, as well as their custom manufacturing, allow you to choose the best camera option. When choosing, they are guided by the estimated design of the device, the place and method of its installation, the type and size of the fireplace. From the options offered by manufacturers, you can purchase fireplace inserts: Drywall is considered the preferred material for the manufacture of hinged and suspended structures. But some of its brands are also suitable for non-standard applications - the construction of a full-fledged fireplace.
How modern heating structures are made using these sheets, what they are like and how the facades are finished - we suggest you find out in this publication. Decorating with decorative self-adhesive film is a simple, relatively cheap option. The variety of textures and patterns allows you to choose one that suits any interior.
On sale you can find imitation marble or granite, bog oak or wenge, brick or plastered surface, straw or bamboo. First, using a building level, markings are applied to the wall. The guide elements are measured, marked, cut and attached to the wall using a puncher and dowels.
The frame is usually made of a metal profile, less often - wooden slats or timber. Wooden is practically not inferior in strength to aluminum or steel; it is used when it is necessary to reduce the weight of a structure to the maximum possible minimum. Metal is more expensive, but holds the shape of the product better.
- Preparatory stage - development of a sketch, selection and purchase of tools and materials, preparation of the site.
- The stage of creating a base, a base, is the construction of a structure frame from a metal profile or timber, finishing the fireplace with plasterboard.
- Finishing - decorating the appearance of a false fireplace, working with the firebox, creating a suitable space around it through the use of suitable accessories (pokers, candelabra, candles).
An original solution can be considered wallpapering the fireplace. You can choose vinyl wallpaper with high-quality relief, on which imitation brick, stone, or arbitrary ornaments and patterns will be painted. Wallpaper looks impressive on a false fireplace and goes well with the paintings on the walls of the room.
Another type of portals for fireplaces that do not have a chimney, but which have a heating element, are electric and biofireplaces. They also use plasterboard cladding. A heat-resistant analogue is used here; it differs in its composition.
Fireproof properties are enhanced by a special layer of clay and reinforcing fiberglass. In the middle part, the sheet is equipped with crystallized water up to 20 percent of the mass of the material. Externally, it is easily distinguished by the pink color of the cardboard.
The classic wall portal is simpler in design. For complex original flash fireplaces, a foam model is first made. For beginners, it is better to study the selections on construction sites and evaluate their capabilities.
- firebox for burning wood;
- a smoke collector through which smoke enters from the firebox into the exhaust pipe;
- portal decorated with decorative material;
- chimney guaranteeing draft
The built-in fireplace has a chimney and firebox in the wall masonry, which requires the use of a significant amount of facing material. It protrudes outward in thickness by no more than half a brick. Designers prefer to use the same material for finishing such a fireplace that was chosen for wall cladding.
Portal for an electric fireplace made of plasterboard
In order to make a beautiful portal from plasterboard, you need to carry out all your actions clearly according to this list:
- We purchase an electric fireplace and measure its dimensions.
- We determine the place where the future fireplace will be located.
- We make a drawing with images of the frame and appearance of the fireplace.
- We make markings on the walls and floor.
- According to the drawing (dimensions), we cut the metal U-shaped profile (UD or CD) into pieces and assemble the frame using self-tapping screws, starting from the support frame near the wall.
- We check the correctness of the lines with a building level and a tape measure (diagonals).
- We mark and cut the sheets of drywall and use self-tapping screws to attach them to the finished frame in two layers.
- In a similar way, we assemble the base of the future fireplace portal and the mantelpiece from plasterboard and a metal profile.
- We attach the mantelpiece and the base with screws and glue (or silicone).
- We putty all the joints and holes in two or three layers, smooth out the unevenness with an abrasive mesh until absolutely smooth surfaces are obtained.
- We putty the surface and start decorating the portal using self-adhesive film, paint, gypsum stucco elements, decorative plaster or other materials necessary to create the stylistic design of the fireplace portal.
Finishing the fireplace portal with artificial stone
Artificial stones have a number of advantages. The appearance can imitate granite, malachite, sandstone, marble and other natural stones. Artificial stones are divided into three groups: porcelain stoneware, agglomerates and colored concrete stones.
The process of finishing a fireplace with decorative stone
Before purchasing material for constructing a fireplace portal, you should pay attention to:
- the thickness of the purchased stones (this affects the dimensions of the finished structure);
- frost resistance and percentage of water absorption;
- repeatability of elements (optimally 3 m2).
Preparation stages:
- We create a sketch of the future portal, drawing all the elements and taking into account the color scheme.
- Open several packages and mix them. Clean the side of the stone that will come into contact with the adhesive mixture and the wall with a wire brush.
- Using a brush or roller, apply acrylic primer to the cleaned surface of the stones.
Styling:
- We lay out the design on the floor according to the sketch (for cutting we use a grinder with a cutting wheel).
- Using a brush, moisten the surface of the fireplace and stones.
- We start laying from the top corner, initially using whole elements and taking into account the thickness of the seams. The rows alternate larger stones with smaller ones. Accordingly, elements of smaller thickness are chosen for the upper rows, and greater thickness for the lower ones.
- We carry the adhesive solution and level it with a spatula. We maintain a layer of about five millimeters.
- We press the stone to the surface and slightly scroll in different directions.
If necessary, we make jointing and apply paint and a protective coating to the front part of the masonry.
We use a tin profile
Tin profiles are easily attached at intersections in one plane. The elements are connected using small self-tapping screws using a screwdriver or similar attachment on a drill or screwdriver. When making plaster fireplaces using tin profiles, evaluate your metal handling skills. Bends or breaks in the profile are made along the line of cuts in the side flanges. They should be made with an angle cutting machine with a metal cutting disk installed on it. You can use a jigsaw with a metal file.
All cuts are made in clearly marked places to ensure that the front side of the profile is bent or folded exactly in the required place. When assembling a fireplace from plasterboard with your own hands, you will have to stock up on marking tools:
- square
- building level
- tape measure, construction ruler or laser tape measure
- construction marker for making marks and lines
The main requirement for the results of the work is that all surfaces must present a perfect plane.
Having completed the frame, we begin to create the surface. It is necessary to install sheets of drywall on the future fireplace. They are cut according to the configuration of the plane being closed. For pruning, you can use a construction knife, a hacksaw with fine teeth, or a cutting machine. The material cuts and breaks very easily. It is enough to draw a fault line and gently press along it along the loose side of the sheet. Drywall is attached to the frame with self-tapping screws, the length of which is about a centimeter greater than the thickness of the sheet and a diameter of about five millimeters.
After installing the sheets, you can putty the joints and seams using putty tape. This is not necessary if the surface is not subsequently painted or covered with film. Attention should be paid to careful alignment of the ends of the sheets facing intersecting planes. Do not forget that the lining of the fireplace insert with plasterboard should not be continuous, since electrical appliances installed in it need to remove heat. It is necessary to leave ventilation holes at the top of the structure.
The influence of a plasterboard fireplace on the layout
At the same time, the decision to install a fireplace in your apartment should not be taken lightly. Wrong decisions will turn advantages into disadvantages, and an unnecessary pretentious shelf for trash and dust will be piled up in the corner. Therefore, we have prepared information on how to make a fireplace from plasterboard, in order to expand your design horizons.
First, you should carefully consider the changes in layout that the fireplace will cause and choose a suitable location. Based on your conclusions, think about the shape and appearance that you would like to see.
The simple design of plasterboard fireplaces reveals the limitless possibilities of this material. Don't get hung up on grave granite, the brick splendor of old England fences, or marble covered in bronze to look like gold. There are many other stylistic choices that can be fun to explore.
Simulated fire vs natural flame
The home comfort industry offers several options for simulating live fire with varying degrees of authenticity. From a full-fledged picture of a fire to an almost completely identical process of burning birch logs with smoke and flame. The dimensions and characteristics of the selected equipment will allow you to determine the dimensions of the plasterboard fireplace required for installation.
1 - electric fireplace; 2 — imitation of fire; 3 - portal decor
This is much better than the real soot, soot, firewood and drafts of a real fireplace. The question of choice is only the amount you are willing to pay for it and the goals you want to achieve. An electric fireplace, or combustion simulator, is that part of the structure that will have to be purchased ready-made. You won’t be able to make it yourself, and there’s no point in experimenting. But decorating an electric fireplace with your own hands will allow you to show creativity.
Start of installation work
The experience of using plasterboard in interior decoration can be expanded to interior elements. Making fireplaces of the desired appearance with your own hands is a completely feasible task. Make a drawing and put the main dimensions on it. Many people neglect this stage, making a big mistake at the very beginning of the matter. Three sets of work are conventionally distinguished:
- frame manufacturing
- covering the fireplace with plasterboard
- finishing
The frame can be assembled from a tin U- and L-shaped profile or from wood. It is difficult to say which is preferable; it all depends on the dominant skills of the performer. The advantage of tin can be considered that it allows you to easily reproduce a broken and even bent surface.
Fireplace insert
The firebox is the place where the combustion process of solid substances (coal or wood) directly occurs. Do-it-yourself finishing of the fireplace insert can be done:
- Plasterboard for finishing the fireplace insert is used only in the construction of false fireplaces. But, as a rule, there are exceptions to the rules. Drywall may be needed if the surface of the firebox needs to be leveled.
Advice. For such work, only a certain type of drywall is used - moisture resistant.
- During the work, it is worth noting that the size of the firebox may decrease. All this is due to the fact that drywall is attached to a metal frame. It is made on the surface from special profiles.
To install drywall, use:
- But here some difficulties may arise with the installation of the material. There are hard-to-reach places in the fireplace. It is for this reason that it is worth using a cordless screwdriver.
Drywall in the decoration of a false fireplace
- Finishing the fireplace insert with plasterboard can be used if it is necessary to significantly reduce the size of the firebox. This happens if the fireplace is quite large.
- When using drywall, it is necessary to initially consider the finishing inside in order to protect the material from the negative effects of fire.
For this you can use:
- A natural stone.
- Decorative rock.
- Ceramic tiles - in rare cases.
Finishing a fireplace insert with plasterboard will not be difficult. You can carry out the entire process of installing the material and then carry out the finishing work yourself.
Application of bricks
Brick lining of fireplace insert
As a rule, brick is used if the fireplace structure itself is built from this brick. In this case, the firebox is built together with the entire structure of the fireplace; such a firebox does not require additional finishing. Brick is also used when the entire structure of the fireplace is made of another material that cannot withstand temperature effects or is flammable. It could be:
- Tree.
- Drywall is not fire resistant.
The firebox and the chimney itself are built from it inside the structure. For safety, it is necessary to maintain a certain distance from the brick to the fireplace box. It should be at least 20-25 cm.
Using ceramic tiles
Ceramic tiles are rarely used for interior decoration of fireplace inserts. As a rule, it is glued to a flat surface. Most often on drywall. The installation is quite simple. In order to install ceramic tiles you must have:
Characteristics of ceramic tiles:
- Ceramic tiles are high-quality fire-resistant material. In order to carry out its high-quality installation, concrete mortar or special construction adhesive is used.
- To ensure that the distance between the tiles is uniform, it is necessary to use cross-shaped beacons that are inserted between each finishing element.
- After the installation of the tiles has already been carried out, a special product is used to mask the seams - decorative putty, which has a large selection of colors. Choosing a suitable option will not be difficult.
Useful tips from professionals
Construction of a box for a decorative portal requires patience and some skills; at the first stage, advice from professionals will be useful. The most interesting and artistic part of the work is the finishing of the front part.
The traditional way of decoration is wallpapering. Wallpaper hides surface unevenness well, and one layer of putty is enough. The wallpaper is selected to match the tone of the walls from one collection, using a border with an ornament to decorate the facade. The option of covering the box and walls with the same trellises looks good only in fashionable, stylish interiors - Scandinavian, minimalism, hi-tech. In this case, it is better to prefer monochromatic colors. A fireplace covered with floral wallpaper or with monograms looks out of place.
Decoration equipment
But what about the flame?
Without it, a fireplace is not a fireplace. The beneficial effects of contemplating dancing tongues of fire have been genetically ingrained in us since prehistoric times. A fire in a cave meant the well-being and safety of the tribe. But you can’t light a fire in a city apartment. Modern firefighters do not understand primitive psychology. Should you make a tacky dummy or buy a ready-made one made of plastic? Put candles in the firebox? This is all wrong.
There are such things on sale - electronic photo frames. This is an LCD display designed to display pictures. The control electronics of such a frame are much simpler than those in a computer or tablet, which is why frames cost much less than computer displays. Many models of electronic photo frames allow you to display moving images in the form of animated GIF files, etc.
With the help of an electronic photo frame, the appearance of your apartment “hearth” can be changed every day, depending on your mood. And with some simple manipulations, a fireplace can even become an aquarium.
The price of an electronic photo frame is largely determined by its memory capacity and set of service functions. But we don’t really need them for the fireplace! We need to show just one animated picture: dancing flames.
Under this condition, a frame with a diagonal of 17” (40 cm) made in China will not put a burden on the family budget, and 40 cm diagonally is the size of the firebox of a quite decent-looking fireplace. If more is even better. And keep in mind - the frame with the flame will be in the depths of the artistically decorated niche for the fireplace. Such an imitation of a fireplace can mislead anyone, but will give you the complete illusion of a real flame.
And yet, for many, the most acceptable option for decorating a fireplace niche is to place candles in it, so let’s not write off “live” fire.
Work structure
Some stores provide ready-made portal layouts that do not require lengthy installation or repair work. However, such solutions are quite one-sided and do not allow imagination to unfold, contributing to the creation of a typical fireplace that is unlikely to please the eye. An alternative to buying angular and not very beautiful prefabricated structures is to build a full-fledged portal yourself. However, for this it is necessary not only to have some practical skills in working with materials, but also to have spatial thinking.
The structure of work to create such an object is as follows:
- preparatory work;
- collection of tools;
- construction of the frame;
- portal cladding;
- decoration.
The above steps are an integral part of constructing a portal with your own hands from plasterboard. Today, such a solution is one of the best, since it does not involve large material costs and does not require much time.
The key feature of construction work is preparation aimed at creating optimal conditions for the construction of the facility. In the case of our construction, it is based on the following:
- determining the location for installing the fireplace;
- clearing the area, preparing surfaces;
- creation of a basic construction plan.
We decide on the place where the portal will stand.
Based on these principles, building a full-fledged portal for an electric fireplace will not be difficult. At the very beginning, you should decide on the location of the fireplace system. Choosing it is not as difficult as when building a full-fledged stone fireplace, when it is necessary to strengthen the foundation and prepare a fire-resistant base, but still there are some nuances in this matter. The best place to install an electric fireplace is a wall in the back of the house or even a corner. In this case, the appearance of the fireplace will not be blocked by daylight, and the entire interior will become more cozy and comfortable.
This solution will create optimal prerequisites for the construction of the system, and will also make it possible to carry out construction work more quickly and accurately.
Drawings and their creation are an integral part of preparation. It is the creation of a plan that makes it clear what the finished object will be like, its geometric proportions and aspect ratios, as well as determine its shape and preferences for finishing.
Decorating with plasterboard
Finishing a fireplace with plasterboard is one of the simplest and most budget-friendly options.
In order to carry out such a design, it is enough to simply sheathe a metal or wooden frame with sheets of this material. Its main advantages and features include:
- Low cost;
- Easy installation;
- Minimum time costs;
- Possibility of giving any shape;
- Light weight.
Design selection
Let's start with the fact that the first step is to establish in which place in the room the fireplace should be installed.
If you turn to a professional designer who is drawing up a design project for you, then this specialist will figure out where and what to install and how to place it.
But if you have taken on its role, then when creating the interior you will need to take into account some rules for installing a fireplace.
Everything will depend on the size of the room where it will be placed. If the room is small, then you can use two options: corner and in the form of a niche, slightly protruding from the wall.
The first option has several advantages:
- Small sizes.
- Does not take up useful space in the room.
- Fits well into the design.
- Can be used as a decorative shelf or cabinet.
The only negative is that the corner option cannot always be used. Usually the corners of the room near the window are covered with curtains, on the opposite side there is an entrance door in one corner, and on the other side the fireplace is not so clearly visible.
Therefore, it is best to give preference to the usual front element. Moreover, it is possible to build a small structure that will fit well into the interior of the room and will not take up much space.
This is interesting: Baroque style in the interior - undisguised luxury and wealth
Design
This is the very first stage, during which several important points should be taken into account, especially for functional fireboxes:
- It is necessary to determine the location for the equipment in the room relative to the walls and furniture arrangement. At the same time, do not forget about fire safety: the distance from flammable surfaces to the firebox is at least 700 mm.
- The base for the equipment is recommended to be made of concrete with a height of 300 mm. The perimeter of the foundation should extend beyond the dimensions of the firebox by 250 - 300 mm on each side.
- The recommended gap between the firebox and the plasterboard structure is 50 mm.
- An air vent box should be provided.
- Podium. The design must provide air flow for heating and support the weight of the firebox.
- The thickness of the fireproof wall finishing and a technical gap of 100 mm between it and the firebox.
- To accurately determine the dimensions of the portal, you should take into account the parameters of the facing material: profiles: guide – 27×28 mm and rack – 27×60 mm). For cladding, it is recommended to use fireproof or moisture-resistant plasterboard with a thickness of 12.5 mm.
- The design of the portal and its decoration should fit organically into the interior.
The listed parameters will help you avoid installation errors.
Imitation of fire in a fireplace: design options
Decorative home hearths made of gypsum plasterboard require compliance with fire safety standards, since such a design is designed exclusively for artificial fire.
There are several ways to create an artificial imitation of fire
Most often, craftsmen use the following types of fire imitation:
- Use of steam.
- Creation of "theater fire".
- Use of salt lamps.
- Installation in the TV hearth.
The most difficult way to create a decorative flame is with steam. Not everyone can create such an imitation, because it will require a specific set of components and special equipment, as well as skills in working with electronics.
To make a fire of this kind, you need to prepare:
- DMX controller.
- Fan with a diameter of 9 cm.
- LED RGB lamp.
- DMX decoder.
- 3 ultrasonic fog generators.
These devices must be selected according to the parameters of the built fireplace, the layout, as well as the manufacturer and characteristics. It all depends on what initial result the master wants to get. All these devices are included in steam electric fireplaces, as well as concert electrical devices that create the effect of steam.
If the master wants to use exactly this method of simulating a flame, it is important to provide the necessary parameters for the components and mount the fireplace of the required size. The operating principle of such an electric fireplace looks like this:
The operating principle of such an electric fireplace looks like this:
- A fog generator should be placed at the bottom of the container into which water is previously poured.
- The generator has a membrane that creates vibrations at a specific ultrasonic frequency, providing reduced pressure. Therefore, it turns out, one might say, a vacuum and the water evaporates at room temperature.
- Thanks to this, the steam rises.
- The top is illuminated by an LED lamp.
- A diaphragm is installed above the structure.
Assembly using technology will make it possible to create a more natural imitation of flame yourself in a false fireplace. The second way is the theatrical option. As is already clear, this method is used in theatrical circles for various kinds of productions. However, it is also suitable for making a dummy, imitation of fire.
To make such an imitation yourself, you need to prepare the following items:
- A piece of light white silk fabric.
- 3 halogen lamps with reflectors.
- Silent, powerful fan.
- 3 filters: red, orange and blue.
- A box or a special bowl for assembling a false structure.
When everything is prepared, you can begin assembly according to the following scheme. A fan should be installed at the bottom of the box or bowl. The cord must be routed out. Next, you need to attach halogen lamps to one axis so that the light is directed upward. Then, at a distance of 20 mm above the lamps, you need to install light filters.
The next step is to attach the flaps to the box, bowl along the edges of the fan. When you turn on the fan in the power supply, not a real fire will appear in the fireplace, but very similar to a natural one. This method is quite simple and makes it possible to create an almost real, mesmerizing flame in the fireplace.
What to paint with?
The more preferable method of finishing an artificial fireplace is painting. To do this, apply a primer to the rough layer of putty. After drying, a finishing putty is applied, which is rubbed with a fine mesh until a smooth, even top layer is obtained. Then comes another coat of primer for painting. The paint is applied in two or three layers, less often in one.
The modern generation of water-based acrylic paints have good technical characteristics, dry quickly, are odorless, and can be tinted to any desired shade. The acrylic paint coating is not afraid of moisture and can withstand several wet cleanings.
Oil-based paint is more resistant to external influences and temperature changes. When installing a fireplace with a heating element, you must choose a composition with a fire-resistant component. Interior acrylic paint is available in glossy and matte versions. Gloss gives a beautiful shine to the surface; if you use the marbled painting method, where beautiful stains are specially created, you need to choose this type of paint.
For classic fireplaces with stucco, it is better to opt for a matte structure; it gives a silky effect.
- Painting is a traditional way of finishing a stove or fireplace. With its help you can get any decor option, from artificial marble to a shiny metal surface. Bronze, gold, and silver components are used to give stucco a gilded effect. Pilasters, rosettes and moldings made of polyurethane foam are glued to the façade and painted white, green or blue. A gold stripe is applied to the carving of the pattern with a thin brush; it does not have to be perfectly smooth. Small changes in the width of the gilding will add an expensive handcrafted look to a classic palace-style fireplace.
- Portals made using the technique of “artificial aging of the surface” look very interesting. This decoration will decorate the interior in the style of shabby chic, loft, Provence. The technology of work is as follows. The first layer is painted with an active bright color. After drying, cover with pastel-colored paint. Next, you can apply one or more pastel layers of a different color. After waiting for complete drying, lightly rub the surface with sandpaper so that the lower layers of paint begin to show through. A vintage fireplace will take on the appearance of noble antiquity.
- It is worth paying attention to such painting techniques as applying patina and artificial cracks. Patina is a very thin layer of shiny gold, silver or bronze paint applied over the base color. Then the gilding is lightly rubbed down with sandpaper, creating the feeling of a very old valuable item. Artificial cracks - craquelure - are made by applying several different layers of color.
- On top, everything is covered with a special varnish, which cracks, lifting layers of paint behind it, resulting in a very interesting “antique” texture.
Dream come true!
Layout
Work should begin with the manufacture of the box. We can safely say that this stage of work is the most important, because already at this stage the foundation, strength and stability of the future fireplace are laid. As a rule, the frame is made of UD and CD profiles. First, from a design drawn on a piece of paper, transfer the outline of the fireplace to the wall and partially to the floor. In this case, use a level, thereby achieving accuracy
Profile frame
When the entire frame is ready, you can begin covering it with plasterboard. After this, each formed joint is covered with a special putty.
If you want to make a footstool, you will need to additionally build a frame for it from a profile. Subsequently, logs can be placed on this foot as decoration.
Before installing an electric fireplace, you will need to thoroughly putty the entire structure. After grouting, the fireplace will be ready for finishing work.
Video description
Try making a fireplace according to the instructions in this video or use it as an example to assemble your own design:
The instructions provided are suitable for simple wall-mounted models. Angular, asymmetrical and other complex shapes require an individual approach to frame assembly. Some craftsmen first make it completely, and only then fasten it in place.
It is important! When an electric fireplace is built into a plasterboard structure, the combustion chamber frame is assembled taking into account the fact that after plating its internal parameters will decrease.
Spectacular examples for inspiration
Choosing the model and finish of a plasterboard fireplace is a very important task. The fireplace should become the central accent of the living room interior. Which style to choose, where to place it – ideas will suggest effective and stylish design solutions.
- The built-in plasterboard structure is a portal for an electric fireplace in a minimalist style.
- A decorative fireplace built into the wall elegantly emphasizes the lightness and conceptuality of modern design trends.
- A fireplace built into the corner of the house organizes the space and adds dynamism to a simple setting.