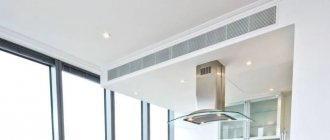
With the onset of cold weather, garage owners are thinking about insulating their boxes. Indeed, in addition to the cold and discomfort of being in an unheated room, humidity increases, which leads to the appearance of dampness and mold. To avoid this, you should install a stove. But not like in residential buildings, but with a high percentage of efficiency.
A conventional oven cannot fill the entire space of the garage with warm air in a short period of time, because it differs in its design from the house, and when heating, Galileo’s square-cube law is taken into account.
How does a garage cool down?
What is the square-cube ratio? Heating engineers know this parameter firsthand. The thing is that the smaller the building, the greater the ratio of the area of its limiting structures to the internal volume of the room. This means that heating it will require more thermal energy.
So that you understand what we are talking about, let’s compare two objects: a house 10x12 m with a height of 5 m, a garage 7x4 m with a height of 2.25 m. The volume of the house is 10x12x5 = 600 m³. The area of the structural elements, which are four walls, a floor and a ceiling, through which heat loss occurs, is 460 m² (it’s easy to calculate, everything is at the school curriculum level). Now the volume of the garage is 63 m³ and the area of its boundary structures is 105.5 m².
The optimal temperature in the garage is no more than +16C Source ko.decorexpro.com
Now it is necessary to compare the ratio of the total area to the volume of each object. It turns out at the house: 460/600=0.77, at the garage: 105.5/63=1.67. That is, the comparison shows that the garage’s heat loss area is almost twice as large as that of the house. So it turns out that the stove that will have to be used in the garage must be more powerful.
Of course, you can take into account that the garage temperature may be lower than in the house. For example, optimally it will be no more than +16C. But even in this case, the heating element will still be more powerful than the one used in the house.
How to heat properly?
Correct combustion procedure:
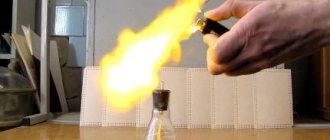
- Open the condensate drain valve. When condensation stops dripping, close the valve.
- Check the draft by opening the ventilation, fan door and damper, light a match and bring it to the fan. If the fire from the match hits the fan, a draft is fine.
- Place paper and small shavings on the grate, then light it with a match. When the potatoes are hot, place larger chips and narrow, thin (1-1.5 cm) firewood (7-15 pieces) on them.
- When the fire is hot, place 4-6 thin dry logs (3-5 cm wide and thick), then close the firebox door.
- After 5 minutes, insert large dry firewood (3-5 logs) and close the fireplace door.
- Check the fire every 20 minutes, and if necessary, remove wood from the street.
- If the fire is too intense (a loud hum or roar is heard), cover the fan, then the gate. A fire in a properly adjusted stove produces a very low hum, so it can only be heard near the stove.
- After heating your garage, wait until the flames disappear above the coals, close the fan, and close the gate and vents. After 10 minutes, close the damper and ventilation.
Rules for heating a garage
So, having dealt with heat loss, let’s move on to the question of how to properly heat a garage. Firstly, it should be noted that a more powerful stove means higher fuel consumption. This means that it is necessary to purchase an economical heating unit that has a high efficiency.
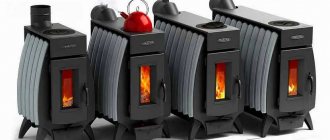
Secondly, the stove must heat the garage quickly. And if this concerns a private garage, then it should cool down quickly. This is due to fire safety requirements. Wood-burning garage stoves typically fall into this category. They quickly heat up and heat the room (15-20 minutes), and also cool down quickly. But due to low fire safety, such units are rarely used.
A wood stove is the fastest way to heat a room Source drive2.ru
However, it should be noted that wood-burning stoves are the most efficient of all those offered. Therefore, manufacturers try to maximize their safe operation. But you don't need a large, powerful furnace to heat your garage. The main task of the heating device is to heat quickly. And this can be done using low-power models. Vedas main requirement is the rapid appearance of thermal energy that heats the air. And the last one rushes up to the ceiling.
But on its way it is sure to encounter a layer of cold air, which is denser than warm air. This means that heat will begin to spread along the bottom, mainly near the floor, gradually heating the space as a whole. At this heating rate, warm air will never reach the ceiling; it will spread wider. In this case, the upper part of the garage and its walls will remain cold, because the convection of warm air will spread like a mushroom, that is, to the ceiling without touching it, and then along the walls to the floor. In this case, the warm air will not touch the surfaces of the walls either. And there is no contact with cold surfaces, and there is no heat loss through them.
Low-power stoves work well in insulated garages Source drive2.ru
See also: Catalog of garage projects presented at the Low-Rise Country exhibition
If you use an ordinary stove for the garage, which is used in homes, then all the physical laws described above will not work. This mainly applies to garages where the thermal insulation qualities of the materials used have not been taken into account. But keep in mind that non-thermally insulated garages absorb thermal radiation instantly. So this heating option, and any other, can be immediately discarded as ineffective.
Therefore, before deciding on a garage stove, it is necessary to think through and carry out thermal insulation measures. It is important to choose the right insulation and finishing. Optimally, if space allows, thermal insulation is carried out from the outside. The simplest option is brick cladding.
Insulated garage with bricks from the outside Source 100realt.ru
See also: Catalog of companies that specialize in installation services for fireplaces and stoves
Is it possible to do it yourself?
For those who love to work with their hands, nothing is impossible. A garage oven would be another creative approach.
Instructions for making a garage stove yourself:
- a compressor from an old refrigerator or a propane cylinder will be suitable for the stove container;
- metal corner for legs: length - at least 20 cm, welded to the container on 4 sides;
- a hole is cut out in the central part of the lower container and a pipe is welded to it in a strictly vertical position;
- at least 10 holes are made in the pipe and the upper container is connected to it;
- a fuel loading area is made in the lower container;
- The final stage will be the chimney - the pipe is placed strictly vertically for improved draft.
For experienced DIY enthusiasts, we offer video instructions for making buleryan.
Brick kilns
It should be noted that stoves made of brick are not the best option for heating a garage space. There are several reasons for this:
- The thermal output of brickwork is 0.5 kW per 1 m² of its own plane. That is, to heat a standard-sized garage, you will need a stove that will occupy half of its area .
- For a brick structure , in which clay is used as a masonry mortar, a special microclimate with slight differences in humidity and temperature. The same cannot be said about the garage. Ved clay is a hygroscopic . It quickly absorbs moisture , cracking and delaminating.
- Convection in ovens of this type is minimal . That is, there is no need to talk about quickly heating the garage . It usually takes up to 2 hours , depending on the size of the garage space.
Small-sized brick kiln Source yastroyu.ru
But it should be noted that brick kilns are installed in garages. Especially if the garage is used as a workshop.
Increasing heat capacity
The heat capacity of a potbellied stove can be increased both by increasing its weight and dimensions, and by using additional heating materials. In any case, it is necessary to make changes to the design of the heating system. One option could be to use smoke circulation inside the oven. This can be done by installing heat-resistant metal sheets in the firebox, thereby providing additional paths for the movement of gases. In this case, they are fired by heating the oven to a higher temperature. But at the same time, the temperature of the exiting smoke also increases. With a short chimney, the heat is simply released into the atmosphere.
Choosing a garage oven
So, wood stoves are not suitable. Today, manufacturers offer liquid fuel units that run on diesel fuel and various oils (their waste). It should be noted that this is one of the optimal types of solutions for heating a garage in winter. What do manufacturers offer?
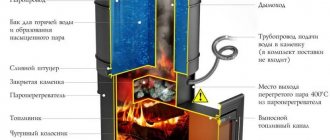
- Long burning stoves . The essence of the device and the principle of operation of the device is that the burned fuel not only burns one hundred percent, but also pyrolysis gases generated due to the combustion of the fuel itself burn. In this case, combustion heats diesel fuel or technical oil , which reduces energy losses to bring them to the required state. That is, it turns out that the long-burning furnace is divided into two parts : in one the fuel burns , in the second (upper) pyrolysis gases . Hence the double power . But such stoves are very economical : 1.5-2.0 liters of waste to produce 8-10 kW of thermal energy.
Long-burning stove model “Cinderella” Source housechief.ru
- A heat gun running on diesel fuel . Such heating devices are available in a wide range today. But this unit, even the most low-power one, has too much fuel consumption . It's all about the design of the nozzle through which diesel fuel . It is not possible to make a strong constraint on this element. Because a small hole in the nozzle will not provide a stable supply of fuel, due to which the unit itself will not work efficiently. It is better to use heat guns to heat large garages or warehouses.
Diesel fuel heat gun Source sydvesta.dk
- Infrared stoves using diesel fuel . Experts believe that this is the best option for heating small . The design of the stove is based on the so-called drip-evaporation burner , which operates on any liquid fuel and oils. Plus, a fan , which replenishes the exhaust gases emanating from the fuel combustion zone with oxygen. The result is a flammable mixture , which also burns, releasing a large amount of heat . This model is somewhat reminiscent of the first one (long-burning stove), but its efficiency is 100% .
Infrared stoves using diesel fuel Source drive2.ru
Design examples
“Buleryan” stove: drawing
Heating power 6-13 kW. Additional equipment will be required for manufacturing, because there are bent and turned parts.
Stove “Potbelly stove”: diagram
It is similar in power to the Buleryan stove, but much smaller in size. It has a double chamber for the afterburner. To prevent air leakage, asbestos plates are fixed to the door and ash pan. All parts of the afterburner are made of steel up to 4 mm thick, the grate for the grate is made of steel up to 8 mm thick, the protective screen is made of galvanized or tin.
Bubafonya stove: drawing
It is a stove with a closed combustion zone. You can make it from scrap materials: an old barrel, a propane tank, a piece of large diameter pipe. If you do not install a screen around this oven, it will create convective currents. A significant disadvantage is the possibility of reverse draft, when flames burst out of the air duct. In a closed garage space, this effect can cause a fire.
Similar do-it-yourself model
You will need:
- a piece of steel pipe with a diameter of 60 cm and a length of 1 m for the stove body;
- steel circle 2 cm thick and 55–60 cm in diameter;
- steel circle 3 mm thick and 60 cm in diameter;
- steel pipe, corners and tee with a diameter of 15-20 cm for the chimney, as well as a steel circle 5 mm smaller than the internal diameter of the pipe;
- corner 50x50 mm 1 m long;
- steel reinforcement with a diameter of 20-40 mm, a total length of 3-4 meters;
- small canopies or loops (can be made from pipes and timber);
- valve for draining condensate and adapter for welding into a pipe;
- a steel circle whose diameter is equal to the diameter of the pipe and the thickness is 3 mm;
- steel strips 20-30 mm wide and 2-3 mm thick;
- steel rod with a diameter of 5-6 mm for hooks and gates;
- mushroom cap for the chimney.
Assembling a potbelly stove
Installing a potbelly stove begins with its purchase or self-assembly. When choosing a purchase option, pay attention to the Soviet-style cast iron model.
They began to be produced in 1955 and are still stored in army warehouses. We won’t go into where they came from for sale. But let's say that these are excellent stoves. Judge for yourself:
A cast iron potbelly stove has a very impressive appearance and, due to its thickness, can last for decades.
- Thermal power is about 4-5 kW, which is enough to heat a garage of up to 40 square meters. m;
- Reliable cast iron - its thickness is 10 mm;
- Soviet assembly - no comments here, back then they knew how to make quality things;
- Omnivorous - works on coal, wood, sawdust;
- Suitable for installing a cauldron instead of a top lid.
The cost of the unit is between 4-5 thousand rubles. The thing is really cool, but it’s hellishly heavy, its weight is about 60 kg.
You can also assemble a potbelly stove for your garage yourself. For example, according to this scheme:
The assembly diagram of one of the simplest and yet quite effective and reliable potbelly stoves.
It is assembled from sheet steel. The recommended thickness is 4-5 mm. This is enough to prevent the steel from burning out in the next few years. The statement is most relevant when using coal, which burns at a higher temperature. For assembly, you need to cut the metal on a machine or using a powerful grinder. Legs may or may not be made - in this case, the potbelly stove is installed on a stone base.
To assemble the stove, you will need additional materials - a metal pipe, doors and fittings for assembling the grate. The pipe is necessary to create a chimney pipe - the chimney is connected to it. You need two doors - one large, the other small. The large one is welded opposite the combustion chamber (furnace), the small one is welded between the bottom and the grate . If you are making legs for floor installation, take strong metal corners or fittings with a thickness of at least 15 mm.
The diameter of the chimney according to this scheme is 100 mm - this is quite enough (for this drawing). The potbelly stove is assembled using a welding machine. Special attention is paid to the welds so that they can withstand heat and do not allow smoke into the garage itself. When assembling the housing, do not forget to install the grate and smoke circuits.
Smoke circulations improve heat transfer and are the basis for pyrolysis combustion - in this case, a tube for supplying secondary air is welded into the rear wall above the level of the first revolution.
Conclusion
The stove oven is suitable for temporary heating of 1-2 car garages. Now you know:
- how to make a potbellied stove yourself;
- how to heat it;
- what safety measures to follow.
Popular publications
latest comments
This spring I built a garage, now it needs to be heated. Because it’s not pleasant to work and sit with friends in a cold garage in the cold.
The stove design consists of two 27-liter cylinders. The metal thickness is 3mm, which is quite enough. To remove heat from the firebox, I used a 40 * 40 * 3mm profile.
10 pieces of 40 cm each serve as flame arresters.
The stove design consists of two 27-liter cylinders. The metal thickness is 3mm, which is quite enough. To remove heat from the firebox, I used a 40 * 40 * 3mm profile. 10 pieces of 40 cm each serve as flame arresters.
We cut holes for the profile.
I'll try it, it looks amazing
Let's make a lid, it turned out a little crooked. but this does not affect functionality.
Let's start cutting the second cylinder
We put all the parts together and cook, it took one kilogram of electrode...
Well, a test oven.
In conclusion: the stove turned out to be very economical; a large amount of heat is removed from the profiles. The furnace is not yet completed, a diffuser is provided for heat removal and dissipation with adjustable heating direction. I forgot to mention that the chimney is an 89 mm pipe, 3.5 meters long.
The downside at this stage is that the draft is not very strong, basically it’s enough, the wood burns moderately, one board lasts for 40-60 minutes, but I want to have a reserve of draft.
Do you like our site? Subscribe or subscribe (notifications of new topics will be sent by email) to our channel Mirtesen!
Installing a potbelly stove in its original location
We have assembled the potbelly stove, now let's start installing it. The foundation is prepared for this. The stove cannot be installed on earthen floors - it will gradually push through them. It is necessary to pour a concrete screed on which the stove itself will stand. If you have ready-made concrete floors, there will be one less problem in the installation procedure. In the case of installing a potbelly stove on wooden floors, it is necessary to lay a sheet of metal 1-2 mm thick on them. The same sheet should be placed in front of the firebox - this will prevent fire if coals accidentally fall out.
It is recommended to install a protective jacket made of brick. It will prevent burns and ensure uniform heat transfer.
To install the potbelly stove in the garage as correctly as possible, use the following recommendation - step back 50-60 cm from the nearest walls. This way you will avoid overheating them and reduce heat losses. The recommendation is valid for brick, concrete and wooden walls. In the case of wood, it becomes mandatory (the distance to the wooden wall should be 1 meter; it is recommended that they be lined with brick or covered with asbestos). You can also line the walls with metal to reflect heat. The distance to vehicles is at least 1.5 meters (preferably 2 meters).
Heating a garage with a potbelly stove will be more efficient if it is located not at the garage door, but against the opposite wall. We pay special attention to the vent - make sure that there is an opening in the garage for outside air to enter. Otherwise, the oxygen level in the room will be too low.
Do not forget to move canisters with machine oil, gasoline and other flammable liquids away from the place where the potbelly stove is installed. We also move away everything that can burn - rags, plastic, wood, etc.
Required materials and tools
Scheme of the furnace.
To install a potbelly stove in your garage with your own hands, you will need the following tools:
- welding machine;
- welding overalls, gaiters and mask;
- hammer;
- chisel;
- Bulgarian;
- drill;
- measuring instrument (ruler, tape measure, building level, scriber, triangle).
First launch of the potbelly stove
The slide valve allows you to control the draft in the stove, thereby affecting fuel consumption and temperature.
The installation is complete - you can perform the first launch. To do this, place a small amount of wood chips and paper inside and light a fire. Next, we stack a small amount of firewood and wait for the stove to warm up. The firewood must be dry (no more than 15-20% moisture), otherwise the soot from it will quickly pollute the entire stove and chimney. We make sure that the smoke goes into the chimney properly, add more firewood, close the firebox door and open the ash pan door (it works like an ash pan).
After 20-30 minutes the temperature will rise to a comfortable level. To save fuel, close the vent and the flame will go out. This achieves temperature regulation. You can also retrofit the chimney with a damper.