Energy saving is now the most popular topic on the Internet. Of course, everyone wants to save money, especially in the current economic conditions. Calculation of heat losses plays the most important role in this case. Heat loss in the simplest sense is the amount of heat that is lost by a room, house or apartment. They are measured in Watts. Heat losses occur in the house due to the difference in external and internal air temperatures.
During the transitional and cold period of the year, the temperature on the streets drops, and the temperature difference between indoor air and outdoor air increases. And as we already mentioned, no one has canceled the Second Law of Thermodynamics, so the heat from your houses and apartments tends to leave it and warm the cold environment. To reduce these heat losses, houses are insulated in various forms, from polystyrene foam and ventilated facades to modern thermal insulation materials in the form of putty. The main task in our profession is to maintain comfortable microclimate parameters in the room. And first of all, we calculate heat losses to compensate for them.
Why do heat loss calculations?
When do they calculate heat loss in a house? Calculation of heat loss is mandatory when designing heating systems, ventilation systems, and air heating systems. Design temperatures are taken from regulatory documents. The external air temperature value corresponds to the external air temperature of the coldest five-day period. The internal temperature is taken either from the one you want or from the norms; for residential premises it is 20+-2°C.
The initial data for the calculation are: external and internal air temperature, the design of walls, floors, ceilings, the purpose of each room, and the geographic area of construction. All heat losses directly depend on the thermal resistance of the enclosing structures; the greater it is, the less heat loss.
To ensure comfortable living conditions for people in a room, it is necessary that the heat balance equation be true
Qп+ Qо+ Qс+ Qк= Qср+ Qос+ Qр+ Qpeople,
where Qп – heat loss through the floor, Qо – heat loss through the windows, Qс – heat loss through the wall, Qк – heat loss through the roof, Qср – heat gain from solar radiation, Qос – heat gain from heating systems, Qр – heat gain from appliances, Qpeople – heat gain from people .
In practice, the equation is simplified and all losses are compensated by the heating system, regardless of water or air.
Criteria for choosing insulation for a frame frame
When making the final choice of insulation for your own frame house, the following criteria must be taken into account:
- Thermal insulation properties. They are determined by the thermal conductivity coefficient. The lower it is, the less thickness will be required for insulation.
- Water absorption. The penetration of moisture into a structural element reduces its durability, especially taking into account the freezing of moisture in winter.
- Shrinkage of the material. If the insulation has such a drawback, then cold bridges gradually form.
- Fire safety. It is advisable to select non-flammable or self-extinguishing materials that do not propagate combustion. Otherwise, they must be impregnated with a non-flammable composition.
- Ecological cleanliness. For a residential building, it is especially important that the insulation does not release harmful substances even when ignited.
- Biological inertia. The material should not be prone to rotting, the development of mold and fungi, and also create a favorable environment for the life of microorganisms, insects and small rodents.
- Working temperature. An important requirement is frost resistance and resistance to other climatic influences.
- Life time. The higher it is, the less often you will have to worry about home repairs.
When choosing a material, it is necessary to take into account actual climatic conditions. First of all, this concerns humidity, maximum and minimum load, and the amount of solar ultraviolet radiation.
Finally, the choice depends on the installation location of the insulation. In horizontal structures, the use of bulk materials is quite appropriate. Floor insulation can be done with heavier and more voluminous materials.
For walls, especially for internal installation, thermal insulation with a minimum thickness is required. In each specific case, you should proceed from real conditions and your own financial capabilities.
Heat loss calculation
Having received the initial data, designers begin calculations. Let's consider the main types of heat losses and formulas for their calculation. There are heat losses: through walls, through the floor, through windows, through the roof, through ventilation shafts and additional heat losses. Thermal resistance for all structures is calculated using the formula
Rst =1/ αв+Σ(δі / λі)+1/ αн,
where αв is the heat transfer coefficient of the inner surface of the fence, W/m2 °C; λi and δi – thermal conductivity coefficient for the material of each layer of the wall and the thickness of this layer in m; αн – heat transfer coefficient of the outer surface of the fence, W/m2·os;
Coefficients α are taken from the standards, and are different for walls and ceilings.
So, let's begin:
First of all, let's look at heat loss through the walls
The design of the walls has the greatest influence on them. Calculated using the formula: Coef. n-correction factor. Depends on the material of the structures, and n=1 is accepted if the structures are made of piece materials, and n=0.9 for the attic, n=0.75 for the basement floor.
Example: Let's consider heat loss through a 510 mm brick wall with 100 mm mineral wool insulation and a 30 mm decorative finishing ball. Internal air temperature 22ºС, external -20ºС. Let it be 3 m high and 4 m long. The room has one external wall, placement to the South, the area is not windy, without external doors. First you need to know the thermal conductivity coefficients of these materials. From the table above we find out: λk =0.58 W/mºC, λut =0.064 W/mºC, λsht =0.76 W/mºC. After this, the thermal resistance of the enclosing structure is calculated:
Rst=1/ 23 +0.51/0.58+0.1/0.064+0.03/0.76+ 1/ 8.6 = 2.64 m2 ºС/W.
For our area, such resistance is not enough and the house needs to be better insulated. But that’s not about that now. Heat loss calculation:
Q=1/R·FΔt·n·β=1/2.64·12·42·1·(10/100+1)=210W.
ß is additional heat loss. Next, we will describe their meaning and it will become clear where the number 10 comes from and why divide by 100.
Next comes heat loss through the windows
Everything is simpler here. Calculation of thermal resistance is not necessary, because it is already indicated in the passport of modern windows. Heat loss through windows is calculated according to the same scheme as through walls. For example, let's calculate the losses through energy-saving windows with a thermal resistance of Ro = 0.87 (m2°C/W) of size 1.5 * 1.5 and oriented to the North. Q=1/0.87·2.25·42·1·(15/100+1)=125 W.
Heat loss through ceilings includes heat removal through roof and floor coverings. This is mainly done for apartments where both the floor and ceiling are reinforced concrete slabs. On the top floor only losses through the ceiling are taken into account, and on the first floor only through the basement floor. This is due to the fact that the same air temperature is assumed in all apartments, and heat transfer from apartment to apartment is not taken into account. Recent studies have shown that large heat losses occur through non-insulated junctions between floors and enclosing structures.
The definition of heat leakage through a ceiling is the same as for a wall, but additional heat loss is not taken into account. The coefficient α is taken differently: α in = 8.7 W/(m 2 K) α in = 6 W/(m 2 K), the temperature difference is also the same, because in the basement or in a covered attic the temperature is taken within 4-6ºС. We will not describe the calculation of thermal resistance for the ceiling, because it is determined by the same formula Rst = 1/ αв + Σ ( δі / λі ) + 1/ α. Let's take a ceiling with a resistance of 4.95 and take the air in the attic +4ºС, the ceiling area is 3x4 m, inside 22ºС. Substitute into the formula and get: Q=1/R·FΔt·n·β=1/4.95·12·18·0.9= 40 W.
Calculation of heat loss through the floor on the ground
It is a little more complicated than through the ceiling. Heat losses are calculated by zone. A zone is a strip of floor 2 m wide, parallel to the outer wall. The first zone is located directly next to the wall, where the most heat loss occurs. It will be followed by the second and other zones, up to the center of the floor. For each zone, its own heat transfer coefficient is calculated. To simplify, the concept of resistivity is introduced: for the first zone R1=2.15 (m2°C/W), for the second R2=4.3 (m2°C/W), for the third R3=8.6 (m2°C/W) W)
Example There is a room in which the floor is on the ground, the floor size is 6x8 m. The temperatures are still the same. First, let's divide the floor into zones. We got two of them. Find the area of each zone. For us it is 20 m2 for the first zone and 8 m2 for the second. Then we set the conditional resistances R1=2.15 (m2°C/W), R2=4.3 (m2°C/W), substitute into the formula: Q=(F1/R1+F2/R2+F3/R3)( tout - tin) n=(20/2.15+8/4.3) 42 1= 470 W.
Additional heat loss
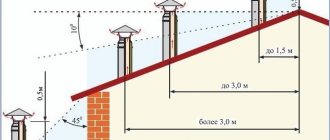
They are taken into account only for walls and windows, that is, structures that are in direct contact with the environment. There are four types of additional heat loss: orientation, windiness, the number of walls and the presence of external doors. They are expressed as a percentage and subsequently converted into an additional heat loss coefficient. If the room is oriented to the North, East, North-East, North-West, additional heat loss is 10%, when to the South, West, South-West, South-East, 5% is added. If the building is located in a windy area, another 10% of heat loss is added, and when in an area protected from the winds, only 5%. If the room has two external walls, then additional losses are 5%, when there is only one, there are no additional losses. If there is a door in the external wall, you can calculate the loss through it, but it is easier to add 60% if the doors are triple, 80% if the doors are double and 95% if they are single. For example: A room has two external walls, located in a windy area, one wall faces South, the other faces North, there are no doors. Then the additional losses are 10% + 5% for orientation + 10% for wind + 5% since there are two walls. And that 30%, in order to add them to the main heat losses, needs to be converted into a coefficient β = 30% + 100% = 30/100 + 1 = 1.3 and substituted into the general formula.
Heat loss for ventilation
They are not taken into account if air heating is being designed or a ventilation unit with air heating is used, since the air entering the room is already warm and no heat is wasted on heating it. But if the installation is not heated, it is necessary to take into account the heat consumption for heating the incoming air. The simplified formula looks like this:
Q=0.337·V·Δt
where V is the room in m3, Δt is the difference between external and external temperatures.
The sum of all heat losses constitutes the total losses of the room.
Ventilation measurement
Another important component of calculating the heat loss of a room is the amount of energy spent on heating the ventilation air. It can amount to up to 30% of total losses, so it must be calculated and added to the result of the main calculations. The formula for such a calculation is taken from a physics textbook to determine the heat capacity of air: Q air. = c * m * (tв - tн).
The energy spent on heating ventilation air is calculated using the formula
Here is a breakdown of the main indicators:
- Q air — the amount of energy spent on heating the air is measured in W;
- tв - average internal temperature measured in degrees Celsius;
- tн - the lowest temperature outside is measured in degrees;
- c - heat capacity of air is 0.28 W / (kg °C);
- m is the mass of air entering the room from the outside, measured in kg.
To more accurately calculate the mass of incoming air, use a simple formula: multiply the volume of all calculated rooms by the air density. The volume is calculated using internal data, multiplying the length, width and height of the rooms, and then adding all the volumes into one. The air density value is found in a special table, where it is indicated depending on the temperature. The starting temperature is taken to be the lowest external indicator for the area.
To determine the final result, the total values of two basic formulas are added. The result obtained will be the most accurate indicator of the building's heat loss.
Calculation of heat losses in Excel
The process of calculating heat losses at home takes quite a lot of time, so we created a template for ourselves in Excel with which we make calculations. We decided to share it with you and you can use it by following the link. Here we will write out the instructions for use.
Step 1
Follow the link and open the program file. You will see a table like this:
Step 2
You need to fill in the initial data: room number (if you need it), its name and temperature inside, the name of the enclosing structures and their orientation, the dimensions of the structures. You will see that the area counts itself. If you want to subtract the window area from the walls, you need to adjust the formulas, since we do not know where your windows will be recorded. Our space is being taken away. You also need to fill in the heat transfer coefficient 1/R, temperature difference and correction factor. Unfortunately, they are filled out manually. In the example, we have an office with three external walls; one wall has two windows, another has no windows, and the third has one window. The wall structure will be as in the example where we calculated R, eat k=1/R=1/2.64=0.38. Let the floor be on the ground and divide it into zones; we have two of them and calculate the losses for two zones, then k1 = 1/2.15 = 0.47, k2 = 1/4.3 = 0.23. Let the windows be energy-saving Ro = 0.87 (m2°C/W), then k = 1/0.87 = 1.14.
The picture shows that the amount of heat loss is already visible.
Step 3
Unfortunately, additional losses are also filled in manually. You need to enter them as a percentage; the program itself will convert them into a coefficient in the formula. And so, for our example: Walls 3 means +5% heat loss to each wall, the terrain is not spindle therefore +5% to each window and wall, Orientation to the South +5% for structures, to the North and East +10%. There are no external doors, therefore 0, but if there were, the percentages would only be added up to the wall in which there is a door. We remind you that additional heat losses do not apply to the floor or ceiling.
As you can see, the loss of premises has increased. If you already have warm air entering the room, this is the last step. The number written in column Q is your desired heat loss of the room. And this procedure must be carried out for all other premises.
Step 4
In our case, the air is not heated, and in order to calculate the total heat loss, we need to enter the area of our room 18 m2 in column R, and its height 3 m in column S.
This program significantly speeds up and simplifies calculations, even despite the large number of manually entered elements. She helped us more than once. We hope it will become a helper for you too!
Which one is better to choose?
Numerous thermal insulation materials are usually classified according to their origin, structure and method of application.
By origin they are:
- natural insulation materials of natural origin;
- artificial, synthetic materials.
Based on their structure and installation technology, they are divided into several groups:
- bulk, liquid or semi-liquid;
- applied by spraying or coating;
- hard or soft (fibrous);
- roll, block (panel) or tile type.
Unfortunately, there is no ideal insulation. All options have their advantages and disadvantages. Therefore, to determine which insulation is the best, you need to rank the following indicators in order of importance:
- environmental friendliness and health safety;
- lack of capriciousness of the material (fragility, hydroscopicity, possibility of shrinkage);
- ease of installation;
- price.
Now, having decided what the best insulation should look like, let’s consider all the possible options on the market.
Types of timber houses
Wooden houses are divided into two types:
- For seasonal stay (summer)
- For permanent residence (winter)
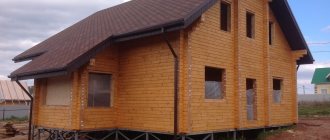
The main difference between summer houses and houses for winter living is that such buildings most often are not additionally insulated. At the same time, houses for winter require more thorough insulation, since without additional thermal insulation, significant energy costs will be required to ensure a comfortable temperature in winter. In addition, for the construction of summer houses, timber of a smaller cross-section can be used, which reduces the cost of materials and the overall construction estimate.
Heat loss through the ceiling
All the heat goes up. And there it strives to go outside, that is, to leave the room. Heat loss through the ceiling in your home is one of the largest quantities that characterizes the loss of heat to the street.
The thickness of the insulation on the ceiling should be 2 times the thickness of the insulation in the walls. If you mount 200 mm in the walls, mount 400 mm on the ceiling. In this case, you will be guaranteed maximum thermal resistance of your thermal circuit.
The ceiling needs the thickest insulation.
What are we doing? Walls 200 mm, floor 300 mm, ceiling 400 mm. Consider that you will save on any energy carrier that you use to heat your home.
Wall design and thickness
The thickness of the walls of a frame house is determined by their design, the presence of ventilation gaps and the choice of insulation. Traditionally, a frame wall consists of the following layers:
- External wall cladding - its thickness can vary from a few millimeters (if it is a metal profiled sheet) to several centimeters (if it is a more massive cladding - OSB particle board or cement-bonded particle boards).
- The ventilation gap between the outer wall cladding and the insulation is at least 30-50 mm and ensures free air movement.
- Mineral insulation must be used with membrane protection. The membrane itself does not take up much space. Its width is measured in microns. But mineral insulation will determine the size of the wall, since it is the thickest material of the wall “pie”. The width of insulation varies depending on the climate conditions and the purpose of the house (seasonality of residence - all year round or only summer). Usually it is at least 50 mm for a summer building and more than 150 mm for a year-round one. The thickness of the wall of a frame house for permanent residence is greater, since the structure is used during cold and winter temperatures. If necessary, the heat insulator is placed in two layers, increasing the thickness of the outer wall. Then the thickness of the insulation of the frame house can double.
- Internal wall cladding - its thickness also depends on the choice of wall material. The internal cladding can be thicker than the external one if it is made of wooden materials (block house, timber). Thin internal cladding is possible - plywood or MDF panels.
Sectional view of the frame structure.
Now let’s take a closer look at how to build a frame house, what thickness of the walls will the building have?
Wall thickness
Exterior wall decoration serves two important functions. It protects the inner wall from precipitation and maintains the strength of the house, strengthening the frame. The choice of wall cladding takes into account not only the characteristics of water and moisture resistance, but also bending strength and the ability to withstand wind loads.
External wall cladding
External wall cladding can be made of various materials. OSB boards are used for a frame house, metal profiles, cement particle boards, wooden boards - lining, block house, timber. Each of them has its own characteristics and dimensions.
Isoplat for plating.
OSB boards are used most often due to their affordability. The choice of their thickness is determined by the number of storeys of the building. The thickness of OSB for the walls of a frame house in one-story buildings is at least 9 mm. For two-story houses it should be at least 12 mm. Thus, in a frame house, the thickness of the OSB determines its strength, durability, and resistance to hurricane winds.
Internal wall cladding
Internal wall cladding can be done with sheet materials. It can be OSB with a thickness of 9 or 12 mm. It can also be assembled from thin materials - plywood, MDF, the thickness of which does not exceed 5 mm. It can be made of plasterboard, the thickness of the sheets is 12-13 mm.