To create a comfortable microclimate inside the home, it is necessary to ensure high-quality air exchange with effective exhaust air extraction. Often, the ventilation installed during construction is not enough, and air circulation inside the house is disrupted. If the microclimate is disturbed, then installing exhaust ventilation to the street through the wall will save you.
How to make a hood in a private house with your own hands?
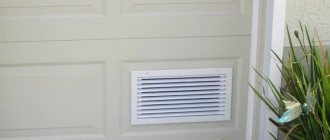
In order for a private house to receive an influx of fresh air, as well as remove already polluted air, it is necessary to install a ventilation system - an exhaust hood, which can be natural, forced or combined. But regardless of the choice, ventilation will perform its function only if preliminary calculations are made that take into account the size of the room and the features of the future system.
Air removal system parameters
To determine the most important dimensions of pipes and air intakes, you will need to perform a small calculation in the following order:
- We determine the amount of air flowing through the kitchen ventilation per unit of time;
- Knowing the cubic capacity of the kitchen air space and the recommended air speed values, we calculate the cross-sectional area and the recommended diameter of the air duct.
This is enough to build simple ventilation in the kitchen. As a rule, a kitchen ventilation system is assembled from two independent subsystems - natural and supply and exhaust. Both schemes are calculated based on the maximum air exchange rate in the isolated kitchen space. For a private home, according to SanPiN 2.1.2.2645-10, the air in the kitchen atmosphere should change from 3.5 to 5 times per hour, depending on the type of stoves and ovens used.
If the kitchen is planned in the form of one large studio or pavilion, or a semi-open veranda, the gas exchange rate can be reduced to 2.5-3 times.
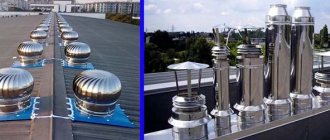
Natural ventilation
At the design stage of a house, a natural ventilation scheme must be drawn up. The principle of its operation is to ventilate the house due to the natural circulation of the air mass. In order for the system to perform its function properly, the influx of fresh air and the exhaust of already humid air must be carried out through different rooms. Typically, the space through which air enters is called dry, and the outlet space is called wet.
Attention!
A kitchen designer
has started working on our website . You can get acquainted with it and design the kitchen of your dreams completely free of charge! A wardrobe designer can also be useful.
You can ventilate your house in four ways:
To increase the level of air exchange in the house, special fans are installed on the exhaust ducts, which can operate either continuously or at set times. Accordingly, such equipment requires a connection to the power supply network.
Advantages
It does not require the installation of expensive equipment, and system breakdowns are automatically eliminated. But even with fans installed on the exhaust ducts, the circulation system naturally consumes electricity in small quantities. Consequently, money is saved. Another advantage of the system is its compatibility with other types of air exchange.
Flaws
This type of ventilation in a wooden house directly depends on weather conditions, which directly affects the ventilation of the building. As a rule, insufficient supply of fresh air manifests itself in the form of fungus, as well as the accumulation of toxic substances that can come from building materials. Thus, it, not combined with other systems, will not always be able to ensure proper air exchange in the house.
Video description
The video shows how to properly install a ventilation supply valve in a wall:
Since there are many types of valves on the market, the methods for installing them also vary, but the principle is the same. For example, there are devices in which a heat-insulating shell is installed in the cylinder. That is, they drill a wall along the diameter of a plastic pipe. The external decorative grille is not attached to the wall, but is inserted into the protruding end of the cylinder in the form of a lid. The same goes for the head.
Forced exhaust
Since the dependence of natural ventilation on external climatic conditions does not allow the premises to be fully ventilated, the installation of additional equipment is necessary to ensure air circulation in a private home. Air exchange carried out using special installed devices, as well as components for them, is called forced ventilation.
According to the principle of operation, it is divided into:
However, the operation of the forced system is carried out by connecting its devices to the power supply network. In addition, the design and calculations of the system are carried out at the stage of drawing up the house construction plan. All components of forced ventilation perform different functions, but the main and only task of all elements is the supply of fresh air to the premises and the removal of already used air to the street.
The compulsory system includes the following elements and equipment:
Equipment selection
Supply ventilation equipment is not limited to the installation of fans. The types of supply ventilation systems are:
- ventilation with heating of forced air (equipped with electric climate control);
- ventilation with filtration (in this case, filters, depending on the type, can either simply clean the air from dust impurities or capture gases harmful to health).
The air flow is provided from the street, therefore, before being evenly distributed throughout all rooms in the house, the air must undergo pre-filtration at the inlet. Full filters can only be installed if the air intake is equipped with a suction fan.
If the ventilation system in the house is exhaust, and there are simply grilles at the entrance vents, then it is impossible to install full-fledged filters in them - they will act as an artificial barrier, and the air will not have enough pressure to overcome it.
As a result, the supply of fresh air will not occur through the openings provided for this in the room, but through various cracks, and sometimes this air will not be fresh at all. For example, if the ventilated room is located on the ground floor, then exhaust gases from warming up cars can penetrate through the cracks in the doors.
The choice of equipment for an exhaust or supply forced ventilation system should be based on the following criteria:
- fan motor power;
- operating noise, which influences where exactly the fan unit should be located: inside the building or outside it;
- ventilation system cost.
A fan for an exhaust hood in a private house should be selected after calculating exactly how much air you need to remove from the room per unit of time, and depending on this, the power of the unit is selected.
There is no need to install outlet filters, but it is strongly recommended to install an exhaust valve that will shut off the air duct when the hood is not working. This will prevent heat from escaping from the room.
How to properly install a hood in a kitchen in a private home
Preparatory work for installing a hood in the kitchen begins with measurements of the room (the installation was discussed in more detail in this article, and how to choose the right one - in this one).
After all, the obtained values will affect the choice of device model. First of all, the cubic volume of the room is calculated by multiplying the length, width and height of the kitchen. The result is then multiplied by a factor of ten. This value determines the number of air changes per hour established by current regulations. The result obtained will be the minimum power required for the measured kitchen.
Since all exhaust devices require electricity, the installation locations of the devices are equipped with sockets.
Preparing a niche for a kitchen hood is also an important factor. After all, a centralized gas pipe can be installed in such a way that in the future it will interfere with the installation of equipment on the wall. The way out of the situation is to install brackets that will allow you to leave the necessary space between the wall and the hood. In addition, the wall should not have obvious defects and should be strong enough to support the kitchen exhaust system.
To install the equipment you will need:
Manufacturers of hoods provide consumers with three main modifications of devices:
Also, according to the method of air purification, they are divided into devices that remove exhaust air to the street, and models that operate in recirculation mode.
When the device operates in recirculation mode, the hood does not emit pollution into the street, but passes air through the filter and returns it back into the room.
Since wall-hung models operate in recirculation mode (more details), they are more suitable for small kitchens. This is explained by the fact that conventional filtration is not able to cope with air purification in large rooms.
gas holder for the dacha: pros and cons
Hanging hoods are equipped with filters that need to be changed periodically. The frequency of replacements is indicated in the technical documentation of the device.
Among the positive qualities of the devices are their low price, the ability to be attached to a kitchen cabinet, and the lack of additional components, since hanging equipment does not require an air exhaust system.
Built-in appliances are practically hidden from view and serve as an air supply. The body of such a device is mounted directly into the kitchen cabinet, and only the air intake remains outside, which basically has a retractable panel.
The air duct of a built-in exhaust device can be led outside either through the ventilation system already existing in the house or through a wall or roof.
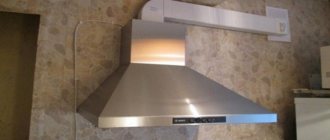
The most expensive model range, but at the same time the most powerful, is considered to be the fireplace or dome class. Hoods in this series not only provide stable air purification, but also become pronounced elements of room design. In addition to factory production, dome models can be individually designed.
Installing a kitchen hood over a gas stove
How to properly make a kitchen hood over a stove with your own hands in a private home depends on the shape and size of the device.
At the same time, the installation of an electrical appliance is also influenced by the location and dimensions of the kitchen unit modules. There are three installation options:
To install the device in a cabinet, the lower shelf of the kitchen module must first be removed. Subsequently, it may either not be installed at all, or a hole is made in it using a jigsaw that is suitable in size with a hood.
On the shelf located in the middle of the cabinet, holes are made for the electrical cable and air duct. Then the body of the device is applied to the shelf to be fixed and the fastening points are marked with a pencil. Next, the hood is attached using self-tapping screws.
The device mounted under the kitchen cabinet differs from the built-in version only in that the hood body remains outside. If desired, it is covered with a false panel or any other finishing material using double-sided tape or glue.
When attaching the hood to the wall, first of all, mark the mounting points through the rear panel of the device. Holes are drilled along the marks, dowels at least 5 cm long are inserted into them. Then self-tapping screws are screwed into the two upper holes so that the hood can be hung freely on them. After checking the reliability of the structure, without removing the device, screw in the remaining screws and tighten the top ones.
Duct connection
Before connecting the air duct to the hood, you need to decide on the choice of material. There are two types of pipes for removing exhaust air from the room (read more here):
But regardless of the material of manufacture and cross-section, the diameter of the air duct must coincide with the inlet of the hood. With a smaller pipe size, the kitchen hood will work in increased mode, which will lead to rapid engine failure.
The installed air duct should not completely block the opening of the natural ventilation shaft. To do this, a special grille is purchased and installed, the valve of which closes when the hood is turned on, and opens after the device has finished operating. This mode of operation allows the natural air circulation system to operate fully.
Ventilation in the bathroom and toilet
The task of installed ventilation in the bathroom is to clean the room from various odors and eliminate high humidity.
Since the operation of a natural hood is completely dependent on external climatic factors, it will not always be able to cope with its task. In addition, the absence of special grilles on the outside of the ventilation ducts makes it possible for small rodents and insects to enter the house. However, the natural air circulation system has its advantages, which include simplicity of design and relatively low price. The absence of complex mechanical elements in a natural hood predicts long and uninterrupted operation.
Ventilation ducts for the bathroom are selected with a diameter of at least 50 cubic meters per hour, and for the toilet an air duct with a width of 30 cubic meters per hour is suitable. The ability to remove odors and moist air from the bathroom is provided by a forced ventilation system. Its operation is carried out using installed fans, which can be with bearings or bushings. Devices with bushings are much cheaper than fans with bearings.
Forced exhaust fans installed in the bathroom can operate either from a light switch or have a separate power point. Device manufacturers also offer fans with built-in humidity sensors. In this case, the system begins to operate when the humidity in the room reaches a certain level. There are also models that are equipped with motion sensors that allow you to activate air circulation when a person enters the room.
Basement ventilation
To ventilate the basement, you can limit yourself to installing several holes in the basement of the house.
The openings should be located in opposite parts of the room. In addition, the openings must be equipped with special meshes or gratings. This method of ventilation is quite simple in its organization, but like the entire natural ventilation system, it is directly dependent on weather conditions.
A more effective method is a system that uses two pipes, 8–15 cm wide. In this case, the supply channel is mounted so that the lower part of the pipe is located at a height of 20–40 cm from the floor. The upper end should be fixed on the street so that the gap to the ground is 40–60 cm.
hip gable roof rafter system drawing
The lower end of the exhaust pipe is mounted directly under the ceiling, and the outer part is led through the ceilings to the roof and fixed 30–60 cm from it.
How to make a duct box
Some air duct models do not fit into the overall design of the room. The way out of this situation is to hide the channel in a special box. Read more…
Depending on the material used, decorative designs are:
However, when installing the box, it is taken into account that it will constantly be exposed to burning, fat and other by-products that arise during cooking. It follows that the structure must be washed and cleaned well. Only in this case will the decorative box fit into the overall design of the room.
Supply devices
Due to the advent of modern materials, buildings began to be more airtight, which led to another problem associated with a decrease in air flow inside.
If previously houses and apartments could be ventilated without additional inflow, now the situation has changed. It is especially difficult to breathe in a home if plastic is used as the main material.
About the functionality
Finished products for air intake from the street can completely prevent the penetration of dust, insects and all kinds of sounds. After installation, there are no drafts in the rooms. The air supply device resembles the operating principle of an air reducer, which slows down the flow rate.
This is a valve for air flow.
Operating the supply valve is extremely simple, as it is equipped with a convenient handle for closing the channel. Its visible part fits perfectly into the interior of the room. Being located from the outside, it does not spoil the impression of the façade of the building. During operation you will not have to spend financial resources.
More information about the design of the products
The air throughput element is a small plastic tube, the diameter of which can vary widely. Inside there is insulation that prevents the penetration of sounds.
Below you can get acquainted with the structure of products of this type.
- The plastic channel is the basic component, since it is through it that air enters the room.
- The adjustment knob is located on the inside. With its help you can block the channel.
- The filter element allows the incoming flows to be cleaned from dust particles.
- The internal fragment of the head, equipped with a ventilation flap, is the main limiter.
- The O-ring is designed to improve the seal between the elements of the product.
- Insulating material provides the ability to protect the interior space from sound and other effects.
- The outer grille helps protect the structure from precipitation.
- The mosquito net inside it completely prevents the penetration of insects.
The main parts of the product are shown.
Carrying out installation work
The first step is to select a suitable location for installing the element on the side plane bordering the street. There must be direct access to the functional head, otherwise control will be problematic. The best option involves installing it next to a heating radiator so that the incoming air has time to warm up.
One of the installation options is demonstrated.
After selecting an acceptable location, proceed directly to making the hole. If the walls are wooden, then use a regular drill and drill. In other cases, diamond drilling is carried out with a special tool. When constructing an opening, it is recommended to make a slight slope towards the street to drain condensate.
You will have to make approximately the same hole.
A plastic sleeve of the required size is inserted into the finished hole. A ventilation grille is installed on the outside, and a functional cap is inserted from the inside. In the process of fixing the elements, small bolts are used, with the help of which the structure gains rigidity.
Everything about installing a kitchen hood through a wall in a private house
Kitchen hoods come in flow-through, recirculation and combined types. Flow devices are the most common due to budget service and low price segment. But it is not possible to install them everywhere. If the kitchen ventilation shaft is clogged or there is no air duct, it is very difficult to install an exhaust unit. To remove air outside, a supply valve is installed in the wall, and then the entire system.
Read more about installing a hood through a wall for a kitchen in a private house below.
Wall device design
A typical exhaust valve consists of three main parts:
- flange;
- dampers;
- decorative lattice.
A round flange is a connecting element that allows you to connect the valve to the ventilation duct. The grille is a decorative element that simply masks a hole in the wall and also prevents large debris from accidentally getting inside. The basis of the design is the damper.
This is a movable petal, round or square, mounted on an axis. It can only open in one direction, ensuring proper air flow. The design may also include a plumb bob that allows the valve to remain closed if the fan is turned off.
An axial exhaust fan consists of the following elements: power cable (1), air intake grille (2), switch (3), switch cable (4), impeller (5), blinds (6)
For industrial applications it is usually recommended to select a valve with good explosion protection characteristics, but for residential applications other features are important. For example, it would be useful to have a rubber gasket that can reduce the amount of noise.
One common exhaust valve option is the butterfly design. It consists of two blades mounted on a central axis. Another popular design for such devices is called a petal design, which includes a series of parallel blades that move like a blind.
Installation of an axial fan for exhaust type ventilation is carried out according to the same scheme for all systems:
This type of fan is often installed in bathrooms and bathrooms.
Standards and requirements for kitchen exhaust systems
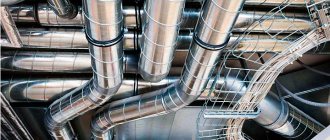
The air duct of the kitchen hood ventilation system has a square or round cross-section with a width or diameter of 130 mm. If the exhaust equipment is installed away from the ventilation shaft, the air duct in the room is mounted using a corrugated pipe, which can be steel, aluminum or plastic. The most common choice is aluminum.
Important! The corrugated pipe connects the hood to the ventilation shaft, so its diameter should not be less than the air duct on the unit itself.
Aluminum corrugation has an aesthetic appearance. It is cheaper than the steel version and much stronger than its plastic counterpart.
Recommendations for choosing a hood:
The color, design and shape of the equipment, as well as the type of control, are chosen according to personal preferences.
Remember! The efficiency of the hood depends not only on the engine power, but also on the diameter of the ventilation duct.
If you do not take into account the rules for choosing the power of the unit, the device will consume a lot of resources, producing low efficiency. The power of the exhaust device is measured in m³/h. Many are sure that the more power the hood has, the better, but this opinion is wrong.
The purpose of the unit is to remove unnecessary odors and impurities from the air, and not to ventilate the room. Since the capacity of a pipe with a diameter of 130×130 mm is 400 m³/h, a hood with a higher power will be useless.
On a note . When the fan operates at medium or low speed, the hood's performance increases.
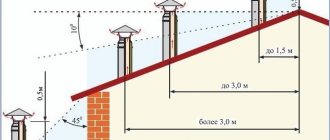
The height of the hood above the stove depends on the type of hob. SNiP standards for hoods: above gas stoves - 750-850 mm, above electric stoves - 650-750 mm, above combined stoves (where there are gas and electric burners) - 700-800 mm. The inclined hood is mounted at a distance of 550-650 mm from the working surface of the gas stove, 350-450 mm from the countertop with an electric stove and 400-500 mm from the combined hob.
To install a kitchen hood through a wall, you will need a device with certain characteristics. A hood that is too powerful makes a lot of noise, leaving some of the combustion products inside the room
For your information. The noise level in accordance with SNiP should not exceed 55-60 dB.
When using any hood, the exhaust shaft must be anti-corrosion painted every three years.
Easy way to calculate
In theory, the dimensions of the supply ventilation window in a kitchen in a private house for calculations are taken to be 70% smaller than the cross-section of the exhaust pipe. In practical work, adjustable gate valves are installed for air flow, with the ability to change the flow area from 70% of the calculated value to 150%. In this way, you can effectively and accurately regulate ventilation performance and the level of gas exchange in the kitchen, without using noisy electric exhaust systems.
In a situation where the room is divided into several sectors or levels, the ventilation system in a private house in the kitchen is calculated based on building regulations No. 60.13330.2012, 62.13330.2012, 7.13130.2011. But there is one problem. The longer the air duct pipes, the more difficult it is to take into account the influence of turns, elbows, splitters, valves, filters on the resistance of the air ducts and the loss of flow energy.
Therefore, the design of a kitchen ventilation system for two- to three-story private houses is traditionally calculated in several stages. Initially, calculations are performed using air flows under ideal conditions, without taking into account friction. In the second pass, the air speed values are checked, taking into account losses in elbows and turns, joints and branching of pipes. Speed reduction coefficients have long been calculated and tested experimentally; their values can be taken from reference tables in SNiPs.
The work is not difficult, but requires accuracy. If you don’t want to bother with calculations, you can use pipes that are obviously larger than 10-15% of the cross-section accepted for a standard kitchen. A small reserve of throughput will allow you to reduce the flow speed to 0.8-1.0 m/s, which will make the operation of the ventilation system less noisy, but more cumbersome.
You cannot arbitrarily choose the cross-section of pipes used in the kitchen ventilation layout; there are limitations here. In pipes of small diameter, usually 90-110 mm, at a speed of more than 2 m/s, the air flow begins to hum at joints and turns, especially in windy or frosty weather. For the kitchen, this limitation is especially relevant, since hot air is removed from the room. As it moves through metal air ducts, the flow quickly cools and loses its energy of movement before it rises to the roof and is thrown out through the vent pipe.
Making air ducts with a large cross-section, especially if one central exhaust pipe is used, is also dangerous. The slow and at the same time massive air flow after turning off the hood can easily tip over and return to the ventilation system of a private house. Even if there is a check valve in the kitchen, kitchen fumes and odors easily flow through the air ducts into the bedroom and living room.
Preparatory work for installing a kitchen hood through the wall
Connecting the hood to an outlet through the wall is an option for private houses or apartments where ventilation is not provided for by the design or is in poor condition. In such cases, for the normal functioning of the exhaust unit, the outlet is made directly to the street, punching a through hole in the wall, providing a channel of minimum length. For the air duct, it is recommended to choose a round pipe.
Note ! The fewer turns the air flow makes on its way to the exit, the more efficiently the entire system will work. Do not plan to install the stove too far from the vent.
To prevent the external channel from freezing and leaking, a check valve is installed in the hole inside the wall.
At the preparation stage, the exact installation location of the unit is determined and materials are purchased: a galvanized pipe with a canopy for arranging external ventilation, a corrugated aluminum pipe for the air duct, clamps and a check valve. You will also need hardware.
When preparing the room:
Equipment location and dimensions
The location for installing the air purifier is selected taking into account the location of the exhaust unit and the area of the kitchen.
On a note. In a kitchen with high ceilings, even the most modest hood will turn out to be an attractive piece of furniture.
According to the location of installation, exhaust units are divided into:
options for connecting heating radiators in a private house
The shape of the hoods is flat, inclined and dome. The size of the suction surface should not be smaller than the area of the hob, otherwise the hood will be ineffective.
For your information. Ideally, the area of the hood should be 50 mm larger than the size of the hob on each side.
According to the rules of SNiP, the socket for powering the hood is installed above the wall cabinet, inside it or in the casing of the device at a height of 1900-2200 mm from the floor.
Selection of materials for the exhaust duct
When choosing a check valve and an outer pipe for the air duct, they are guided by the thickness of the wall and the material from which it is built. The best option is a galvanized round pipe with a canopy. Any moisture-resistant material is suitable as insulation for such a pipe. Most often, penofol with a thickness of 100 mm is used.
On a note. It is better to place two valves in the channel - internal and external. This creates an additional air gap between the valves, preventing condensation from forming.
The check valve for the hood is made of:
Plastic valves are easy to install, lightweight and affordable. Most often, such products are used in apartments.
Important! When heated to temperatures above 120°C, plastic releases chlorine, and at a temperature of +5°C it loses strength and becomes brittle.
The most durable valves are made of polyethylene and reinforced vinyl urethane. The latter is almost impossible to damage.
Creating and preparing a ventilation hole in the wall
The hole for the air duct in the wall should be located at a distance of 200-300 mm from the ceiling on the outer wall as close as possible to the slab. Ideally, directly above the hob.
Before starting work, empty the kitchen of decorative items, utensils, small accessories, and cover furniture and appliances with film or cloth. The location of the hole is measured on the wall and markings are made for the air duct.
A through hole in the wall and installation of a ventilation duct are done in several stages:
Next, a system of check valves is assembled, which will prevent dust and debris from entering the channel and will not let cold air from the street into the room. After installing the valves, the hood body is attached.
Why does the valve freeze up?
The phenomenon occurs in areas with low winter temperatures. The source of frost is condensation falling on the very cooled surfaces of the ventilator. To fix the problem, you need to identify the cause of freezing:
- Natural exhaust works ineffectively or does not function at all. Result: water vapor remains inside the room and partially escapes outside through the supply valve.
- The power of the heating system is not designed for infiltration (natural supply) of air by the supply unit. The head becomes supercooled and moisture condenses on it.
- Violation of installation rules, for example, placing the ventilator too close to the window, a large distance from the radiator, or insufficient insulation of the pipe.
- The head is covered with curtains that are too thick, which creates a cold zone along the wall. Ice appears on the lid.
Among user reviews there are complaints about a decrease in temperature after installing ventilators, literally - there is a lot of blowing from the valves. We would like to remind you of a simple rule: the air flow through the element depends entirely on the operation of the hood. Try to adjust the flow at the wall valve or partially block the exhaust vent.
The photo on the left shows the correct installation of the ventilator; cold air is mixed with the warm flow from the radiator. The valve on the right is too low
Hood installation
Built-in hoods are attached to the back of the bottom of the hanging cabinet or instead of it. The air duct is masked in the closet. In the case of a dome-type hood, the corrugation is hidden in a special casing, and the unit itself is attached to the wall.
On a note. If there are other communications in the area where the hood is installed that cannot be moved (for example, a gas pipe or a ventilation ledge), the device is mounted at a distance from the wall using plumbing self-tapping screws, which are used when installing sinks.
The valve system is sealed from the outside of the wall. Then an insulated galvanized channel pipe is installed and secured to the wall using clamps and dowels. Install the visor. Usually the pipe is connected to the roof.
Once the valve systems are sealed, the duct installation begins.
Where should the outlet be installed?
Sockets are installed in accordance with the requirements of the state standard. Manufacturers recommend deciding in advance the location of the hood and connecting the power source to the required distance before installing the device.
When laying electrical wiring, you must adhere to the following rules:
- avoid a large number of bends, which increase the load on the exhaust device;
- ensure the tightness of the pipes in which the wiring is laid;
- Bring the socket as close as possible to the equipment being installed.
In addition, you need to consider the size of the load experienced by the electrical grid. Modern hoods consume little electricity. But if there are many appliances installed in the apartment (house), then it is recommended to connect a separate line from the electrical panel for the device that ensures air exhaust from the kitchen. This will reduce the load on the network.
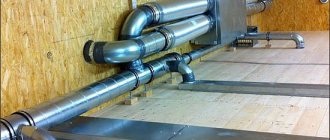
Air duct laying
The duct pipe can be made of corrugated plastic, steel or aluminum. These materials have different characteristics. The most common is aluminum. It is quite durable and not as expensive as steel.
The air duct is placed on the protruding socket of the exhaust unit and tightened with a clamp. Similarly, the corrugation is attached to a pipe with a valve system. The corrugation is secured to the wall in several places with a clamp and dowels and covered with a wall cabinet or casing.
Important! Before tightening the clamp in the right place, the connection is treated with silicone sealant.
If there is no casing included with the hood to mask the air duct and there is no wall cabinet provided, use a special rectangular plastic pipe or install a plasterboard box. The main condition: the box must withstand the load of its own weight and the weight of the air duct.
Algorithm for installing an air duct:
A practical solution is to wrap the air duct with a layer of soundproofing material before hiding it behind the walls of the duct.
Types of air ducts
There are three types of exhaust pipes:
Corrugated aluminum. The easiest to install. Usually it is enough to buy one such pipe, stretch it to the required length, put it on the flanges and secure it with clamps. The ribbed surface creates turbulence and air noise can be clearly heard.
Plastic round. Installation will require the use of elbows and possibly couplings. It will be necessary to cut the pipe sections to the required size. Air passes through such pipes with the least turbulence and noise.
Plastic rectangular. You can lay it flat on the top of the cabinets so that they will not be visible. If the walls are sheathed with panels or plasterboard along the sheathing, then it is possible to lay such pipes behind the panels.
For each type and size of pipes, it is necessary to buy suitable ventilation grilles, which are attached to the vent opening, and to which the pipe, in turn, is attached.
If the air duct is longer than half a meter, you will also need to install intermediate supports. Special supports are available for various types of pipes, but it is also possible to use metal mounting tape with perforations and universal clamps.
Air exhaust can be carried out into an existing ventilation system, or into one installed specifically for exhaust hood. To control the air flow, valves can be installed to prevent its movement when the hood is turned off.
Creating a box to mask air ducts
There are two materials for making the box - plastic and plasterboard.
The plastic box consists of ready-made elements. Install it under the ceiling or above wall cabinets. The box is durable and weighs little, so you can install it without outside help.
Attention! Before masking the duct corrugation, the system is checked for leaks.
A plasterboard box is a complex structure that requires skills in working with this material. A frame is made from a metal profile, sheets of plasterboard are sewn onto it, then the structure is covered with putty and decorative finishing is performed.
It is better to install at least two inspection hatches in a plasterboard box. This will make it easier to access the air duct if necessary.
Conclusions and useful video on the topic
The video tells about what happens when the owner of the premises has violated the integrity of the ventilation duct structure and this has been discovered.
Legislation, public opinion and even common sense are against drilling ventilation ducts. The reason is that this redevelopment will not provide any cardinal advantage, but will reduce, and in some cases significantly, the comfort and safety of living. Microclimate parameters will also worsen, which often leads to various diseases, including asthma.
Have you encountered the issue of violation of the integrity of the ventilation duct and want to supplement the above material with useful information? Or do you still have questions? You can express your opinion, share your experience, and ask for advice from our experts and other site users in the block located below this article.
Rules for ensuring air exchange
To effectively change air, remove household fumes and prevent the formation of condensation, it is necessary to correctly calculate the total cross-sectional area of all ventilation openings. According to the rules, it must be at least 1/500 of the overlap area.
Properly organized air exchange will not only prevent excess moisture, but also equalize internal and external pressure. And, accordingly, it will protect the connecting elements of the roof from destruction.
In addition, it is important to consider the properties of building materials. Modern versions of insulation and moisture-proof films allow less air to pass through than their predecessors
Therefore, more efficient ventilation is required.
Therefore, when using materials with a high degree of tightness, it is worth increasing the cross-sectional area to 1/400 and even 1/300 of the total floor area.