Arranging a bathroom in a private house is a necessary condition for living outside the city with city comfort. However, with wooden houses everything is not so simple. Mold, warping, cracks in joists and flooring (cladding), breaks in the water supply and sewerage systems, musty air and other not very pleasant “little things” - all this is quite real if the house and the bathroom itself were made without taking into account the characteristics of wood. The basic rules for finishing walls, ceilings, and choosing the finishing floor covering do not differ from those suitable for brick and block houses. But there are still some nuances for arranging a bathroom in a house made of timber.
How to make a quality bathroom in a wooden house
The first thing to consider is that different types of wood react differently to high humidity. Let us immediately list the best wood options for arranging floors, walls and ceilings in our latitudes: alder, beech, oak - these are the most successful species in terms of their qualities and cost. If possible, you can use materials from larch core.
The wood prepared for the base and finishing must initially be dry or completely dry in the structure. Otherwise, very soon the beams will deform due to changes in moisture and temperature.
The second thing you need is to present a clear procedure for carrying out the work and try to adhere to it so as not to redo anything. A typical plan might look like this:
- Choosing a location for the bathroom and arranging floors
- Laying utilities (water supply, sewerage, electricity, ventilation)
- Waterproofing the room
- Finishing, decor, installation of plumbing, external electrical equipment - most often these works have to be carried out simultaneously or alternately.
The third prerequisite for a bathroom in a house made of timber to turn out well is a careful approach to materials and performers!
A bathroom is a room with high humidity; design errors, the use of inappropriate materials or violation of technology are unacceptable here. If you doubt your abilities, hire a professional team. Yes, you will have to spend money, but the amount will definitely be less than what will be spent on repairs and restoration and the inevitable hiring of specialists for reconstruction.
Briefly about the renovation
Sooner or later you have to start renovating your bathroom. It’s better not to make do with half measures, but to open the skin completely to assess the condition of the waterproofing and wooden elements.
The affected areas of the sheathing are replaced, and the wood is treated comprehensively. The damaged canvas is sealed with adhesive sealing tape, and in no case with tape. It is advisable to use products from the same manufacturer, due to possible chemical reactions.
For local repair of wet joints, ready-made KNAUF latex waterproofing is suitable. Before any work, the room and structures should be dried. Wet insulation loses its properties.
Remember the difference between a vapor barrier film and a vapor-windproof membrane. The first is to prevent vapors from entering the house structure. The second one works in a mirror way: it does not allow street moisture to pass through, but releases air to the street; do not confuse the sides when replacing.
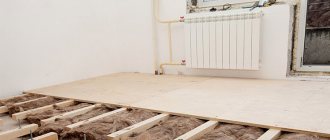
Calculation of wooden floor beams
The average weight of the bath is 100 kg. Every liter of water in it is one more kilogram “on top”. We add the mass of the maximum number of people who can be in the room, a washing machine, cabinets and installations with sinks and washbasins, and other “loads”, and we understand that the best place for a bathroom is the first floor. Or an external extension with its own lightweight foundation.
If the first step doesn’t work, then you definitely need to strengthen the floors in the area of the future bathroom. You can do this in several ways:
- reduce the distance between the base beams;
- increase the thickness (section) of beams;
- think about the possibility of installing support columns on the first floor.
The first and third options are preferable for the reason that it is advisable to make the finished floor in the bathroom lower than in other rooms, and with a slope for water drainage. And increasing the thickness of the base does not help this.
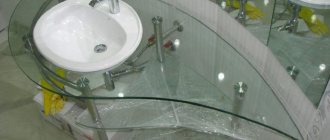
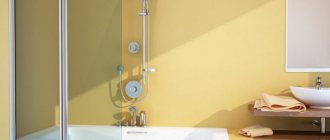
Choosing plumbing fixtures and furniture
The choice of furniture and fixtures leads to the completion of the bathroom design. At this stage, you should be guided only by your wishes. You only need to take care of strengthening the wooden floorboards so that they can withstand the load of a full bath.
A standard set of plumbing fixtures for comfortable use of this room:
- toilet (for a combined bathroom);
- sink;
- bath or shower.
What types of equipment to choose and how to place them in the room depends on the size of the bathroom.
The choice of furniture and fixtures leads to the completion of the bathroom design
For a large room, you can choose a corner bathtub, or place it in the middle of the room.
If the floorboards are not reinforced, to reduce the load on the floors, plumbing fixtures are placed along the wall.
For a small room, it is more important to choose a shower stall that will save space. And if you choose a wall-hung toilet, you can save another couple of centimeters of usable space.
If the room is spacious, you can place a closet for linen and towels, shelves or a chest of drawers for toiletries. A mirror is an essential element of the bathroom. If there are children at home, do not forget to have a special ladder that will help them easily reach the washbasin.
Don't forget about the laundry basket. In a spacious room it can be a separate interior detail. In a small room, the laundry basket is usually hidden in the closet.
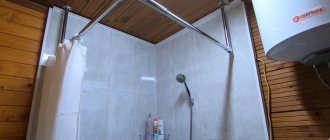
Plumbing and sewerage in a “wooden bathtub”
Hot pipes will cause the wood to warp and waterproofing and decorative coatings to crack. Cold pipes are a constant source of condensation, and even “special” types of wood do not like constant humidity. To eliminate or minimize the destructive effects of these factors, we adhere to the following recommendations:
- We give preference to plastic pipes instead of metal ones
- The pipes must be covered with suitable heat-insulating material.
- We secure the pipeline using special clamps so that it does not touch wooden walls and ceilings
- In places where they pass through finishing materials and the base, be sure to install gaskets and seals
Particular attention should be paid to joints and branches; they should be as tight as possible and not subject to weight loads.
It is better not to run the sewer on top, but to bury it in the ground below the soil freezing line. Everything above must be insulated, for example, with mineral wool in metal foil. The slope of the floor, the angle and diameter of the drain should guarantee a smooth flow of water even if the pipes are partially clogged (freezing).
What waterproofing materials are there?
The most common methods of waterproofing are pasting and coating. The first has its advantages and disadvantages - you can continue working after 24 hours, but pasting is a painstaking job in itself. You can apply both well-known roofing felt and roofing felt, as well as more advanced materials - Ecoflex, Isoflex or some other. Among them, there are adhesive ones - the protective layer is simply removed from them, and the material is ready for use, and weld-on ones - the adhesive layer that they have must first be heated. A gas burner is used for this. You just need to remember that this type of waterproofing will add 5 millimeters to the main floor height.
The second method – coating – is a simpler option. The materials used adhere perfectly to any surface and can withstand high temperatures. Coating materials are divided into several types.
The simplest waterproofing option is coating. It easily sticks to any surface
| Bitumen. | They are applied to the surface in two ways - cold and hot. But the first option has a disadvantage - it does not fit on a concrete base. The second option uses heating of 160 degrees. |
| Bitumen-polymer. | It does not require heating and is suitable for all surfaces, including concrete. They create a soft, but at the same time highly reliable layer. |
| Polymer-cement. | The waterproofing layer is quite plastic, excellent connection with the surface. |
| Acrylic. | The most advanced type of waterproofing. Ecologically pure. Produced as a water-based emulsion. Creates an elastic and very strong layer. |
Nowadays there are many different waterproofing materials in stores, they are divided by type: painted, glued, impregnated. The first includes mastics and emulsions. They allow you to create a reliable waterproof layer. Apply to the surface in layers after a certain time. The second group is a film or roll material made on a polymer or bitumen basis. To glue it onto a plane, you will need cold or hot mastic. It is better to overlap the material so that moisture does not penetrate into the seams, and to use cement-based, moisture-resistant compounds for filling.
The third group includes all materials, which include moisture-repellent cement, chemicals, and crushed sand. It is not advisable to use this type in residential buildings. For waterproofing in the bathroom, the first and second groups are mainly used. They can be combined with each other.
Mastic will create a reliable waterproof layer
Electricity in a wooden bathroom
Not only the bathroom in a house made of timber, but any room in a wooden building is electrified according to a strict standard. A short circuit can be strong enough for sparks to ignite even slightly damp wood, and moisture on exposed conductors can heat them to such a temperature that even a spark is not needed for a fire!
It will not be possible to make wiring without connections, so the places of twisting and soldering, connecting blocks and terminal blocks must be properly protected from water. It is better to take the wire cross-section with a “reserve” - the miniscule losses of electricity are nothing compared to the possible consequences of melting the insulation. It is worth investing in a protective metal hose, corrugation or pipes in which the wiring will be protected from mechanical and temperature influences.
Lamps, switches, sockets only of designs and models recommended for bathrooms (moisture-proof). If possible, their number should be reduced to the required minimum.
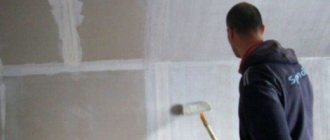
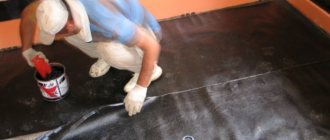
Coating waterproofing
Materials for coating waterproofing are mastics, the components of which are bitumen, cement, rubber or polymers. After drying, they form a durable water-repellent film on the surface that is highly elastic.
The mixture is applied with a roller and leveled with a spatula. Joints, corners and seams are treated with a brush, and for additional sealing, a waterproofing film or tape is laid. Places where sewer pipes are inserted are protected with rubber liners. A second layer of mastic is placed on top.
After drying, check the quality of the resulting coating, assessing uniformity and smoothness. After a few hours, you can apply a second layer to more reliably protect the building structures. It is laid perpendicular to the direction of the previous layer. Then the time required for the polymerization reaction to occur is maintained and finishing begins.
Ventilation
Since a bathroom is almost always steam and concentrated odors, and wood absorbs them well, ventilation with proper performance is also necessary. To supply fresh air, it is enough to install small grilles at the bottom of the door or leave a gap between the leaf and the threshold. But it is better to make the hood forced, with outlets to the attic or even the street.
Again, you will need a special fan, fire dampers in the air ducts, and materials that are not afraid of water and fire. When decorating the outlet of the ventilation duct, the main thing is not to reduce the design performance of the system, otherwise some of the steam will constantly get into the joints and corners, gradually destroying the wood and promoting the formation of mold.
How to waterproof bathrooms in wooden houses
Before proceeding with the installation of waterproofing, the wooden base must be cleaned and treated with special impregnations and primers. This will strengthen and compact the top layers of wood, protect them from pests and prevent the appearance of blue stains, fungus, mold and other unpleasant organisms.
For the floor in the bathroom of a wooden house, combined waterproofing is best suited:
- The leveled, soil-treated floor, joints with the wall and approximately 5-10 cm of walls from the joint are impregnated with liquid bitumen mastic, and then the treated area is covered with the same material of a denser consistency
- The top is glued with a waterproofing film
- After this, a reinforced cement-sand screed with the addition of a plasticizer is installed
This technology is good for its accessibility, simplicity and versatility - it is suitable for almost any coating. But the waterproofing of the walls depends on what the further finishing will be like:
- Before sheet materials and painting, the walls are coated in several layers with special acrylic or latex waterproofing compounds
- If you plan to lay tiles, use the same bitumen mastic
- For bathrooms in houses made of timber, where lining will be used or the original material will be left, there are specialized varnish- or oil-based compositions
- The ceiling is usually coated with bitumen mastic and covered with an antiseptic.
Bathroom location
First of all, even at the design stage, you need to decide where the bathroom - or rooms - will be located. Why is this necessary?
- It is necessary to correctly calculate the load on the floors between floors and further strengthen them.
- To prevent the house from flooding in the event of force majeure, the floor in the bathroom area is made slightly lower than in other rooms.
- You need to carefully consider the communications and electrical wiring diagram, plan the location of risers, valves and plumbing.
A convenient location option is on the ground floor, not far from the kitchen, in order to organize a single water supply system and not distribute it along the entire perimeter. If the house is large and several bathrooms are planned on different floors, it is better to place them one below the other.
Instagram @designer_polina_s
Instagram @gala.interior
Design: Chenchow Little Architects, chenchowlittle.com
- Bathroom, toilet
7 designer bathrooms that meet modern trends
Floor arrangement
Using the preparation method described above, almost any floor can be made on a wooden base. Most often, tiles chosen for bathrooms are PVC, ceramic, porcelain stoneware, granite or marble. Laminate and even budget linoleum are in high demand. You can leave the wood, or lay a special three-layer “board” that does not allow moisture to pass through at all.
Of the significant nuances of laying bathroom floors in wooden houses, two can be noted:
- If you want to have a warm floor, then you will have to abandon wood in the finishing coating
- Hard coverings should not reach the walls by 15-20 mm, and the resulting gap is closed with a plinth attached only to the wall
How to highlight the bathroom design?
Wood finishes pair beautifully with modern furniture. The harmonious combination of rustic simplicity of wooden finishing panels and stylish modern furniture looks very beautiful and interesting. Glass shelves and tables, a cabinet with a porcelain stoneware top, metal elements in the decor, all this goes perfectly with the wooden finish.
This style is always in fashion
You can also purchase furniture made from sustainable wood. Oak resists moisture best. Oak furniture can last a long time in a humid environment without pre-treatment.
Professionals give recommendations without which it is simply impossible to create a comfortable environment in the bathroom:
- When choosing a color palette to decorate a room, you should stick to the golden mean. Too many dark shades, or, conversely, an excess of flashy colors will only irritate.
- The walls and ceiling in the bathroom (only in the bathroom) can be made the same color. Or make a smooth transition from one color to another without separating the ceiling line.
- Waterproofing is a mandatory stage in finishing a bathroom in a wooden house.
- For finishing it is recommended to use several materials. For example, the lower part of the wall is decorated with plastic panels or tiles, and the upper part is decorated with lining.
Waterproofing is a mandatory stage in finishing a bathroom in a wooden house.
Suitable Bathroom Styles:
- Classic . This style is always in fashion. It is distinguished by an abundance of decorative elements, smooth flowing lines and elaborate furniture. For this style, a large full-length mirror in a thick wooden frame and wooden furniture are suitable.
- Minimalism . The opposite of the previous option. A minimum of furniture is used, and only the essentials. Clear shapes, strict lines. Calm monochromatic colors.
- Country . Warm shades and wooden furniture are used. Country is great for the bathroom due to its simplicity and elegance.
- Antique . In a wooden house, this design will look as harmonious as possible. Curtains with floral patterns and heavy fabrics, shabby wooden furniture are chosen, and pastel shades are used for decoration.
- Modern . Exquisite room design, combining clear and light lines. Repeating elements, the use of modern materials, a harmonious combination of beauty and comfort.
- High tech. The use of glass, wood and steel is implied. The style is characterized by unusual shapes and sizes.
I want to spend a lot of time in a room like this.
Bathroom ceiling made of timber
The ceiling can be anything, but it is very important to provide a vapor barrier to the ceiling. So, in addition to waterproofing, it is worth using a vapor barrier - a special type of membrane that is glued to the ceiling and extends onto the walls. Today, suspended structures are most often used for finishing. Behind them you can hide base defects, place communications and an exhaust hood. The most popular materials for ceilings in bathrooms are moisture-resistant gypsum fiber board, PVC panels, wooden or plastic lining, and tension fabrics.
Performing adhesive moisture protection
For adhesive waterproofing, film or roll materials are used. They are either glued or fused, usually applied in 2-3 layers. For work, bitumen-polymer, polymer, bitumen-containing materials are used. Mastic for gluing is used polymer, bitumen-rubber, bitumen, bitumen-polymer.
First of all, a thin layer of mastic is applied to the prepared surface, then the roll is rolled out, it needs to be secured, and the surface is again coated with mastic. This procedure must be carried out several times. The material is glued to the walls, starting from the floor. Which waterproofing method you choose will depend on your budget and how often the area is used.
Adhesive waterproofing is glued to mastic
Don't ignore waterproofing. After all, it will not only protect against mold and mildew, but will also increase the service life of the room.
Plumbing for a timber home
We repeat - weight matters, especially if the bathroom is located on the second floor. Therefore, it is better to avoid cast iron containers and massive ceramics. Although, if you are confident in the strength of the foundation and the adequacy of the style solution, then why not.
Another thing is installation. Houses made of timber are less susceptible to shrinkage, but any tree still “shrinks” over time. So it may make sense to secure the plumbing fixtures to their own “floating” bases, which we already mentioned in the conversation about wall decoration. By the way, if wall installations are used, it is advisable to consider options with elastic sealing inserts in the final covering of the wall, so that fluctuations due to temperature changes do not lead to damage by the brackets.
Before installation, you need to carefully “calculate” the space. There should be at least 25-30 cm between the sink, bathtub (shower) and toilet, plus convenient approaches to each are necessary. In general, there must be a place! Because reinstallation is troublesome, especially in this case.
In what style can you make a bathroom in a wooden house?
The style of the bathroom should be in harmony with the home. Wood can look luxurious without unnecessary accents. You should also remember about the materials used.
With an abundance of wood, a bathroom in the “Country” or “Provence” style automatically suggests itself. Wood on the floor, walls, ceilings, wooden shelves, stands and screens, woolen rugs and curtains with large patterns are always in fashion and conducive to spiritual comfort.
The fashion for “classics” never goes away. A minimum of metal, light shades, neat shapes and disguised lighting are well suited for those who love tranquility and versatility.
However, everything is in your hands and thoughts. You don’t have to adhere to any specific style, but choose the finishing materials you like and make the room ideal for yourself and your loved ones. And this is precisely the main thing...