Material selection
Absolutely any building material intended for the construction of permanent and temporary structures is suitable for building a gazebo. It is also permissible to use a variety of leftovers after the construction of a country house, etc., including all possible combinations of them. However, it is imperative to take into account the individual properties characteristic of each individual building material.
Metal
Almost any metal structure is characterized by increased rigidity and wear resistance. This material is ideal for constructing a gazebo, since in this case it can be done as quickly as possible, in no more than a few days.
Learn how to design your seating area.
In addition, the metal is also highly plastic, so it can be used to create almost any shape of structure. Also an undoubted advantage will be a fairly wide list of all kinds of forged elements that can easily be attached to the main structure.
- The advantages of building a gazebo from metal:
- a metal building does not require a solid foundation
- all elements are firmly connected into an integral structure, which gives it special wear resistance
- the gazebo can be made in almost any style
- Such designs allow you to fully glaze the structure
- Disadvantages of building a gazebo from metal:
- can't boast of being cheap
- in case of self-construction, it requires metal welding skills or the involvement of appropriate specialists
- Over time, the metal becomes corroded
- metal has high thermal conductivity, so during hot weather and autumn such a gazebo will not be able to provide the necessary comfort
Tree
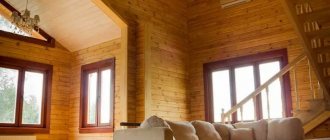
Wood is considered the most popular building material; it can be easily processed in all possible ways, and also creates the necessary coziness on the site. Such a gazebo will always look rich and solid, despite the fact that it can be made practically from construction waste. This contributes to the fact that wooden gazebos are the most popular and found in the garden.
At the same time, the most popular basis for such a structure is considered to be a pine board. But, massive structures made from solid logs look most aesthetically pleasing, but in this case it will not be possible to do without the involvement of individual specialists.
- Pros of creating a wooden building:
- low cost
- wood best creates the necessary microclimate and comfort indoors
- installation of wooden structures can be done with a minimum of tools
- a wooden building does not require a solid foundation
- Disadvantages of creating a wooden building:
- the material needs to be treated against moisture and pests, including throughout its entire service life
- increased fire hazard
- wood cannot boast of durability
- over time, the decorative effect of the material decreases
Did you know? The oldest architectural structure on the planet is considered to be the Barnenes Mound, located on the territory of modern France. According to archaeologists, it was built between 4800–4000. BC e., approximately 2000 years before the construction of the Egyptian pyramids.
Brick and stone
Natural stone or brick is not often used to build a gazebo. These materials do not allow you to create a miniature and lightweight structure, but with their help you can build a solid structure for almost any type of recreation.
Most often, red, silicate or special decorative bricks are used for this. As an alternative, crushed natural stone (granite, limestone, etc.) can be used. To reduce the cost of the construction process, all kinds of foam and cinder blocks are used.
- Advantages of a gazebo made of brick or stone:
- durability and reliability
- brick or stone does not corrode or rot
- almost complete environmental safety of materials and their components
- minimal fire hazard
- Disadvantages of a gazebo made of brick or stone:
- a brick building requires a solid concrete foundation
- high cost of materials and components
- laying stone requires certain skills and knowledge
- the final design almost always looks monotonous
Kinds
Such structures are built from various materials.
Among the most popular options are the following:
- brick;
- wood;
- professional pipe
Forged metal structures are also popular. All materials have certain advantages and disadvantages. The final choice will depend on the specific situation and taste preferences of the owner of the summer cottage.
Forged
Forged metal gazebos look very beautiful. Such designs seem weightless, light, openwork. To create a forged structure, you need not so much construction skills as the ability to work with a welding machine.
Metal advantages:
- structures made from such material can be made very elegant and aesthetic;
- metal is durable, it is not afraid of insects, it is not subject to rotting;
- This material is fire resistant, so you can safely place the barbecue in a metal gazebo.
Let's not forget about the disadvantages of metal.
- Rust may occur on such surfaces. To avoid this problem, you will need to use a special anti-corrosion agent.
- Metal gazebos are not resistant to high and low temperatures.
Profiled pipe
Structures made from such material can be assembled very quickly. When using a welding machine, this takes several days. Such gazebos are very stable; during their construction you can experiment with shapes. The main disadvantage of such options is the limitation in creating structures intended for use in winter. A closed metal gazebo does not retain heat well.
Brick
Brick gazebos look like small houses. Such options are most often chosen by owners of brick houses who want to complement the main structure with a similar building.
The advantages of such options make them quite popular.
- Originality of design. You can use not only brick, but also natural stone.
- The ability of the material not to heat up very much. At the same time, it is able to retain heat remarkably well.
- Durability. There is usually no need to update brick gazebos.
Disadvantages of such buildings:
- static - a brick gazebo will always be located where it was installed;
- construction work takes a very long time;
- high cost of bricks.
Tree
Building a gazebo from boards is an ideal option for novice builders. Working with such materials is quite easy. Some prefer more massive buildings - log gazebos. When constructing such structures, it is recommended to preserve the naturalness and texture of the material. In this case, the building will look especially beautiful.
There can be several advantages of wood. Let's highlight the most basic ones.
- Wood is aesthetically pleasing. Such material can fit well into any landscape.
- Such raw materials are environmentally friendly. Wood can be used by people who care about their health, as well as by allergy sufferers.
Of course, there were some downsides.
- You cannot install barbecues in gazebos made of this material, because it is not fire-resistant.
- Wood can deteriorate quickly. To avoid such a problem, special products should be applied to the surface to prevent rotting.
Stages of work execution
Construction process
In order to make a hexagonal gazebo, you need to decide on the choice of material. In this case, spruce or pine is suitable, since in terms of its properties this material is quite durable and relatively inexpensive.
- Before starting work, it is necessary to draw up drawings showing the dimensions. For example, the height of the structure can be 2.6 m.
- When you decide on the dimensions of the future structure, you should use a circular saw to cut boards and beams of the required dimensions and plan them using an electric planer.
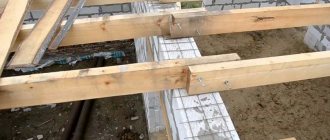
- Then you need to mark the site for construction. To get a hexagon of the correct shape, you need to draw a circle of a given diameter using two wooden pegs and a rope. It is necessary to draw six lines on the circle equal to the diameter of the circle and apply notches at the intersections of the lines.
- In the places marked with notches, holes are dug for the foundation about 50 cm deep. A layer of sand about 10 cm thick is poured onto the bottom and compacted. As a support under the support pillars, you can lay 30x30 cm paving slabs in the hole and lightly tamp them down. After installing the support beams, the pits can be filled with sand, followed by compaction and watering.
Concrete block 40×20×20 for foundation
You can also use concrete blocks as a base for the gazebo.
- In order to give strength and stability to a wooden structure, one reinforcing rod 1–1.5 m long must be driven into the corners of the markings in dug holes with compacted backfill. The diameter of the reinforcement can be from 10 mm, but in this case it is difficult to drive it in, so how it will vibrate. To do this, you can put a piece of pipe on the reinforcement and drive the rod into it. The pipe must be removed, and then holes must be drilled in the concrete blocks and placed on the reinforcement.
- It is necessary to lay a layer of waterproofing on concrete pillars - this can be two layers of simple roofing material. Then, using an electric drill, they drill holes in each wooden beam and put them on the reinforcement like a well, and cut them off at the intersection of the beams. For strength and alignment, cutouts are made in advance for the “half-beam” connection. Then the beams are assembled and secured with nails. For supports, beams with a cross section of 100×100 cm are suitable.
- The next step is the construction of the base. If the gazebo is large, then in the middle you need to make a support pillar that will serve as a support, and then lay the logs, having previously treated them with protective impregnation from the destructive effects of moisture. Tongue-and-groove wooden boards, moisture-resistant plywood, as well as moisture-resistant chipboard and OSB boards are widely used as flooring.
- After fixing the flooring, you can install the support posts, having previously drilled holes for the reinforcement, and then put the beams on it. Using a plumb line, you need to check how vertically these pillars are installed, and then fix them in this position with temporary jumpers.
Installation of rafters
- The crown is made according to the same principle as the lower ring of the frame. It is laid on the beams and secured with self-tapping screws.
- The final stage of construction is the installation of the roof. This happens as follows - the tops of the vertical posts are connected with bars, using a hacksaw to align them with the end part at an angle of 60 degrees, and then secured with self-tapping screws. When the frame is completely ready, the gazebo is covered with roofing material. For convenience, it is better to construct the roof on the ground, and then the finished structure should be installed on the upper ring of the structure. If the roof is assembled at the top, two boards are attached to the upper ring, a support post is installed on them, and then guide bars are placed on it and secured. The finished sheathing is sheathed with sheet material or slats. Metal tiles, corrugated sheets or other materials are used for the roof.
Fencing and finishing of the gazebo
- The gazebo must be fenced around the entire perimeter with railings 0.9 m high. The railings are made from ordinary boards, and with the help of a special template they can be given an unusual shape.
- Vertical beams can be covered with clapboard or decorative lattice made from wooden slats.
- To protect a wooden structure from rotting and give it a beautiful appearance, you must definitely varnish or paint it - the choice is yours.
You can equip a path for convenience and make a small porch, fill the internal space with floor and wall flowerpots with fresh flowers, and decorate the outside walls with evergreen climbing plants.
Construction of the frame
To successfully achieve this goal, it is necessary to perform the following sequence of actions:
- In accordance with the drawn up drawing, we cut the bars to the required length, after which we process them with a plane and a grinder. Next, on each side of the base beam we mark an even square with sides equal to the thickness of the wooden product and drill holes at the intersection of the diagonals. We lay the prepared bars in a well on the reinforcing bars located in the foundation of the support pillars. The beam is folded using a half-tree connection.
- Then, we proceed to install the central support beam. For this purpose, it is most rational to use a beam with a cross-section of 100×100 mm and a height equal to the distance from the central columnar base to the intended floor boundary.
- Then we begin to build the side posts. The same “weaving” timber with a length equal to the height of the future gazebo will help us in arranging them. We drill a hole on the underside of each composite post and then place it on the foundation reinforcement. We set the verticals using a plumb line or a building level and fix the piles with metal corners using self-tapping screws. To simplify the subsequent installation of the roof and the upper crown frill, it would be useful to strengthen the equipped wooden supports with temporary structures from scraps at hand.
Construction of a gazebo frame
- The next procedure is making the crown ring. The named structural element is the same frill of timber as at the base. We lay the cut parts on the upper parts of the support posts and fasten them with self-tapping screws.
- The final event is floor equipment. To do this, you will need to cover the area under the future floor with plastic film and cover it with a significant layer of sand. Next, we proceed to install the logs. As a rule, they are made from 50x100 mm beams, although this value is only recommended and not final, so the determination of the type of wooden product and its dimensions remains with the owner. As a floor covering, it would be optimal to use a classic floorboard, sheets of plywood or oriented strand boards.
Before carrying out installation work on joists and floors, do not forget to treat each wooden element with protective antiseptic compounds!
Preparing for work
Collapsible metal gazebo
Metal gazebos can be temporary or permanent. Temporary ones are installed for the summer period and removed for the winter. A foundation is not needed for such structures. Sometimes hollow pipes are driven into the ground as a foundation, which will serve as the basis for the frame. In winter, the top of the pipes must be closed to prevent precipitation and debris from entering.
91dcdd0df6b5a44003933f0313fe5a98.jpe
3ef1745a5e70fdbe627ddc9aa85da2f1.jpe 5dcfe1a893d61a80d24833891083b2be.jpe
Capital gazebos require a reliable foundation, which is arranged before construction. The base can be wooden flooring or concrete covering. The wooden base elements must be impregnated with an antiseptic, and the metal parts must be primed to prevent corrosion.
Welding machine
During the work you will need the following tools and materials:
- welding machine;
- drill and metal drills;
- Bulgarian;
- roulette;
- building level;
- metal pipes of square or round cross-section;
- primer and paint for metal;
- roofing material.
The installation of a metal gazebo requires a competent and responsible approach. First, you need to draw up a drawing indicating the dimensions and calculate the required number of pipes for the frame and supports, and the amount of roofing material. You need to buy building materials with a drawing in order to purchase everything you need and manage the funds correctly.
Advantages of metal structures
Relatively simple design of a metal gazebo
Compared to wooden ones, metal structures are durable, but without proper anti-corrosion treatment they begin to rust. Such gazebos are not subject to rotting or fire, and are installed on any foundation or without one at all. Installation of metal structures is relatively simple, and the rigid frame prevents changes in geometric shapes during soil subsidence.
What to build a hexagonal gazebo from?
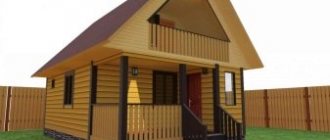
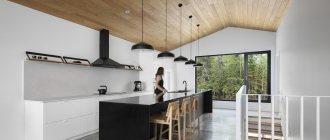
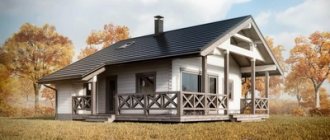
The hexagonal canopy is really beautiful and laconic. Of course, the easiest way is to build a rectangular structure. But it loses to the hexagonal one in all respects. You don’t need to look far for an example - it’s no coincidence that a honeycomb has a hexagonal shape. And no one under any circumstances will force a bee to make a square or pentagonal honeycomb.
With proper construction, the structure will serve you for decades. Before building a hexagonal gazebo, let's decide on the materials. You can take brick or wood, order a forged base, or assemble it from a corrugated pipe. Let's look at each option in more detail.
Forged metal structures. An excellent option for those who like light, visually weightless structures. To make the gazebo truly elegant, you need not only to know the basics of construction, but also to be able to handle a welding machine. This DIY forged hexagonal gazebo is durable and not afraid of fire. From a composition point of view, this is the most perfect option. But keep in mind that from time to time the metal needs to be treated with an anti-corrosion compound. In winter, it is quite cold inside the gazebo; on hot summer days it can be stuffy.
Canopies made of corrugated pipe. One of the strong advantages of this hexagonal gazebo project is quick assembly. As a rule, it takes no more than 2-3 days. Profiled pipes with a diameter of 8x8 centimeters are used as support pillars. Other sizes are acceptable. Other advantages include stability and the opportunity to show imagination. There is also a drawback - a certain limitation when creating winter-type gazebos.
Brick hexagonal gazebos. They look like small but very cozy houses. Suitable for summer residents who are familiar with the basics of brickwork. This design can be used for a long time without updates. It is temperature stable - it does not get too hot in the sun and at the same time retains heat. You can experiment with brick and natural stone. However, you will be building such a gazebo for more than one week, and bricks are not cheap. In addition, a brick gazebo cannot be disassembled and moved to another place - it is static.
Buildings made of wood. This option is the most popular among novice builders. It involves the use of environmentally friendly raw materials, which is already good for allergy sufferers and health-conscious people. A wooden gazebo will fit perfectly into any site design; it is characterized by long-term operation. It is not recommended to install a barbecue in it - there is a high risk of fire. When exposed to precipitation, the material may deteriorate
Therefore, it is important to promptly treat it with special compounds that prevent rotting.
Decor and operating rules
A gazebo, furnished in a classic style, can be decorated with flower pots with fragrant petunias at any time. Art Nouveau fans instead prefer wooden furniture and bedspreads made from natural fabrics, which are convenient for decorating window openings. But lovers of oriental style create stained glass windows of incredible beauty using frosted and colored glass.
The minimum shelf life of a wooden gazebo is 15 years. But if from time to time the wood is treated with bitumen and alkyd impregnations, the natural processes of destruction can be delayed.
Phased construction of a gazebo
Therefore, we will consider step by step the stages of building a hexagonal gazebo made of wood.
- According to the drawings, it is necessary to make wood blanks using a circular saw, and then plan the boards with an electric planer.
- Treat the material with an antiseptic and anti-rotting impregnation.
- At the place where it is decided to put the gazebo, it is necessary to make markings in the form of the future building - the basis for the foundation. A hexagon is easy to obtain from a circle, so using a rope and two pegs on the ground you need to draw a circle. The radius of this circle is equal to one side of the hexagon - based on this rule, it is not difficult to construct a hexagon from the resulting circle.
- Next, inside the resulting figure, they dig a pit for the foundation, about half a meter in diameter. A sand and gravel cushion is formed, which is well compacted.
- Support pillars are installed at six designated points. It is best if they are made of concrete. You can use wooden round timber, but in the ground they tend to rot and collapse over time.
- To stabilize the structure, a reinforcing rod is driven into the concrete pillars in the middle. It is on this that the wooden elements will then be mounted.
- Horizontal supports are seated along the perimeter of the future gazebo on the reinforcement in two rows using an “overlapping” method.
- Next, the floor joists are installed. In order for the coating to be strong and stable, additional concrete supports are installed under the intersections of the joists.
- The joist structure must be embedded into ready-made horizontal supports.
- Holes for fittings are made in the vertical posts using a drill. Next, these supports are installed and, using scraps of wood, are aligned clearly perpendicular to the future floor.
- The temporary measure to align the vertical axes is removed after the trim is installed on top of the structure.
- The middle strap is the future railing. For better stability of the building, the railings are installed in the middle of the structure.
- Next, the installation of the roof frame begins. A board is cut along the diameter of the hexagon, onto which a hexagonal post is installed in the center. The rafters will diverge from it.
- The six rafters should fit snugly against the edges of the support post. On the other hand, they must cut into the supporting top trim. The entire structure is strengthened with self-tapping screws.
- The roof frame is ready, you can begin installing the roof. As a material, you can choose bitumen shingles, slate, metal profiles, corrugated sheets, and so on. In the first case, it is necessary to make a base from an OSB board. The slab should be cut on the ground, cutting out the elements strictly along the edges. Next, the OSB is installed and secured on top of the roof frame, treating the joints with sealant.
- For any heavy roofing material, the cornice should be made of metal.
- Now you can lay the roofing material.
- Before finishing work on the floor, it is necessary to protect the structure from below from moisture; for this, the voids between the joists are sewn up with a vapor barrier.
- Deck or tongue and groove boards are suitable as flooring materials.
- The lower part of the gazebo is decorated in the chosen style, the entire structure is painted or varnished.
The wooden hexagonal gazebo is ready! All that remains is to lay a garden path to the building and plant flower beds and shrubs around it. As an additional detail, you can install benches around the perimeter. If the gazebo is large and spacious, it is better not to do this, but to place garden furniture inside, for example, a dining room.
Metal structures are similar in installation to wooden buildings, only the set of tools differs, but brick gazebos require a reinforced concrete foundation. The secret to the stability of a brick structure is reinforced pipes, which are used as vertical supports, and bricks held together with cement are laid around them. Iron pipes also serve as supports for the roof frame.
b30186d87fde76f6eea5dfe00dbe82f6.jpe
e37e52e8c915147d28f2d01dc7a04c45.jpe
Beautiful examples
A spacious gazebo can become a kind of lounge area in the garden. In such a summer room you can place sofas, armchairs, and a coffee table. Decorative flowerpots, which are part of the gazebo and made of the same material, perfectly combine nature and a wooden building.
A miniature gazebo with versatile edges can fit into any corner of the garden. Such a lightweight design seems to dissolve into the landscape design. A great place to retire and read a romance novel.
Winter gazebos are often made in the shape of a hexagon. A barbecue grill is installed in the center, which makes it warm inside. The principle of constructing a winter building is the same as in the summer version, the difference is in the insulation and glazing of the building.
Step-by-step instructions for making a wooden gazebo
Project
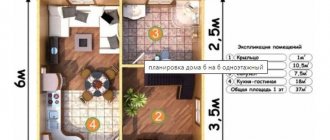
Analyzing what was written above, we can confidently conclude that a do-it-yourself wooden gazebo is suitable for self-production without special skills. The drawings and dimensions of the roof dome are as follows:
Hexagonal base markings
The position of the frame racks is oriented at its extreme points. The advantage of a hexagonal dome is its interesting appearance and better resistance to wind and snow.
Hexagonal gazebo project
Materials
To make a budget option you will need:
- Post beam 150*150 mm – 6 pieces, 2 m each;
- Strapping and rafter beams for roof elements - 100 mm and 40 mm for sheathing;
- Roofing iron or tiles;
- Carved shields;
- Edged board;
- Fasteners – self-tapping screws, bolts;
- Impregnating and decorative compositions – varnish, stain and others.
Beam for frame
Tools you will need to carry out the work
Depending on the complexity of the structure, additional reinforcing beams, steel corners, and logs are required. Next, we will consider the algorithm for constructing a hexagonal gazebo with your own hands according to individual dimensions and drawings.
Marking and preparation of the site
Marking the area for a hexagonal gazebo
The turf is removed from the soil surface and leveled. Markings for racks are carried out using stakes and cord. In a hexagonal figure, the triangles formed by the twine are equal - see the drawing of the dome. Once you are sure of the correct position, proceed to the next stage.
Foundation and installation of racks
Installation of supports in prepared holes and filling with cement mortar
Various options for attaching racks to the foundation
For recesses under the rack frame, a hand drill is used. By rotating it to a depth of 0.7 m, 6 identical holes are obtained. The ends of the prepared racks are coated with liquid bitumen or wrapped with roofing felt to prevent rotting. The installed timber is poured with liquid cement mortar and left to set for about 1 week.
875bb5ad1b23f846df15def9a2ed40bb.jpe 0d90b1b485a616ce1eb7ccbba1fde800.jpe ae8075aa63d31f54ba3e5e9164ca650d.jpe
dd3d1cfcd72dc1345b782d03ec1f25f5.jpe
Installation of strapping beam
Frame strapping
Using the cutting method, the upper strapping beam is attached to the paw, and then the lower one for installing the floor joists. The nodes are reinforced with steel corners. If you use self-tapping screws, then pre-drill holes of a smaller diameter and then screw in the fasteners, otherwise the timber will crack.
Finished gazebo skeleton
For reliability, a do-it-yourself hexagonal gazebo, drawings and dimensions of which are indicated on its own plan, must have a middle strapping beam installed at half the height of the object. It will serve as a guide for installing carved shields.
Dome assembly
Assembly and installation of the dome
The roof is assembled at the bottom and installed all at once. To do this, the rafter beams are sawed at the desired angle and connected at the ends at one point. The other ends fit into grooves on the posts, with a remainder of 30–40 cm outside the gazebo to protect against dripping moisture during rains. They are reinforced with bolts - the roof requires reliability. The rafters are reinforced with each other by their own strapping. All that remains is to fill the sectors with lathing and cover the roof with tiles or ondulin.
Ondulin roofing
Installation of flooring and fittings
Installation of the floor in the gazebo
Floor joists are attached to the lower strapping beam in pre-cut grooves. They should not interact closely with the ground to avoid dampness. Next, the floorboard is laid. Wooden carved shields are reinforced on the outside, and benches are installed inside along the walls of the gazebo, unless otherwise provided.
Protection and decor
Impregnation of wood with a protective composition
The finished gazebo is cleaned with a grinding wheel or paper, then impregnated with compounds to prevent moisture penetration and prevent mold and rot. All that remains is to decorate your own brainchild. This is a matter of taste - the wood pattern itself is already good. However, if recycled materials were used for the gazebo, then it makes sense to coat the cleaned wood with varnish or reveal the pattern using stain. As a last resort, paint it in dark, noble colors.
Complex options are made on the basis of simple ones. For clarity, detailed video instructions for assembling a summerhouse are offered to help the home craftsman.
e8976a78cf1d0ea5fe3f9bfc57af6e1d.jpeTypes of roofs
Round
The shape of a circle always causes surprise and admiration. If you think about building such a roof yourself, you won’t immediately decide where to start.
In fact, the round design is not very complicated. The main thing is to lay the roof sheathing evenly on the wooden sheathing, and the roof is no longer the biggest problem.
If we are talking about polycarbonate, then the process of laying it on the roof is noticeably different. Thanks to its flexibility. it can simply be bent and secured to the roof using roofing screws. How much easier it is to perform such an installation compared to wood is a big question.
With two tiers
Interesting projects always have a certain “zest” in the design. In this case, it is a two-tier roof, which is called a turret in the Hacienda program. We are not talking about a full-fledged gazebo with two floors, but rather with a decorative element on the roof.
Cone shaped
By adjusting the angle of the slopes, you can create a cone-shaped roof. The gazebo will look taller and more massive in appearance, although, apart from the sheathing and elongated rafters, you will not need anything else.
In addition to the aesthetic aspect, there is another useful cone-shaped shape: snow will not linger on the roof, and this, in turn, will reduce the likelihood of leaks.
Brickwork technology
Laying gazebo walls
The next step after the foundation will be brick laying. It is made from both ordinary and facing bricks (in the first case, the appearance will suffer).
If you use bricks of different colors, you can give the gazebo a decorative and sophisticated look.
The bricks are laid on cement mortar using a trowel. The cement mortar consists of:
- 1 part cement M400;
- 3 parts sand;
- water (added as needed).
To give the building a complete look, you can use figured lattices as decoration, as well as decorative architectural elements. If wood products are used, they must be impregnated with an antiseptic to prevent rotting and mold. Products can also be varnished.
As you can see, if you try hard, you can achieve the desired result, and then the gazebo will become a source of pride, and using it will bring a lot of joy and pleasure.
Peculiarities
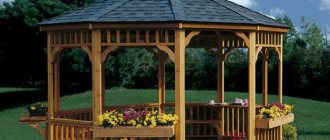
Hexagonal construction has a number of advantages. From the point of view of the harmony of construction in any natural landscape, models of small and medium-sized architectural forms that tend to be round in shape meet all the laws of Feng Shui. Thus, we can assume that relaxing under a hexagonal-shaped canopy will energize and maintain health.
If we talk about utilitarian and decorative aspects, we can highlight the following advantages of this solution:
- A 6-corner gazebo is much more spacious than a square or rectangular building;
- such a design is strong and reliable, it can withstand a large mass of snow in winter;
- a gazebo of this shape can be made from any material, this is possible due to the stability of the structure;
- Most often, it is the hexagonal shape of the building that is erected for winter picnics, since the frame technology can withstand heavy glazing;
- the simplicity of the design is accessible to any craftsman;
- attractive appearance.
Final work
The main part of the activities has been completed, all that remains is to build the railings according to your taste and color, as well as carry out manipulations to decorate both the internal and external space. In addition, if the floor is made too high, especially if children are planning to visit the gazebo, it would be useful to build steps at the entrance. Since the structure being erected is a street structure, it should be protected as much as possible from the harmful effects of natural phenomena.
As you can see, building a gazebo on your own at your dacha is quite a difficult task, however, with the right approach and due diligence, the installation process in accordance with the attached instructions can turn into a pleasant hobby for every owner, the result of which will delight every member of your family and guest.
Tools
Regardless of what you need, you will need a standard set: hammer, saw, hacksaw, drill. If you are making a gazebo with a metal frame, then welding the seams is best for fastening. Bolts and nails will only be needed to secure the roof and parapet cladding. In the wooden version, it is best to connect the beams with bolts, using wide washers so that the head does not push through the wood. For concrete, you will need a concrete mixer or a container convenient for manual mixing and shovels. There will also be a need for consumable tools, such as brushes, nails, bolts, electrodes for the welding machine.