Review author: Terra Design School
On any site it is simply necessary to arrange paths in some way. Thus, they not only acquire an aesthetic appearance, but also provide a lot of convenience to the gardener. Concrete paths in a country house are the most common way to design a landscape in a garden.
Garden paths made of concrete at first glance are simple devices, but they are quite complex structures that are designed for a long service life.
Before starting work, you need to carefully consider their location, all the bends and turns, since changing anything after pouring is a very troublesome task.
No. 1. What are the benefits of concrete paths?
Before installing concrete paths on your site, you need to know about all the advantages and disadvantages. The main advantages of paths made of concrete include:
- ease of installation, you can do everything yourself without the help of specialists;
- low price (compared to other options);
- the ability to manufacture any shapes and sizes if appropriate formwork is available;
- extensive decoration possibilities (adding pigment to the solution, using stone, mosaics and other decorations);
- strength and durability;
- resistance to the harmful effects of the environment (moisture, frost, etc.).
Among the disadvantages are:
- lack of possibility of redevelopment. Since this is a capital structure and it will be practically impossible to change the direction after the completion of the work, it is necessary to plan in advance both the structure itself and the entire surrounding area;
- the complexity of the preparatory work. In order for the design to be truly high-quality and reliable, you will need to put in enough effort and spend a lot of time preparing materials;
- occurrence of cracks. Sometimes in the off-season, soil shifts can occur, as a result of which the concrete structure can gradually collapse, including due to temperature changes.
If we compare concrete paths with other options in terms of advantages and ease of arrangement, then they win in many ways. Related to this is the desire to independently organize such trails on the site. Where to start and what to consider?
Final events
The formwork with pegs is removed a few days after the work is completed.
The remaining small gaps and holes in the ground are masked using concrete and waterproofing additives. After this, the side parts of the path are carefully cleaned, covered with earth and compacted. After 5-10 days the path is suitable for use. Paths in gardens and courtyards are often decorative elements, so they can be given an unusual appearance. Often, to decorate them, they use imitation of natural stone, chaotic or ordered pressing of pebbles, painting, laying out patterns with pieces of tile, etc. If the path is planned to be used infrequently, then it can be made in the form of separately poured slabs of the desired shape. Affordable and practical to use, concrete has gained popularity in organizing garden areas and personal plots.
No. 3. What tools and materials will be needed?
Before starting work, you should stock up on everything you need, namely:
- cement not lower than grade 300;
- sand;
- crushed stone;
- waterproofing additives for concrete;
- pieces of plywood, boards or metal to create formwork;
- wooden or steel pegs;
- sledgehammer or hammer for hammering in pegs;
- container for mixing the solution;
- a pair of shovels;
- steel construction mesh;
- smoother for leveling the surface of the path;
- trowels and spatulas.
No. 4. How to design a path?
The first thing you need to think about is where the paths will be located, who will move along them and when , what determines their width and shape. On paper, you can draw a site plan, indicate on it the location of all buildings and important areas, connect them with straight lines, which will be the axes for future paths. The paths can remain smooth and straight only between huge beds; in other cases, it is better to make them slightly curved to give the area an interesting look and make movement more comfortable and convenient.
The width of the path that leads from the gate to the central entrance of the house should be about 2 m, for auxiliary paths a width of 0.8-1 m is enough, between the beds you can arrange paths about 0.5 m wide. Those paths along which the car will move , should be no narrower in width than the car itself.
Do-it-yourself concrete garden path: step-by-step instructions
- Prepare enough space. To do this, determine in which part the trail will go. Plan its location correctly, otherwise you will still walk on the lawn. Then clear the area of stones, grass and debris.
- Use boards to make formwork.
- The base is ready. Now fill it with a mixture of sand and gravel. Compact everything well and fill with water. Wait a little and then start pouring the concrete. The proportions depend on the functionality of the track. For example, to build garden paths for pouring, use 1 part cement, 1 part gravel and 9 sand. Pedestrian paths also do not need to withstand heavy loads, so take 4 parts crushed stone, 2.5 sand and 1 cement.
- Afterwards, it is important to ensure that the concrete dries as evenly as possible, so water the path with water for several days in a row. For watering, it is best to use a regular watering can.
- The complete readiness of the concrete depends on the weather, the thickness of the path and how dense the solution is. When the concrete is completely dry, remove the formwork.
Then you will need a shovel, with which you will remove the top layer of grass. The depth of work is 15-17 centimeters.
No. 5. How to correctly calculate the weight of building materials?
To avoid having to urgently purchase additional cement or sand during construction work, it is better to at least approximately estimate in advance the amount of materials that will be needed. The layer of concrete in different conditions may differ : for heavy clay soil - 5-7 cm, for sandy and light loamy soil - 10 cm. In addition, if the soil is swampy, then you need to provide a layer of gravel 5 cm thick. In any case, you will need a so-called cushion , which is made of sand and has a thickness of 10-15 cm.
The calculation of all the necessary materials is quite simple. Let's say it is necessary to build a path with a width of W = 1 m, a length of D = 10 m and a thickness of T = 10 cm (0.1 m), and the underlying layer of sand will be equal to P = 0.1 m:
- To organize a sand cushion, the required amount of sand is calculated as W*D*P. In our case, it turns out 1m*10m*0.1m=1m3. According to the reference information, the weight of a cubic meter of sand is 2400 kg, so 2400 kg is needed to complete the underlying layer;
- concrete can be prepared in the proportion of 3 parts sand and 1 part crushed stone, cement and water, but there are other options, which will be discussed later. It is more convenient to first calculate the volume of concrete required using the formula W*L*T, which comes out to 1m*10m*0.1m=1m3. According to reference information, the average weight of a cubic meter of concrete is 2800 kg. The resulting weight of the concrete volume can be divided into 5 parts, not taking into account water: 2800/5 = 560 kg - the weight of one part, i.e. cement. The rest 2240 kg is the weight of sand, crushed stone and water. You may also need dyes, plasticizers, water-repellent additives, etc.
Of course, this calculation does not pretend to be strictly mathematically accurate, but it allows you to approximately understand how much and what will be needed.
Technology selection
The whole day was spent searching for a suitable “path” technology. The main candidates here were paths made of sandstone and paving slabs. I rejected the first option due to my lack of the necessary artistic skills, but the second was unpleasantly surprising at the cost. For the kind of tiles I liked, they asked about 150 hryvnia, but they still had to spend money on borders and trim. Where do people get this kind of money?
But I didn’t want to see square concrete slabs in my yard. Oddly enough, advertising helped.
Why not? In fact, they don’t offer anything terrible. The same concrete only in a more attractive decorative form.
Of course, instead of wooden formwork, you will have to buy forms for concrete paths, but if you take into account that I needed to fill not more than a meter, and wood in our time is also not free, then the purchase should ultimately pay off.
Along with the forms, I ordered fiberglass and plasticizer. Even if I did not have a technical education, the importance of the above components would still not raise any doubt.
But I decided to abandon the lubricant and dye. It’s not that there wasn’t enough money for them, but I was quite happy with the concrete color of the sidewalk, and pulling out a plastic mold from a damp solution is not such a difficult task that it would be worth throwing away an extra 70 hryvnia.
No. 6. How to markup?
Using a pre-prepared plan for the location of garden paths, it is necessary to determine directly on the ground where the paths will go. Their location is indicated by wooden pegs , which are driven in at equal distances from each other and a rope is pulled between them. This is the simplest and least labor-intensive stage of work.
Features of the arrangement of underlying layers
Simply mixing a solution and pouring it on the ground is a waste of time, labor and money. For any coating, especially concrete, it is necessary to install the correct foundation.
Drainage
The purpose of this event is to remove excess moisture and reduce deformations resulting from soil heaving. The soil is cut to a depth of 25-30 cm, the base is well compacted. There is no need to go too deep. This will increase the consumption of materials, but will not affect the strength and durability of the track in any way.
Crushed stone and sand are laid on the resulting dense bed. The total thickness of the bedding should be at least 10-20 cm. Everything is compacted layer by layer.
To protect the base from the germination of vegetation and siltation of crushed stone, it is recommended to use geotextiles. This is a non-woven polymer material that allows water to pass through but filters out contaminants. It definitely won't be redundant.
Waterproofing
Many people think that a garden path does not require waterproofing, but this is not entirely true. It must be taken into account that moisture is necessary for concrete to harden. And since the hydration reaction of cement with a lack of water occurs incompletely, dehydration should not be allowed at the initial stage of hardening.
To prevent water from fresh material from seeping into the ground, waterproofing is installed - roofing felt, dense polyethylene, membrane. The water in the solution is retained, and the hardening process proceeds normally.
No. 7. How to prepare the soil?
At this stage, they begin to select the top layer of soil at the trail locations. The soil is removed along with small roots, which can begin to rot and form voids in which water can accumulate, and when it freezes and increases in volume, additional pressure will be exerted on the path.
If the layer of “cushion” of sand is 10 cm, and concrete - 10 cm, then taking into account that it is better for the path to rise 3-5 cm above the ground level , you will need to choose 10 cm + 10 cm - 3 cm = 17 cm of soil. If a drainage layer of gravel is needed, then you need to add another 5-10 cm to the resulting value. Select the soil layer using a shovel.
Process Basics
You can create the texture of a concrete surface that will imitate stone, brick or other material using the following techniques: stencil mixture, stamped mortar and sprayed mixture.
Stamped concrete
Now let’s look at the technological processes of each of the listed methods for manufacturing decorative concrete:
Spraying method.
It is used in cases where there is a need to imitate stone, brick or other images on the wall. During the application process, a special acid dye is used, which is laid on the surface in several layers. This leads to a reaction of the solution with dyes, which results in the desired color. The color shade can be complemented by a variety of effects. The dye is applied to the surface using several methods, in particular, the spraying method. To create a beautiful texture or apply a particular image, you can use stencils when spraying.
Stencil method.
This method is called “stencil mixture”. It is applied to the surface using a pre-prepared stencil made of paper or other material.
Stamping method.
This method is unique of its kind. Stamped solution, as it is also called, is applied to a wet surface, consisting of a colored fixative, a protective mixture and hydrophobic additives. All this is necessary to ensure that the stamp used does not stick to the concrete. Before stamping concrete, you need to make sure that the surface is perfectly smooth. The template or matrix must remain on the concrete until it dries completely. After removing the stamp, the surface must be thoroughly impregnated with a special impregnation, which acts as additional protection. But before applying it, the surface must be thoroughly washed to remove all kinds of substances that were used during the work process.
So, now we invite you to consider the process of making garden paths from decorative printed concrete.
No. 8. How to install formwork?
Formwork is a structure for pouring concrete. It is made of wood. If you want to make smooth lines or curves, you can always use plywood or other flexible material. The formwork is installed immediately or in parts, since the concrete is poured gradually. The second option will also save costs on materials.
The formwork should protrude 5-10 cm above ground level. It is necessary to lay a construction mesh at the bottom of the prepared trench, and every 5-6 m of the future path, install boards across it, which act as expansion joints . Thanks to them, the concrete path will not crack during temperature changes, placing stress on the boards. The height of the expansion joints must match the height of the track.
Design
The final result directly depends on how carefully the project is thought out and the necessary calculations are carried out. To do this you will need to do the following work.
- Choose a location for the path. It is better to lay it where a natural path has already formed: people always intuitively choose the optimal path.
- Make sure that the path does not pass under the crowns of large trees and under the eaves of the roofs. This will avoid damage to the canvas by tree roots and moisture from leaves or the roof dripping onto the concrete, which can damage the material.
- Decide on the shape and design.
- Decide what the width will be. If the area is small, forty centimeters is enough. However, if free space allows, it is better to make paths 60-80 centimeters wide.
- Consider the presence or absence of curbs. If you do not plan to install such elements, you will have to raise the road surface above the soil level. This will require additional work, but it will prevent the edges of the concrete structure from crumbling and protect it from subsidence.
No. 9. How to arrange a pillow?
The so-called cushion under the concrete path performs several functions, the main ones:
- concrete load distribution;
- drainage.
The sandy base allows water to pass through well, which means that the soil under the path will not freeze, causing deformation of the path. Under the sand, many experts advise organizing a layer of compacted crushed stone, but this is not always necessary. Over time, sand can sink into the ground along with water passing through it, so it is better to lay a layer of waterproofing made of roofing felt, geotextile or agrofibre . The last two perform very well, as they do not rot and allow moisture to pass through perfectly.
The sand layer must be compacted well. You may have to wet it for this, since there should be no voids left inside. The surface must be level so that the concrete layer is distributed evenly. It is worth noting that an alternative to sand can be a concrete screed or flat stones, but their thickness must be taken into account when deepening the trench.
Tips and care recommendations
After a long winter, a long absence of owners from the dacha, concrete paths often require cleaning, repair, and restoration. On the surface, along the edges, cracks, gouges, chips, and pits form, which do not always add decorativeness to the coating, because over time the damage will become larger and grass will grow through them.
Experts advise the following:
- correct the edges of the canvas - clean the surface, treat it with a primer, apply formwork along the edges, cover up defects with concrete mixture;
- level the entire plane of the canvas - prime the surface, install the formwork, fill it with a semi-liquid solution until a flat surface is formed;
- large potholes are reinforced with metal mesh before filling;
- if the road is made of tiles, the broken fragments are replaced with whole ones, a little cement is poured under the sagging places, after removing the parts;
- when, instead of tiles, wooden cuts that have become unusable are embedded in concrete, the easiest way is to replace them with new ones, having previously been impregnated with hydrophobic compounds;
- weeds, even the smallest ones, that have grown near the path must be removed in time - their root system gradually destroys the surface;
- it is important to ensure that the paths are not washed away by water and to clear them of snow in a timely manner;
- Painted paths are periodically watered with a hose to prevent dust from accumulating.
All paths must be kept clean - this way they will last a long time, maintaining a beautiful appearance.
No. 10. Concrete preparation and mixing
There are no single correct proportions in the ratio of sand, cement, gravel, water and other components of concrete. As for the amount of water , the best option would be 1 part water to 4 parts cement, but as the composition is prepared, water can be added to improve plasticity.
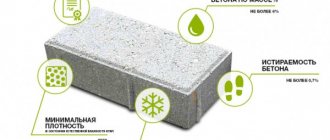
For paths with light loads, you can choose a cement, sand and gravel ratio of 0.5:5:4. For car paths, a ratio of 1:1.5:2.5 is suitable. Many experts use a universal composition of durable concrete , where cement, sand and crushed stone are in a ratio of 1:3:1. Additives are also used to give the concrete the required qualities.
It is better to choose cement no lower than M300, river sand, crushed stone 10-20 mm in size. Granite is optimal. If the load on the paths is large, then you can take a larger crushed stone fraction of 40 mm. It is convenient to mix all the ingredients in a concrete mixer or mortar mixer , but if they are not available, any container such as a trough or just a large steel sheet will do. First, sand and crushed stone are mixed, then cement is added, and a gray mass is obtained. After this, add half of the required amount of water, mix, and then gradually add the rest of the water so that the composition becomes the desired consistency.
In theory, the thicker the concrete, the stronger it is, but thinner ones are easier to work with and distribute evenly. To simplify your task, you can add a little plasticizer , which makes the concrete more plastic and fluid without excess water.
Advantages and disadvantages
Like any other surface, concrete roads have many advantages:
- strength, reliability, durability - the surface remains for decades;
- the surface can be easily given almost any configuration;
- affordable price - the cement, sand, water that makes up the coating cost very little;
- ease of installation - easy to create with your own hands, without special skills;
- high resistance to mechanical damage, wear resistance, even during active use;
- the material does not lose its qualities, even when exposed to harsh weather conditions - rain, wind, frost, heat, snow;
- the ability to fit a path into even the most complex terrain and garden design.
But there are also disadvantages:
- due to seasonal soil mobility, cracks often appear on the paths;
- a concrete surface is a permanent structure, its location is difficult to change;
- If done incorrectly, the path will ruin the appearance of the site.
No. 11. Reinforcement and filling
Reinforcement or reinforcing mesh is laid on a sand bed, on top of which concrete is poured. The bottom of the trench can be additionally watered so that it does not sag under the weight of the concrete. The layer is leveled and compacted until the so-called cement laitance appears, which gives the concrete excellent strength characteristics and allows it to harden rather than dry out. In order for the concrete to harden and not dry , it is recommended to periodically wet the surface with water or cover it with polyethylene. Some even spread plastic film under the concrete, but this is not the best way.
To prevent water from accumulating on the paths in the future and forming puddles, you can make the central part of it a little higher than the side ones. The next day, when the solution has slightly hardened but is still soft, you can decorate the surface. For example, you can make furrows in a chaotic manner, imitating a stone surface. The next day, white or red colored cement mortar is poured into the furrows.
Requirements for compositions
When choosing a suitable composition, you should focus not only on the color of the paint, but also on its characteristics. The purchased paint and varnish material must withstand special operating conditions, and therefore must meet certain requirements.
In order for the applied coating to last as long as possible, it is necessary to choose compositions that have:
- resistance to abrasion and mechanical stress;
- resistance to ultraviolet radiation, which can cause cracking and peeling of the applied coating;
- good breathability;
- sufficient durability. The properties of the applied composition must remain unchanged for many years.