Changes in temperature and humidity can negatively affect a seemingly quite durable construction covering - screed, which is necessary to level the floor and correct various defects on its surface. This layer, under the influence of external factors, begins to expand, which creates a certain pressure on the screed itself and the walls of the room. As a result, the integrity of this part of the floor may be compromised. But any hardware store has something that will prevent damage to the cement screed when exposed to various factors - this is a damper tape for floor screed. What is it and how is it used?
Damper tape for floor screed
What is a damper tape and why is it needed?
Expansion of the cement screed - this phenomenon does occur and can cause a lot of harm if the screed was not done correctly. Due to the processes taking place, the screed itself may become cracked or cause damage to other building structures.
Defects in screeds - cracks
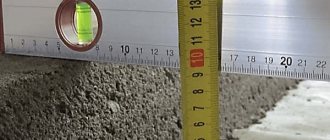
Attention! The thermal expansion of a standard, almost universally used sand and cement screed is about 0.5 mm per linear meter. This is quite a lot, considering the hardness of the walls of the room in which this work was carried out.
Cracks in the screed due to expansion
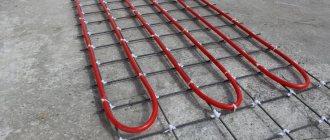
This is why it is necessary to use a damper tape when creating a screed. The latter is a long strip wound into a roll and made of polyethylene foam. The material is soft, plastic, easily compressed under external pressure, and it is precisely due to this that it is able to nullify the expansion of the concrete screed. The damper tape serves as a kind of shock-absorbing layer between the screed and the walls, protecting them from mutual destruction as a result of the resulting pressure.
Damper tape for underfloor heating screed Isolon, 8 mm x 150 mm x 50 m
On a note! Damper tape can also be called buffer, edge, compensation. And its main name comes from the German word Dämpfer, which translates as “silencer”. Thus, the material fully justifies its name.
The expansion tape also provides additional heat and sound insulation and is used as a expansion material and separator when pouring large areas.
Why is damper tape needed?
damper tape for screed
Recommendations for selection
Damper tape is an ideal object for counterfeiting. A student can print (download and then print on a color printer) the insert. Cutting the tape itself from the roll backing is just as easy. Roll it up and seal it in cellophane - no problem. Therefore, when shopping for goods, you need to study some nuances.
- While at home, you need to decide on the width and thickness of the tape, as well as its appearance.
- The tape must be in undamaged packaging, box (packed by European manufacturers) or film. This will protect you from many troubles.
- If the packaging is damaged, the following steps should be taken:
- ask to see a certificate of conformity;
- check the density of the bay, especially a large one - they could rewind ten meters;
- make sure the strip is intact, and if there is a skirt, then that too. If there is damage, even at a discount, it is better to refuse the purchase.
- The self-adhesive tape should not have partial peeling of the protective strip - the glue has lost its properties.
- The thickness should be the same along the entire length, which is clearly visible on both sides of the bay.
- The cutting line must be perfect. Irregularities indicate a fake.
- Dirt on the surface is not allowed.
- Preference should be given to trusted manufacturers.
Advantages of damper tape
Buffer tape does its job perfectly and has a lot of advantages. It is precisely due to the special properties of the material from which the tape is made that it cannot be fully replaced by other materials.
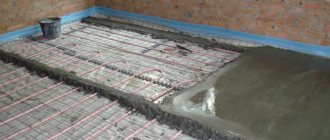
Correct application of the damper tape is a prerequisite when pouring the floor
Advantages of buffer tape:
- sufficient softness and plasticity to perform its functions - foamed polyethylene easily wrinkles and then restores its shape if necessary;
- excellent thermal insulation properties. This feature reduces heat leakage through the joints between walls;
- high sound insulation rate;
- environmental friendliness and complete safety for human health;
- the ability to provide waterproofing in installation areas;
- durability and strength of the material;
- ease;
- high resistance to external factors;
- complete resistance to biological factors - polyethylene does not rot, fungi and other parasites do not settle on it;
- very simple installation method.
Laying damper tape for floor screed
The only disadvantage of damper tape is its high cost. Using tape in repairs and construction can cause a serious blow to the budget. But, due to its advantages, this material is quite often used for repairing premises for various purposes - from residential to industrial. The damper tape does not have any negative reviews.
Self-adhesive damper tape
Additional Buffer Tape Features
As a rule, compensation tape is installed only around the perimeter of the rooms when installing the screed. However, it can also be used for other jobs - all of which are related to the floor. For example, expansion tape is often used as a barrier to spreading mortar, or as a separator if the screed has a large area. However, when installing a self-leveling floor, such a tape does not need to be used.
Damper tape - a panacea for cracking (destruction) of concrete
Damper tape can be used not only for internal, but also for external work. For example, when constructing a blind area. It will protect concrete from cracking during sudden temperature fluctuations. In this case, the tape is laid in the expansion joint between the blind area and the wall.
The process of creating a concrete blind area
Video - Floor filling technology
Typical sizes
There are several standard sizes on the basis of which compensation tape is produced. The best option is considered to be products with a width of about 15 cm and a thickness in the range from 4 to 10 mm, sold in rolls of 50 meters.
It is recommended to select the width of the tape taking into account the thickness of the future concrete layer. During the rough pouring of concrete, a 10 cm wide strip is sufficient, and for a thicker screed it is recommended to use 15 cm wide strips.
| Options | ||||
| Width, mm | Thickness, mm | Length, m | ||
| 100 | 10 | 25 | ||
| 150 | 10 | 11 | ||
| 100 | 10 | 11 | ||
| 100 | 10 | 25 | ||
| 150 | 10 | 50 | ||
| 80 | 8 | 20 | ||
| 100 | 8 | 25 | ||
What should you consider when purchasing damper tape?
Demand creates supply, and therefore in the construction market there is now a large selection of damper tapes from various manufacturers. They differ from each other in technical characteristics, appearance, and price. Due to the fact that the market offers a large selection, it is not easy to settle on the tape of any one manufacturer. You will have to study the proposed options and choose the best one with the optimal price-quality ratio.
Choosing the right damper tape
First, you should get acquainted with the form in which the damper tape is sold. It is sold in rolls, which are easy to transport due to their lightness and relative compactness. This aspect is also useful when installing the material - you don’t need to cut anything.
On a note! The cost of one roll usually varies between 500 rubles, although there are more expensive types. When decorating a small room, the costs will not be large, but for large rooms and halls you will have to purchase a lot of tape. When drawing up an estimate, it is better to immediately include the tape in the list of required materials.
Despite its resistance to external factors, the material should be stored in dry rooms at room temperature. In this case, the tape must be wound into a roll.
Compensation tape on a roll
Attention! During transportation, it is advisable to avoid severe mechanical damage and impact on the tape - these factors can worsen the performance properties of the material.
Damper tape in a heated floor system
When choosing a tape, you should pay attention to the following parameters.
- Integrity and absence of deformation . The tape should be smooth and neat. Damaged tape should not be purchased.
- Appearance . The tape must be clean, free from stains and defects.
- Roll density . If there are delaminations or cracks in the roll, then there is a risk that the adhesive surface is damaged and unusable.
You should not give preference to a tape that is cheaper but has defects. As a result, the quality of all screed installation work may ultimately suffer.
Tape laying process
Advice from professionals
Demand creates supply, so in the modern building materials market there is a wide selection of damper tape options from foreign and domestic manufacturers. Products differ in appearance, technical properties and, of course, price. For this reason, many, especially inexperienced craftsmen, find it quite difficult to make a choice of one tape or another.
Experts advise buying damper tapes with a width of 100 mm for laying single- and double-layer screeds. For prefabricated systems, purchase products with a width of at least 150 mm with a divider.
You can learn how to properly install the damper tape in the following video.
Cost and manufacturers
The most popular manufacturers of tapes, which have earned the trust of the buyer and are used by construction companies, are known to most from other products for repair. These are Knauff and Energoflex.
Edge damping tape 100 mm x 20 m
Table. Characteristics of Knauff, Energoflex and Leroy Merlen tapes.
| Brand | Description and characteristics of the tape |
| Knauff | Made of polyethylene foam and polyethylene film (skirt). The material ensures high quality work. Can be used for arranging self-leveling floors. The width of the tape is 10 cm, the length of the product in one roll is 40 m. The main disadvantage is the high price. |
| Energoflex | The tape is used to compensate for the expansion of screeds, including when installing heated floors. It has a skirt that prevents the solution from penetrating under the edges of the tape itself. The thickness of the product is 10 mm, the length of the tape in a roll is 11 m. The product, as a rule, is installed completely around the perimeter of the room, if the screed area does not exceed the required 10 m2; if the area is larger than this value, then it is necessary to provide compensation seams. |
Knauf damper tape
SoundGuard Band Rubber, 50 mm
Damping tape SoundGuard Vibro EcoRoll
Energofloor damper tape
Prices for damper tape VALTEC
Valtec damper tape
Varieties
Different manufacturers make different additions to the parameters of the base material of the edge tape. However, despite this fact, there are only three types of damper tape on the modern building materials market:
- Standard self-adhesive strip. This is a long tape made of styrene or polyethylene foam assembled into a roll. Easily attaches parallel to the walls of the room.
- Stripe with a skirt (basque). The last in this case is dense material that extends beyond the edges of the tape by approximately 30-100 mm. The skirt is durable; when the tape is fixed, it is laid on the floor along all walls, partially covering the floor covering. Skirt tape can be regular or self-adhesive.
- Self-adhesive, with an adhesive strip on the back side. In the process of laying the edge strip, the protective layer in the form of a paper glossy tape is removed from it, and the tape is easily glued to the desired surface with the sticky side. Due to this connection, the product does not slip while filling the field with screed mortar.
Installation of damper tape for screed
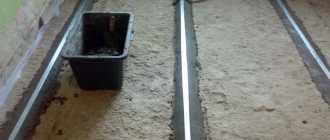
Installation of the damper tape begins before the concrete screed is poured. It is laid along the perimeter of the room. If there are columns, material will be laid around them.
Let's start installing the damper tape
Table. Laying damper tape with your own hands.
| Steps, photo | Description of actions |
| Step 1 | Laying the damper tape starts from the corner of the room. Since the tape is supplied in rolls, installation is very convenient, gradually unwinding the required amount of material. If the tape is self-adhesive, then during installation the protective layer is removed from the back surface and the tape is glued. A conventional product is attached using adhesives or self-tapping screws. |
| Step 2 | The material is laid continuously. If the room is too large and one roll is not enough in length, then the edges of the strips can be overlapped with each other. |
| Step 3 | The corners of the rooms are carefully taped. In these places the tape is pressed very tightly against the walls. |
| Step 4 | The installation is completed at the moment when the tape returns to the starting point. At this point it is cut with a stationery knife so that there is a slight overlap. |
After completing the installation of the damper tape, you can walk over it with a roller to seal the connection between the material and the wall. If the screed area exceeds 10 m2, then it is advisable to divide it into separate sectors. In this case, the principle of installing the tape does not change.
Installation of expansion joints in floor screed
Video - Installation of damper tape
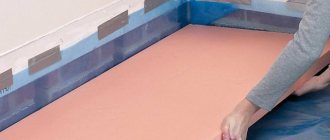
Table. Installation of dry screed using damper tape.
| Steps, photo | Description of actions |
| Step 1 | First of all, the subfloor - the base - is thoroughly cleaned of debris. |
| Step 2 | The base is covered with polyethylene film for waterproofing. |
| Step 3 | A damper tape is laid and secured around the perimeter of the room. |
| Step 4 | The corners are well glued so that the tape does not fall behind. |
| Step 5 | The filler – expanded clay sand – is scattered over the prepared surface, starting from the highest point of the floor. |
| Step 6 | The thickness of the sand layer should be at least 4 cm, but not more than 12 cm. By the way, various communications can be laid inside the layer, if necessary. In this case, the layer should overlap them by 2 cm, no less. |
| Step 7 | The coating is leveled. The most convenient way to do this is by lighthouses. Then the surface is compacted with a rubber hammer. |
| Step 8 | The evenness of the base is checked using a building level. |
| Step 9 | The sand layer is covered with gypsum fiber sheets. |
| Step 10 | The sheets are attached using glue and screws. After this, the screed should rest for about 2-3 days, and then the repair work can continue. |
What can be replaced
In general, damper tape is not the cheapest material. It is quite possible to find materials with the same properties, but cheaper. Without a skirt and an adhesive layer, but this is advanced functionality. If your budget is limited, you can replace the edge damper tape:
- polyethylene backing for the laminate, cut into strips of the required width;
- rubber band;
- old linoleum;
- penofol cut into strips.
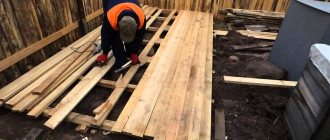
If you are pouring screed over joists, you also need damper tape.
There is another cheap option. Instead of damper tape, use thin wooden strips wrapped in plastic film. After the concrete has set, they are removed. A void can be left, or it can be filled.
How to fill the seam
In general, damper tape is a consumable material. That is, it is not removed from the screed and is not reused. But if you don't like the idea, you can delete it. And so that the gap does not fill with debris and insects do not live in it, it is filled with silicone sealant, which remains elastic after drying. But this option cannot be called cheap. The high consumption of expensive silicone makes savings irrelevant.
Buffer/damper/edge/edge floor tape for screed: how to install it
You can fill the gap with foam. Cut off the excess after hardening, but not to the level with the coating or screed, but a little deeper. Apply the same silicone on top. And the elasticity will remain, and there will be no gaps, and debris/insects will not annoy.
How and with what to cut
Most substitutes for damper tape are rolled materials. They can be cut into strips of the required width. If you need to be more or less careful, take a board, a sharp knife and a long ruler. Roll out the substrate, Izolon or other selected material. We lay a board under it along the edge. Place a ruler at the required distance from the edge and cut.
Ready for further work
To speed up the process, we fold the material in several layers, and then everything is the same. We put the board down, apply a ruler and cut along it. But we try to cut through all the layers at once down to the wood. It doesn't work out very nicely, but it's much faster.
Another way is to hang it with scissors. But this is not ideal at all, so you can do what is necessary. It’s also long and tedious, especially if you have to cut it for the whole apartment or house. The total is more than a hundred meters. So be patient. You can speed it up by sawing with a saw. If you are not a perfectionist, this is a great way.
Methods for attaching edge strips
The damper tape must be fixed during installation. But if it does not have an adhesive strip, then alternative fastening methods can be used.
- A furniture stapler and staples will allow you to secure the tape to walls made of foam or aerated concrete, as well as wood.
- Self-tapping screws, dowels, hammer drill and screwdriver . Not the best option, since the tightness of the material is severely compromised. A method suitable for brick walls.
- Liquid Nails . Suitable for poorly leveled walls.
- Masking tape will allow you to temporarily fix the tape while you pour the screed.
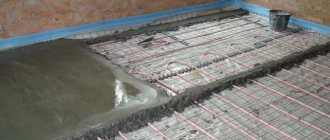
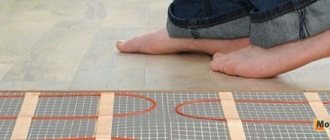
Damper tape when installing heated floors
Laying
In order to correctly lay the damper tape around the perimeter of the room, you must first determine its required size. Taking into account the required multi-layer base, the optimal parameters of the strip are determined.
The following steps for fixing the damper tape and creating a high-quality screed must be performed in stages:
- Before attaching foamed polyethylene, the surface of the walls and floor must be cleaned of dust and construction debris.
- For better adhesion, it is advisable to treat the surface on which the tape is laid with a degreasing mixture and dry it.
- Work must be carried out at positive temperatures.
- The excess parts of the product are cut off, but if a plinth is subsequently installed on the floor, the excess parts of the edge strip can be left.
- If you are laying a tape with a skirt, it is important to ensure that this part is well covered with the building mixture.
- When installing a heated floor, tape is also needed. It must be laid between the heating systems and the vapor barrier layer or under it.
- Laying foamed polyethylene does not provide for voids. The room needs to be completely taped around the perimeter. It is also undesirable to make frequent joints from segments.
- After installation is complete, you can walk over the tape with a construction roller - it will remove minor flaws and additionally press the strip against the wall. Only after this stage can you start pouring the screed.
If the tape has an adhesive layer, then simply press it with the adhesive side against the wall along the entire perimeter of the room. The option with a “skirt” is folded onto the floor so that no liquid (moisture) can get under it.
There are alternative ways to attach the strip. These include:
- Furniture stapler. In the case where the walls of the structure are made of foam concrete, the tape is fixed with a stapler using metal staples.
- Self-tapping screws and hammer drill. Ideal mounting option for a brick wall. The screws are screwed directly into the wall. First, holes are created with a hammer drill, and then dowels and screws are inserted into them.
- Temporary fastening can be masking tape, which must be secured with PVA glue to walls that have been thoroughly cleaned of dirt. It is removed immediately before pouring the screed.
- Liquid Nails. Apply in those areas of the base where there are unevenness.
Installation of the edge tape is carried out before pouring the screed. The strip must be securely fastened so that when pouring the solution it does not move or come off. To do this, preparatory work should be carried out. Plaster the walls, putty the bottom of the walls, install frames and finish the slopes. It is better to carry out this work before pouring the rough screed, then you can use construction waste as a fastening element for concrete.
It is also necessary to eliminate level differences, cracks, chips, unevenness and height differences on the rough base (no more than 5 mm is allowed). The contact angle between the wall and the floor should be 90 degrees. All debris and dust must be thoroughly removed. Despite the high adhesion of the adhesive coating, it is better to apply a primer underneath and wait until the primer dries.
Now you can glue a regular gasket with liquid nails or any quick-drying polymer glue, and then secure it with small nails or use double-sided tape. A self-adhesive product is even easier to install. To do this, you need to gradually unwind the roll, removing the protective strip and press the tape against the wall, attaching it around the perimeter. It is advisable to roll over the top for a tighter fit of the material.
If there is a canvas with a skirt, then it should be straightened horizontally, and the skirt should be completely hidden under the tie. The seal should be placed continuously without breaks, and when the roll is finished, the next one begins to overlap by about 5 cm. A damper should also be laid around all architectural and decorative structures. If the width of the compensator is chosen correctly, it will be 2-3 cm higher than the frozen mortar.
The excess must be trimmed flush after pouring or cut off using special cuts. If finishing the floor involves installing skirting boards, then you don’t have to remove unnecessary elements, since they will be covered by the skirting board, and if tiles are laid, then the unnecessary elements must be removed after grouting the joints.