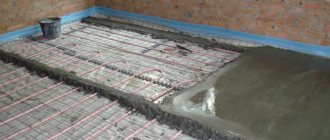
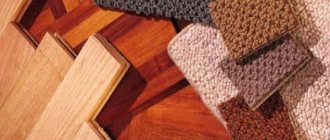
When installing heated floors in a house, a concrete solution is poured. Such a screed is needed to securely fix the heating elements of the structure. The layer of sand-cement mortar has excellent thermal conductivity, so heating the floor covering becomes as efficient as possible.
During the pouring process, a mesh for underfloor heating is used as reinforcement. Let's consider all its varieties and the features of choosing the right product for installing a heating system.
Is it possible to put reinforcing mesh on underfloor heating pipes?
Home / House construction / Floor / Is it possible to put reinforcing mesh on underfloor heating pipes?
You are here: Home >> Do-it-yourself water heated floor >> Installation of a warm water floor >> Installation technology for a heated water floor with a concrete screed
This article discusses step by step the technology for installing a warm water floor with a concrete screed. By this point, a damper tape should be attached to the bottom of the wall and other preparatory work should be done, which was discussed in the article Installation of a damper tape for a heated floor. If this is the case for you, then read on.
- when installing a heated floor, the relative humidity of the floor (a rough concrete base - if the floor is laid on one) should not exceed 85% (otherwise, excess moisture will evaporate and tend outward, which is why the finishing screed may burst). If wood or materials based on it are used, then the relative humidity should not exceed 70% (otherwise the wood will “lead”, the floor will change shape, the coating will crack, etc.).
Conclusion: we do everything that is written about in this article below only after the rough screed has dried.
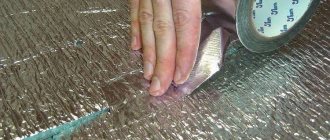
If the thermal insulation is penofol or cork or similar materials, then there is nothing special to say: this is sheet material that is laid out, glued together with tape, and a pipe is laid on top.
If a special polystyrene system is used for laying pipelines (with grooves for the pipe), then there are no problems either - such sheets have grooves, like a laminate or tongue-and-groove board, due to which they are joined:
But it is not always possible to purchase such specialized products, or it is unaffordable. Then you can buy polystyrene foam 5-10 cm thick. Expanded polystyrene sheets also have grooves for joining:
If finances don’t stretch to extruded polystyrene foam, then you can take foam plastic of sufficient density (from 35 kg/m3 or more), only it is advisable to glue the foam sheets together, for example, with polyurethane foam: spray a little foam, connect the sheets and... actually, this All. However, for me, it’s better not to save a penny and not add to your hassle, but to still buy extruded polystyrene: a warm floor is made for more than one season, so by saving on insulation, you can make a difference in the quality of heating. In addition, an important indicator is the density of the foam, because it will bear the load from everything higher. But you can’t always trust what’s written on foam plastic!
Once again: Extruded polystyrene foam is the best choice both in terms of density and thermal conductivity. White foam has a density of 18, 20, 22 kg/m3 - usually, so it is not suitable. It is better to buy extruded polystyrene foam as insulation for a heated floor and sleep peacefully.
How much insulation do you need to buy for a heated floor? The insulation covers the entire area, so we count the area of the house (if there are rooms where heated floors are not needed, then we do not count these rooms). But you need to take into account pruning, usually up to 5% is added to it. Well, multiply the resulting number by the number of layers of insulation.
So, polystyrene boards have a groove, which gives a tight connection. We place the first sheet of polystyrene in the corner of the room, pressing it tightly against the walls. We place the slabs with the inscription facing up:
Then we lay the remaining sheets, fitting them tightly one to one:
Where you need to get around obstacles (columns, for example), we trim the sheets. Polystyrene can be cut well with an ordinary sharpened knife; no electrical tools are needed. We draw a cutting line with a marker along the ruler, put something under the sheet that will not dull the knife, and cut. It's simple.
To ensure better insulation, we place the following row so that the sheets are staggered:
If necessary, we lay the second layer of polystyrene in the same way, also trying to ensure that the joints of the bottom layer overlap the sheets of the top layer. It’s even better to lay the second layer of insulation perpendicular to the first (that is, if the first layer is laid along the room, then the second one is laid across it).
With a properly arranged warm field, the temperature of the coolant is low (32...40 degrees). This means that you need not skimp on thermal insulation, but lay it at least 100 mm thick, and preferably 150 mm. In this case, you will not heat the surface of the planet - the heat will not go into the ground. We don’t skimp on thermal insulation!
A mixture of cement and sand
How to properly fill the floor under heated floors with a water circuit? The most common type of screed is made of cement and sand. It is easy to work with; sand particles act as an excellent plasticizer.
Typically, for concrete work in living rooms, cement-sand mortars of grade 150 are used. For installing a water floor, it is recommended to use M200. With increased loads on the floors, you can use a higher brand:
- M200-M250 when installing floors in retail premises or public buildings;
- M300 is used in warehouses and garages.
Factory mixtures, which will be delivered to the repair site, are purchased at mortar units. In stores they are packaged in bags. You can make the mixture yourself. This is a more labor-intensive way, but economical. You need to maintain the dosage of the components and find river sand with a coarse fraction.
Cement-sand mixtures for damp, wet rooms (bathrooms, swimming pools) are made with M400 cement. M500 cement quickly gains strength and is suitable for rooms with dry floors. The recommended thickness of underfloor heating screed is about 40 mm. In this case, laying a water-heated floor in a screed will be carried out without difficulty.
How to properly fill a warm water floor so that it lasts a long time? It must be resistant not only to mechanical, but also to thermal stress. It is recommended to add polypropylene fiber to the solutions: 900 grams per 1 cubic meter. The cost of such an additive is small, but it will increase the level of strength of the screed and prevent the appearance of small cracks. You should be aware that the fiber additive does not replace the reinforcing mesh.
Advantages of composite materials
Composite materials are rapidly replacing structural steel due to their engineering and technical qualities:
- Gain in weight and savings on delivery - for 100 m2 of screed (thickness 40 mm, mesh 50x50x3) is 160 kg less than for steel mesh (180 kg steel, 20 kg composite).
- Does not rot or rust, service life is from 80 years (for basalt).
- Increased moisture resistance – use even in sea water.
- Chemical resistance. Compatible with any additives to concrete, and basalt mesh for flooring is applicable in anhydrite compositions without additional treatments.
One or more cracks rarely compromise the integrity of the floor screed. In fact, a professional can successfully apply a number of corrective measures to repair cracks and ensure a high-quality foundation that meets specifications. But the use of floor reinforcement with mesh eliminates costly and costly repairs.
Purpose of the reinforcing mesh inside the screed
Appendix B of the construction standard SP29.13330, which is the main document for both professional and individual developers, provides terms for floor structures:
- waterproofing - a continuous film layer that cuts off groundwater/wastewater;
- vapor barrier - a film or membrane located under the screed or insulation, cutting off water vapor that can penetrate into the floor structure from the lower floor or underground;
- soil base - compacted soil on which the underlying layer is laid (available only in the construction of a floor on the ground);
- sound insulation – protects against structural and/or airborne noise from below;
- thermal insulation – reduces heat loss in the floor structure;
- underlying layer - distributes loads on the ground in the corresponding floor structure;
- coating - an exploitable part of the structure, made of decorative materials;
- screed – masks communications, provides a slope for drainage, levels the slab floor, ensures vertical adjustment of the finishing coating, and is always located underneath it;
- interlayer - an elastic bed for covering or a rigid connection of the facing material with the base.
Installation technology
Let's figure out how to properly install the mesh for laying heated floors.
It doesn’t matter which mesh you decide to use - the reinforcement is performed over the entire floor area. If the length of the surface to be poured is large, it is allowed to lay the mesh for overlapping reinforcement, followed by connection with wire.
Do not forget that indentations are made from the walls. If a complex base with smooth transitions or steps is being reinforced, the relief must be repeated. In such cases, the mesh is mounted on special fasteners so that it is suspended at a distance of two centimeters from the base.
Preparatory work
First you need to correctly place the mesh for the floor screed.
Install it at a certain height from the base, taking into account the thickness of the future screed for the heated floor and the size of the mesh rods. For this, it is allowed to use various devices - wooden blocks, fragments of bricks, metal profiles, etc. The main condition is that the stands must have the required thickness, allowing the solution to penetrate under the heating elements.
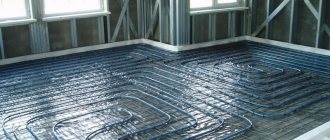
Before you start pouring the screed, you need to lay out layers of sand, gravel, hydro- and thermal insulation. After constructing such a “pie”, it is allowed to install the reinforcing mesh and fill the solution.
Nuances of reinforcement
There are general rules for the design and reinforcement of screeds that should be followed in work:
- Despite the different types of mesh for reinforcement, plasticizer components are added to the sand-cement mortar to increase strength and elasticity. The mixture is able to penetrate into cells of any size;
- Before starting work with the mesh, it is recommended to study the accompanying instructions from the manufacturer.
There are also certain reinforcement features:
- to prevent this from happening, the mesh should be located directly in the thickness of the layer, and not on the subfloor;
- The grid cells are determined in such a way as not to create obstacles for pouring the concrete mixture.
- the reinforcing mesh should not be contaminated;
- mesh elements should not protrude onto the surface of the screed. This will prevent the formation of corrosion on metal rods.
Laying the mesh
The reinforcing mesh is placed in the lower third of the poured layer. The stands are placed at the intersections of the rods. For ease of installation, it is possible to purchase special stands made in the form of crowns, stands, chairs, etc.
When installing the mesh, one important feature is observed - the installation step of the supports depends on the thickness of the intended screed.
If you decide to use a composite or plastic mesh, you will have to act somewhat differently:
- Having carried out the preparatory work on the construction of the pie, you should fill in the third part of the solution and level the layer;
- after this, the mesh is laid and embedded in the mortar layer;
- as soon as the electrical cable or warm water floor is laid over the grid, the remaining part of the solution is poured in, to level which beacons are placed;
- These types of meshes can be laid directly on the pipes of the underfloor heating system, but there is a possibility that the solution will not completely fill all the void areas.
The use of each known variant of reinforcing mesh has its own advantages and disadvantages, and this must be taken into account at the initial stage of work.
Installation work for laying mesh
In order for the mesh to perform its functions, installation specifications must be observed.
Attention! Any type of mesh is laid over the entire surface of the floor, maintaining a gap between the walls.
If the laying area is large, then the mesh is laid overlapping, connecting the pieces with wire.
If the floor relief under the mesh is unusual, for example, it has steps, then when laying out the mesh, you need to repeat the configuration of the floor covering.
The mesh is attached using suspended fasteners, at a height equal to two centimeters from the rough base.
Preparing for installation. If the base for the mesh is ready, it is worth checking that it is even and free of cracks. A polyethylene film is placed on it to protect it from moisture, then a layer of thermal insulation is laid.
The perimeter of the room is covered with damper tape, which serves to compensate for changes due to temperature changes.
If the floor is screeded on the ground, then layers of gravel and sand are laid, then thermal insulation, then waterproofing. A mesh is placed on these layers and a screed is made.
Reinforcing measures are carried out on the fill base in two layers.
Laying process. When installing the mesh, the most important thing is to position it correctly. The mesh is placed at a short distance from the base, which is calculated based on the size of the mesh rods, also taking into account the thickness of the concrete screed.
To create space between the mesh and the base, you need to lay blocks of wood, brick, or metal profiles under the mesh. These supports must allow the cement mixture to penetrate under the heating devices of the system. The stands are placed at the intersections of the mesh rods. In stores you can purchase ready-made products for stands, which are made in the form of a crown or a chair.
The surface reinforcement passes from below on the third part of the concrete screed.
The reinforced strips are laid overlapping by ten centimeters, retreating from the walls of the room by about two centimeters.
Attention! The distance of one stand from another directly depends on the size of the concrete screed.
Plastic or composite mesh is placed differently:
1. As soon as the layers of the cake are laid out on the base under the screed, it is filled with one third of the entire mixture, then leveled.
2. The mesh is laid on top, slightly pressing into the screed.
3.Next, lay the pipes or cable, filling with the rest of the solution, level the floor surface, focusing on the installed beacons.
This type of mesh can simply be laid over the pipes, but empty spaces may form during grouting.
How to secure pipes or cables. A simple way to secure cables or pipes to reinforced mesh using clamps. The method is considered the most reliable. Attention! Before fixing with clamps, they should be immersed in hot water for about ten minutes to soften the material, then the fastening process will be easier and faster.
Also, pipes and cables are attached to the mesh using fastening tape or wire.
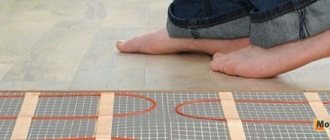
Types of reinforcing mesh for heated floors
Today, there are several types of reinforcing mesh for heated floors on the market, each of which has its own properties and installation features. They differ not only in the width of the cells, but also in the material from which they are made:
We recommend: How to make a warm floor from a heated towel rail?
- metal mesh. This mesh is made of wire with a diameter of 2.5 to 6 mm. Due to the fact that the mesh roll reaches a length of 25 m, its installation can be carried out practically without joints. The cells have a square shape, which increases the strength of the entire structure and prevents it from stretching during installation. In order to improve the adhesion of the mesh to the concrete screed, the cells have special notches. The galvanized top layer protects the metal mesh from exposure to moisture and cement mortar;
- composite meshes. Made from carbon or basalt fibers. The main advantages of such a mesh include its strength, low thermal conductivity, plastic structure, and low cost. The only drawback is poor heat resistance. If the system temperature exceeds 200 degrees, the metal begins to deform. Fortunately, it is simply unrealistic to reach such a temperature in heated floors, so composite meshes can be freely used as a reinforcing layer for concrete screed. The maximum thickness of such a mesh is 14 mm;
- fiber mesh This reinforcing mesh is based on a special fiber called fiber. The maximum fiber length is 20 mm. To ensure a strong concrete screed, experts recommend using fibers 6 cm or higher in length. Fiber meshes perfectly level the surface of the base, but there is an important nuance here - it is prohibited to attach heating pipes or cables to it;
- plastic mesh. They are great for floor reinforcement. Plastic boasts light weight, moisture resistance and a long service life. The length of a roll of plastic mesh is 50 m, width is 2 m. The cells can have different sizes. The main purpose of such a mesh is to increase the strength of the concrete screed and reduce the load on the system. Installation of such a mesh is quite simple. You can do this yourself. Otherwise, you can resort to the services of specialists, who will not be difficult to find in Moscow.
We recommend: What should a laminate be like for a warm water floor?
Which grid to choose and why
Today there are a large number of models of reinforcing mesh on the market from various manufacturers. When choosing a mesh covering when constructing a water or electric heated floor screed, you should give preference to:
- For square models with cells of 150 mm, in extreme cases, 100 mm. Indeed, more often, the pitch of the heating elements of a water heated floor is 150 mm, so cells of this size will be optimally convenient for fixing them.
- A reinforcing product made on a CNC machine, since it is smoother than a homemade one. In homemade ones, in addition, the cell size is often not respected.
- The mesh, with a rod thickness of 4 mm, fits well on polystyrene sheets and is convenient for fixing a water system pipe or cable to it.
In addition, choosing a model for installation should take into account:
- the consistency of the cement-sand mortar, because it must penetrate freely through the cells;
- level of mechanical loads - the higher the indicator, the smaller the cell size.
Video
Mats or mesh. What is better to use for installing heated floors?
Fiber fiber
The principle of using fiber as reinforcement for screeds is significantly different from mesh reinforcement.
Fiber - fibers of basalt, glass, polypropylene, metal, in dry form are added to the ingredients of mortar or concrete. When the floor hardens, the fiber gives the effect of a durable monolith, protects the floor surface well from microcracks, but will not save you from significant mechanical impact.
The fiber-reinforced screed is laid and leveled along the beacons, just like concrete or mortar for other types of reinforcement.
If fiber is used simultaneously with metal or polypropylene mesh, a super durable coating is obtained.
When working with fiber, you need to add it in small portions to the mortar mixture, waiting until the fibers are completely distributed in a concrete mixer or other container. If you add all of it at the same time, the fiber can bunch up into a shapeless lump.
Finishing
If control measurements have been made and a test run has been carried out, then you can begin laying ceramic tiles. Finishing stages:
- We are preparing special glue for heated floors.
- Place it carefully on the mat, in a layer of 10-12 mm, avoiding damage to the cable.
- Spread evenly with a notched spatula.
- We glue the ceramic tiles without leaving air voids in the places where the cable passes.
Reference! The adhesive mixture is evenly distributed over the tiles. Thickness and uniform plane are controlled by the building level
It is recommended to put the warmest floor into operation after 3-4 weeks and gradually increase the heating power. The adhesive composition must dry completely, and the tiles will not move on the facing floor.
Types of heated floors for the bathroom
The installation of an electric heated floor can be:
- Cable.
- Film (infrared).
This is the main division. Depending on the release form, the cable can be produced:
- On the reel.
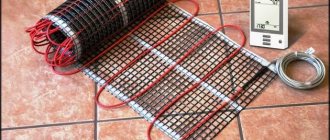
- In the mats. This is the same cable, but it is attached to a plastic mesh.
Film floors are divided according to the materials used into:
- Carbon.
- Bimetallic.
Due to their specificity, electric film floors are ideal for laying under laminate flooring.
In the bathroom, the best choice would be a heated cable floor. The easiest way to install it is with your own hands and without experience. It should be noted that the cable can be two-core or single-core. If you will be installing a heated floor yourself, and you do not have the skill, then be sure to take a two-core heating cable. Its advantage is that it connects only from one end. The second end will remain where you finish styling. Laying the heating cable in mats (as in the video) will be a little more difficult the first time. In this configuration, it is produced more for professionals. First, let's focus on the two-core cable.
The power of the heating element is calculated based on the figure 150 V/m2. For a bathroom, as a room with high humidity, this is the minimum value.
What is included
In addition to the cable itself, you will need:
- Thermostat (equipped with a remote temperature sensor).
- Mounting tape.
- Thermal insulation 4 mm thick.
- Dry mixture for screed.
- Consumables: tape, dowels.
How much does it cost?
Indeed, when plans include the task of installing a warm electric floor in a room with your own hands, the question of its cost first arises. Let us immediately note that by installing the system yourself, you will save half the cost of the entire repair, because It is the services of craftsmen that will require the most costs.
So, if we are talking about ready-made heated floor kits, then on average 1 m2 will cost about 3,500 rubles. In specialized stores you can find a variety of kits costing from 2000 to 5000 rubles per 1 square meter. Here we do not recommend chasing a low price, because... this usually means the system is of poor quality. And it is clear that if the heating cable fails, it will not be possible to simply replace it, because... it is usually installed under the tiles.
The cost of a master installing heated floors ranges around 1,000 rubles per sq.m.
Choosing the right film
If you are going to install a film heated floor without involving specialists, start with the main thing - by choosing a suitable film. It is necessary to decide what role is assigned to this heat source. Choose a film with a power of 180-200 W/m² if it will be the only source of heat in the room. In other cases, a power of 100-130 W/m² is sufficient.
As for the width of the film, it is necessary to focus on the laying scheme. You should draw this diagram yourself, having decided on the places where the furniture will be installed. Where furniture elements without legs will stand, heated floors are not needed - here they will become unusable due to overheating. Depending on the size of the room and the dimensions of the heated areas, select a film of suitable width.
Reviews from some experts indicate that it is better not to lay film heated floors under tiles. They advise giving preference to other types of heating equipment, for example, heating mats.
When choosing a film for a warm floor, you need to pay attention to the future floor covering. In the case of engineered wood, laminate or linoleum, it is enough to take the simplest film material
If you plan to lay tiles or porcelain stoneware, you need to purchase perforated film - it has small holes that ensure reliable adhesion of the mixtures used to the subfloors.
What is the mesh for?
Reinforced mesh plays a big role when laying heated floors:
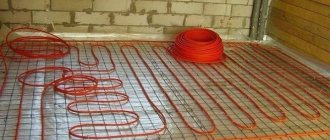
- When laying heated floor heating elements: pipes or electrical cables, it is necessary to fix them to prevent shifting and disruption of the layout. To do this, before laying the heated floor, lay the reinforcing mesh onto which the heated floor elements are fastened using clamps.
- To increase heat transfer, the screed solution must envelop the heating elements on all sides. Therefore, the mesh is placed on stands so that there is space between it and the base.
- The heating system cable requires insulation, otherwise, if voids form, it will overheat, which will lead to failure. When laying the cable on the reinforcement, the solution envelops the cable on all sides, leaving no voids.
- Thanks to the cellular structure of the mesh, it is possible to lay a warm floor without pre-applied markings.
- With a heated floor system, temperature fluctuations occur, which affect the quality of the screed. When reinforcing the screed, its strength increases and the service life of the structure increases.
- There is an even distribution of loads over the surface of the floor, when people walk on it or from furniture standing in the room.
Important! Using reinforcement, you can reduce the thickness of the cement screed without affecting the strength
Why do you need reinforcement for heated floors?
Warm floors in an apartment do not require the use of a mesh during installation, but with it the system will acquire additional advantages:
- It will add strength to the concrete layer and extend its life. When temperature fluctuates, the screed contracts and expands, which can negatively affect the system and floor coverings. Masonry reinforcement can compensate for this problem;
- The load exerted by furniture and other interior items will be distributed evenly using reinforcement;
- The presence of mesh reinforcement reduces the amount of cement used when pouring the mortar. The screed becomes thinner, but the strength characteristic remains at the same level;
- The mesh fixes the heating pipes in the water circuit where hot water circulates;
- The performance of the system becomes maximum - the electrical cable or pipes do not fit too tightly to the base, and the solution penetrates into the shutter to increase heat transfer.
Types of mesh for heated floors
Heated floor mesh is produced by many companies in Moscow or any other city, and each option has its own characteristics that can be used to benefit the efficiency of the floor heating system.
Metal
- A warm floor, which has metal mesh reinforcement inside, has maximum efficiency. This will improve the thermal conductivity of a thick screed, maintaining its shape with square-shaped cells. The size and pitch of each cell are selected so that there is no excess metal consumption;
- In metal reinforcement, wire with a diameter of 2.5...6 mm is used. Thinner wire is made in the form of small sheets, 25 m rolls. This way you can reduce the number of joints;
- The heated floor mesh does not prevent the concrete solution from penetrating through the cells. Mechanical loads are also taken into account, the indicators of which are reduced when using small cells;
- The surface has special notches, which improves adhesion to the solution. The zinc layer protects the metal from moisture and other components in the solution that have an aggressive effect on the reinforcement;
- Steel rods on the surface are resistant to temperature changes and do not allow destruction and deformation to occur;
- Steel has excellent strength characteristics; if one link fails, the integrity of the entire mesh will remain the same.
The only drawback that can be noted is corrosion, which causes voids to appear. In the presence of such areas, the strength of the screed becomes several times less.
Composite
Warm floors with composite reinforcement are made from basalt fibers (sometimes carbon instead) treated with binders. Composite reinforcement makes the screed invulnerable to moisture and aggressive chemicals.
Advantages of composite reinforcement:
- Light weight;
- Low thermal conductivity;
- Resistance to the action of the solution;
- Long-term operation without corrosion;
- Low cost;
- Plasticity, which makes installation easier.
The disadvantage of composite type screed reinforcement is its average heat resistance. When heated to about 200 degrees, the material begins to deform. The thickness of the reinforcement is 4...14 mm, while the masonry mesh is produced in sheets with rods tied with wire.
Composite mesh is sometimes made with fiber fibers of 6...20 mm. To fill the screed with special strength, the fibers should be 6 mm each. Such reinforcement will not make the heated floor more reliable, but it will make the screed stronger.
There are several options for this reinforcement:
- Glass fiber reduces cement consumption by 15%;
- Basalt fibers are used for floors exposed to aggressive environments;
- Polypropylene fiber with fibers of 15...25 microns and a length of 0.6 cm. Such fiber will relieve the screed from microcracks;
- Metal fiber is the most practical and widespread, strong and durable.
Plastic
Plastic reinforcement is elastic and not afraid of moisture. The system is protected from corrosion. The reinforcement plastic is lightweight and will last a very long time. It is produced in the form of rolls of 2*50 m with different cell pitches. A warm floor with plastic reinforcement makes the screed stronger and reduces the load on the screed.
Advantages of plastic:
- Concrete during natural shrinkage does not destroy the mesh, it only stretches;
- It is easy to deliver the material to the site and perform installation;
- The polypropylene mesh is woven with a special biaxial direction of threads without knots;
- Polymer reinforcement is cheaper than metal reinforcement;
- Cutting the mesh can be done with simple scissors, which makes installation quick;
- The plastic does not shield the wiring, so the owner will not have to solve problems with communications in the home.
This is interesting: Do-it-yourself subfloor in a wooden house: consider in general terms
Popular manufacturers
Reinforced mesh structures, which are used to screed electric or water heated floors, are produced by many companies. The most popular manufacturers include:
- Armplast specializes in the production of fiberglass products, which are used for pouring electric-type heated floors. In addition, a fiberglass product is used to strengthen the plaster layer or masonry mortar.
The advantages of fiberglass reinforcement from Armplast: it is not subject to corrosion, has a long service life, is light in weight, 2 times stronger than steel, has a similar coefficient of expansion to concrete and does not conduct electric current.
- Fibrasnab produces reinforced products from metal welded rods. The company's mesh is characterized by increased rigidity due to the almost perfectly square shape of the cells. And the optimally selected wire laying step allows you to avoid waste of material.
Fibrasnab products are made of steel 0.65 mm thick, in rolls of 25 meters, which reduces the number of joints. Coated with a galvanized layer - this protects against damage and extends service life. The adhesion of the solution to the surface is increased due to the location of the mesh ribs at an angle.
- Tepah - products are made by extrusion from polypropylene. This method makes it possible to obtain products with increased strength and flexibility. Tepah mesh is an excellent option for laying screeds up to 8 cm thick under a water or electric floor heating system.
Distinctive characteristics of the company's products: it does not deform when concrete shrinks, it is lightweight, it is not susceptible to chemical attack from the outside, it is easy to cut, which simplifies the installation process.
- Gridex - specializes in the production of basalt types. Basalt fiber has low thermal conductivity, which is ideal for constructing structures for underfloor heating. In addition, it is not exposed to aggressive environments, therefore it is used for reinforcement using cement-concrete mortar.
Gridex impregnates basalt mesh products with acrylate, which improves the adhesion of the material. The standard cell size in manufactured meshes is 25 by 25 mm.
- LenStroyDetal - produces high-quality products from steel rods coated with a galvanized protective layer. The use of metal products significantly increases the service life and strength of the concrete surface.
The company produces mesh for underfloor heating from wire with a diameter of 4 mm, with a cell size of 100 by 100 mm.
Video
Water heated floor. About reinforcement, furniture, crimping and discomfort
Reinforcing mesh installation technology
Preparing the base and pouring the subfloor
To carry out the work, it is important to properly prepare the base for pouring. This involves dismantling the old floor covering and removing all dirt and dust.
Laying the rough covering
To improve heat and sound insulation, mineral wool or penofol is usually used. In many cases, expanded clay is used as a rough coating, which saves concrete mixture and reduces the weight of the entire structure.
Installation of reinforcing mesh. A vapor barrier film must be laid over the rough coating. Next, a reinforcing mesh should be laid out on the prepared surface. Under no circumstances should it lie on the rough surface. To hold it at a height of 2-3 cm, special holders or ordinary pieces of drywall are used. Sheets of reinforcement are laid overlapping on one cell, about 2-3 cm should be retreated from the wall.
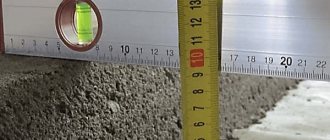
Installation of beacons. To make the floor perfectly flat, you need to install beacons, for example, from a metal profile. First you need to determine the highest point of the laid rough covering. In this place the screed should be at least 4 cm thick. Next, you need to use a laser or mounting level to mark where the upper boundary of the screed will be.
After this, you can set beacons-profiles. To do this, it is better to use special strips with stiffening ribs, which are usually 3 m long and are convenient to use.
The distance between the beacons should be approximately 1.5 m, and the distance from the walls should not exceed 30 cm. If these figures are neglected, the screed may turn out uneven. Beacons should be located along the longest wall of the room. In order to maintain horizontality, it is recommended to stretch nylon threads between the walls at the level of the markings on the walls. Workers will focus on them and raise profiles to the desired level. The beacons can be fixed at the required height using a plaster or alabaster solution.
- Pouring cement mortar. When the gypsum has hardened, you can mix a thin cement solution. After this, it should be carefully poured onto the mesh.
- Leveling the cement. When the mortar is laid, you need to level it using the rule, focusing on the beacons.
- Removing beacons (optional). Some experts argue that there is no need to remove beacons. Instead, you can fill the floor with a small layer of self-leveling mixture (3-5 mm) to hide them. If you want to remove the profiles, you should do this immediately after the supporting surface appears (after about 3-5 hours). After removal, the resulting voids must be filled with thick cement mortar and leveled using a rule.
What is special about laying the mesh?
When laying the mesh, adhere to the general rules:
1. When laying any mesh, in order to increase the properties of the screed solution such as elasticity and strength, it is diluted with the help of plasticizers.
2. The mesh should be located inside the concrete solution, without touching the rough base.
3.The mesh must be clean during operation.
4. The reinforcing mesh should not extend onto the surface of the screed.
Before starting work, be sure to read the instructions that come with the mesh.
Commissioning of the system
After the final hardening of the poured screed, coolant can be supplied to the system, the temperature of which should not exceed +26ºС.
The algorithm for commissioning a heated floor system made of cross-linked polyethylene is as follows:
- we connect the collector to the supply and return pipelines;
- we open all circuits simultaneously using taps on the manifolds;
- We install the air vent valves in the “open” position;
- start the circulation pump;
- set the temperature to +25-26º C;
- raise the pressure in the system to working 1 bar;
- we close all circuits except the longest with taps;
- record all positions of flow meters and balancers;
- We open the next circuit in length and use a tap to equalize the pressure along the first circuit.
In this way we connect and balance all the circuits of the heated floor. The performance of the heating can be assessed only after 2-3 months of operation.
The article, which describes in detail the rules for the design and construction of the system, will familiarize you with the features and rules for installing floor heating on a wooden base.
Laying without screed
Installation is carried out using the laying method. Polystyrene plates and aluminum plates with grooves for pipes can be used.
Installation of heated floors under tiles and installation of equipment are effective in the following cases:
- the strength of the floors is low and they will not be able to withstand high loads (during installation, a warm floor is laid under the thin tiles);
- if the owner does not want to lose the height of the ceilings in an already low room;
- when the screed device is impossible for technical reasons.
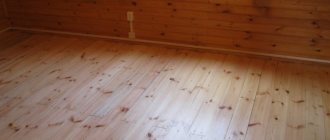
Heat-resistant laminate or parquet boards can be laid on polystyrene sheets. For tiles, it is better to use moisture-resistant materials, for example, gypsum fiber board sheets.
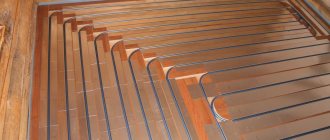
Laying on joists
When constructing a structure, insulation based on polystyrene or mineral wool is laid between the joists. When working on a heated floor under tiles, do-it-yourself installation is carried out using a slatted or modular method. In the first case, pipes and plates are laid between slats made of chipboard. When modular, special chipboard modules with ready-made channels are used. GVL and DSP sheets are laid on the surface and the tiles begin to be laid. The warm water floor without screed under the tiles is ready.