When using a self-leveling floor, beacons are not needed, since the mixture has self-leveling properties and can be brought to “zero” without reducing performance characteristics.
Conventional cement-sand mortars do not have such properties. The minimum layer thickness is 3 cm; at the lowest points of the house it can reach 10 cm. Therefore, information on how to set beacons for floor screed to increase productivity and quality is relevant for an individual developer.
Peculiarities
In order for the floor finish to look flawless, without wrinkles, cracks and unevenness, it is necessary to first level its surface. Most often, a screed is used for this - a special mixture that is evenly distributed over the entire surface of the room. It is difficult to visually bring even a few square meters under one level, so you have to install special rigid guides - beacons.
Placing beacons is only necessary in some cases; for example, when using a self-leveling floor, they are not needed, since the mixture itself, which has leveling properties, spreads evenly over the entire surface. But for concrete and cement-sand screeds, their presence is simply necessary. The minimum layer thickness for such solutions is 3 cm, and at the lowest points it can be more than 10 cm, so you have to use beacons.
Metal beacons look like hollow pipes, profiles or corners. They can be attached to cement mortar, gypsum plaster or self-tapping screws. Some make them from strong and smooth wooden beams or from the same mortar. The main condition is to maintain an ideal horizontal level on the entire surface of the floor in the room. After the beacons are installed and firmly fixed, they begin to pour the screed.
Screed: preparing the base
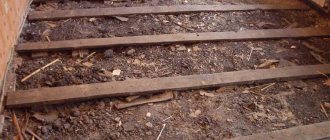
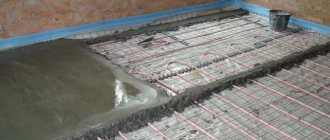
Clean the base of the room. Then place waterproofing on its surface: film or special solution. The next layer is polystyrene foam boards as a layer of thermal insulation. Place a reinforcing mesh on top. Then, according to the chosen scheme, place the water heating pipes.
We place water heating pipes in front of the screed
Purpose of beacons for floor screed
Beacons for floor screed represent the actual level of the new floor, marked throughout the entire area of the room. Essentially, these are marks (markers) located throughout the room, which are at the same horizontal level. This horizontal level coincides with the pre-made marking of the floor screed level. Beacons for screeds must be installed according to pre-made screed markings and after preparing the base of the floor for the screed.
Preparatory work
First of all, you need to decide what floor leveling beacons are. This is understood as a certain structure, which most often consists of guides that are installed at the same level on the surface and create the necessary plane for quick alignment. The use of ready-made profiles is not necessary; you can use suitable materials at hand.
Both special guides and improvised means are used as beacons, but they all must be perfectly smooth and rigid
Installing beacons for floor screed is not always easy, regardless of the type. Before installation, it is advisable to prepare the surface:
- The base is cleared of all foreign elements, and when working with concrete slabs, the remains of construction debris are removed. Peeling or crumbling areas are removed from finished coatings that require leveling.
- Existing cracks are expanded and covered with the prepared solution.
- The surface is well primed. A minimum of two coats of a deeply penetrating compound should be applied.
- A layer of waterproofing is laid.
Cleaning and repairing the base is a mandatory procedure before installing the screed.
These procedures are mandatory and are carried out some time before pouring the screed.
Definition of zero level
Beacon screeding should definitely begin with determining the zero mark. A level is used for work. Laser is considered the most accurate, but the standard version is also suitable.
The most accurate result when marking a floor line is obtained by using a laser level, but this is expensive equipment
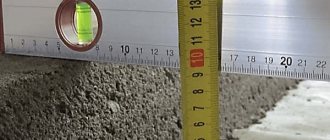
100 cm away from the floor from the highest part of the room, a point is marked on the wall, which is transferred to the rest of the surfaces. For example, in a flat rectangular room there will be 4 points. A line is drawn. The greatest elevation is determined by measuring the distance to the floor; the minimum distance is considered the highest point of the floor. 30 mm are retreated from the resulting mark, which is equal to the optimal thickness of the screed, and the resulting marks are connected. This line will be the zero level; if necessary, they retreat further from it.
The level of the finishing screed can be “beaten off” using a hydraulic level
Naturally, when pouring a solution with a layer less than 3 cm, such a procedure is quite difficult to carry out; it is more suitable for rough surfaces. For the final version, calculate the highest point of deviation using a level or a stretched cord and add 1 mm. This event helps to achieve a minimum thickness of 3 mm.
Attention! It is important to consider that beacons are mounted at some distance from the walls, usually this figure is 15–20 cm.
Classification of lighthouses
Very often, the functions of beacons are performed by metal profiles, but in addition to them, other materials can be used, for example, pipes or wooden blocks. Depending on the type of screed, the type of beacon and the method of its installation are determined.
Metal profiles
These are guides, sort of “rails” along which the rule is moved, leveling the layer of solution, turning it into an ideal surface. If a thin screed is intended, conventional profiles for plastering work can be used. But remember that these products have a small margin of safety and the solution can deform them. It is better to use more durable U-shaped profiles, which are used for working with drywall.
Advice! In the case when we are laying heavy concrete mortar, we can increase the strength of the lighthouse by putting two U-shaped profiles together.
Wooden lighthouses
These are blocks of wood (30 x 30 mm), which are first soaked in water so that they do not subsequently absorb liquid from the mixture; Moreover, their evenness is checked before and after the “water procedure”. The leveling of the bars is done by placing pieces of wood or wedges, after which they are attached to the base with self-tapping screws.
Important! Since a humid environment contributes to the rotting of wood, it is recommended that when the screed hardens a little, remove the wooden beacons and fill the resulting cavities with concrete mixture.
Landmarks made from concrete composition
This technology of placing beacons on the floor using only cement-sand mortar is quite painstaking, but it is worth it, since they do not have to be removed after pouring the screed, that is, the beacons become part of it. The process algorithm looks like this:
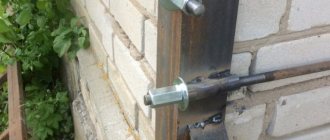
- We screw self-tapping screws into the floor along the entire length of the lighthouse, adjusting their height above the floor according to the level;
- We stretch steel wire between the screws (the number of rows of wire depends on the thickness of the screed), which serves as a reinforcing element;
- cover the entire line of screws and wire with mortar;
- As a rule, we give the structure the required height, focusing on the heads of the screws;
- We form a narrow concrete path, which will serve as a beacon.
Important! Beacons of this kind must be given time to dry completely in order to give them the required strength (about two to three days).
Benchmarks
A bench mark is a tripod with an adjustable central rod, which allows you to set the desired tie level. Benchmarks should be placed on the floor in a checkerboard pattern in 1-meter increments. After the fill begins to set, such landmarks can be easily removed.
How to lay the screed
So, we have already prepared a solution of the correct proportion, it is time to lay the screed. We have already briefly mentioned this process above, but due to its high importance, we will consider it in detail. So, the screed is laid from the corner distant from the doors and is gradually directed towards the entrance. When leveling, we use the rule, directing it with slow movements from the wall towards ourselves. It is important that the rule does not come off the surface of the slats during operation. We repeat, we move the excess solution to areas that have not yet been filled.
Beacons installed
Then we wait a certain amount of time (namely seven days) for the screed to more or less dry. So, if you can already walk on it (on boards, of course), then the plates are removed, and the resulting voids are sealed with the same solution that was used for the screed. It may happen that there will still be unevenness, in which case it can also be removed with a spatula.
Floor screed using beacons
Finally, one more important point. After the rough screed is completed, until further work begins, it is strongly recommended to take a so-called technological break. It is at least twenty-eight days and is intended for the concrete to finally “mature”.
For this considerable period of time, the screed must be covered with a piece of plastic film, and for the first ten to eleven days, it should also be periodically watered. In addition, if the final coating you have is laminate, then after that you need to lay another layer of screed in order to completely level the surface.
We hope this article has provided a comprehensive answer to your question regarding how floor screed beacons are installed.
Dimensions
It is best that the beacons for the screed are solid, spanning the entire width of the room. If their length is not long enough, then you can change the installation across the room.
It is also worth remembering the standard sizes of different types of profiles:
- plaster beacons T-shaped 10x26 or 6x21 mm have a length of 2.7-3 m;
- guide profiles, rack-mount, ceiling profiles can be 2.75, 3, 4 and 4.5 m;
- bent profiles can reach a length of 6 m.
Tubular beacons with a rectangular or round profile come in different lengths, depending on their purpose, but most often it does not exceed 6 m.
What kind of wire is needed for string beacons?
What to use as a string for beacons?
The first and most common option (1) is stainless steel wire (GOST 9389-75). The string can be made of wire, which remains after electricians pull the cables in the corrugation (4).
What are strings for lighthouses made from?
The string may also be made of thin cable (3). When assembled, it is more compact, but cuts a wedge when plastering.
Another option is copper-plated welding wire (ER 70S-6) with a thickness of 1.2 mm. It is designed for semi-automatic welding of various types of steel (2).
Which ones are better to choose?
It is quite advisable to pour a floor with minor differences of up to 3 cm under profile perforated plaster beacons, those that are used for walls. Their advantages are that they are cheaper than metal profiles for gypsum boards or profile tubes, they are very lightweight and can be easily cut with metal scissors. Their standard cross-sectional dimensions are 10x26 or 6x21 mm, the most common length is 3 m.
Plaster perforated beacons can be secured to a quick-hardening gypsum mixture, metal or plastic fasteners. The best of them are “ears,” which are thin metal plates with a hole in the middle and small curved ears. Such fasteners are mounted to the floor using ordinary dowel screws. The advantage of fastenings for beacons with “ears” is that there is practically no gap left between the floor and the beacon, this allows you to save on screed mortar.
To perform screeds with high differences, when a layer of more than 3 cm is needed, it is best to use metal profiles for gypsum plasterboard. The required length and width of the guides are selected, then they are cut and mounted under the level using mortar or screws. Their surface is smooth enough to guide along them with a rule.
If the width of the floor being poured is large and requires several layers of thermal insulation, protection from steam and moisture, then the best option is profile pipes installed on cement or gypsum putty mixtures. The design is strong, rigid, and allows you to pour a floor screed on top of penoplex, mineral wool, polyurethane foam, polystyrene foam and other insulating materials.
Should the beacons be removed from the screed after the solution has dried or not?
The answer in this situation is ambiguous:
- Reusable metal pipes are definitely removed before the solution completely hardens. The remaining recess is filled with the same mixture that was used to fill the floors.
- Wooden beams must be removed.
- Plaster perforated beacons for ceramic floor tiles can be left in the screed.
- It is better to remove the beacons under laminate and linoleum and cover the groove. The fact is that the liquid solution after drying gives a slight shrinkage, the edge of the lighthouse will begin to bulge, which will distort the facing coating.
Beacons from metal pipes must be removed, and the resulting grooves must be sealed with a solution
For dry screed, as previously mentioned, profiles for gypsum plasterboard are used. They are not left under the floor.
Installation of beacons for different types of screeds
Beacons for dry screed
Dry screed is made from expanded clay. These are small clay balls that are scattered into a “tray” and compacted. This method has many advantages, but the main thing is warmth, simplicity and purity.
According to technical documentation, the minimum height of the embankment should be at least 30 millimeters, so ordinary beacons will not be suitable. The best option is a plasterboard profile with a thickness of 27-30 millimeters. Subsequently, it will be possible to place sheets of drywall on it.
So how to set beacons for floor screed? First you need to set the level. The upper plane of all beacons should be the same, so it is better to place them on “splashes” of plaster or cement (more on this below).
Afterwards, the distance between the beacons is filled with expanded clay into a level and leveled using the rule. There is no need to wait for drying and hardening - everything happens quickly.
By the way, after the beacons can be easily removed and the gap filled with expanded clay.
Beacons for semi-dry screed
Semi-dry screed is a mixture of sand and Portland cement with water. For it, ordinary construction beacons are used, as for walls. Typically the screed has a height of up to 5 centimeters. The beacons are placed according to the level on the mortar “bugs”.
Beacons for arranging a floating screed
Beacons under a floating screed are installed on polystyrene foam with reinforcement. It is better to watch the video for more information about this method.
Advantages and disadvantages
Craftsmen prefer string beacons due to the fact that these designs have the following advantages:
- reusable;
- maintainability;
- simplicity and speed of installation;
- low cost.
Along with the advantages, string beacons have some disadvantages:
- if there are large differences on the surface, the use of support elements is required;
- the area after removing the string requires additional sealing.
- To install the clamps into the wall, you will need a tool.
Installation of beacons for wet and semi-dry screeds
In finishing work, various types of screed beacons are used, each of which has its own advantages and disadvantages. The easiest way is to install point beacons, but to navigate using such marks you need to have considerable experience in pouring screeds.
Setting the fill level using the CPR is also not difficult, but this option requires a lot of time and also serious experience. It is difficult to install a profile for beacons, but working along such guides is much more comfortable and easier.
To understand how to make floor screed beacons in different ways and choose the most suitable option, you need to familiarize yourself with the order of work for each type of marking.
Linear beacons
For novice builders, it is best to install floor screed beacons with your own hands, focusing on the design of the guides. There are two options for mounting the planks: on self-tapping screws and on mortar.
How to install beacons on self-tapping screws using guides? Initially, you need to prepare the necessary tools and material:
- aluminum rule, at least two meters long;
- laser level;
- hammer drill or impact drill;
- yardstick;
- dowels;
- self-tapping screws;
- bowstring;
- U-profile;
- screwdriver
The number of profile rows depends on the length of the rule.
Number of guides. A – walls, B – guides.
Start marking from the wall. The first self-tapping screw is tightened at a distance of 40 mm from the vertical surface. The height of the screw takes into account the thickness of the profile, i.e. The thickness of the guide is subtracted from the desired fill level mark and the self-tapping screw is tightened to this height.
In the same way, install a self-tapping screw on the opposite side and connect them with a stretched bowstring. Self-tapping screws are placed along the string line with a run of 400-500 mm, bringing them to the desired level. This is how each marked row is installed, after which the height is checked with a level and, if necessary, adjustments are made.
There is no need to worry about how to secure the U-profile to the screw heads. It fits on the heads and holds up perfectly. After pouring is completed, the strips are removed and the screws are unscrewed. The installation locations of the slats correct the central position and bring them into the general horizon.
Mortar beacons
How to properly install beacons from a profile on a solution? You will need to purchase a special mixture for beacons, which hardens faster than the usual CPR. Usually a rotband is used. Any material can be used as guides, but a metal profile is most convenient to use.
Initially, the level required for pouring the screed is marked, and the installation of each guide is marked, taking into account the length of the rule. Focusing on the markings along the line where the guide should be installed, small piles of rotband are laid at a distance of 300-400 mm from each other. The height of each pile is aligned with the fill level minus the profile height, after which you can begin installing the guides.
To fix the profile on the pile, it is grabbed with mortar from the sides, but it must be remembered that the rotband will have to be removed after filling the CPR, so you should not apply too much mixture to install the guide. After pouring, the screeds, profiles and excess rotband are removed, and the unevenness is sealed with mortar and leveled.
The use of alabaster for installing guides is not recommended, since it does not adhere reliably to cement-sand mortar.
Point beacons
Any novice builder can figure out how to install point-type beacons, but for further laying of concrete along these beacons, you will have to invite an experienced craftsman.
The heads of self-tapping screws, set to the height of the pouring level, act as beacons. Self-tapping screws can be installed in the same way as in the version with linear beacons, only a profile is not used.
Beacons from the Central Station
Pouring screed over mortar beacons requires a lot of experience and skill, so this method of installing beacons is used mainly by professional finishers. The beacons are set in the same way as in the case of installing linear beacons on the solution, only without the use of guides.
In order to perform high-quality pouring of the screed along the mortar beacons, it is necessary to begin work only after the mortar has completely risen.
FAQ
Which is better, a string beacon or a regular perforated one?
It is impossible to answer this question unequivocally, since everything depends on the preferences of the master. The string beacon is set faster, but working with it is slower, since after each insertion or broaching you need to compare the layer with the string. It's easier with perforated beacons. It takes a lot of time to set them up, but it will be much easier and faster to pull them out. By following the beacons as a rule, you can cut off the excess, leaving exactly the layer or level that is needed.
Is it convenient to use string beacons under gypsum plaster?
If gypsum plaster is used as a base for puttying, then it is permissible to install strings. When leveling the walls with a thin layer of high-quality gypsum plaster with a gloss, the strings will interfere.
String beacons are not the only way to control surface alignment. But when you need a thin layer of plaster and you have to work on a large surface, they will become the optimal guide.
General practical advice
Despite the existence of a large number of methods for installing beacons under floor screed, professional builders have developed general tips for all cases.
Tip #1
Before starting work, it is recommended to check the condition of the base using an ordinary lath or a long rule. Apply the tool along the diagonals of the room, then at several points around the perimeter. As a rule, install a long bubble level; with its help, try to hold the tool in a horizontal position and measure the gap between it and the plane of the base. The purpose of the preliminary inspection is to detect the area of the floor with the maximum protrusion. If it is small in area, then it is much more effective to cut off the protrusion with a hammer drill than to increase the thickness of the screed by several centimeters. This not only speeds up the work process, but also reduces the estimated cost of floor installation.
Bubble level for construction
Tip #2
If you don’t have a laser device, you can set the level of the beacons using an old water level. By the way, this is the most accurate instrument in nature. No modern laser can compare with water in these indicators. A water level is an ordinary flexible transparent hose filled with water; it can be painted in different colors to improve visibility. The water level works according to the fundamental law of physics - the law of connected vessels. This means that the liquid level in such vessels will always be the same; it is leveled by gravity.
Water level
You need to make marks using this level in the following sequence. You need to work with an assistant; you cannot complete the markings alone.
- Place a mark on the wall at a distance of about a meter from the floor, the specific height does not matter.
- Place one end of the water level to this mark, the other end should be located against the opposite wall. Achieve a position so that the water level on the wall coincides with the zero mark on the hose; in this state, make a mark for the location of the water level at the second end of the hose. Both lines will be strictly horizontal.
- Using the same pattern, make marks around the entire perimeter of the room and connect them with lines using upholstery rope.
- Now you have a horizon throughout the room, use it when placing beacons.
How to use a water level
At first glance, it seems that working with a water level is much more difficult than working with a laser level. This is not true, it all depends on the practical skills of the performers. Of course, a laser device has many significant advantages; you need to know them and use them in practice. But the ability to use traditional measuring instruments will always be useful in life.
Tip #3
There is a method for installing beacons on a line made of cement-sand mortar. In essence, it is not much different from those described above, only under the metal profiles, not individual buns are made, but continuous tubercles of the appropriate height. Professionals try to use this method whenever possible. Its disadvantages are fully compensated by its advantages.
Lighthouses are installed on a line made of cement-sand mortar
There are two disadvantages: an increased amount of solution is required to install beacons and its preparation requires additional time. But when laying the screed, significant time savings are achieved. The fact is that it is necessary to push a mass under the freely sagging beacon profiles; this takes a relatively long time and is very inconvenient. If the beacons have a solid base, then there is no need to push anything anywhere; the screed is made faster and easier.
Tip #4
The accuracy of the beacons depends on the parameters of the finishing coatings. If the screed for joists may have deviations of up to 1–2 centimeters in the corners of the room, then for linoleum the tolerance range is reduced to several millimeters. Keep this in mind and, in accordance with technological requirements, adjust the screed tolerances. There is no point in wasting time on excessive screed precision if the quality of the floor finish does not depend on it.
The accuracy of the beacons depends on the parameters of the finishing coatings
Tip #5
Never rush, the time required to re-check the position of the beacons is always much less than the time required to redo the tie. There is no need to talk about the price of the work. If you have absolutely no experience in performing this type of work, then it is better to practice in utility or technical rooms, and only then work on living rooms.
Beacons for screeds are checked
Heated floor structure
It is determined by two indicators:
- underground space;
- type of heating elements.
Underground space
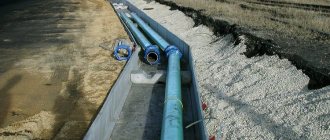
- Before pouring the screed, two types of insulation are installed on the first floors or in basements: thermal and water. Thermal insulation consists of insulation. For flooring in residential premises, basalt mineral wool or extruded polystyrene foam is used. Layer thickness – 50-100 mm. It depends on the climatic region. Mineral wool must be waterproofed on both sides. For this purpose, use ordinary polyethylene film or membrane vapor barrier. Extruded foam does not absorb moisture. Therefore, the waterproofing is laid directly on the rough base under the insulation.
- In rooms with a warm underground space, it is not necessary to install insulation. If a decision is made on additional insulation, then the thickness of the material is only 20-30 mm.
Regardless of the type of room, the heated floor is laid in a screed on a layer of heat-reflecting material. It has one side covered with foil and prevents heat from escaping downwards.
Type of heating elements
Water or cable - provides the maximum number of layers:
- The first is the foundation. This could be a floor slab that needs to be leveled, or an earthen substrate on which a reinforced monolithic concrete slab needs to be mounted.
- The second is waterproofing. In the case of a floor slab, it is laid over it. When constructing a monolithic reinforced concrete slab, the film is placed directly on the ground.
- The third is insulation. These are sheets of basalt mineral wool or polystyrene foam. They are laid end to end. The cracks are sealed with polyurethane foam.
- The fourth is steam or waterproofing. It is used only to protect mineral wool. It is not needed for polystyrene foam.
- The fifth is a heat-reflecting surface. It consists of foil material and foamed polystyrene.
- Sixth – heating elements. Use polypropylene pipes or electrical cables. They are attached to the base with staples.
- The seventh is reinforcing mesh. It is installed when the thickness of the heated floor screed is more than 50 mm.
- The eighth is a leveling screed made of sand and cement. It is poured over the entire surface of the heated floor.
- Ninth – finishing coat. For water and cable heated floors, this can be ceramic tiles, laminate, parquet boards and other finishing materials.
For cable or infrared heating mats, the number of layers is reduced:
- The first is the foundation. The mats can be installed on flat floor slabs without prior preparation. It is enough to sweep away all construction debris.
- The second is cable or infrared electric mats. They are sold in rolls, which are rolled out on the floor and connected to the electrical network.
- The third is the finishing coat. Most often these are tiles laid on glue.
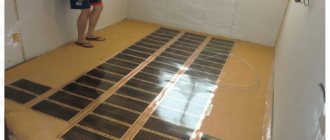
When installing film heating elements, it is strictly forbidden to install a “wet” screed.
They use “dry”, consisting of several layers:
- The first is the foundation. The technology of its device is no different from the previous two.
- The second is film heating elements. They are mounted directly on the base. Then they are connected into a single electrical circuit.
- The third is waterproofing. Polyethylene is laid on the film floor.
- The fourth is flooring. For rigidity, GVL, fiberboard, OSB sheets are mounted.
- Fifth – finishing coat. This could be laminate, cork flooring, linoleum, etc.
A floor screed made from gypsum fiber sheets or chipboard is the simplest option. It does not require large financial and labor costs.
Do I need to clean up after?
Since metal profiles or plaster beacons are made of metal, over time they tend to rust. Even in a dry environment, the material can oxidize and form rusty stains or cracks. Therefore, it is best to remove thin profiled beacons after pouring, when the mixture has not yet had time to dry and become extremely strong. For T-shaped beacons, their upper edge is clearly visible above the screed; you can pull them out with the corner of a spatula. If the floor is already dry enough and the mortar has set, then you will have to remove the beacon using a pick or chisel with a hammer.
After removing the plaster beacons, grooves remain in the flat floor, which can be easily leveled using the same solution that was used for the screed. You can also seal cracks after removing the profiles with gypsum plaster. Pointed beacons-benchmarks in the form of metal tripods are easy to remove from a fresh screed thanks to sharp legs with a smooth surface. Also, immediately after pouring, you need to remove the plastic markers.
It is quite difficult to remove tubular beacons from a poured screed. Typically, such thick guides are left in the finished floor, plus they additionally reinforce the concrete layer.
Plastering walls along strings.
After installing the strings, the technology remains almost unchanged:
- Lubricating the lighthouse with some mixture to prevent sagging during the application of plaster. The mixture for lubrication is different and depends on the situation. It can be gypsum, cement-sand or glue.
- Plastering the surface after the compound has hardened.
- Removing the wires and sealing the places where they were installed.
But there are cases of “perversion” of this method, when easy ways are not sought. Two horizontal beacons (along the strings) are made only in order to additionally place vertical plaster ones along them:
Zero level
The zero level is a horizontal line along the entire room, which is decisive when calculating the fill height. Correctly set zero level is the key to the success of arranging any screed. The sequence of work is as follows:
- we step back up from the floor, say, 1 meter and set the starting point;
- using a level (laser or water), from this point we draw the initial level along all the walls of the room;
- Using a staff and a marker, we take measurements and determine the largest and smallest distance from the original level to the surface of the base;
- we calculate the difference between these two values and, based on this, determine the type of screed (whether it will be made with self-leveling mixtures, or using a concrete mixture, with or without reinforcement, and so on);
- the point with the shortest distance from the original level to the surface of the base is the starting point for the zero level, which we draw along the entire perimeter;
- Having determined the type of screed, select the thickness of the fill; we set this value upward from the zero level and draw another line along which the landmarks will be set (that is, the upper part of the beacons should be at the same height as the markings on the wall).
Video
In everyday life, people are faced with the problem of how to determine the readiness of the screed. All tables show average parameters. There is an effective and simple method. A paper napkin is placed on the screed. Cover the top with a mug. After 8-12 hours it is removed. If the napkin is dry, then the screed is ready. If it is wet, then you need to wait.
Are you planning to screed a heated floor, but don’t know how to organize the work? Today I will share my experience of pouring screed. You will learn what you need for the job, how to prepare the base and how to make a perfectly flat floor.
Types of beacons for floating screeds
The choice of method for installing beacons under the floor screed on your own depends on the finishing budget and the skills of the finisher. There are two major categories of beacons:
- spot - faster to manufacture, but require highly qualified craftsmen when leveling the laid mixture;
Beacons are made from special quick-hardening mixtures, ordinary solutions, special profiles, products and even ordinary hardware, strings or fishing line.
Spot
For small areas, with a limited budget, a highly qualified finisher or the use of a self-leveling floor, point beacons can be used - benchmarks, self-tapping screws screwed into the base, or piles of quick-hardening starting putty mixtures.
Important! The screeds are not reinforced because they are poured onto a obviously strong concrete base. However, communications and heated floor contours can be built into them, which must be laid on the floor slab before installing the beacons.
Reference
With a sufficient finishing budget, it is advisable to use reference beacons for screeding floors made of self-leveling mixtures or concrete with various fillers. Benchmarks are tripods with a central screw-in rod, which has a scale on the threaded part and a support table for setting the rule at the upper level.
Benchmark for self-leveling floor.
The beacon installation technology looks like this:
- benchmarks are installed in a checkerboard pattern;
- the support tables are unscrewed to a common horizontal level according to marks on the walls, a bubble level or a laser mark on the level;
- the mixture is placed along the lower scale of each benchmark;
- after which these devices are pulled out by the master;
- self-leveling mixtures close in these areas on their own; the usual solution is additionally leveled with a rule or spatula.
Important! Leveling technology was created for additional control of self-leveling floors, therefore it is used very rarely when pouring concrete screeds.
There are polymer benchmarks without support tables and tripods in the form of a vertical ruler with a millimeter scale (usually 10 cm), fixed inside the base with a self-adhesive sole.
They are mounted similarly to steel benchmarks; after the screed has dried, the ruler is removed, the base remains embedded in the concrete, and the hole is filled with cement mortar or starting mixture.
Pin
Cheaper, but more difficult to install, is a pin beacon made from dowel-nails for gypsum plasterboard systems. Installation is done as follows:
- making parallel rows of blind holes in the concrete base, the step between the beacons is 0.5 - 1 m, between the rows is 10 - 15 cm less than the length of the rule;
- driving polymer dowels into the holes;
- screwing in special screws so that their heads are at the same horizontal level (controlled by a rule, cord or bubble level).
Installation of pin beacons.
Important! After laying and leveling the mixture and gaining strength with the screed sufficient for walking, the screws are unscrewed and the holes are filled with starting mixtures.
Mortar brands
A more expensive, but less complex way to provide beacons when casting screeds is mortar grades using the following technology:
- conical piles of the starting putty mixture are laid in rows at intervals the length of the rule, with a step of 0.6 - 0.7 m in rows;
- the top of the cones is cut off with a rule or a long bubble level using a laser level or marks on the walls of the room;
Advice! After laying the mortar, the beacons remain inside the screed structure. Therefore, it is not recommended to use alabaster, which is rejected by some concretes and self-leveling floors.
Linear
More convenient for the home craftsman are linear beacons, which serve as guides for the rule, which is used to clean off excess concrete when pouring. When using mortar guides, it is necessary to ensure compatibility between the components of the beacons and the concrete (self-leveling floor), since they are embedded in the screed. Plaster beacons are usually permanent, profiles for gypsum plasterboard systems are removed after the mixture has partially set, and the grooves are sealed with concrete.
Mortar
If you have a sufficient amount of starting putty, you can install linear beacons using the following method:
- strips of the mixture are laid in a cone across the wall in which the doorway is located;
- according to the marks on the walls or the beam of the laser plane builder, their upper edge is trimmed at the general horizontal level by the rule;
- after the guides have hardened, concrete is laid between them;
- As a rule, alignment is carried out according to these beacons.
The technology requires relatively low qualifications of the craftsman and ensures the strength of the screed structure.
Plastering
The industry produces a T-shaped perforated profile for preliminary leveling of walls and ceilings, called plaster beacons. Perforation is intended for self-tapping screws with which long elements are attached to the building envelope.
Lighthouse plaster profile.
The profile is placed on the concrete base of the floors either on plastic wedges (support spacing 0.4 - 0.6 m) or on piles of quick-hardening putty. The inherent rigidity of plaster beacons is very low, so it is not recommended to exceed the specified support step.
Profile
With a significant thickness of the screed, the ideal option for beacons is a galvanized or stainless steel profile for gypsum plasterboard systems. These elements are installed level on a quick-hardening starting putty mixture or fixed to the concrete base with self-tapping screws.
Profile for gypsum boards.
The profile has a stable spatial geometry, can withstand the pressure of large volumes of concrete, and is easily removed from the mixture after it has hardened. It is not recommended to leave the profile embedded in the screed.
Timber
To save budget, an individual developer can use a wooden block of a suitable cross-section as beacons. Since these elements are removable, it is enough to treat the lumber before laying it on the base with an antiseptic and waste oil or soap solution, after removal, clean it from concrete and use it in partitions and the rafter system of the building.
Important! The technology is completely identical to installing a profile, however, lumber rarely has ideal geometry, and the technique is not used often.
Tubular
Another option for low-cost leveling linear elements for moving the rule are square and rectangular pipes. They are laid on quick-drying branded beacons and removed after the concrete has completed its curing in the usual manner, discussed in previous technologies. Round pipes are completely hidden in the structural material of the screed; it is much more difficult to pull them out of concrete without damaging the areas adjacent to them.
Pipe guides.
Maximum performance
There are parameters for a future screed that should never be exceeded. When leveling a crooked floor, each individual case will help to obtain an answer to the limits of the floor pouring level. If we take the technological side of the issue, then the layer should not exceed 150-170 mm. If you move away from this, a large amount of time and effort will be spent. In addition, the drying time will increase noticeably. Large layers can be installed in rooms where significant loads are possible. These include garages. The same applies to problematic soil, as well as the use of screed as a supporting structure.
It is worth noting that it is not always possible to hide even significant differences in heights on the base of the floor using a screed. It is enough to knock down the protrusions or fill existing potholes. Most often, in this case, expanded clay or crushed stone is even used to reduce the total weight of the fill.
Maximum screed level
From a financial point of view, there is no justification for a thick layer when installing a heated floor system. A significant height of the floor pouring above the heating elements will not allow the latter to fully transfer all the heat that will be lost. Heating costs will increase significantly, since you will have to completely heat the entire thickness of the solution in order to get inside the room. So leveling the floor surface should be done wisely.
Workflow Stages
For simplicity, I will divide the process of pouring a water heated floor into 3 stages:
- Collection of necessary materials and tools;
- Installation of beacons;
- Filling the screed.
Let's look at them in order.
Required materials and tools
To work you need:
| Illustration | Description of material |
| Cement . It is best to use the M500 brand to achieve maximum screed strength. Cement for heated floors must be fresh, that is, made no more than 3 months ago. |
If there is no M500 brand, then you can use M400, just the proportions during preparation will be larger.
Its quantity is calculated based on the length of all adjacent walls. Experts call this type of product damper tape.
The elements are located at a distance of 20 cm less than the length of the rule. That is, if you have a 2-meter rule, then there should be 180 cm between the beacons.
If you use a ready-made mixture for screed, then purchase sand concrete of a grade not lower than M300.
- Concrete mixer. It is best to rent equipment for 1-2 days; the rental price is low. If the room is small, then you can get by with a drill with a special attachment for heavy mixtures;
- Trowel . With its help, the composition will be leveled and evenly distributed over the surface;
- Rule . The length of this device is selected depending on the size of the room. I do not recommend taking options larger than 2 meters - working with them is inconvenient and difficult. The optimal option is 180-200 cm;
- Building level;
- Screwdriver and hammer drill . Holes for dowels are drilled with a hammer drill, and a screwdriver is used to tighten the screws. In our case, both tools were used;
- Construction knife.
Installation of beacons
Instructions for placing beacons look like this:
| Construction sand . Necessary for preparing the solution. There are no special requirements, the main thing is that it is clean, without plant roots, clay and black soil. River sand is also suitable for work. |
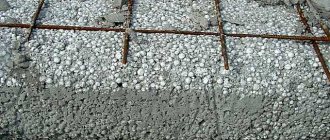
| Crushed stone . Material with a fraction of no more than 30 mm is best suited. This is the main filler that gives concrete strength and reduces cement consumption. |
| Wall tape . It is laid around the perimeter of the room and creates a deformation gap between the wall and the screed. |
| Lighthouses are galvanized . With their help, we will quickly set the ideal plane for pouring the screed. |
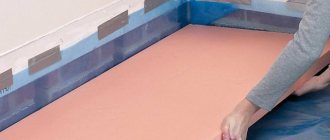
| Polyethylene film . It will be used to cover the screed after pouring in order to create optimal conditions for strength gain. |
| Illustration | Description of the stage |
| Damper tape is laid . It is simply laid out around the perimeter and placed behind the reflective material. If there is nothing to fix the tape with, then it is glued with double-sided tape. |
Small pieces are glued every half meter, this is quite enough to fix the material in the desired position.
Pieces of tiles help raise the beacons to the desired position, because the thickness of the screed is at least 5 cm and laying out the mortar in slides is not very convenient.
Identification of unevenness
Before you fill the floor with mortar, you should determine the level and thickness of the layer. It is not possible to do this with your own vision. The work must use specialized tools. Protrusions and potholes on the surface are determined using a block and a level. The longer the bar, the more accurate the results. There are also more modern ways of carrying out this type of work.
The thickness of the screed will depend on the quality of the base and usually ranges from 30 to 50 mm. But a thick base does not always show excellent qualities during use. Filling cannot be done to raise the floor level. Its main purpose is to create a flat surface for subsequent finishing.
If the fill level is significant, it will take longer to dry. This will not please those who want to carry out renovations in their apartment as quickly as possible. Subsequent work cannot begin until the base has completely gained strength and dried. The determination of the degree of drying is different for each type of screed.
Requirements for the screed layer
The fill layer performs a certain list of functions and has its own purpose. The result should be a solid base that can withstand static and dynamic loads during operation. It is very important to follow the technology to obtain a smooth surface. Subsequently, it will be possible to install any floor covering, such as tile, laminate or linoleum.
The arranged layer of screed allows you to evenly distribute the load over the entire plane in the room. The load is transferred to the underlying layers, where a heated floor system, as well as various communications, can be located. This significantly increases the service life of all components. If necessary, you can create slopes for specific rooms (bathroom). In this case, the floor filling level will be different.
The leveling layer must have identical density throughout its entire thickness. Cracks, chips, potholes or other surface defects must not be allowed to appear. It is for this purpose that the base leveling technology is fully followed, performing all the work sequentially. If you want to get a horizontally flat surface, only a slight slope of up to 0.2% is allowed.
The service life and strength of the entire structure will depend on the specific type of floor screed, as well as the optimal thickness of the fill. Particular attention should be paid to the room where the work will be carried out, the soil at the base. This all affects the level of filling, the need to use layers of reinforcement or other reinforcing elements.