The most reliable (but not always appropriate) option for interfloor slabs is a monolithic slab. It is made of concrete and reinforcement. Read about the rules for installing monolithic floors in this article. Analysis of the characteristics of types and applications, installation of monolithic floors.
In what cases is it necessary to install monolithic floors?
Monolithic reinforced concrete flooring is the most reliable, but also the most expensive of all existing options. Therefore, it is necessary to determine the criteria for the feasibility of its design. In what cases is it advisable to install monolithic floors?
- Impossibility of delivery/installation of prefabricated reinforced concrete slabs. Subject to conscious refusal of other options (wooden, lightweight Terriva, etc.).
- Complex configuration in plan with “unsuccessful” arrangement of internal walls. This, in turn, does not allow laying out a sufficient number of serial floor slabs. That is, a large number of monolithic sections are required. The costs of a crane and formwork are not rational. In this case, it is better to immediately move on to the monolith.
- Unfavorable operating conditions. Very heavy loads, extremely high humidity values, which cannot be completely solved by waterproofing (car washes, swimming pools, etc.). Modern floor slabs are usually prestressed. Tensile steel cables are used as reinforcement. Due to their very high tensile strength, their cross-section is very small. Such slabs are extremely vulnerable to corrosion processes and are characterized by a brittle rather than ductile nature of destruction.
- Combining the functions of overlap with the function of a monolithic belt. Supporting precast concrete slabs directly on lightweight block masonry is generally not permitted. A monolithic belt is required. In cases where the cost of the belt and prefabricated floor is identical to or exceeds the price of a monolith, it is advisable to focus on it. When resting it on masonry with a depth equal to the width of the belt, the installation of the latter is usually not required. An exception may be difficult soil conditions: type 2 subsidence, seismic activity, karst formation, etc.
Recommendations for pouring concrete
The concrete mixture for filling the formwork of a monolithic floor section can be made in a factory or independently. The choice should be based on the standards SP 63.13330, which require the use of concrete with a density of 1800-2500 kg/m³ with a compressive strength grade of at least B7.5. For the construction of internal monolithic structures of buildings, the water resistance and frost resistance of concrete does not matter.
When preparing a concrete mixture with your own hands, special attention is paid to reducing the likelihood of concrete cracking. In practice, this is achieved by following two important rules:
- It is necessary to use crushed stone, gravel or other filler of various fractions.
- The amount of sand in the concrete mixture should not be more than 1/3 of the total volume of the aggregate.
Before pouring concrete into the formwork, the edges of the laid slabs should be cleaned of dust and dirt; it is advisable to moisten them and prime them with cement mortar to increase adhesion. We offer a small number of recommendations, the implementation of which will certainly improve the quality of concrete:
- to prevent the delamination process, it is necessary to reduce the height of dropping the concrete mixture as much as possible, the optimal parameter is up to 0.5 m;
- laying concrete must be carried out continuously in one direction until the formwork is completely filled;
- you need to try to lay the entire volume of concrete in one go - in a small monolithic area this is quite achievable even with manual preparation of the mixture;
- It is advisable to compact concrete using a deep vibrator, as if piercing the layer every 40-50 cm;
- in the absence of a vibrator, you can use a simple bayonet shovel, also sticking it to the full possible depth, but in increments of 5-10 cm, understanding that the main purpose of this action is to remove air bubbles from the concrete;
- the fluidity of the concrete mixture cannot be increased by excessive addition of water - it is increased by vibration;
- The construction site must have a film to cover the concrete in case of bad weather.
Almost all extreme natural phenomena are contraindicated for concrete during the hardening process: rain and drought, frost and exposure to the sun. You can save it from destruction using inexpensive, accessible methods. First of all, this is covering with fabrics, tarpaulin, sawdust and even sand. In hot weather, the concrete surface should be wetted regularly. The film will not only protect from precipitation, but will also help retain heat during the process of cement hydration.
Determining the required thickness of a monolithic floor
For bending slab elements, over decades of experience in the use of reinforced concrete structures, the value of the ratio of thickness to span has been experimentally determined. For floor slabs it is 1/30. That is, for a span of 6 m, the optimal thickness will be 200 mm, for 4.5 mm - 150 mm.
An underestimation or, conversely, an increase in the accepted thickness is possible based on the required loads on the floor. At low loads (this includes private construction), it is possible to reduce the thickness by 10-15%.
Flaws
The trump card of lightweight concrete is considered to be specially created pores, which give them the above-mentioned positive properties. However, they also cause the disadvantages of blocks:
- less strength compared to traditional, heavy materials;
- higher level of moisture absorption. It penetrates precisely through artificially created voids. Therefore, plastering of external and internal surfaces is strongly recommended.
Return to contents
VAT of floors
To determine the general principles of reinforcement of a monolithic floor, it is necessary to understand the typology of its operation through analysis of the stress-strain state (SSS). The most convenient way to do this is with the help of modern software systems.
Let's consider two cases - free (hinged) support of the slab on the wall, and pinched one. Slab thickness 150mm, load 600kg/m2, slab size 4.5x4.5m.
Deflection under the same conditions for a clamped slab (left) and a hinged slab (right).
The difference is in the moments of Mx.
The difference is in Mu's moments.
The difference is in the selection of upper reinforcement according to X.
The difference is in the selection of upper reinforcement according to U.
The difference is in the selection of lower reinforcement according to X.
The difference is in the selection of lower reinforcement according to U.
Boundary conditions (nature of support) are modeled by imposing the corresponding connections at the support nodes (marked in blue). For hinged support, linear movements are prohibited; for pinching, rotation is also prohibited.
As can be seen from the diagrams, when pinched, the work of the near-support section and the middle region of the slab is significantly different. In real life, any reinforced concrete (prefabricated or monolithic) is at least partially clamped in the body of the masonry. This nuance is important when determining the nature of the reinforcement of the structure.
Materials used
There is a division of structures according to the materials from which they are made:
- Wooden is the most common type.
- Metal.
- Formwork made of thermal insulation material.
- From OSB sheets or plywood.
Each material has certain properties that must be taken into account during assembly.
OSB plywood panels
OSB plywood sheets are not the most popular material for manufacturing. The fact is that any plywood is afraid of moisture. Direct contact with the damp solution causes the plywood to become saturated with moisture and swell, and after drying it no longer returns to its original size.
It is possible to use plywood as a formwork material, but additional waterproofing will be required, which is done using greenhouse film or roofing felt. And this is already extra expenses and wasted time. It is convenient to attach the film to the OSB surface using a construction stapler.
The second way to protect against moisture is to paint with oil paint. A layer of paint will protect the material and make the formwork reusable.
Metal shields
They are used mainly in the construction of multi-apartment monolithic buildings. Shields are made from metal corners and sheet iron welded to them. They are mounted mainly on studs and bolts or on special spring locks.
Reinforcement of a monolithic floor. Longitudinal and transverse reinforcement
Concrete works great in compression. The reinforcement is tensile. By combining these two elements we get a composite material. Reinforced concrete, which uses the strengths of each component. Obviously, the reinforcement must be installed in the tensile zone of concrete and absorb tensile forces. Such reinforcement is called longitudinal or working. It must have good adhesion to the concrete, otherwise it will not be able to transfer the load to it. For working reinforcement, periodic profile rods are used. They are designated A-III (according to the old GOST) or A400 (according to the new one).
The distance between reinforcing bars is the reinforcement pitch. For floors it is usually taken equal to 150 or 200 mm. In case of pinching, a supporting moment occurs in the support zone. It generates tensile force in the upper zone. Therefore, working reinforcement in monolithic floors is placed both in the upper and lower zones of concrete. Particular attention should be paid to the lower reinforcement in the center of the slab, and the upper reinforcement at its edges. And also in the area of support on internal, intermediate walls/columns, if any, this is where the greatest stresses arise.
To ensure the required position of the upper reinforcement during concreting, transverse reinforcement is used. It is located vertically. It can be in the form of supporting frames or specially bent parts. In lightly loaded slabs they perform a structural function. Under heavy loads, transverse reinforcement is involved in the work, preventing delamination (cracking of the slab).
In private construction, transverse reinforcement in floor slabs usually performs a purely structural function. The supporting shear force (the “shear” force) is absorbed by the concrete. An exception is the presence of point supports - racks (columns). In this case, it will be necessary to calculate the transverse reinforcement in the support zone. Transverse reinforcement is usually provided with a smooth profile. It is designated AI or A240.
To support the upper reinforcement during concreting, bent U-shaped parts are most widely used.
Installation of floor reinforcement.
Pouring the floor with concrete.
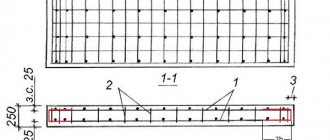
The simplest formwork
The budget, most common formwork option is made from boards and timber of at least 2nd grade wood:
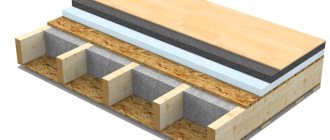
- The monolithic layer is poured onto a plank deck with a thickness of at least 25 mm; the width of the boards can be any.
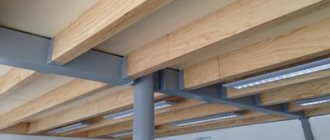
- Beams and purlins are made of 50x100 timber.
- The minimum cross-section of load-bearing posts is 50x65 mm.
Compliance with these requirements will ensure that there is no sagging in the monolithic section of the floor.
Installation of racks
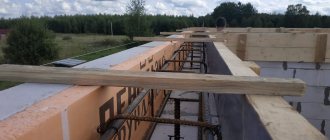
The side edges of the floor slabs serve as formwork fencing for the monolithic section being constructed. Its deck is placed under the floor slabs and mounted on support posts
Procedure for installing supports:
- Pillars are installed on both sides of the opening.
- Beams rest on them and are laid across the slabs.
- The purlins are mounted on top of the beams along the slabs and are made of 50x100 mm timber.
- Next, the remaining supports are mounted under the purlins in increments of 1 m to ensure the horizontality of the formwork.
- At the base of the supports, a lower frame is made - the posts are sewn together lengthwise and crosswise with a 25 mm board to ensure the stability of the structure when poured with concrete.
- The top trim is done in the same way at a height of approximately 1.5 m, resulting in a rigid spatial structure.
Racks can be made using the extension method. The essence of the method: the supports are made smaller than the required height, but then they are built up at the top in pieces of the required size. This makes it easier to dismantle the formwork after performing monolithic work:
- The lower beams are removed first;
- then the upper parts of the racks with beams are dismantled;
- then the flooring with the purlins attached to it is removed.
Flooring
The deck is mounted on top of the purlins, the edges of the boards run under the installed floor slabs. Any gaps in the flooring are sealed on top with polyurethane foam. The entire surface is covered with plastic film. Covering purposes:
- retaining water in the concrete mixture;
- preventing cracking of the monolithic layer;
- facilitating the dismantling of formwork;
- giving the surface increased smoothness.
Fastening the deck without the use of posts and beams
If the width of the monolithic section is small (up to 1 m), you can use a simplified method of attaching the deck, which does not require the installation of racks. The principle is quite simple, fast, and economical: attracting the deck to the lower plane of the slabs with wire clamps. The technology provides:
- boards, plywood, OSB can be used to construct the flooring;
- the deck should extend under the adjacent floor slabs by 20 - 25 cm on both sides;
- clamps are made of wire with a thickness of 6 mm or more;
- the fastening wire is launched into the flooring in increments of 0.5 m;
- above each place where the wire clamps pass onto the slabs, a transverse bar with a cross-section of at least 50x75 mm is installed;
- the deck is pulled through the top beam using the twisting method;
- The flooring, firmly attached to the lower plane of adjacent slabs, is reinforced and poured with concrete in the standard way.
Important! Sometimes developers punch holes for reinforcement in the edges of slabs, but this should not be done due to the weakening of the structure of hollow-core slabs.
When dismantling the deck, the clamps are simply cut off with a grinder, and part of the wire remains in the monolith.
Monolithic floor thickness
In accordance with the calculations performed, we can recommend, for the installation of monolithic floors, in private houses, a floor thickness of 150 mm, for spans up to 4.5 m and 200 mm up to 6 m. It is not advisable to exceed the span of 6m. The diameter of the reinforcement depends not only on the load and span, but also on the thickness of the slab. The often installed fittings with a diameter of 12 mm and a pitch of 200 mm will form a significant reserve. Usually you can get by with 8mm at 150mm pitches or 10mm at 200mm pitches. Even this reinforcement is unlikely to work to the limit. The payload is assumed to be 300 kg/m2 - in a home it can only be formed by a large closet completely filled with books. The actual load in residential buildings is, as a rule, significantly less.
The total required amount of reinforcement can be easily determined based on the average reinforcement weight coefficient of 80 kg/m3. That is, to install a floor with an area of 50 m2 with a thickness of 20 cm (0.2 m), you will need 50 * 0.2 * 80 = 800 kg of reinforcement (approximately).
In the presence of concentrated or more significant loads and spans, the diameter and pitch of the reinforcement specified in this article cannot be used for constructing a monolithic floor. Calculations for the corresponding values will be required.
Sealing the ceiling seam from the bottom side
Inter-tile seams - rustications are filled with concrete during installation, then the ceiling is primed, puttyed and painted, unless other finishing is provided.
Sequence of sealing rusts
Before concreting, the seams are thoroughly cleaned of dust and mortar residues with a wire brush ; for better adhesion of the mortar to the slab, the side surfaces can be primed.
- The prepared fresh concrete solution is unloaded into a container and delivered to the work site;
- If the width of the rustication is small, the filling is carried out at one time, if the width of the area is large - in several layers, but no more than after 2...3 hours;
- A concreting area of small width is bayoneted; for a large one, it is compacted with a vibrator;
- For the first week, the surface of the monolith is moistened with water daily;
- After 28 days, the formwork is removed.
Uneven shrinkage of the house
It's unpleasant when cracks appear on the ceiling. This often happens due to::
- Uneven settlement of the building;
- Incorrectly selected brand of concrete;
- Poor quality concrete.
Let us dwell on the causes of uneven precipitation. It may occur in the following cases:
- Structural defects - incorrectly designed foundation;
- Foundation construction without taking into account geology, soil freezing depth and groundwater depth;
- Poorly performed work on the construction of the foundation and masonry of walls;
- Poor quality building materials.
To understand the reason for the appearance of cracks, it is sometimes necessary to order a construction examination.
Decorative ceilings
A protective layer of concrete 30-50 mm thick should ensure that there are no rust stains on the ceiling from the reinforcement, but sometimes this layer is ineffective. The best remedy for seeing stains on the ceiling, traces of leaks and rust cracks is to install a suspended, suspended or suspended ceiling.
A decorative ceiling is the best solution when it is necessary to level the ceiling surface. It will cover all construction flaws and give completeness to the interior. If you want to reduce the height of the room, multi-level or suspended ceilings made of plasterboard, acoustic boards, or combinations of various materials are arranged.
In rooms of low height, false or suspended ceilings are used. The champion here is the suspended ceiling, which “eats” only 3-5 cm of the room’s height.
Every problem finds its solution. Sealing joints between slabs in an aerated concrete house, even with a large width, does not pose a major structural or technical problem. From the proposed options it is easy to choose the one that suits your specific case.
We tried to write the best article. If you liked it, please share it with your friends or leave a comment below. Thank you! Great article 11
Mixing the solution
The only way to lighten the weight of a concrete material is to use various methods to enrich it with air. Achieving goals like this:
- Replacing traditional fillers with lightweight ones. These include pumice, slag (metallurgical granules, expanded perlite and vermiculite), sawdust, rice husks and others. These units are fire-resistant; thanks to their cellular structure, they improve their own adhesion of the solution.
- Introducing gases or air bubbles when mixing. Thanks to special reagent additives, hydrogen or oxygen is released into the mixture. Foaming agents (synthetic, protein) are used for foam concrete. You can also make it yourself, for which you can use pine rosin, carpentry bone glue, and caustic soda.
Return to contents