Homestead owners have to think about arranging a place in which various products and preparations for the winter will be stored. It is not possible to put a significant part of them in the refrigerator. The cellar is a great place to store a large number of different products. However, not every farm has such a room. This is why there is often a need to build a cellar with your own hands under a barn or other outbuilding. This will ensure the possibility of long-term storage of various products. A barn with a cellar is an excellent option for owners of suburban areas.
Selecting a location
A cellar is a room located under a house or other building. Winter preparations, as well as various products, are usually stored in it. The most favorable conditions for this are created in the cellar. The basement, unlike the cellar, is a part of a residential building that is actually an underground floor.
The cellar is usually arranged:
- in the courtyard;
- under a garage or shed;
- under a residential building.
If you choose the option of arranging a cellar in the yard, it is located separately from other buildings, with a slight elevation - the above-ground part. It contains the entrance, roof and walls. However, the construction of such a cellar is more expensive than with other options.
If a vegetable storage facility is supposed to be built under a house, this can create significant inconvenience for a long time. In this case, it is necessary to consider protective measures against various pests and mustiness.
The best option is to build a cellar under the barn. In this case, a minimum of costs and time will be required, and it will also be possible to create a truly reliable structure. In addition, if the building is located next to the house, there is no need to build a path to it.
Plastic cellar
Now there are ready-made plastic cellars on sale, which are also installed during the construction of a house, or, in this case, a barn. If the building is already in use, then such a cellar can only be installed as a wall-mounted option.
After all, they are seamless, which means they are voluminous, and require enough space for installation:
- The process of installing plastic cellars also begins with digging a pit. Only in this case, its area should correspond to the size of the cellar, and not the barn. The difficulty of this technology is that a caisson needs to be made for a plastic basement - that is, not only the base, but also the walls must be concreted.
Plastic cellar in a concrete caisson
- The technology for pouring the base is the same as in the case of a conventional basement. But in order to concrete the walls of the pit, you need to install formwork. For its installation, edged boards, sheets of moisture-resistant plywood, OSP boards, and flat slate are used. It must be said that a plastic basement is not a cheap pleasure. The caisson under it can easily pass for an independent cellar.
The convenience of using polymer cellars lies in the fact that there is no need for internal arrangement: drainage, ventilation, shelving, hatch and stairs.
And the issue of high humidity is unlikely to ever bother you. In general, the manufacturer’s instructions for its installation and operation must be included with the cellar kit. So, we will not focus much attention on this issue.
Drafting
The design of a barn with a cellar is the key to long-term service of the premises. The vegetable storage facility can be arranged in two options:
- a pit, the entrance to which is located on an inclined slope;
- a pit equipped with a steep descent onto which an extension ladder is installed.
Before you start designing cellar equipment, it is worth checking the level of soil water that exists on the site. If during a flood they rise to a depth of 2 meters, you should abandon the construction of a cellar. Otherwise, it may be subject to regular flooding.
During the design process, the owner of the site should take into account the dimensions of the future building. To do this, certain measurements are taken at the cellar site. The dimensions of the pit must meet certain requirements. She should not come closer than half a meter to the walls of the barn.
Such requirements are mandatory. This will prevent the structure from collapsing in the future. It is better to cover the floor and walls with bricks or fill them with concrete mortar. In addition, the cellar under the barn should be equipped with ventilation. To conveniently place workpieces for the winter, you should install shelving of the required size in the room.
It is better to do the upper ceiling of the cellar separately, or based on the existing floor in the barn. The latter option involves the presence of a concrete slab or boardwalk. At the beginning of designing a cellar under a barn, an accurate drawing should be made. The dimensions of the room must be linked to the dimensions of the building.
Design Features
The standard design process consists of several stages:
- Preliminary design. Selecting configuration and functionality, determining dimensions and placement on the site plan.
- Technical project. Selection of materials, development of the general design, determination of connection points to utility networks.
- Development of documentation - drawings and detailing, calculation of the quantity of materials and components. Calculation of estimates.
You can buy a ready-made project, order an original one, or calculate it yourself.
Dimensions
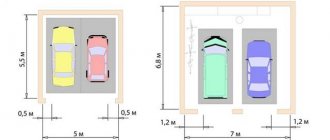
The dimensions for each room are determined based on the required usable volume. Here is an approximate list of factors that affect the size of the garage:
- how many cars and what dimensions should it accommodate;
- what passages should remain between the machine(s) and the enclosing structures;
- what type of gate will be used - swing gates need space in front of the garage, sectional and up-and-over gates need a margin of ceiling height to accommodate the mechanism;
- Is an inspection hole needed?
To calculate the size of the utility unit, you need to determine its purpose.
If this is just a storage room, then the volume of items is assessed, and depending on their nature, a storage system is chosen. For the workshop the task is a little more complicated:
- make a list of equipment, tools and equipment;
- choose the size of the workbench, shelving and cabinets;
- arrange equipment and furniture in accordance with the requirements of ergonomics and safe operation;
- look at how much space the workshop will take up in terms of area and height.
Proceed similarly to calculate the sizes of other types of utility rooms.
You can also consider cases when they combine a garage and a bathhouse (and at the same time a recreation room). But this is no longer a utility block, and it has its own design features.
Once the dimensions of the garage and utility block have been determined, they are assembled together and see if such a structure can be placed in accordance with the requirements of SNiP regarding the house, communications and site boundaries. Not forgetting the driveway from the gate and the walkway to the house.
Equipment and materials
No matter how easy the work may seem, you should stock up on special materials and equipment in advance. When building a cellar you will need:
- scrap;
- shovel;
- buckets;
- concrete mixer;
- sledgehammer;
- building level;
- saw;
- Bulgarian;
- welding machine.
You will also need to prepare various materials. These include brick, sand, reinforcing bars, cement, and clay. Also, to build a cellar you will need beams and boards. Materials should be chosen of good quality, otherwise after a few years the cellar will have to be repaired.
By material type
Initially, we need to decide what kind of carport we decided to build at the dacha. To do this, consider their classification according to the type of materials used.
Wood
A wooden carport with a utility unit is built entirely using lumber. For the manufacture of support posts, timber 100 by 150 by 6000 mm is used, and thinner beams and boards are used for strapping and sheathing.
Metal
When erecting a metal canopy with a change house, it is best to use profile-type pipes with a diameter of 60 by 60 mm. A pipe is also used for lathing, only with a smaller diameter (30 by 30 mm).
Polycarbonate
A polycarbonate canopy with a utility block is currently most widespread. Both wood and metal can be used for supports and sheathing in these projects. Polycarbonate with a thickness of 6-10 mm is used as a roof.
Digging a pit
How to make a cellar without spending a lot of time and effort? To do this you need to follow the instructions. First you need to open the floor where the entrance to the room will be equipped. Typically, excavation work is performed by several people. One of them digs a hole, and the second removes soil using buckets. The lower, harder layers of the earth are usually crushed using a crowbar.
The depth of the cellar pit is usually 2-2.5 m. Its length and width are calculated taking into account the design dimensions of the room. It is important to remember the need to leave aisles along which you can move freely between shelves. Their width must be at least 1 m.
The entrance to the cellar can be vertical or inclined. The last option involves arranging a capital staircase with your own hands. It is important to ensure that the edges of the pit do not come closer than half a meter to the foundation of the shed. This will ensure the reliability of the structure. If you neglect this rule, the barn may not only sag, but also collapse.
Construction of a cellar box
The first step after digging a pit is to make drainage. It doesn’t matter what material the walls are built from, for a cellar it is extremely important that part of the walls or floor remain earthen. This way the room will maintain a low temperature and an average level of humidity. It is necessary to lay a drainage pipe around the perimeter of the future cellar and fill it with fine screenings.
If you don't like the idea of an adobe or paved floor, you can do a traditional concrete screed. This option is convenient for installing racks and multi-tiered boxes with vegetables. In addition, a concrete slab at the base of the cellar will help strengthen the foundation for the shed.
If the floor is concreted or paved with paving stones, the walls of the cellar must be made of brick or cinder block. In any case, half-brick masonry will be sufficient to protect the walls from crumbling and ensure high-quality heat dissipation into the ground. Sometimes walls are built from foam blocks, but only for cases when the main structure of the barn is made of frame panels, boards or timber. For brick sheds, a foam cellar will be too weak for the foundation.
A cellar for a barn does not have to be built to the full depth of the walls. Most often, the cellar is deepened 150-170 cm into the ground, and the basement part, rising above the ground level, is waterproofed and covered with a thick meter-long layer of clay.
Foam materials can be used to build the ceiling and the entrance to the glacier room. To do this, you will need to lay wooden beams, fill the sheathing with boards, lay down plastic film and secure fiberglass reinforcement to strengthen the floor of the future barn. The layer of foam concrete should be at least 25 cm. A week after pouring, you can fill in a layer of expanded clay 20-25 cm, and then begin assembling the wooden shed.
How to arrange the floor and walls
To create a reliable vegetable storage in a barn with your own hands, you should follow simple rules. Most construction work on creating a cellar is best done together. The assistant must ensure timely lowering and raising of the bucket. The walls are finished with a clay castle. The latter is located between the ground and the masonry.
It is better to place it on a strip base. It is also possible to carry out masonry directly on solid ground. In the event that sand is poured onto the bottom of the cellar, a foundation under the wall must be constructed. In this case, it is important to measure 40 cm from the walls. This space is necessary for arranging a clay castle.
After this you can start laying bricks. First perform 4 rows. Oily clay must be placed between them and the soil. The result is a clay castle. The procedure for filling the space between the masonry and the soil with clay is carried out every 3 rows. Thanks to the presence of clay, the cellar will be reliably isolated from rainwater during heavy rainfall.
How evenly the brick rows are laid can be checked using a level. If the verticality of the masonry is not maintained, it may collapse in the future. During masonry, it is necessary to provide for embedding special hooks into the cellar wall, on which racks and shelves will be attached.
Sand is poured into the bottom of the hole. Its height should be 30 cm. A brick floor can be laid on it, however, most often the pillow is filled with concrete. When building a cellar, it is better not to use wood. It quickly loses its properties under the influence of humidity.
Advantages and disadvantages
The advantages and disadvantages of sheds with outbuildings partly depend on the materials from which the structure is built. The advantages of such buildings include the following:
- cost savings;
- simple design, which allows you to build the structure yourself;
- quick installation (takes no more than a week);
- the ability to expand the usable area;
- the presence of a separate area intended for storing automobile or gardening equipment;
- There are many design solutions, so you can choose an option that matches the characteristics of the house and the rest of the landscape.
The main disadvantage of a canopy with a utility unit is the lack of complete protection of the car from precipitation. The second disadvantage of such structures is that it is impossible to repair the car in the winter season.
Overlap
A ready-made barn floor can be selected as the ceiling of the cellar. In this case, it should be strengthened. You will have to not only mount beams on the ceiling of the cellar, but also install supports. They are usually made from metal channels. The supports can also be made of brick.
If an independent ceiling of the cellar is provided, it is arranged on the basis of a welded frame, which is made from a channel. The gaps should be sealed with reinforcement. When making the floor frame, it is important to leave holes for the ventilation pipes.
The plank ceiling of the cellar is laid on the frame. You can also use chipboard sheets. They are covered with earth on top. Often, a previously raised floor of the structure is mounted on the laid floor.
Construction process
It is necessary to mark the territory with pegs, and stretch a rope between them, marking the boundaries of the building. It is recommended to dig a hole 50-70 cm deep under the supports of the canopy. Make a distance of about 100-150 cm between the supports. The supports must be leveled, covered with sand and then filled with concrete. For convenience, it is better to use a laser level when setting up supports. The concrete will harden for at least 2 days. For this reason, no construction work should be carried out during the drying period. After the concrete has hardened, it is necessary to install cross boards as rafters. If you use a metal rod, then welding between them is necessary. The optimal distance between them will be 50-75 cm. In the area where the utility unit is located, they must be installed evenly over the entire height. This will be a sheathing for attaching OSB boards or other wall finishing materials. You can build walls in the utility block using aerated concrete. In this case, a solid foundation is needed. On the second or third row of blocks, bandaging should be done using reinforcement.
Indoors, the floor structure is made of wooden blocks (lags), then sheathed with slabs. The space between the logs is filled with expanded clay, crushed stone or sand.
To cover the roof, corrugated sheeting, polycarbonate, metal tiles and other types of roofing are used. Before installing the roofing material, make the top trim using wooden beams and metal corners. Next, a sheathing is created on which the roofing material will be laid. The material should be overlapped to prevent water from leaking between the joints. For types of coating such as polycarbonate or metal tiles, it is recommended to use a press washer with a rubber seal. Cover the joints with waterproofing material. If polycarbonate is used, a small gap is left between the joints and filled with plastic materials. When tightly connected to each other under the influence of the sun, polycarbonate expands and can become deformed.
After completing the construction of the canopy, you can proceed to finishing work. The outer part of the utility block can be sheathed with wooden inserts, siding, clapboard, as well as cement particle boards (CSP). The latter option is quite expensive and is rarely used in these buildings. The walls can be filled with mineral wool or polystyrene foam. The interior is covered with OSB boards. Before doing this, you need to plan the wiring, if any. For indoor partitions, a suitable option would be to use a metal profile for plasterboard, but cover the partitions with OSB boards. Wood used in construction must be coated with a special compound that protects it from destruction. They are also coated with a fire retardant compound to increase fire safety.
Ventilation
It is at the stage of constructing the ceiling that the cellar should be ventilated. Usually 2 pipes are installed for this purpose. One of them will provide air flow into the cellar, and the other will provide an exit. Typically plastic or asbestos-cement pipes are used. They are attached to the walls using clamps or anchors.
The supply pipe should go down almost to the floor - its lower section is usually located 30 cm above the cellar floor. It extends up 40 cm above the barn floor. The exhaust ventilation duct is located with its lower part 20 cm lower than the ceiling of the cellar, and on 1.5 m higher than the top of the pipe for fresh air.
It is also worth ensuring that there is at least 10 cm between the boxes in which supplies will be stored and the floor of the cellar. This will allow fresh air to flow freely to the vegetables.
Staircase device
To figure out how to build a cellar, you should consider all the subtleties of the process. A capital staircase usually takes much longer to build than an extension staircase. For such work you will need bricks or concrete. To give the structure durability, you must first weld its frame. It consists of metal corners. In some cases, such a staircase is performed using a welding machine. The steps in this case are made of sheets of corrugated metal.
A capital staircase can be arranged in this way:
- first arrange the brickwork;
- reinforce it with a welded frame.
When creating a steep descent into the cellar, an extension ladder is installed on the descent. It is usually welded from metal corners. The structure can also be knocked down from timber. The extension ladder usually has a length that is equal to the depth of the cellar pit. An excellent solution is a staircase made in the form of a ship's gangplank.
Boxes and racks
Usually the boxes are placed at the very bottom of the cellar. Root vegetables and vegetables are placed in them. On top there are shelves on which boxes with fruits and jars are placed. Place boxes and racks along the walls. Bottom boxes can be retractable or stationary. You can do them yourself. In the first case, they are equipped with runners. Shelving is usually made of sheet metal. This option is the most reliable and durable. If you use wooden planks for shelves, they may be exposed to moisture.
Wall-mounted shelves are another good solution. They are hung on hooks, which are sealed with anchors in the wall. Small walls can be made from brick into which the boxes will be placed.
Advantages of garages with a utility block
It is not uncommon for all sorts of storage systems to be installed in the garage itself. Moreover, they store not only things related to the car, but also household or household items.
The utility block will allow you to unload the space if you allocate a separate pantry. Two are even better. One for seasonal tires, auto chemicals, filters and consumables, if the owner prefers to wash the car and carry out preventative/seasonal maintenance of the car with his own hands. But the second room should be reserved for storing everything else: tools, garden furniture, sports equipment.
The interior space of the garage will thus be freed up only for the car. This is not only convenient and aesthetically pleasing, but also completely eliminates the risk of damage to the paintwork of the body when you need to take or put something down.
The same applies to home workshops, which are often set up in garages. They are given a separate room, which can be accessed either from the yard or from the garage.
Another advantage of the combination is the saving of materials and time for construction:
- general pit and formwork for the foundation;
- common internal walls;
- common roof from the ceiling to the drainage system;
- general blind area, drainage and storm drainage.
And as stated in the introduction, combining two buildings into one saves space on the site.
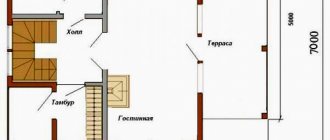
Project of a garage with two outbuildings and a canopy
Project of a garage for two cars with outbuildings
Entrance to the cellar
A hatch is placed at the entrance to the cellar. They also often use a regular door. It is installed at the entrance from below. It is usually made from sheet metal or wood. Hang it on a wooden or metal box.
For steep descents, it will be equipped with a metal hatch. Often there is a version of a product made from boards. The hatch hinges are welded to the pins, which are concreted into the floor of the barn. You can also make eyelets for the lock.
Lighting
It is almost impossible to live in a cellar without light. The main lighting branch is usually connected to a 220 V network. The electrical cable must be securely strengthened. It is mounted to the ceiling. Usually the cable is laid in a pipe to protect it from rodents and moisture.
The lighting lamp is placed on top, above the entrance to the cellar. If you mount it on the ceiling, it may frequently touch while moving around the room.
Setting up a cellar under a barn with your own hands is quite simple. If you follow all the rules and recommendations, the work will go quickly and without any particular difficulties. A properly equipped room will serve for many decades.
Garage for a car with a utility block or a workshop in the country
A car garage allows you to hide your car from prying eyes and protect it from the harmful effects of atmospheric factors (sunlight, temperature changes, precipitation, etc.). They can ruin the surface of the car, its interior upholstery, panels, and even disable the iron horse. It will help extend the life of the car and allow you to carry out repair and maintenance work in comfortable conditions.
You can also read the material about the advantages of carports for the country house.
Some car enthusiasts equip their garages with inspection holes. This will save costs at the service station, because it will give you the opportunity to do the repairs yourself.
A garage can be used not only as a place to store and repair a car. It is customary to drag things here that do not belong in the house. Bicycles, household supplies, garden equipment, and many other necessary and useful things need to be placed somewhere for the winter (summer) season.
This link will tell you what to build a garage from.
Ultimately, all this undoubtedly speaks in favor of building a garage with a utility block.
Features of construction from a utility block
Sooner or later, to store things that are unnecessary in the house, the utility block will have to be completed. Therefore, when starting construction, it is better to design two combined structures under one roof. Using such combined premises will be simple and convenient.
Until recently, the main task of a garage was parking, storing cars, spare parts and equipment, but now great attention is paid to its appearance.