Of course, in our world you can buy absolutely everything. But sometimes the price tag for a thing of proper quality is too high, so the idea comes to mind to do everything yourself. And one of those things that everyone can make is an axe. This tool is simply irreplaceable in a country house or in a private home, but choosing a quality ax from the entire assortment of stores is quite difficult.
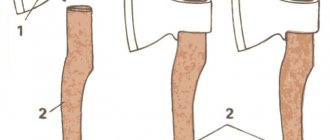
The ax handle requires processing.
Restoring an old ax
Restoring an ax begins with a careful inspection of it for chips and through cracks. If these defects are small and are located closer to the edge of the blade, then such an ax can be put in order, but a tool with large chips and, especially, cracks in the place where the handle is attached is better replaced with a new one, since it will most likely break during operation.
Preparing the template
When you have ready-made material, you can begin to create the ax itself. To do this, they think over and make a sketch of the handle, thanks to which the manufacturing process of the product in question is facilitated. The shape of the ax is determined by the type of tool. If a handle is required for a light ax weighing 0.8-1 kg, then its length is 0.4-0.6 m. The length of heavier ones can reach 0.6-0.9 m. Axes are classified according to their purpose:
- carpentry;
- lumberjacks;
- loppers;
- cleavers;
- butcher's
Based on the purpose of the tool, the length of the ax will depend. When making it, you should adhere to the following rules:
- to prevent the ax handle from slipping while working with an axe, the tail should be slightly wider than the handle itself;
- the cleaver's ax handle is made 0.75-0.95 m long, while for a carpenter's ax it is 0.5 m long;
- 10 cm is added to the length of the handle for allowance. This part is cut off after attaching the butt.
The future handle of the desired shape and size is drawn on cardboard, after which the image is transferred to wood and cut out with carpentry tools.
Mechanical cleaning and straightening of the ax
To remove the outer layer of rust and small edge defects, you may need the following tool:
- hand brush with metal bristles;
- coarse and fine sandpaper;
- electric grinding wheel.
Using a metal brush, remove the top layer of rust. If you have a power tool, it can be replaced with a drill with a grinding wire attachment. In hard-to-reach bends and in the interior, you will have to work hard with coarse sandpaper. Next, you should remove defects in the blade using a sharpening stone and polish the entire ax with fine sandpaper.
In some cases, you can be satisfied with the work already done, but to make the ax look like new, you need to clean it of rust at the molecular level.
Sharpening the piercing part of the taiga ax
Excellent performance of the hatchet is ensured by a properly sharpened blade. The sharpening angle depends on the activity you will perform with the axe.
The taiga ax is sharpened at an angle of 30-35 ̊. If they will be working with fresh wood, then we sharpen it at an angle of 25 ̊.
If you use a sharpening wheel for sharpening, then the ax handle must be held at an angle of 40-45 ̊. We reproduce the sharpening slowly and carefully.
If you have all the necessary tools in stock, a photo of the step-by-step production of an ax, then its creation will not take a lot of time, effort and money, and in return you will receive a high-quality ax made by yourself.
But do not forget that with a piercing part made of high-quality metal, the ax will last much longer and if the handle is treated with linseed oil, it will not rot and deteriorate.
How to clean an ax from rust using electrolysis
Electrolysis is one of the cheapest and most effective ways to clean an ax from rust, but the main thing is to act carefully and not mix anything up. To clean an ax from rust using electrolysis, you will need:
- current source, preferably low voltage;
- a degreaser such as acetone;
- soda ash or caustic soda (baking soda will not work);
- a small plastic container (excess liquid will significantly slow down the cleaning process), sufficient to immerse the ax;
- unnecessary hardware (can be made of stainless steel), to which rust will transfer;
- two wires.
The process of cleaning an ax using electrolysis proceeds as follows:
- The ax is degreased.
- Then it is connected to one of the wires, and a piece of iron for collecting rust is connected to the second. Here it is important not to confuse the polarity and attach the object to be cleaned to the negative wire, i.e., the cathode, otherwise the process will go in the opposite direction, and the tool may be lost altogether.
- Fill the structure with an alkaline solution at the rate of 1 tablespoon of soda per liter of water.
- Plug in and leave for a while (from two to eight hours).
After such treatment, all rust and salt deposits from the ax will transfer to unnecessary iron. The ax itself may become covered with a black coating, which can be easily removed with a hot solution of citric acid.
By the way, increasing the volume of water slows down the reaction, and increasing the voltage, on the contrary, speeds it up. If the voltage is too high, the liquid will boil strongly and actively release hydrogen, which is an explosive and rather poisonous gas, especially if you use stainless steel as a receiver. That is why it is better to carry out rust treatment outdoors.
The main advantage of this method is that it does not damage the metal. You can remove rust from even the thinnest iron without damaging the engraving or dulling the edge of the product.
What to make an ax handle from
An ax handle is an ax handle. It is usually made from wood. Although now metal and plastic axes have become widespread.
- You need to initially know why you need an ax. Perhaps for chopping wood, or maybe for carpentry. And only after you decide on the type of activity, you can choose wood.
- One of the main criteria for selecting wood is strength and good impact strength.
- Next, based on the type of activity, you need to choose the material for the ax handle: oak, birch, elm, ash, acacia or hornbeam. Birch is a versatile wood, while oak is highly durable.
- A very important point is the age of the tree. It is recommended to use only mature trees, at least 40 years old. Then your ax handle will be much stronger.
Processing is one of the final stages.
How can you clean an ax from rust?
You can also remove rust from an ax using chemical agents, among which rust converter comes first. Its main active ingredient is phosphoric acid, which very effectively and quickly dissolves iron oxide, and various additives (depending on the brand) form a reliable protective layer on the surface of the product, preventing new corrosion.
Also, for minor contaminations, you can use kerosene, diesel fuel or gasoline. Soak the product in the chosen product for several hours or even days, depending on the depth of the corrosion, and then wipe off the remaining plaque.
An excellent way to combat corrosion is hydrochloric acid, which corrodes everything unnecessary on an iron tool with a bang. In order not to damage the ax itself, some advise adding “Urotoropin” to the acid solution (from 3 to 10 percent) at the rate of 1 tablet per half liter of solution.
Among the available methods of fighting rust, a special place is occupied by soda based on phosphoric acid (most of it is in Coca-Cola, but Pepsi or Sprite are also suitable). If a rusty object is brought to a boil in soda, the effect will be the same as that of a rust converter, since the active substance is the same.
Hydrogen peroxide will help facilitate the removal of oxides before mechanical treatment. If the ax is first moistened with it and then heated, the oxides will be rubbed off much easier.
Ax with plastic handle: 8 interesting models
An ax with such a handle is more convenient and is now widely available on sale. Mostly such axes are made in China and they are not particularly expensive. But often axes with plastic handles break and this is their big disadvantage. They also look more attractive and come in different colors and shapes. Below you can see the most interesting models in the world.
The NEO ax is easy to use and can be purchased at outlets and in various stores. This ax weighs 950g and when working with it, your hand doesn’t get particularly tired.
An excellent ax for chopping wood, manufactured by a well-known company - Verto.
A small ax is suitable for tourists on hikes and for outdoor recreation.
Such an ax can often be found in stores, one of the best companies for making tools.
A very light ax with specially cut grooves for the fingers.
A good ax with a plastic handle and a length of 36 cm.
A small ax for outdoor recreation is a great helper for chopping wood for the grill.
This ax can also be used to hammer nails.
Read in full (link)
Dark ax cover
Good evening everyone! I made myself a taiga ax. Naturally, the original coating was removed during processing. Became brilliant. But at the same time, it immediately rusts in a humid environment. I saw axes forged from carbon with some kind of dark gray coating. How can this be achieved at home (garage)? How can you protect an ax from corrosion? And even after just lying in the garage, after a while it becomes covered with a fine red coating
Etch in ferric chloride, iron sulfate, or some acid.
Vova_N
Etch in ferric chloride, iron sulfate, or some acid.
Covered with ferric chloride. At first it seemed to work out. But a day later I came to the garage and saw that the whole ax had turned red)) maybe I did something wrong? How to do this correctly?
Try phosphoric acid.
Pavel Bykov 74
Try phosphoric acid.
What will it give and how to use it correctly? What about ferric chloride? How does it actually work?
There is sufficient phosphoric acid in Coca-Cola. That is, degrease it, put it in cola overnight and you will be happy))) and it’s not difficult to renew.
I’ve already asked this question here, I’ll ask again since the topic came up: I etched a kitchen knife from a quick cutter in orthophosphoric acid, at first it was uniformly gray, but within six months it turned black (but did not rust). How to stop this process?
If I’m not mistaken, phosphate coatings have a finely porous structure (phosphating is one of the options for preparing metals before painting), try soaking a fresh coating with vegetable oil, this may preserve an even color.
Alexanderishenko
I made myself a taiga axe.
After treatment in acid, do not forget to lower it into a soda solution. as an option, use the “clover” bluing solution (if I’m not mistaken)
And after the cold treatment, be sure to rinse with soda. And after thoroughly drying, lubricate with oil.
after chronic liquidation, you need not soda, but ammonia. It is best to use a 10% nitrogen solution, then rinse thoroughly (or in a soda solution), and spread with oil. Personally, I did this.
Question on topic. And if you just paint it (I see Swedish army axes are all painted green). Just what? The first thing that comes to mind is Kuzbasslak, but it seems to be for short-term (up to 6 months) storage https://www.kraska-sale.ru/lak_bt-577.html
Mr Draibalit
. Try saturating the fresh coating with vegetable oil; this may help maintain an even color.
What does “impregnate with oil” mean? How long does it take to saturate a thin oxide film? Apply and wipe or leave overnight? Or in the sun to polarize the vegetable oil? I’m asking seriously because I’m interested not only in “what to do,” but in the operating principle of the chosen method. Why vegetable oil?
And after the cold treatment, be sure to rinse with soda. And after thoroughly drying, lubricate with oil.
Main components
When making and choosing a weapon, its future owners are often faced with the question of how to calculate the mass of a taiga ax. To do this, you need to focus on its components and compliance with certain proportions between them. On average, the weight of the product does not exceed 1 kg; its main components are a wooden ax handle and a metal head. The main elements are shown in more detail in Figure 2.
Figure 2. Main components of the product
The weight of the taiga ax handle and its length should be proportional to each other. The optimal value for everyone is considered to be equal to the distance from the wrist to the shoulder joint, provided that the shaft is fully grasped by the hand, in order to avoid injuries. 50-55 cm is enough to work for a long time with one hand or chop something with two hands.
The ax handle should be quite light, since the main weight of the product is concentrated in its head. With a total mass of the specimen of 800-1000 g, the wooden part is approximately 40-60 cm and weighs about 200-400 g.
How to bury an ax at home?
Rust appears on metal not only from exposure to moisture, but also when exposed to air. There are many reasons for this:
- metal becomes covered with red spots at high humidity (from 60%);
- gases in the atmosphere accelerate the process of destruction;
- active and passive particles in the form of solid inclusions increase the rate of rusting;
- a decrease in temperature leads to evaporation of moisture, which promotes rapid corrosion;
- steel has thermodynamic instability.
How will blueing an ax help?
Experts note that steel products must be blued. The process helps protect products from corrosion. The surface is treated with oxidation and then with oil.
It ensures the absence of rust stains if the ax is properly cared for.
The thickness of the coating layer ranges from 1 to 10 microns. The higher it is, the better the corrosion protection. The procedure is carried out at low temperatures. In hot weather conditions, only an alkaline solution is used, as it is more gentle.
Preparing for bluing
The operation is carried out outdoors or in a well-ventilated workshop specially prepared for working with chemicals. Be sure to purchase protective clothing, strong gloves and a mask that will protect your skin and respiratory organs from exposure to harmful substances.
It is strictly forbidden to carry out bluing in residential premises.
Chemical components are stored in special containers that are not subject to destruction. Protective clothing and a mask will help avoid burns to the mucous membranes.
Metal processing methods
There are three main methods: alkaline, acid and thermal. Each of them has its own advantages. At the same time, not only axes are processed in this way, but also weapons, as well as other metal objects.
Alkaline bluing is based on the ability of the material to oxidize. This is a popular method that will be successful if you strictly follow the instructions. The procedure is carried out in a well-ventilated room. Temperature ranges from 135 to 150 degrees.
- Clean and degrease the ax head.
- Pour 100 ml of water into a porcelain container.
- Add 30 g of sodium nitrate and 100 g of technical soda.
- Mix the composition well and heat to a temperature of 150 degrees.
- The device is immersed in the resulting liquid for half an hour.
- Wash in distilled water.
- Air dry.
- Lubricate with machine oil.
After processing, the ax head is covered with a dense black film with a bluish tint. If more powerful protection is required, increase the amount of alkali in the solution.
Acid bluing involves a similar treatment. First, degrease the surface and dry thoroughly. Then add 2 g of tartaric and tannic acid to a liter of clean water, mix and heat to 150 degrees.
Place the ax handle in the solution for 17 minutes, then remove it and rinse with clean water. After this, immerse it in machine oil for an hour. Finally, wipe with a rag and dry in the open air.
The oldest and simplest method is thermal bluing of metal. The result is achieved through heating. The color after treatment directly depends on the temperature:
- 220–229 – covered with a pale yellow coating.
- 230–255 – yellow-golden or yellow-red.
- 256–280 – lilac or purple.
- 281–295 – blue.
- 296–320 – dark blue.
To work, you will need a gas hair dryer, pliers, rags, a bath for car oil and half a liter of liquid. You will also need a dry cloth. Using a hairdryer, heat the part to a certain temperature, then lower it into oil and leave for several minutes. After taking it out, blot it with a napkin and dry it.
The procedure must be repeated three times.
Recently, bluing has been used as a decorative finish, since there are special anti-corrosion solutions that protect the metal from destruction. When processing it yourself at home, follow the advice of professionals and follow safety precautions.
How to select and prepare wood?
Many jobs are impossible without a well-sharpened and strong axe. This tool is often needed in both household and larger-scale work. In retail outlets you can find many different models of such tools, because there are quite a lot of types of axes themselves. It is possible to choose the ideal option in accordance with any requirements.
But there are also cases when the consumer could not find a suitable tool for himself. Many people in such situations find a simple way out - they make an ax themselves. For a tool to be of high quality, reliable and durable, it must consist of good elements. So, to create an ax handle, it is very important to choose the right material.
Not every type of wood is suitable for creating this ax part. It is believed that a true master will go around the entire forest before he finds the very tree from which he can make an axe. In most cases, this element of the ax is constructed from the root section of a birch tree, and even better, if you use the growths that are present on its trunk. These parts are distinguished by a very dense and curled structure.
Birch is not the only tree that can make a good ax handle. Instead, it is permissible to refer to trees such as oak, maple, acacia, ash and other deciduous trees that are classified as hardwoods. According to experienced craftsmen, beech, oak, larch, walnut and elm produce the most reliable, comfortable and durable high-quality handles. But it’s not enough to find the ideal material for making an axe. It is still necessary to properly prepare it for the upcoming work.
The workpieces must be thoroughly dried. This is done only under natural conditions, and it often takes a lot of time - on average 3-4 years, and better yet even longer (5 years will be enough). Wood should be dried exclusively in a dark and dry place with good ventilation. Precipitation, dampness and water should not penetrate into the space where natural material will be prepared. Otherwise, such drying simply won’t do any good, and you won’t be able to make a good axe.
How to prevent an ax from rusting: 2 proven methods
Any instrument requires careful handling and proper care. The process of restoring an ax is very important, since the device becomes covered with rust over time.
Any amount of rust can be cleaned off.
- Why does rust form on an ax?
- How can you clean an ax from rust?
- Mechanical cleaning and straightening of the ax
- How to clean an ax from rust using electrolysis
- How to protect an ax from rust
- Application of anti-corrosion compounds
- Folk remedies
- Proper care of an ax
- Conclusion
How to lubricate the blade
In any case, the blade will rust and become dull over time, but you can extend its service life.
- The ax blade is cleaned and wiped with a degreasing solution.
- Immerse in an acid, for example, nitric or phosphoric acid, for 3-4 hours.
- Afterwards it is necessary to dry and impregnate with a thick layer of lithol.
With such lubrication, the blade will not rust for several more years.
The blade also needs processing.
Why does rust form on an ax?
Everyone knows the electrochemical process known as corrosion. Electrons pass from the anode to the cathode through the electrolyte. The iron content provokes destruction, as the physical properties of the metal deteriorate from exposure to:
- water;
- humid air;
- stray currents.
Corrosion happens:
- local – covers several areas;
- uniform - over the entire surface area;
- intercrystalline - destruction occurs within the boundaries of metal grains.
There are 4 types of rust:
- yellow - a humid and undersaturated oxygen environment contributes to it. She can be found underwater;
- brown - water is not involved in the appearance. This is the rarest type;
- black - provokes low oxygen content. This is a stable and slow process that occurs without water;
- red is the most common type. Covers the entire area. Oxygen and water destroy the metal completely. It is also used for smelting cast iron and as a dye.
Features of a homemade ax
An ax is a simple and common tool that is difficult to surprise anyone with. However, thanks to it you can cope with many complex jobs and ultimately get an excellent result. On sale you can find both simple versions of axes, as well as more interesting and original ones, for example, with decorative inclusions. If you don’t want to spend money on a ready-made option or you couldn’t find a suitable one among those, you can make it yourself.
Many home craftsmen, not finding the right tool on sale, decide to make it themselves
Such work cannot be called impossible or extremely difficult, but even here it is very important to act according to all the rules in order to get a good result. It should be borne in mind that there are several types of axes that you can build on your own
For example, there are special cleavers that are very popular today:
- mechanical;
- with electric drive.
Of course, the mechanical option is the simplest and easiest to implement. It is equipped with a manual drive. Making such a model with your own hands is not difficult. The drawings of mechanical tools are quite simple and understandable, and the principle of their operation lies in simple mechanical manipulations. This device consists of the following basic elements:
- metal wedge;
- spring mechanism.
You should also know about other options for axes, which many craftsmen can make on their own.
- Carpentry. This tool is light in weight and size, and has a sharp blade. It is used in cases where the most precise and accurate work with wood is needed.
- Taiga. This ax can also be made with your own hands. It is perfect for cutting down trees, removing knots and bark.
- Tsalda. This tool is made to clear an area of bushes.
- Kitchen. Such tools are made exclusively for chopping bones. A kitchen ax is a small device with a short handle and a large blade.
- Lumberjack. Suitable for cutting down trees only. Made from a long ax and a sharpened wide blade. It also has other names, for example, felling.
The taiga types of axes are recognized as the most popular and practical. They are distinguished by the following features:
- little weight;
- small area of the stabbing area;
- unusual sharpening of the blade (the edge at the back is several times smaller and thinner than the front).
Any homemade ax is distinguished by the fact that it is ideal for the master who works with it. By making this instrument with your own hands, you have the opportunity to adjust it to suit yourself, to suit your hand. The result is the most convenient, practical and easy-to-use devices.
How can you clean an ax from rust?
Chemicals with a rust converter can cope with corrosion. With the help of the active substance (phosphoric acid), iron oxide quickly dissolves, and additives contribute to the formation of a reliable protective layer, preventing new plaque.
For weak plaque, it is appropriate to use:
- kerosene;
- diesel fuel;
- gasoline.
Processing algorithm:
- Soak in one of the compositions from several hours to a day.
- Wipe off excess.
Weight parameters
The possibility of its use in wood processing depends on how heavy the tool is. The minimum value is considered to be a mass of 0.9 kg. Lighter models are used only for a limited range of household and household purposes when finishing small workpieces, for example, for sharpening wedges.
For standard work with wood, you will need a tool of 0.9-1.7 kg. It will be effective both when cutting medium-thick firewood and when carrying out construction work. Heavier splitting axes weighing 2.2-2.5 kg are used for chopping large firewood. They have a longer ax handle.
How to protect an ax from rust
To protect against corrosion, contact with air and water should be kept to a minimum. The question arises of how to cover the ax so that it does not rust. At home you can apply:
- edible fat;
- salo;
- vegetable oil.
At a professional level they protect using the following method:
- alloying - introducing elements into the alloy that prevent or slow down the process (for example, nickel, titanium, chromium);
- creating a film using oxidation or phosphating;
- environmental treatment – remove harmful components;
- varnish coating.
Application of anti-corrosion compounds
There are a huge number of tools to help combat this problem. The best solution is to prevent plaque from forming. Both domestic and imported manufacturers of protective compounds performed well. Among the main ones are:
- professional anti-corrosion agent with one or two-component polyurethane coating;
- cold galvanized composition – provides durable protection of the structure;
- quick-drying decorative “Soil enamel 3 in 1” - does not require preliminary priming.
All certified products are tested. They are able to withstand high operating loads.
Treating the ax with special products will prevent rust.
Folk remedies
Metal damage can be treated with ordinary improvised means. Using vinegar and lemon juice:
- Mix in equal parts.
- Apply and leave for 2 hours.
- Clean with a brush or washcloth.
Using citric acid:
- Add 1 packet of acid to a glass of water.
- Apply evenly with a sponge.
- Leave for 30 to 60 minutes.
- Wash it off.
With fish oil:
- Apply grease to stains.
- Leave for 40 minutes.
- Remove with dry wipes.
Using raw potatoes:
- Cut the potatoes in half and coat them with soap.
- Rust is salted.
- After 30 minutes, rub with potatoes instead of a sponge.
treatment :
- Apply a large amount of ketchup.
- After 20 minutes, rinse and wipe.
treatment :
- Soda is added to water to form a thick solution.
- Apply for half an hour.
- Remove with a sponge and wash.
- For heavy contamination, repeat the procedure.
Ax processing.
Selecting a workpiece and making an ax handle
The length of the ax is selected based on the height and strength of the master. The quality of the wood also plays an important role. Lightweight axes, weighing about 800-1000 g, have handles from 40 to 60 cm long. For heavy tools (1000-1400 g), the length of the ax varies from 55 to 65 cm.
Latest posts 5 unusual zucchini dishes instead of the boring pancakes and stews 8 folk remedies for fighting the Colorado potato beetle: for those who are against “chemicals” in the garden 5 ways to use garlic arrows, which experienced gardeners know
The force of the blow depends on the length of the axe. The longer the ax handle, the easier it is to chop wooden logs. The strength and height of a person also matters
Not every type of wood is suitable for making an ax handle. For this purpose, a true master searches the entire forest before finding a suitable tree. Most often, a blank for an ax handle is made from the root part of a birch tree, or better yet, from growths on its trunk, which are distinguished by their special twisted and very dense wood. Instead of birch, you can use maple, oak, acacia, ash and other hardwood deciduous trees. The workpieces must be dried well in natural conditions, which will take a lot of time.
On the prepared blank, the contours of the future ax handle are outlined according to the selected template. There should be a thickening at the end of the ax handle, designed to “braking” the hand in case the tool slips. Then the excess wood that is outside the contour is removed with a knife, an ax with a perfectly sharpened blade, a chisel or a jigsaw, which is much faster. After fitting the ax on the ax handle using a mallet, and making sure that these parts fit tightly, you can continue further finishing of the tool handle. Glass is used for scraping, and fine-grained sandpaper is used for grinding.
Above is a drawing of an ax handle (a) that meets the requirements of GOST 1400-73, and below is a marching ax handle (b) with an area of unbroken fibers of 40 mm
Rust control methods
There are several methods that can extend the life of iron parts and objects. The most effective way is chemical treatment. These include inhibitor compounds that coat metal objects with a thin film. It is this that allows you to protect the product from destruction. Such drugs are often used for preventive purposes.
Let's look at the main methods to prevent corrosion:
- mechanical rust removal;
- chemical treatment;
- anti-corrosion substances;
- folk remedies for rust.
Mechanical cleaning
To perform mechanical anti-corrosion treatment manually, you need to purchase a metal brush or coarse abrasive sandpaper. Items can be processed dry or wet. In the first option, the rust is usually scraped off, and in the second, the skin is wetted in a solution of white spirit or kerosene.
You can also mechanically clean rusting materials using hardware, such as:
- Electric drill with a metal brush attachment.
Of course, you can clean the surface more thoroughly by hand. But it is used in small areas. Hardware materials will speed up the workflow, but they can also harm the parts. During processing, a large layer of metal will be removed. The best option that will carefully remove corrosion is a sandblasting machine. Such equipment has its own small drawback - high cost.
When processing objects with sandblasting equipment, the metal surface is not ground down, but retains its structure. A powerful jet of sand gently removes rust.
Treatment with chemicals
Chemicals are divided into two groups:
- Acids (the most popular is phosphoric acid);
- Rust converters.
Acids often mean ordinary solvents. Some of them have an orthophosphorus composition, which allows you to restore rusting material. The method of using acid is quite simple: wipe the iron or metal from dust with a damp cloth, then remove any remaining moisture, apply a thin layer of acid to the object with a silicone brush.
The substance will react with the damaged surface, leave it for 30 minutes. When the part is cleaned, wipe the treated area with a dry cloth. Before using anti-rust chemicals, wear protective clothing. While working, make sure that the composition does not come into contact with exposed skin.
Orthophosphoric acid has a number of advantages over other compounds. It is gentle on metal objects, removes rust and prevents the appearance of new areas of infection.
Rust converters are applied to the entire metal surface, thereby forming a protective layer that will subsequently prevent corrosion of the entire item. After the composition has dried, you can open it with paint or varnish. Today, a large number of converters are produced in the construction industry, the most popular of which are:
- Berner rust modifier. Designed for processing bolts and nuts that cannot be dismantled.
Step-by-step manufacturing instructions
It is not difficult to prepare an ax handle with your own hands. To do this, you need to adhere to a not very complex technology for carrying out work. Let's get acquainted with it:
- mark the workpiece using a template;
- after this it can be carefully cut out with a jigsaw or other similar tool;
- Next, the prepared part will need to be turned on a special machine and polished.
There are a number of important rules that must be followed as work progresses.
- Processing the fixing area of the ax must be done as carefully and carefully as possible, so as not to accidentally remove excess part of the wood. Otherwise, the butt simply will not be able to be firmly fixed in place. It is better to periodically try the handle against the eye, so that in the end you get a small margin (no more than 2 cm).
- You should not use a file while finishing the part. This will lead to inevitable loosening of the wood. Because of this, it will be more difficult to work with him further. It is better to use fine abrasive sandpaper and a grinder rather than a file. You will need to move the tool along the wood fibers.
- It is necessary to give the final, correct and beautiful shape to the fastening area of the handle, taking into account the angle of the butt attachment. As for the cleaver, the specified angle for it should be approximately 85 degrees. For a standard ax - 75 degrees.
When making an ax yourself, you need to act very carefully. There's no need to rush. If desired, you can decorate the handle of the tool with patterns and carved decorations (for example, you can wrap it with jute cord - it will hold the blade more securely). When the ax handle is ready, you will need to correctly install the cutting part on it.
Let's look at how this should be done.
- Adjust the top of the piece to the eye of the blade. Remove the excess wood with a knife. Be careful.
- On the handle, set horizontally, the cutting part should be placed on top. Then you need to make a mark on the handle with a pencil until it will be driven in. Divide the segment and make another mark.
- Secure the handle in a vertical position using a vice. The wide part should be at the top. Prepare a hacksaw for metal. Make a cut exactly to the second wedge mark.
- At a specialized retail outlet, pick up a wedge made of metal or make it yourself from wood.
- Place the board on a separate tabletop. Point the blade at it. Place it upside down. Place the prepared ax handle over this part, tapping it on the board. Now turn the tool over and tap the handle on the board. The part will continue to be seated. These steps should be repeated many times. As a result, you will be able to thoroughly drive the ax into the eye.
- Then place the part in a vertical position. Install a wedge into the cut. Hammer it in with a mallet. Saw off any excess protruding parts
Folk remedies
What should you do if you are allergic to chemicals and need to remove rust from metal objects? Don’t despair, there are many folk remedies that are in no way inferior to factory-made drugs:
- Cilit is a product for cleaning plaque and rust in the bathroom and kitchen. This gel is often used for taps, mixers, if the knife becomes rusty, or other metal appliances. Also used to remove corrosion from any iron and metal products. But remember that its chemical composition can corrode the paint.
- A solution of kerosene and paraffin. It must be prepared in a ratio of 10:1. Leave to brew for a day. Afterwards we treat the items damaged by rust and leave for 12 hours. Finally, you need to clean the treated area with a dry cloth. This method is suitable for building materials and tools.
- Coca Cola against rust. Its alkaline composition eats away corrosive stains. To do this, immerse the item in a container of drink or dampen a rag. Leave for a day, then rinse the item under running water.
As you can see, nothing is impossible. Therefore, choose a more acceptable option for yourself in order to return your metal products to their original appearance.
Top 5 ways to remove rust (1 video)
Wood chopping
To prepare firewood, an ax is most often required in country houses and rural farmsteads, since even for frying barbecue, wood is the best fuel.
The blade of a wood ax is sharpened at an angle of about 40-60 degrees for better cutting.
The handle is most often made of wood, but can also be metal; the blade is made of hardened carbon steel
When asked which steel to choose, always pay attention to the manufacturer's seal mounted on the handle
The list of advantages of an ax can begin with the ease of working with it, since even a beginner can handle it. The second advantage is accessibility for the buyer in the sense that finding such an ax is as easy as shelling pears in any store.
There is also a wide price range for these axes, from which everyone will choose something for themselves.
The disadvantage of an ax of this format is that it is intended only for one type of work and cannot be used in other areas.
They cannot cut down a tree, and it is quite unsuitable for a butcher, since it is not so sharp. The disadvantages include the easy opportunity to get a low-quality fake, which the market is full of.
How to clean an ax from rust?
Axes, just like any other gardening tool, also tend to rust from time to time - this especially often happens when they are stored improperly. However, you shouldn’t rush to throw away a rusty tool - it’s quite possible to clean almost any ax of rust and safely continue to use it! How to do this, and how difficult is it?
How to get rid of rust?
You can clean an ax from rust in a variety of ways - some use electric sandpaper or the vaunted electrolysis for these purposes, for some the best assistant is an angle grinder with a blade or cleaning disk, while others prefer simpler, but also effective methods, however, sometimes they turn out to be much more labor-intensive.
If the ax is not too rusty, you can wrap it in a generously oiled rag, then place the tool in a strong plastic bag and send it to the sun. From time to time you will have to look into the bag and clean off some of the rust, but it is important to understand that this method will not remove all the rust in one go.
Kerosene is also quite suitable for these purposes - the ax is wrapped in a rag generously moistened with kerosene and left in this form for several hours. During this time, kerosene will eat away the rust without damaging the metal. And then it doesn’t hurt to wipe the tool with machine oil - it perfectly helps prevent corrosion, as it forms a strong protective film on the metal surface.
Sometimes a rusty ax is wiped with vinegar, and the grayish coating that forms after this is carefully cleaned off with a soft cloth - as a rule, it is removed without much difficulty. You can also soak the ax for several days in a solution of citric acid (the latter is taken at the rate of ten grams for each liter of water). At the same time, some summer residents who have tried this method note that in this case, the side of the ax that lies “facing” outward is much better cleaned. By the way, with this method, a grayish coating can also form on the ax, which will also not be difficult to eliminate. To prevent the metal from oxidizing, it is recommended to wash the ax in a soda or soap solution.
The option with the “Mole” pipe cleaner, well known to many, has also proven itself very well - first, it is diluted in half with water (and some craftsmen quite successfully use the product in its pure form!), and then dip an ax into the resulting solution and keep it there for a minimum of seven to eight hours, maximum - a day. And, surprisingly, many note that this product really works great in this direction too! And to make the result even more pleasing, after finishing the “procedure” you can walk over the hatchet with a brass cord brush. And if necessary, this “procedure” can always be repeated without fear! Just don’t forget that before you start, you should always wear reliable rubber gloves!
And you can finally get rid of rust after carrying out all the above-described manipulations using the most ordinary sandpaper, so it won’t hurt to stock up on it in advance.
Prevention
To prevent the ax from subsequently starting to rust again, it is recommended to “etch” its head in phosphoric or nitric acid (in a 10–15% solution) for three to four hours. Of course, before doing this, the instrument must be degreased. However, even in this case, it is still impossible to give a 100% guarantee that the ax will never rust again in its life. So it is extremely important to constantly monitor its condition and ensure that it is stored correctly!
How do you get rid of rust on tools?
How to properly and permanently place an ax on an ax handle
Many of us are familiar with the situation when a perfectly mounted ax suddenly begins to jump off the ax handle. For few people this phenomenon is inexplicable.
Each of us understands that the drying process of wood is to blame.
But you should know that this can be completely avoided if the planting is carried out technologically correctly and if, after it is completed, you perform a couple of simple but very reliable actions. This is what I will tell you in order.
There are two sequential stages in this process:
- Selection and preparation of an axe.
- Actually planting the ax.
It is this logic that I will follow in my story.
Which side should I put the ax on? Many craftsmen know that the entrance eye of an ax is smaller than the exit eye. Why is this done? Yes, so that the ax handle can be wedged in it and securely fastened. Considering this fact, you should choose the right ax handle for a specific ax.
First you need to take the size of the outlet hole (the larger one) by outlining its internal contour on a piece of paper.
Then a template is cut out of paper along the drawn contour, on the basis of which the search for a suitable ax on the market will be carried out.
The selected ax should be given a couple of days for it to dry completely. To do this, you just need to put it on the heating radiator and occasionally turn it over there.
Do you want to know how to arrange your workshop so that it is very convenient to work in it? Then read this article by my colleague!
Impaling an ax
Mounting the ax begins by placing it on the edge of the ax handle, 5-7 millimeters from its edge, and then marking the boundary of the part that will be processed, i.e. planting boundary.
- Then the outline of the template must be transferred to the end of the ax handle.
- Having completed the markings and armed with a large wood rasp, process the end of the ax up to the boundary mark so that at the end it reaches the outline of the template.
- The end of the workpiece should ultimately coincide with the contour applied to it.
After this, you can begin to try on. Moreover, you need to try it on at the exit (large) hole of the ax. If necessary, you should sharpen it further. Processing should be completed when the ax begins to slightly “bite” the wood of the ax handle.
Having achieved such a “biting”, the very edge of the piece of wood is sharpened so that it fits about 1 cm into the ax.
Do you know how to sharpen an axe? If not, then click here!
After this, you need to take a caliper and measure the size of the entrance hole of the ax.
By further processing, this size should be achieved on the ax handle in the area of the initially applied boundary mark. Moreover, processing is carried out along the entire perimeter of the workpiece so that it completely fits into the exit hole of the ax.
Further processing should result in the end of the piece of wood resembling a champagne cork with a thickening at the bottom.
As in the beginning, the workpiece is processed using a rasp.
Monitoring the dimensions of the workpiece to ensure they correspond to the dimensions of the ax holes should be constantly carried out using a caliper. Having achieved full compliance, a small chamfer is removed at the very edge of the ax to facilitate the process of inserting the workpiece into the ax.
- Having finished processing, make markings for two slots on the processed end.
- The marked cuts are made to a depth not reaching approximately 1 cm from the border of the ax mounting.
- Having inserted the sawn end of the ax into the entrance hole, they begin to tap on its opposite end in order to place the ax on a wooden workpiece.
Then 3 wedges are installed on the glue in the cuts: one large longitudinal and two wedges on the sides. Having inserted the wedges, the end of the ax should be processed to give it perfect evenness.
Now the ax is very securely attached to the ax handle. But if the ax is left in this state, then the wood will inevitably dry out, and the tool may become unusable.
What is a taiga ax
First, of course, we’ll talk about the forged taiga axes we made, and compare them with purchased carpenter’s axes. Then considerations on the recipes for making your own from ready-made axes, which are common on the Internet.
Purpose
A taiga ax is an ax that is convenient to use for hunting, long hikes and work in forest areas. It is intended for collecting firewood, setting up a camp, and, quite often, for cutting up the carcasses of large animals. Therefore, optimal blade hardness, a reliable ax handle, and a convenient case are required.
Buy a taiga ax or make it yourself?
Carpenter's axes are usually on mass sale, but they are not very convenient for working in the forest. A long time ago, skilled people lightened and modified purchased axes for camping use; now a whole industry has emerged for regrinding axes and turning them into “author’s” ones. If everything is done correctly: the shape, the attachment on the ax handle, heat treatment and sharpening, you can get a good tool. But we prefer axes that are completely hand forged and designed specifically for working in the forest. The advantages of such an ax: optimal shape, light weight, more durable blade due to free forging rather than stamping. Therefore, we will first show off our axes, and only at the end of the article will we tell you how to make a taiga ax with your own hands.