The design performs a number of practical and necessary functions. The roof must be reliable and durable, protect from precipitation and wind.
Various projects allow you to create an attic, an attic (increasing the usable area), give the house originality, and add status. How not to make a mistake and make the right choice for your future home, from many different options, we will consider further in detail.
Content
- Types of roofs
- Roof structure - terms
- How to calculate a roof with your own hands?
- Step-by-step instruction
- How to properly attach the Mauerlat?
- Installation of the rafter system
- Attaching the rafters to the mauerlat
- Fastening the rafters in the ridge
- How to strengthen the system?
- Comparison of roofing materials
Types of roofs
The construction of a roof begins with the selection of a design design, that is, with the determination of its future shape. In modern private construction, the most common types are:
- Shed roofs . The design option with one slope is the least labor-intensive, quickly erected and allows significant savings on materials. The main disadvantages are the impossibility of arranging a full-fledged attic and attic, due to the low roof space, as well as use in snowy areas at small angles of inclination.
- Gable roofs (gable roofs) . The design with two slopes and two gables is the most common in private construction, as it provides a balance between labor intensity, cost and practicality. Allows you to create a full-fledged attic space and effectively cope with significant precipitation in winter.
- Hip roofs . The most reliable structures in terms of resistance to atmospheric phenomena: wind and snow loads. They are distinguished by significant weight - they require a strong foundation and strong load-bearing walls, as well as a well-thought-out rafter system. Also, due to the large area of the roof covering and significant heat transfer, additional insulation is required.
- Hip roofs . The structures consist of four slopes, in which the side slopes are shaped like an isosceles trapezoid, and the end slopes are shaped like a triangle. They have minimal resistance to wind loads and an attractive appearance, but are difficult to calculate and install.
- Half-hip roofs (Dutch) . The frame structure is similar to the previous one, with the exception of the triangular slopes, which have a truncated appearance, as a result of which small pediments appear. The main advantage is the possibility of arranging a full-fledged living space. However, such a roof requires the creation of a complex rafter system due to the large number of angles.
- Hip roofs (pyramidal) . Systems of four identical slopes in the form of isosceles triangles converging at one point. The design has the best aerodynamic properties and resistance to heavy precipitation, thanks to the uniform drainage of water. The main disadvantage is the complexity of designing and constructing the frame.
- Multi-pitched roofs (multi-gable) . They are combined pitched roofs for buildings in the shape of the letters “P”, “G”, “T”. The most difficult to design, manufacture and assemble. They are used extremely rarely in private construction.
If you cannot determine what shape of roof to build with your own hands, all other things being equal, compare the appearance of the structures and see which option is the most attractive.
Roof structure - terms
Also, immediately before starting to build a roof with your own hands, you need to familiarize yourself with the basic elements and terminology, which will make it easier to understand the process and allow you to find a common language with the builders.
- roof - the upper part of the assembled building structure;
- roof – the upper element of the roof (covering);
- Mauerlat - support beam laid along the perimeter of the walls of the building;
- bench - support beam laid on the internal load-bearing walls of the building;
- rafters (rafter legs) - structural elements of the roof that support the roof covering;
- purlins - horizontal longitudinal beams supporting the rafters from the inside;
- ties - horizontal transverse beams connecting the legs of one pair of rafters;
- crossbar - a tie installed directly in front of the ridge of the structure;
- ridge - a horizontal rib located at the junction of the slopes at the very top of the roof;
- racks - vertical beams placed on a bench or other support, designed to support the purlin;
- struts (rafter legs) - inclined beams connecting the rafters to the supporting elements and located at an angle of 45°;
- counter-lattice - rows of boards laid along the rafters on top of the waterproofing material;
- sheathing - rows of boards laid on rafters/counter-lattice at an angle of 90°;
- cornice - the hanging part of the roof, which covers the upper part of the external walls from the negative effects of atmospheric manifestations;
- fillies - boards with which you can lengthen the rafter leg;
- valley - an internal angle formed at the junction of two slopes in multi-gable roofs;
- hip - a triangular roof slope at the ends / covered pediment with a slope;
- pediment - the upper part of the facade of a building, which is limited by two slopes.
How to calculate a roof with your own hands?
After the design design has been developed, it is necessary to calculate the amount of materials for its manufacture. This is necessary in order to know in advance the volume of lumber and order the appropriate batch from the manufacturer.
The online roof calculation calculator from KALK.PRO allows you to perform the most accurate calculation of materials, as well as receive a set of drawings and a 3D model of the structure.
It is also recommended to perform a roof calculation for permissible loads in order to select the cross-section of the load-bearing elements. For example, one of the most important parts is the rafter leg - for it, the height and width of the beam is selected based on parameters such as:
- roofing materials;
- snow load;
- laying step;
- span.
However, most often, such detailed calculations are neglected and the choice of rafter sections is made on the basis of general recommendations, but with a slight margin, since the tables do not take into account the specifics of a particular situation.
Section of the rafter leg - table
| Rafter leg length, m | Distance between rafter legs, m | |||||
| 0,60 | 0,90 | 1,10 | 1,40 | 1,75 | 2,15 | |
| Section of the rafter leg, mm | ||||||
| 3,0 | 40×150 | 50×150 | 75×150 | 75×125 | 75×150 | 100×150 |
| 3,5 | 40×175 | 50×175 | 75×150 | 75×175 | 75×200 | 100×175 |
| 4,0 | 50×150 | 50×200 | 75×175 | 75×200 | 75×200 | 100×200 |
| 4,5 | 50×150 | 75×175 | 75×175 | 75×200 | 100×200 | 100×200 |
| 5,0 | 50×175 | 75×175 | 75×200 | 75×200 | 100×200 | 100×250 |
| 5,5 | 50×200 | 75×250 | 75×200 | 100×200 | 100×200 | 100x250 |
| 6,0 | 50×200 | 75×200 | 100x200 | 100×200 | 100×250 | — |
If you plan to build a warm roof, then the choice of the height of the section of the legs should take into account the thickness of the insulation, since it should be mounted so as not to protrude higher than the load-bearing beams.
The parameters of the remaining wooden structural elements are in most cases taken structurally:
- Mauerlat - 150×150 mm;
- racks - 100×150 mm / 100×100 mm (depending on the cross-section of the rafters);
- struts - 100×150 mm / 50×150 mm (depending on the cross-section of the rafters);
- puffs - 50×150 mm;
- purlins - 100×150 / 150×50 mm (depending on the load);
- overlays - thickness is 32–50 mm.
If you want to get the safest possible structure, we recommend that when building the roof of a house with your own hands, double-check the parameters of the elements several times.
In what order should construction work be carried out?
If you decide to add useful space to your home located on the roof, then you must ensure that the correct sequence of construction work is followed. This is the key to the quality and durability of the entire structure of the roof in use. This is what the work plan for the construction of this structure looks like:
- First you need to prepare the base .
- Then vapor barrier flooring is created
- Next comes the installation of insulation .
- The next process is installation of a slope-forming screed .
- Then the waterproofing .
- The finishing coating is installed .
- All that remains is to install the drainage elements .
Each layer is applied sequentially, without changing the order. Source smartremstroy.ru
The construction of an inverted roof in use involves installing waterproofing first, and only then insulation.
Do-it-yourself roof - Step-by-step instructions
After all the preparatory stages of work have been completed, you can proceed directly to building the roof of a private house with your own hands. The step-by-step sequence is as follows:
- Preparing tools, treating wood with antiseptic.
- Attaching the Mauerlat to the wall.
- Installation of ridge beams.
- Installation of the main elements of the rafter system.
- Reinforcing structural components using racks, struts and tie-downs.
- Installation of counter-lattice and waterproofing.
- Installation of sheathing.
- Installation of roofing.
- Creation of a drainage system.
- Roof insulation and vapor barrier.
How to properly attach the Mauerlat?
Installation of any roofing system begins with the installation of the Mauerlat. The beams laid along the perimeter of the walls serve as a base that evenly distributes the load from the rafters onto the load-bearing walls. This frame also “ties” the structure to the house, reducing the negative impact of roof windage. Depending on the type of wall material used, various installation technologies are used.
For example, in wooden structures there is no need for a mauerlat, and its function is performed by the top row of logs or timber. In buildings made of concrete blocks, the Mauerlat is secured using brackets, studs or anchor bolts .
Fixing the Mauerlat with metal brackets requires the presence of wooden blocks, which must be mounted in advance into the inside of the masonry at a distance of 2-4 rows from the top edge. As a result, on one side the bracket is fixed to the mauerlat, and the second is attached directly to the timber in the masonry.
Fastening the Mauerlat using studs involves laying them evenly around the entire perimeter of the walls at the stage of manufacturing the armored belt. In this case, a cross member must be welded at the base of the stud, and the top must protrude over the entire thickness of the beam plus an additional 4 cm in order to tighten the two nuts. If the studs were not provided at the stage of creating the reinforced belt, you can prepare holes for laying anchor bolts.
For brick structures, the traditional method does not lose its relevance - fastening the Mauerlat with wire . To do this, use steel wire rod with a diameter of 5-6 mm, which is laid at a distance of 2-3 rows from the top during the process of laying the walls. It should have such a length that it is enough for the entire volume of the Mauerlat and there is still a little left for twisting the ends together. At the stage when the Mauerlat is already laid on the wall, the beam is pulled in with wire from above or through a special hole, and the excess edges of the wire are cut off.
Types of rafters
There are two designs:
- with layered rafters;
- with hanging rafters.
Installing a roof on a wooden house is only possible using the former. This is caused by two rules:
- hanging rafters must be firmly attached to the mauerlat;
- in a wooden house, the rafters must be hinged to the mauerlat.
These two statements contradict each other, so the rafter system of a wooden house can only contain layered elements.
Only layered rafters are installed in a wooden house
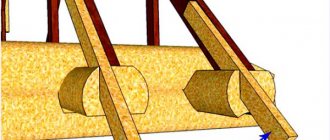
Layered beams are elements that rest on the mauerlat at the lowest point and on the ridge girder at the top. This allows you to reduce the horizontal thrust that acts on the walls when the rafters try to move apart and take a horizontal position. Elements can be reinforced with racks or struts. In this case, contractions can be placed through one pair of legs.
Hanging tanks rest only on the Mauerlat at the lowest point. At the top they just rest against each other. To prevent the system of wooden elements from moving apart, tightening must be done. It is better to install them on each pair of legs. This option is characterized by a strong thrust effect on the external walls, but it allows you to get more free space inside the attic.
Installation of the rafter system
The rafter system is the basis of the entire roof and the strength of the future structure depends on its configuration. According to the principle of structure and nature of application, the support frame differs into two opposite types: hanging and layered .
- Hanging rafters . They rest only on the outer walls of the building, and the triangle-shaped truss remains in a hanging position. Used for lightweight structures.
- Layered rafters . They rely both on the external walls of the building and on the internal ones. The rafter legs “lean” onto the racks, and they, in turn, rest on the bed, which lies on the internal main wall. Used for large and heavy structures.
The functionality and stability of the entire roof depends on the correct choice of the rafter system.
Attaching the rafters to the mauerlat
In private construction, rafters are attached to the mauerlat in the two most common ways: rigid and sliding connections.
In brick and stone houses, the rafters are fastened to the mauerlat in a rigid way using a mortise and non-mortise connection . In the first case, tight fixation is achieved by creating a gash in the rafter leg, and in the second, a support beam is used that supports the beam from the reverse side. These are the most labor-intensive, reliable and universal fastening methods - applicable for both layered and hanging rafter systems.
Slip joints are most often used in timber structures because they exhibit the greatest shrinkage. The rafters are fastened using “floating” fasteners - slides, which avoids deformation of the roof when the position of the upper row of beams changes.
Fastening the rafters in the ridge
Today, only three main methods of installing the upper part of the rafters are actively used:
- Overlapping . In this case, half the cross-section of the adjacent elements is cut out to create a groove and a hole is prepared for the bolted connection.
- Butt . The upper ends of the beam are cut to obtain an ideal vertical joint, and metal plates or wooden linings (notches) are used as fastening elements.
- For a run . The rafter legs are laid close to each other and connected directly to the support beam.
How to strengthen the system?
In order to strengthen the roof frame with a span length exceeding 6 m, it is necessary to reduce the free span of the rafters. This can be achieved by creating an additional horizontal support beam (beam) on the internal load-bearing wall and installing inclined posts.
To add additional rigidity and to reduce the expansion of the rafters, tie-downs are used. They are attached to both sides of the rafter beam using self-tapping screws, nails, and studs at a distance of approximately 1/4 from the top.
To prevent the created frame from being torn off by a strong gust of wind, the rafters themselves can also be attached to load-bearing walls. To do this, twists based on two wires with a diameter of 4 mm are used - they are wrapped around the legs, and then connected from the inside and fixed with an anchor at a distance of 4-5 rows before the cut.
If you are not sure about the reliability of your structure, we recommend not only reading the step-by-step instructions for building a house roof with your own hands, but also contacting specialized specialists.
Video description
How to build an attic roof without racks in the video:
Multi-pronged models
Another type of pitched roof with a structure in the form of several sections covered with gable roofs. And this is not the only distinctive feature. The design of this type has several pediments. There may be three, four or more. By the way, it was the gables, which in construction are also called tenons, that gave the name to the roof.
House covered with a classic multi-gable roof Source builld.ru
Waterproofing
It is laid directly on the rafter legs using small nails or a construction stapler. Work should be carried out from the bottom up, overlapping the bottom layer by 10-15 cm to prevent moisture from getting under the material. The tension should be strong enough to prevent moisture from accumulating on the surface - the sagging should not exceed 2 cm. However, you should not force the material too much, as it is easily damaged.
It is recommended to use a high-quality vapor diffusion membrane, which, in addition to moisture protection, provides vapor exchange and helps create a favorable under-roof microclimate. The seams must be treated with sealing tape.
Counter-lattice and sheathing
The counter-lattice is designed to ensure air circulation inside the roofing “pie” and more reliable fixation of the waterproofing material. To create it, bars with a cross section of 25/30 mm with a pitch equal to the pitch of the rafters are usually used.
High-quality roof ventilation helps protect the structure from mold, fungi and destruction.
The sheathing is laid on top of the counter-lattice and is used as a frame for the roof elements. Depending on the type of roofing material, two types of lathing are used: solid and sparse . The first is used for soft and roll roofs, the second for metal and slate roofs.
For classic sheathing with gaps, use boards with a cross-section of 100x25 mm and a length sufficient to cover two steps of the rafter legs. The pitch of the lathing is determined by the type of covering material - the heavier the material, the faster the step.
It is also recommended to reinforce the outermost elements of the sheathing along the lines of the ridge and cornice with an additional board.
Design - plans, drawings
The project of a pitched roof is needed to accurately calculate the necessary materials for the work, and it is better to entrust its creation to specialists. The drawing begins by constructing the outline of the roof, where arrows indicate the direction of the slopes. Then the ribs are drawn. Next, along the bisectors (from the ribs), valleys and slope ribs are found and drawn, and then ridges, etc.
During the work, the structural type of roof and its finishing coating are selected. And the front and side views in the drawing show the load-bearing structures in detail. According to the project, the quadrature is calculated:
- wood;
- waterproofing and insulation;
- vapor barrier and roofing.
Using the data (protruding parts) in the drawing, you can easily calculate the linear meters of wind boards, ridge parts and other accessories.
The project clearly shows the dimensions, cross-sectional length of the components, including sheathing, rafters, mauerlat, and indicates the fasteners and type of hardware. The diagram shows the locations of access to the roof (for repairs); the dotted lines indicate load-bearing walls for choosing the installation of a snow retainer. The designer must note on the drawing:
- position of dormer windows;
- points for fixing drainage collectors with gutters and the direction of flow;
- option for placing roof decking.
Important components - valleys, ridges, slopes, parapet boundaries and gables - are also highlighted with clear lines.
Small nuances (due to ignorance) can lead the roof to a state of disrepair. Common mistakes:
- cornices that are too narrow;
- improper drainage of water;
- poor quality or durable material and incorrect type of sheathing;
- creation of ventilation outlets in sloping areas;
- excess amount of snow intake grates and parapets.
The operational features of the roof are disrupted and the resistance to loads is reduced, which leads to unplanned repairs.
Video tutorial on how to create a roof truss system in Archicad:
Roof covering
The choice of roof type is based on economic and individual (aesthetic) considerations, and also depends on the angle of the roof slope. For example, for soft roofs stability is not guaranteed at slopes greater than 45°.
Today, the most common building materials on the market are:
- ceramic tiles;
- metal tiles;
- corrugated sheeting;
- bitumen slate (ondulin);
- folded sheets;
- roll bitumen roofing.
Installation methods vary depending on the material chosen, but in almost all cases the roof is laid from the eaves to the ridge to ensure sufficient overlap and protection from precipitation. Also, the fasteners used must be made of galvanized or stainless steel materials and equipped with an elastic sealing washer.
Comparison of roofing materials - table
Drainage system
The roof drainage system allows you to reduce the negative impact of moisture on the lower elements of the roof, maintain a beautiful appearance of the building facade, and also helps remove water from the base. For novice craftsmen, the main difficulty at this stage of work is the installation of gutter brackets.
If the roofing material has not been installed, the fasteners are fixed on the lower rows of the sheathing. This option is the most optimal because, if necessary, the bracket leg can be bent to achieve the correct angle of inclination of the gutter.
If the roofing has already been installed, then you can try installing fasteners on the side surface of the rafters or using a front board. In the first option, brackets are used on a leg bent 90° for more convenient mounting. In the second, a board is installed along the perimeter of the roof at the edge of the eaves, onto which a profile with hooks is attached. At the same time, in order to avoid water overflow in the gutter, the hooks must be secured so that the roof covers the drain by half or a third of its width.
It should also be noted that the latter method is only possible if the rafter legs have a sufficiently large cross-sectional size, for example, 120×50 or 150×50 mm.
Half-hip
This is a subtype of hip roof. In comparison with the previous option, a pediment is added, starting from the ridge or cornice. At the same time, the shape changes from triangular to trapezoidal. In some cases the shape may not change.
Half hip roof
Regarding the first option, this design is the least complex, since in terms of construction it is similar to the symmetrical gable model. Especially the two largest parts. However, at the bottom the slopes increase somewhat, which makes the roof very attractive from afar.
In terms of complexity, the construction of such a roof differs little from a traditional hip roof. However, there are several joints of elements that will require special fastening, which slightly increases the budget.
All gables are mounted on side slopes, and, therefore, the structure will need to be strengthened. However, this depends on the size of the slope. If the area increases, you will need to form a joint using timber with a thickness of 10x10cm. And if it is minimal, a small board will do.
Insulation and vapor barrier
Using high-quality roof insulation can significantly reduce heat losses and save on space heating. Companies provide a large variety of materials with their own advantages and disadvantages. However, the most common are still:
- mineral wool;
- basalt wool;
- glass wool;
- Styrofoam.
Installation is carried out from the inside into the space between the rafters. The sheets should be cut so that their width exceeds the distance between the rafters by 15-30 mm, which allows for more reliable fixation of the material, that is, “in space.” When insulating in several layers, the materials should be placed in a checkerboard pattern to prevent the appearance of a cold bridge.
In order to protect the insulation from evaporating moisture from the lower floors of the building and, accordingly, prevent the appearance of fungus, it is imperative to lay a vapor barrier film from the inside. Its fastening should be done using a stapler, maintaining an overlap of 4-6 cm, and the seams must be sealed with sealing tape.
Insulation is especially important if you have an attic space.
Mistakes when building a roof with your own hands
- Lack of project . When building the roof of a house with your own hands, without a project, it will not be possible to create a reliable and safe structure, since without the appropriate documentation it is impossible to assess the stability of the structure, find out the permissible loads and cross-sections of rafter legs, fix node connections and fastening points, calculate the amount of materials, etc.
- Incorrect roof covering . For example, roofs made of ceramic tiles and slate should be laid only with sufficiently large slopes, while soft materials, on the contrary, require a flat roof, since otherwise the integrity of the structure may be at risk.
- Loose fit of thermal insulation . If blocks with thermal insulation materials do not fit tightly together, this will lead to the formation of cold bridges, which in turn contribute to the accumulation of condensation and the appearance of mold/mildew.
- Absence/incorrect installation of vapor barrier . The absence of a vapor barrier membrane on the inside of the roofing pie leads to the accumulation of dampness in the thermal insulation and wood, as a result of which the materials lose their performance qualities. It is also necessary to ensure that the membrane is laid on the correct side.
- Lack of ventilation . It also leads to condensation and dampness with corresponding consequences. To create optimal under-roof air circulation, it is necessary to use a counter-lattice.
- Poor sealing . Poor quality sealing can lead to damage to the integrity of the entire structure. However, due to negligence, the joints are often insufficiently treated, the sealing tape is glued directly to the dirty surface of the hydro- or vapor barrier, and fasteners without a sealing washer are used to install the roof.
- Inappropriate savings on materials . The roof is one of the most difficult structures to erect, which protects all other elements of the structure. If you want all this to serve in good condition for many years, you cannot skimp on both roofing materials and all accessories - membranes, tapes, fasteners. Otherwise, irrational savings can lead to expensive repairs in the near future.
If you still want to save on construction, we suggest using a roof calculation calculator , which can calculate the optimal amount of materials without overpayments.
What you need to know about the construction of a serviceable roof
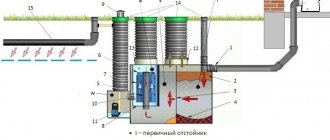
When constructing a building with a serviceable roof, it will be necessary to solve a huge number of tasks and problems. For example, strengthening load-bearing structures or resolving the issue of repairing a roofing pie.
The work of laying insulation and waterproofing also poses certain difficulties. So that during use you do not encounter a large number of difficulties and problems associated with operation, you should pay great attention to the design process. To build such a structure, you should use only high-quality and proven building materials.
To create a serviceable roof, you need to thoroughly think through each component Source niipigrad.ru
Important! All mistakes made when arranging a roof in use can be fatal and lead to irreversible and unpleasant processes. Therefore, you should definitely familiarize yourself with the features of the construction of this structure. Here are the main ones:
- The slope angle should be small (up to one and a half degrees)
- Waterproofing a flat roof in use necessarily requires the use of film materials.
- Funnels and scappers are mandatory design elements. Such devices will ensure high-quality drainage.
- You should definitely take care of heating the drainage elements during the cold season.
- We must not forget that an additional ventilation system for the roofing pie is needed.
- The insulation should only be of a rigid slab type.