Design Features
Previously, all gates were the same, with large, heavy metal leaves painted in unpleasant colors. Today they have changed dramatically in terms of design, materials and appearance. To keep your car safe and protected, choose a garage with reliable swing-up overhead doors. A distinctive feature from other models is their unusual design. These gates are the most convenient and reliable type of garage structure, which is quite expensive.
When installing gates of this type, several conditions must be met for further high-quality operation. First of all, this is the size of the opening. The width should be no more than 5 meters, and the height should be no less than 2.85 m. The distance from the wall to the edge of the opening for installing guides should be at least 120 mm, from the ceiling to the upper edge of the opening 210 mm.
Taking into account the dimensions of the vehicle, the dimensions are adjusted.
The design is quite simple. The gate rotates around its own axis, moving from a vertical to a horizontal position and vice versa. Their constituent element is a frame that is mounted in the opening of the room or behind it and is the most important element for opening the gate. In most cases, it is made from pipes with a rectangular cross-section.
When opened, the roller mechanism and lifting levers are activated, which move the gate leaf along the guides and secure it under the ceiling of the room. The bottom rises up, thus creating a visor. When the gate is closed, the compensation springs immediately stretch, and when they are open, they are in their normal state.
It is known that automatic structures can be made to order. But, despite the difficulties in manufacturing, you can design them yourself.
The complexity of manufacturing depends in most cases on the model you choose, the dimensions and your skills in working with drawings, electrical tools and a welding machine.
When making a drawing of a product, it is necessary to indicate on it the main points:
- wall size;
- opening parameters;
- size of main racks;
- corner joints;
- length of guides and tires.
If necessary, you can use ready-made sketches of these models by selecting the required drawing. Before starting work, be sure to first familiarize yourself with the basic principle of operation , as well as the specifics of installation of this structure.
This is interesting: Types of gate posts and methods of their installation (23 photos)
Wicket insert
Sectional doors cannot be called simple in structure. However, some manufacturers took care and included in their designs the possibility of placing a gate for entry. But even here, different manufacturers of sectional doors have their own restrictions regarding the arrangement of such an entrance.
If you understand the details, the gate is more often used by pedestrians and cyclists. As a rule, the width of the entrance is 1.2 meters, and the height is over 2.5 meters.
There are no varieties of gates, that is, there are only swing gates. The exception is those cases when they are cut directly into the door leaf. At the same time, what kind of gate it is - swing or sliding - does not matter.
Design and principle of operation of folding gates
When constructing overhead gates, the strongest possible support frame and reliable leaf are made to close the entrance opening. The garage owner carries out all work according to a pre-planned plan.
Work without the construction of guides is allowed. Experienced specialists recommend installing these elements to extend their service life. The canvas is made whole. The optimal inexpensive and practical material is profiled sheets. Gate leaves operate thanks to a hinge-lever system, the drive of which is usually mechanical or electrical.
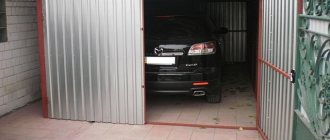
The lifting mechanism is easy to operate. At the moment of opening, the upper part of the canvas is deflected and moves along the rollers to the beam. The gate is fixed parallel to the ceiling. The garage rises without installing external hinges, which can be cut by thieves using tools.
Pros and cons of the design
The following is worth saying in favor of a garage door lifting mechanism:
- To lift, you do not need a lot of free space outside or inside the room. Space under the ceiling is used.
- The one-piece fabric will provide reliable protection against intruders.
- The sash must be insulated with various heat insulators (expanded polystyrene, polystyrene foam, mineral wool).
- Exterior decoration and decoration are allowed.
- The product can be equipped with automation.
- It is possible to install lifting sheets not only in single but also double garages.
Among the disadvantages:
- When open, the height of the opening decreases.
- Installation is recommended only in rectangular openings.
- Cannot be partially repaired. If damaged, the entire canvas will have to be replaced.
- The load on the gate must be strictly observed. Incorrect calculation when choosing a finished product or when making it yourself will lead to a reduction in its service life.
Craftsmen note that making a lifting mechanism at home is many times more difficult than swing gates. Errors in calculations and during assembly are unacceptable here. Therefore, without experience, you need to do this under the strict guidance of specialists or completely entrust the installation to them.
Supports are being installed
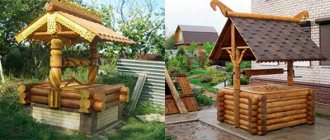
To install the supports, either wooden beams or logs are used. They are cut to the required sizes. The ends of the pillars that will be in the ground are treated with mastic, wrapped with a double (triple) layer of roofing felt and so lowered into the ground. This will ensure their long service life. The pillars are fixed with cement mortar.
- Gate leaves and wickets are made:
- 1) a frame is created from pine boards with a thickness of 40 to 50 mm and a width of 150 mm;
- 2) at the ends of the boards, joints are created, according to the principle of half the board;
- 3) the parts are connected and secured with metal corners (the latter are attached to the boards using self-tapping screws or bolts);
- 4) reinforce the structure using boards 25–30 mm thick.
- The installation of sashes and gates is carried out:
- 1) hinges are attached to the gate and wicket leaves;
- 2) the frame of the door leaves and gates is attached to the supports after they are aligned through the installed hinges using self-tapping screws.
- The canvas and the gate are covered with boards.
- The finished product is treated with an antiseptic (this will increase its service life).
- After the antiseptic composition has completely dried, painting is carried out.
Preparation for construction
After completing all the repair work inside the garage, it is time to begin the preparatory processes of installing the gate. Only the floor needs to be completed after installing the automation, because the frame fits a few centimeters deep.
We calculate the sizes
To ensure proper distribution of the material, measurements should be taken. Gate dimensions include the following indicators:
- opening width;
- opening height;
- lintel;
- left sidewall;
- right side;
- depth of the room.
Choosing material
To make the base of the gate - the frame, you should use wooden blocks or a steel structure. It is recommended to try on the welded part in the opening to avoid errors when calculating parameters.
When creating a shield for a gate, blocks of wood with metal outer upholstery, solid sheets of metal are used; it is also possible to use a steel profile of the required size; the gaps are sewn up with metal elements.
At the final stage, for the aesthetic appearance of the structure, you can choose plastic parts, available in a large assortment on the markets.
Calculation of material quantity
To correctly calculate the materials for the gate, you need to decide on the parameters of the future design:
- opening size;
- gate height;
- foundation;
- sewing the fabric.
Based on the most common and frequently used parameters, when calculating frame dimensions it is worth thinking about the following structural elements:
- The outer frame of the frame is 17 meters of 60x30 profile pipes. Of these, 6 meters lie along the entire length of the guide, 2 sidewalls - 184 centimeters each, the upper part - 430 centimeters, counterweight diagonal = 280 + 20 centimeters for reserve.
- Internal frame – 20 meters of 30x20 pipes: for four racks of 180 centimeters each, three horizontal profiles of 425 centimeters each.
- The guide elements are 6 meters with parameters 60x70.
An automatic electric drive consists of an electronic electricity converter, a motor, and an automatic control system.
When purchasing it, you should make sure that the chosen type matches the structure of the gate.
Selection of automation system
When assembling gates with an electric drive, you should choose the right automation elements
To do this, it is important to consider the dimensions and weight of the structure:
- For systems with an opening of 4 m, a drive unit of 500-600 kg is suitable.
- If the opening size is 6 m, it is better to use a device with a capacity of 600-1300 kg.
- In case of intensive use (applies to production facilities), you will need to install a device with a capacity of 1200-1800 kg.
Special attention is also paid to other equipment parameters:
- The presence of a temperature control option for operation in cold weather.
- Supports changing the speed of the sash movement.
- Availability of backup power supplies.
Principle of operation
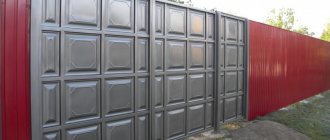
Simplicity of design is one of the main advantages of gates, which are also called panel gates. The metal sheet moves along an axis on metal guides from a horizontal to a vertical position and vice versa.
You can make similar gates yourself
The frame is the foundation of the structure, its leading part, to which the guides are attached. It must be durable and, as a rule, is made from a large-diameter profiled rectangular pipe or channels.
With the help of special rollers and lifting mechanisms, the structure moves along rails and stops when it reaches a horizontal position parallel to the ceiling. In this case, the upper or lower (depending on the design features) part also rises and protrudes slightly forward to the outer part. The springs of the mechanism are free in the open position, and stretched in the closed position.
Garage doors with a lift-and-turn mechanism come in the following subtypes:
- Articulated. They are in great demand. Compensation springs require careful adjustment. In this case, the gate shield directly moves upward.
- On counterweights. In this case, the cable is attached to the canvas, and on the other side, through the winch, a counterweight is attached. This system is installed for large and heavy gates.
In this video you will learn how to make similar gates:
This is interesting: Design of gates and gates for a house (50 photos): beautiful and practical options
Hacking protection
To protect sliding garage doors, vertical locks that are recessed into special grooves are suitable. A simple solution is to make a sliding bolt.
To create such a mechanism, you will need a piece of pipe with holes cut in it. The fittings are placed in the pipe. This type of constipation has several disadvantages. For example, it will be difficult to pull the canvas to the frame. To make the fit tighter, all operations must be done manually, which requires a lot of effort.
It is better to choose screw-type deadbolts. They attract the canvas well, and in the case of double threads they act as a locking device. When creating protective elements for gates, the only rule is followed - the mechanism should not interfere with the functioning of the structure.
Types by control method
Control can be mechanical or automatic.
Mechanical method
Manual control. The mechanism is attached to the outer wall of the garage. In standard models it has two buttons that are responsible for opening and closing. To put the car in the garage, you will need to get out of it.
It is recommended to install it in combination with automation, so that in the event of a failure or lack of electricity, you can always get inside the room.
Auto
The main condition for connection and full operation is the presence of constant electric current.
A special feature of the electric drive of lifting gates is that when closing, a lock is activated, so it will not be possible to open the gate manually from the outside or inside the room.
To remove the lock, you need to receive a signal from the remote control or press a button on the panel in the garage. If there is a power failure, this will not be possible.
There are several ways to solve this problem:
- Install an additional source of electricity. That is, if necessary, connect a backup battery. But this option is not suitable at low temperatures. It will be more reliable to use a generator.
- Order a manual unlocking mechanism as part of the automation kit. Not included in the standard package. You will have to pay separately.
- Combine the two previous methods. This way the gate will operate as efficiently and trouble-free as possible, regardless of the availability of electricity.
When installing sectional sashes, you can secure the automation using two different methods:
- On the ceiling. It is used for small-sized canvases, in garages designed for one passenger car. Fixed on the ceiling at a distance of 1–2 m from the opening. The cable is attached at the top of the sash using a lever, which creates traction. With the help of this cable the door opens.
- A complete set with a bulk drive is purchased for massive large gates. The engine is mounted on one side of the torsion shaft. For uninterrupted operation, you will need to install a reliable chain mechanism. The motor will forcefully drive the shaft and the gate will open or close.
Control is performed using two devices (to choose from): a remote control or a telephone.
From the remote control, key fob
In greatest demand. The control system is equipped with a special unit that receives a signal when you press a button on the remote control. The received signal activates the shutter.
The signal range reaches 10 m from the garage, so you can control it directly from the car.
To prevent the radio signal from being intercepted by intruders, it is recommended to encode it.
From a mobile phone
A special application is downloaded to your phone and works online. With its help you can remotely control the operation of the gate. Similar programs are installed to control the video surveillance system.
Drive selection
By design they are divided into two types.
Counterweight system
Rarely used for a private garage. Gates of bus and trolleybus garages and industrial hangars are equipped with this drive.
Suitable for canvases that are large in weight and size.
One end of the winch cable is attached to the bottom of the sash, then the cable is passed through a mechanical block located on the ceiling, closer to the opposite wall. A load (counterweight) is mounted to the other edge. When the gate opens, it lowers, and when closed, vice versa. Moreover, the mass of the counterweight should be greater than the sash itself.
The advantage of gates with such a drive is maximum security against burglary and unauthorized entry.
Articulated-lever (lever-spring)
The most common option in the private sector, garage cooperatives.
The mechanism consists of:
- springs;
- rollers;
- levers.
Metal profile guides are mounted under the ceiling in a horizontal position along the edges of the doorway. Springs and levers are fixed at the bottom. The rollers are placed in the upper corners of the canvas.
When installing, it is important to accurately regulate the tension of the springs, to observe the vertical and horizontal when fastening the guides.
The leads are mounted to the ceiling. When opening, a cable is used, which is placed on the profile under the ceiling.
When opening, the spring stretches, and the canvas on rollers moves along the guides.
Materials for frame, cladding
To create a frame, it is recommended to use rectangular profile pipes 40*20 mm with a wall thickness of 2 mm.
For crossbars and longitudinal beams, pipes measuring 20*20 mm are sufficient, the wall thickness remains the same.
The material for the guides may well be a channel 20 cm wide.
To make a box where the drive will be placed, it is allowed to take a beam measuring 100 * 50 mm or a metal corner with a 50 mm shelf.
Ideal for cladding:
- Profiled sheeting. It is characterized by high strength and long service life. The sheets have a protective anti-corrosion coating. The raw materials are resistant to environmental influences. Wide selection of colors available. Convenient to cut into required pieces.
- Tree. Not so popular material due to susceptibility to rotting and damage by insects. Fire hazardous. Before installation, any wooden parts need protective treatment. The strength is several times lower than that of a profiled sheet. Pros: low price, beautiful view.
- Cink Steel. Suitable for gate trim. Coated with a protective anti-corrosion compound. When fastening, you need to be careful not to damage the protective layer, otherwise the material will begin to rust.
- Sandwich panels. The material is practical and washable. Installation is simple. It has excellent heat and sound insulation properties. Fireproof.
Most often, owners choose corrugated sheeting or sandwich panels for gate cladding.
For insulation, it is recommended to take slabs of expanded polystyrene, mineral wool or polystyrene foam.
Users are also interested in:
- How to make sliding gates
- What profile to make the gate from?
Step-by-step instruction
Self-installation requires following strict instructions. First you need to decide on the model of the mechanism for opening and closing the canvas. The hinge system is more convenient both for everyday use and for self-installation. When mounting, the main thing is to achieve a vertical position of the hinges.
Necessary materials
The materials and their quantity will depend on the design features of the mechanism. But in most cases it will include:
- Wooden bars. For the frame 120x80 mm, and for the ceiling 100x100 mm. But the dimensions are not static, since they directly depend on the dimensions of the opening and will differ in each individual case. The numbers are taken as an example.
- Construction fabric.
- Steel pins.
- Drive mechanism (if the design is automatic opening/closing type).
- Steel corners of different sizes.
- Steel rod with a diameter of 8 mm.
- Channel.
- Two springs with an internal diameter of 8 mm.
You can use different materials for the canvas. For example, you can take a wooden shield and cover it with tin or a solid steel structure.
The ideal option would be to use a wooden shield treated with an antiseptic. Foam plastic is used for insulation, and panels made of plastic or wood are used for exterior finishing.
Equipment preparation
In order to build and install overhead gates with your own hands, in addition to materials, you will need tools. Their number may also differ depending on the model, but basically you need to prepare a standard set of tools.
Namely:
- welding machine;
- building level;
- hammer;
- marker;
- screwdriver;
- Bulgarian;
- set of drills;
- drill;
- a set of wrenches or spanners (it’s better to have both).
Don’t forget to prepare the tools.
Further stages can be divided into two subtypes - design and direct assembly (installation) of the structure.
Design work
When designing up-and-over gates, the drawing plays a very important role for self-assembly and production, as this will allow you to avoid mistakes in the future.
To draw up a drawing , the opening, its width and height are measured , the installation of the frame on which the canvas will be attached, etc. is taken into account.
You can prepare such a scheme yourself if you have experience in such work. If it is not there, then there are many schemes on the Internet that you can remake for yourself. It is enough to measure all the data and compare it proportionally.
If both the first and second options are not suitable, then there are many specialists who are ready to do this for you. But the construction budget will increase.
Don't forget to prepare a drawing
Assembly of the structure
After preparing all the necessary materials and tools, you can begin to manufacture and assemble the structure. Before doing this, you need to make sure that the walls of the opening in which the gate will stand can support its weight. To do this, it is important to first design and determine the total weight of the finished structure.
The gate frame must be made strong, there should be no voids between the wall and the frame, and the fastening must be reliable. There should be no gaps between the frame and the wall, as well as between the canvas and the frame. In the latter case, they will be there, but they need to be covered with insulating material. This way, moisture will not enter the room and damage the gate mechanisms.
, metal profiles 40x30 cm and a minimum thickness of 2 mm are ideal Additional fastenings for the structure can be made from a 20x20 cm profile. Gate guides, as a rule, are made from channels 20 cm wide. Depending on the size of the channels, the roller model is also chosen.
The box for the mechanism can be made from a metal corner. The rollers themselves and the hinge mechanism (possibly with an automatic drive) are bought ready-made in stores. All other elements can be made yourself.
The assembly is carried out in several stages:
- The first stage is creating the box. It can be made from wooden blocks, and they are attached to the walls using channels or angles. But for a safer and more durable design, you can use a solid frame made of corners or channels.
- A wooden frame is installed in the opening. Metal pins are driven crosswise into it for reliability. The lower part of the bars should fit into the foundation a few centimeters.
- Assembly of the structure. The canvas, fasteners and all other necessary components are mounted.
- Next you need to make a support for the mechanism. It is made from corners. Three holes are made for the bracket in one shelf, and two in the other. The bracket will serve as a support for the mechanism.
- The bracket and the spring are connected by a narrow metal strip. The last turns will serve as hooks. The design will have a kind of ring on one side, and a thread on the other.
- The hinge unit is made from a corner. You need to drill a hole in it. On one side it is welded to the center of the frame, and on the other - to the center of the lifting mechanism.
- The lever has an additional plate with a hole made for the tension regulator.
- Upon completion of installation, the gates are painted.
Installing a counterweight
Instead of a hinged structure, counterweights can be used. To install it, you need to attach the cable to the edges of the frame. Next, the cable needs to be lifted and passed through the winch block. Additional weight is then attached to the other end of the cable. To do this, you can use a bag of sand or stones. It doesn't matter.
Instead of a bag, you can use a more professional design - a counterweight from an old elevator. Although it's a bit difficult to get one. The counterweight must correspond to the weight of the canvas: the heavier the canvas, the more massive the counterweight.
This design has its drawbacks. Raising the gate is quite difficult, and if the cable slips from the winch, the counterweight will fall to the ground. But if you need to pay attention to safety, you can equip gates that are too heavy with such a mechanism and abandon the spring-hinged design. For the cargo, you need to prepare a place where it will lie when the gate is raised.
In the case where the gate is quite light, you can not install a counterweight, but install an electric winch. It is bought in specialized stores in ready-made form. It is enough to use the installation and operating instructions. But you can make it yourself, although it will not have the same functionality as a purchased one.
But the design in both the first and second cases will be automatic, which is good news, since much less effort needs to be applied.
A lift-and-turn design is the best option for closing a garage in a country house, since they do not take up much space indoors and on the site, and also have an aesthetically attractive appearance.
In addition, you can install such a system yourself, having all the necessary tools and materials. This is interesting: how to make automatic swing gates with your own hands.
Installation
The mechanism that makes the doors work is best made from lightweight materials, which will make the load on the product lower, thereby extending its long-term use. Next, select the mechanism that is used to open the sash. The articulated lever is the most common because of its simplicity as well as reliability. You can also choose a counterweight mechanism. It is used in the construction of large, heavy gates.
The following installation steps include:
- Assembling a box from three beams fastened together with corners or metal plates. The bars are deepened into the floor by at least 2 cm.
- Hinges are installed. A top bracket is installed at the top under the roof.
- The sashes are made by cutting the metal corners to the required length. Using a welding machine, they are used to make a frame into which the sash elements are mounted and everything is secured with screws.
- Installation of rails is the part of the product into which articulated rollers are inserted. They should move easily and normally.
- To secure the lifting mechanism, the sashes are pre-installed.
- Attaching the hinge mechanism to the sash. For this purpose, hinges are attached. The levers must move freely and be parallel to each other.
- Connection of counterweights and springs mounted on the guide bracket. The springs must be attached to the left and right of the sash in parallel.
- Overlays are installed at the ends of the product.
- Plaster the joints.
- They install the lock. You can also control the gate opening process using the remote control.
Plastic or metal sheets can be used as a finishing surface coating.
When installing the product you must:
- measure and make the frame;
- measure the diagonal of the entire opening;
- the elements of the canvas frame must be grabbed using a welding machine so that the sash passes easily and the gaps are minimal;
- weld the lintels and all frames using the machine;
- install jumpers;
- clean the weld seams;
- weld a metal sheet on one side;
- apply primer, degrease, apply paint to the surface of the sash;
- adjust springs and lifters;
- install fittings;
- attach handles from below on both sides;
- place latches on the inside of the product;
- the gate is ready.
How to do it yourself?
If you decide to make up-and-over gates yourself, then you need to take measurements and sketch out a drawing, prepare the necessary tools and materials for this, namely:
- return springs;
- brackets;
- counterweights;
- cable;
- roulette;
- level;
- drill;
- components for making the sash;
- welding machine;
- corner;
- screwdrivers;
- profile pipe;
- channel;
- guide skids;
- metal for finishing, etc.
Materials needed to make your own up and over gates:
- wooden beams with a section of 100x100 and 120x80 mm;
- 2 springs with an internal diameter of 30 mm;
- corners 40x40 and 4 mm thick;
- anchor bolts and screws;
- steel rod with a diameter of 8 mm.
Before installing the structure, it is necessary to take into account some nuances. Sometimes installation of the product is impossible, since it is attached only to rectangular openings. The height of the opening decreases when the gate is open. If the sash of the structure is sheathed with a solid fabric, it is dismantled, replacing the entire sheathing.
Main components of the design:
- the frame, which is the main element, on which all other parts are attached;
- a swing-type sash, which is mounted in a steel frame;
- spring required for manual closing;
- the mechanism that makes the doors work.
Sash assembly
Make a frame from metal corners. All sizes must be selected independently. They depend on the parameters of the garage doorway, as well as the sash.
Next in the sash, after you have checked all the parameters, install a shield with a seal. Or it’s not a shield, but panels. You secure all this with self-tapping screws.
Then install the external rubber seals. Next, you need to install a sealing tape around the perimeter. Don't forget that you need to think about the location of the lock.
Next, install the guide profiles. It must be placed on the sides of the bracket, as close to the ceiling as possible. And at the end you check how softly and smoothly the rollers move.
Attach the lifting hinges to the gate leaf. Next, install springs or counterweights. They must be installed on both sides of the gate leaf. Next, install the sash itself and the lock.
Manufacturing and installing this type of gate requires certain knowledge, skills and effort. You need to be as careful as possible and do it according to a clear pattern.
Stage 5. Verification
The main indicator of correct installation is the presence or absence of clearance when the blade is lowered. In this case, the seals will properly perform their functions of sealing and protecting the garage from precipitation. It is worth noting that the seals should be invisible from the outside. If they are visible, then the measurements were taken incorrectly.
Gates
Next, the bottom panel is inspected. The seal fixed at the bottom should fit as tightly as possible to the floor. If a gap is detected, the structure is checked by level. To eliminate defects that are not level, the position of the guides is adjusted.
The last thing to check is the balancing (balancing springs). They can be located on the sides of the profiles or on a torsion beam - it all depends on the area of the canvas. If you raise the gate by 1.5 meters, then the springs should be in place, without falling or rising.