As usual, during the construction of a particular structure, a person who is not privy to all the features of the process has many questions. They often concern the choice of materials, as well as the method of connecting completely dissimilar elements. One of the popular questions is how to attach a board to a metal pipe. The task before the builder is truly non-trivial. The materials differ from each other, almost like “ice and fire”. Therefore, any master needs to learn about all possible (and reliable) options that can be used without fear that “connecting the incompatible” will at some point “give weakness.”
Features of wood
The more unreliable link in this duet is the tree. Some of its features (in relation to connections with metal) need to be given attention.
- Since wood can expand with temperature changes and changes in humidity, it is necessary to provide a gap between the elements being connected. This will avoid problems in the future.
- Pre-treatment of material that can become a victim of various pests, mold, moisture or fire is required. In this case, it is better to use compounds that penetrate deep into the wood structure.
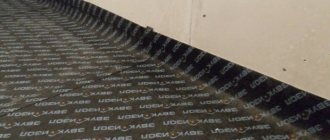
The choice of method for connecting dissimilar elements depends on the characteristics of the future structure, as well as on the location where it will be located. For example, for maximum protection of a street structure, it is recommended to lay roofing felt between wooden and metal parts, or coat the wood with bitumen mastic.
Laying on the ground
Timber is used in the construction of underground and buried structures; structures made from this material prevent soil movement and are able to withstand heavy loads. When laying in the ground, lumber is treated with moisture-repellent and antiseptic impregnations, the most common being bitumen mastics.
To enhance waterproofing, use roofing material or water-repellent synthetic fabric such as “Armostab”, “Stabilenka”. Proper installation can prevent wood from rotting.
What metal products are suitable
For any fence you need supports on which the fence itself will be attached. In addition, the fence is subject to wind and mechanical load.
Metal pipes are suitable as supports. These can be welded pipes of round or square cross-section.
The thickness of the metal must be at least 3 mm. The diameter of the pipe or profile can vary from 5 to 10 cm, rarely more is required.
The thickness of the support will depend on the overall massiveness of the future structure. Pipes are inexpensive, easy to work with, serve well as supports, and last a long time.
If the pipe is too long (6-7 m), it can be cut with a grinder into the required sections. Screw piles can also act as pillars - this is a more “advanced” option.
Installation of screw piles into the ground is quite easy. The piles themselves, thanks to their screws, hold well in the ground and brilliantly perform their supporting function.
Functions of screw pile heads
There are several main types of tying a pile-screw foundation:
- Installation and fastening of support beams at the ends of pipes
- Connecting pipes with metal channels and beams to create a common frame
- Creation of a combined concrete grillage based on screw piles
The first type of piping is considered the most common when constructing a foundation for most buildings - from residential buildings to light outbuildings, such as a bathhouse, summer kitchen or veranda. This type of piping requires caps at the ends of the pipes.
Rectangular support brackets
Fastening to a support-bracket
Rectangular supports-brackets allow you to fasten building parts to various surfaces or make a corner connection. Such fastenings are used for installing joists, installing ceilings and internal partitions. Fasteners are made from solid galvanized metal sheet 2.0-2.5 mm thick by cold stamping.
The support brackets are L-, Z- or U-shaped. L-shaped products can be right or left-handed, Z-shaped ones are used for multi-level installation. In U-shaped brackets, the timber is installed in the internal space and fixed with self-tapping screws; the landing dimensions correspond to standard sizes of lumber. For ease of installation, the working surfaces of the brackets are perforated with holes of different diameters for various fasteners. Depending on the weight of the structures and the design load, several holes can be used for fasteners.
Performing Load Calculations
To calculate weight and other loads on piles, it is better to contact a specialist. He organizes the necessary geological survey of the soil on the site. Allows you to find out the depth to which you need to screw in the piles.
If the type of soil and the depth of the layer required for screw piles are known, you can make the calculations yourself:
- The approximate weight of the future building is calculated (the weight of the elements and furnishings is summed up with a 20-25% margin)
- The coefficient of snow and wind loads is added to the resulting amount (they differ for regions and are taken from local snips)
- According to the building plan, the number of external corners, internal intersections of load-bearing walls, and ordinary walls is calculated
- The total perimeter of the external and internal walls is calculated - divided by 2.5
- The result from point 3 is added to the result from point 4 - the number of required piles
- The number from point 2 is divided by the total number of piles, and the model of the screw pile suitable in this case is found from the catalog
- Screw piles have weight, they exert pressure on the ground, you need to find the total weight, divide by the maximum for the selected type in pp. 6. The number of additional piles will become known. They are evenly distributed around the perimeter.
Head with screw
Supports for timber, open and closed
The edges of the sidewalls of the U-shaped brackets are bent at right angles and form two mounting strips (flanges). The planks can be bent inward or outward; in this design, the support brackets are called closed or open. Closed beam supports will allow timber to be laid in rows with minimal gaps, while open beam supports are used for fastening joists and load-bearing beams. Open beam supports are installed on brick or concrete surfaces and secured with screws. Closed-type supports are attached to a wooden surface with self-tapping screws.
According to the craftsmen, open beam supports provide more reliable fastening due to greater resistance to torsional loads and allow more precise adjustment of the position of building structures.
If you liked the article, please share it
Previously on the topic:
Share
End to end connection
Connection to MZP
Reliable end-to-end connection of timber is provided by nail plates; the product is a metal plate 1.0-1.5 mm thick with spikes 8.0 mm high. Spikes are formed as a result of cold stamping using a special stamp; 80-100 spikes are formed on one square decimeter of surface. The plate is installed on the side surfaces of the mating parts with the tenons down, the tenons are completely driven into the wood. The model range is coordinated with the standard sizes of lumber.
Strengthening a pile-screw foundation
The pile-screw foundation is reinforced and strengthened with a channel. This is necessary for installing a foundation on slopes, large peat bogs and other similar options. Sometimes it is necessary to strengthen only a certain element of a pile-screw structure. As an analogy, you can look at the installation sites of fireplaces, stoves, and liquid storage tanks. +
To strengthen the pile-screw foundation, a 20x40mm profiled pipe is used. The pipe will provide a reduction in rigidity compared to the previously discussed channel, but it is often simply not enough. To use the pipe as a guide for a pile-screw foundation, it is welded not in one, but in a couple of levels. The trim is installed directly on the profile. You can finish the base with wooden boards. They are pre-painted and carefully treated with high-quality antiseptic solutions. +
If you have any questions when ordering a screw pile foundation, you can ask our specialist in the feedback form or by calling one of the numbers indicated in the header of the site. +
Preliminary preparation
All elements of the fence, no matter what material they are made from, are subject to pre-treatment.
Metal poles (pipes) must be thoroughly painted before being buried, even if they are galvanized.
This will improve their anti-corrosion resistance. Only those pillars to which a gate or wicket will be attached can not be painted if additional welding work is planned to be carried out on them (welding hinges, etc.).
The wood (both the crossbars and the picket fence) must be treated with an antiseptic and a fire retardant compound. This will have to be done later, during operation.
After treatment with the solution, the wooden boards are coated with a primer. And then – painting: with any suitable varnish or paint.
You can simply coat it with an antiseptic, which over time will take on a natural brownish or grayish color (depending on the type of wood itself).
What is the harness for?
After installing the piles, they are often tied.
This procedure makes it possible to ensure the most uniform distribution of the entire load that falls on the piles during the operation of the structure. If the strapping is not done, there is a risk of shrinkage of the foundation, which can cause deformation of the supporting structure of the house. In addition, the harness is needed to solve the following problems:
- increasing the stability of the pile foundation;
- effective protection of the pile from soil influence;
- reducing the risk of deformation of screw piles;
- increasing the safety margin of a screw foundation.
Is strapping necessary during construction?
Very often, future owners of private houses wonder whether they need tying screw piles or not. A foundation on piles is a structure of supports buried in the ground. The installation of these supports is carried out very carefully, but even so they will not be able to meet the maximum strength requirements and will not be fully reliable. The floors may well become distorted during the subsequent use of the house, and the strapping will definitely not allow the foundation of the building to lose strength, which will make it very strong, and, therefore, the house will last for many years.
Important: it is necessary to use very strong building materials. The timber will fully allow you to get a fairly strong foundation that can withstand impressive loads.
Fastening elements
You can attach wooden boards to the fence vertically or horizontally.
Vertical arrangement.
Two (in rare cases 3) crossbars, wooden or metal, are welded onto the support, onto which the wooden fence boards will then be strung, respectively.
You can leave large or small gaps between them, or attach them end-to-end.
In the latter case, you need to leave small gaps of 2-3 mm so that the wood has the opportunity to expand when temperature or humidity changes, otherwise the fence will stand on end.
Horizontal arrangement.
The following mounting options may be available:
Regular mount. The two crossbars are placed diagonally and intersect in the middle. Boards are nailed onto the crossed crossbars.
In this case, the boards will be fastened to both the posts and the crossbars. The gap between the boards is allowed arbitrary.
A “barcode” type model (different thicknesses with the same gaps), as an option: two 15 cm boards in a row with a 3 cm gap, and two 50 cm boards with the same gap, after which the order is repeated.
In this case, fence boards are attached directly to the posts. In the middle of the span, if it is too long, you can fasten the boards with a vertical strip (slat).
“Chess”: for example, a 100 mm board with a 60 mm gap is fastened in an even order on one half of the span, and in an odd order on the adjacent half.
You can choose other artistic options. You can make large gaps, or you can attach the boards with an overlap. The main thing to remember is that the closer the boards fit to each other, the higher the material consumption.
Price
The price for each specific screw pile head can vary significantly. First of all, its cost will depend on the size, quality of the material and location of the manufacturer. Foreign end pieces are often more expensive due to the manufacturer's shipping costs for their products.
On average, round headbands cost from 200-250 rubles. Reinforced heads of large diameter have a lower price limit of 350 rubles.
When planning the costs of construction work, you should also include the cost of delivery to the site. If you do not have your own equipment for welding and cutting piles, you will have to rent it.
For information on how to trim screw piles, see the video below.
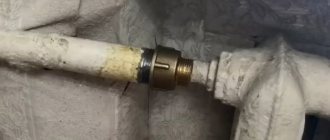
How to fasten a wooden beam to a metal pipe?
How to attach a board to a metal pipe
Good afternoon. I need to lay the floor in a hallway with an area of 1.6 x 2.6 meters, the door of which leads to the street. Along the long walls of this room, at a distance of 1.11 meters from each other, there are two channels. I plan to weld a rectangular cross-section profile pipe onto them, and attach beams to it for laying the floorboard. Tell me the best option for attaching the beam to a metal profile pipe.
Combined load-bearing structures, combining metal and wood in different versions, have recently been widely used in the construction of frame houses, fences and gates, installation of roof truss systems, expansion and insulation of balconies and loggias.
Depending on the expected load on the structure, choose one of two methods of attaching wood to metal:
- on reinforced perforated corners welded to metal;
- joining two materials with special self-tapping screws.
Reinforced perforated connecting corners are usually used when installing rafter structures to enhance the rigidity of the roof, when instead of wooden beams over 10 m long, powerful channels are installed as rafters, ridge supports and purlins.
Wooden beams are attached to the sheathing made of a metal profile pipe with self-tapping screws, and any floor covering can be laid on top of them.
For lighter load-bearing structures, which include the floor system you are planning in the hallway, the best option for attaching a wooden beam to a metal profile is self-tapping screws of the appropriate length. In this case, the wall thickness of the profile pipe must be at least 2 mm so that the applied thread does not become loose over time.
In practice, any supporting structure where wood and metal work together has a significant drawback - the hygroscopic wood is susceptible to rotting and the metal’s tendency to corrode when in contact with moisture. Therefore, to fasten these two materials, be sure to use special galvanized roofing screws rather than black ones.
For fastening wood and metal in combined load-bearing structures, it is recommended to use galvanized roofing screws that are not subject to corrosion
Before installation, be sure to treat all wooden elements with antiseptic and moisture-repellent compounds, and it is advisable to paint metal surfaces.
Staircase: wooden steps and metal frame
Companies specializing in the manufacture of such structures use various materials for steps - stone, glass, polymers, etc. However, when constructing a staircase yourself, wood remains the main favorite.
The most important step for the master is the choice of method for attaching the step to a metal frame. But even in this case, much depends on the characteristics of a particular design. Powerful stringers or bowstrings are the reasons why wooden steps will not be subjected to serious loads, except for their bending under the weight of a person.
More lightweight structures are stringers welded from one of the types of profile pipes. In this case, the dynamic loads will be quite large. For this reason, the most reliable methods are chosen. The steps are attached to the frame by:
The fourth possible option is a connection with a sleeve: a metal sleeve that has both internal and external threads. The advantage of this element is its versatility, the ability to mount steps on a bowstring and stringer. It is this method that is used by the largest companies producing high-quality staircase structures.
Futor connection
The main advantages of this fastener are the chance to hide all mounting elements from view and the ability to quickly, conveniently install and dismantle steps. The disadvantages include the complexity and labor-intensive process of fixing the footers, and the need for the most accurate drawings. Another disadvantage is the limited use. This method is only suitable for hard wood.
Usually they take a footer with certain parameters. The diameter of the external thread is from 20 to 22 mm, and the internal thread is 8-10 mm. A hole of the required depth is drilled into the step using a milling cutter, and then a thread is made in it. The large diameter of the part allows for sufficient groove depth, so the connection will be very reliable. The finished element is additionally fixed in the wood with glue (example - Kleiberit).
Steps attached with a foot can be dismantled repeatedly, without any fear of the connection. The main fastener can be either a regular bolt with a nut or a stud with a decorative nut-cap.
Fastening steps with self-tapping screws
The main advantage of this method is the absence of any “artifacts” on the surface of the treads that cannot become a decoration for any staircase. In this case, it is recommended to use the most reliable elements - those that have a hexagonal or cross-shaped groove in the head. Such fasteners will make it possible not to worry that the groove will simply “slip off” when tightened.
Almost universal roofing screws are increasingly used for the installation of wooden steps. But before purchasing them, you need to know some nuances. They produce two types of roofing materials: for wood and metal. They differ in the number of turns, as well as the diameter of the drill. For wood it is thinner, the threads are larger, and, naturally, there are fewer turns.
How to attach a board to a metal pipe if we are talking about steps? Or rather, what? It seems logical to use self-tapping screws for metal. However, this opinion is erroneous: fasteners for wood have a larger thread size, so only they will ensure the strongest possible connection between the metal and the solid board.
Self-tapping screws with a countersunk head are ideal if the bottom surface of the stairs will be visible. In this case, a hole is immediately made in the metal profile for a cone-shaped cap. If the wood is hard enough (beech, oak, larch, ash), and fasteners with a diameter of 5-6 mm are chosen for the connection, then holes are first made in it. Their diameter is equal to the diameter of those sections of the self-tapping screw where there is no thread (3-4 mm).
Connecting the frame and boards with furniture bolts
This option for installing treads is considered the simplest and most reliable. Through holes are drilled in the steps, which are slightly larger than the diameter of the fasteners. Then a hole is made in the profile pipe.
The wide bolt head will help hide small drilling defects, and the profiled part underneath will prevent the fastener from turning during tightening. In this case, the main thing is to avoid over-tightening the nut.
The advantages of connecting with such bolts are speed of installation, simplicity, and convenience, since it remains possible to dismantle and replace problematic elements. Disadvantages of the method are the cap that “decorates” the surface of the degree, complexity if there is no access to the riser space to tighten the nut.
Fixing wooden steps with Fisher fasteners
This fastening element is one of the latest inventions. The plastic expansion dowel (TB) is used not only for connecting wooden treads and metal profiles. With the same success, it can be used to install it on concrete. In the latter case, another type of fastener is used - TBB. The kit includes a core for marking holes (TBZ 2).
On one side of the Fischer mount there is a large diameter bushing with a hole in the center and with conical notches. On the other hand, there is a sleeve that opens when the screw is screwed in, preventing the fastener from “slipping” out of the profile pipe. The advantages of this anchor system include quick, simple installation, and the elasticity of the polymer structure, which prevents the creaking of steps and vibration of the stairs.
First, a core is placed in the holes of the profile pipes, then steps are laid on top and pressed down. In accordance with the marks made, holes are drilled in the treads. Then Fischer fasteners are installed in the profile and screws are tightened. The last stage is the installation (planting) of the steps.
How to make a choice?
The best option depends on the design of the staircase. If we consider the independent construction of home stairs, then the leaders here are frames made of channels and corners connecting the load-bearing elements. In this case, it is easier to use self-tapping screws.
The second logical way is to use furniture bolts (M8-M10) with a galvanized decorative nut. They will sew the stringers right through. If the owners prefer reliability, but along with the ease of operation of the future design, then they can order wooden steps with already installed footers. However, this option requires an exact match of dimensions.
The attitude towards Fisher dowels is ambiguous. Some craftsmen praise these fasteners. The reason for the positive reviews is the absence of problems when using the stairs. Others, on the contrary, “call” the new invention a mount for “noobs”.
How to attach wooden sheathing to metal profile rafters?
A metal profile is a leaf material (sheet profile, corrugated sheet, corrugated sheet) which is the final roofing covering (material).
That is, rafters are not made from metal profiles; rafters are made either from timber (wood) of different sections depending on the load.
Or metal rafters are made from a profile pipe (square or rectangular cross-section). But first, steel corners are welded to the (metal) rafters, or the corners are bolted (bolted connection).
Next, a timber frame is attached to the corners, and a wooden sheathing is already attached to these mortgages; you can even attach it to nails or wood screws.
READ ALSO: How to choose a welding machine: advice from a professional. What is the best inverter welding machine to choose for your summer cottage and home?
Metal can condense (moisture) due to temperature changes, so the wood must be separated from the metal, for example, by laying roofing material between the metal and the mortgage.
Sheathing bars and embedded bars must be impregnated with antiseptic impregnations and + fire retardant impregnation (such impregnations contain fire retardants).
In the corners we pre-drill holes for self-tapping screws (side holes).
If you want to attach the sheathing directly without corners, then you need metal screws; the wood and metal are pre-drilled.
But even in this case, the wood should not come into contact with the metal, that is, we lay pieces of roofing felt.
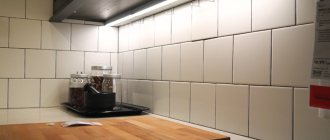
Timber on drywall
At first glance, attaching a massive wooden structure to a wall covered with fragile plasterboard seems an impossible task. Experienced craftsmen suggest: it is necessary to install anchors with a thread for a nut in the load-bearing wall located under the plasterboard slab. The hole for the anchor fasteners is drilled in the wall through the laid gypsum sheet. Any fastener suitable for fastening timber can be attached to such an anchor. To ensure the integrity of the gypsum layer, planks are placed in the resulting gap and secured to anchor bolts intended for fastening the timber.
Fastening the board to metal using self-tapping screws
Fastening boards to metal using self-tapping screws is often used during the construction process. In the material presented, we will tell and show how this is done.
- Metallic profile.
- Padding material.
- Wooden block (detail).
- Round washer for wood DIN 440.
- Self-tapping screw with drill without washer DIN 7504 K.
- Wooden cork.
It should be remembered: Wood, when humidity changes, can change its original volume towards decreasing or increasing, so always leave a small gap to compensate for linear changes in size.
Geometric dimensions of the connection.
H – thickness of the wooden workpieceh – depth of the fastening hole L – length of the screw Sp – thickness of the metal profile St – thickness of the wooden plug Ss – thickness of the spacer material Sw – thickness of the metal washer K – height of the screw head D – diameter of the fastening hole d – diameter of the metal washer
Using the formulas we determine:
Mounting hole depth h = Sw + K + St + 2…3 (mm)
Mounting hole diameter D = d + 2…3 (mm)
Self-tapping screw length L = (H - h) + Sw + Ss + Sp + 6...8 (mm)
Help: If (Sp) of the metal profile is large, it is necessary to drill a hole in it with a diameter two millimeters less than the diameter of the self-tapping screw.
Methods of fastening and laying timber in construction practice
Wooden beams are a universal building material, used as the main material in low-rise construction and the construction of various wooden structures.
As an auxiliary material, it is used in residential, industrial and road construction, in the construction of bridges, ramps, frames for swing gates.
A feature of timber structures is their ability to withstand heavy loads; timber is often used as load-bearing elements. The material is in demand among architectural designers and interior decorators.
The timber is laid on the ground and surfaces of various materials, mated with concrete and brickwork, and attached to metal structures. In each case, different fastening methods are used.
Fastening to concrete and masonry
The need to attach timber to concrete or brickwork arises when finishing walls, attaching shelves to the wall, erecting internal partitions, and constructing various supports. Depending on the tasks, fastening methods can be:
- Installation of vertical racks on a concrete base. The easiest way to install a vertical rack is in a metal head, which has a fastening in the form of a corrugated pin. The retail chain receives standardized fasteners with dimensions consistent with the dimensions of the lumber. Fasteners are produced in two types – “U” and “L”. The pin is embedded in the concrete base, the end of the beam is installed in the head and secured with screws and self-tapping screws. According to this scheme, the lower and upper edges of the structure are attached. Less commonly, a mount in the form of a metal cup is used to install supports.
- Fastening to a wall made of brick or concrete. For fastening to vertical surfaces, galvanized metal corners of industrial production of two types are used - “Z” and “L”. On a wooden surface, fasteners are secured with screws and self-tapping screws, on concrete - using butterfly dowels.
- Connection in a metal profile. Partitions and walls made of timber are assembled using a metal tray or channel. The ends of the beams are installed in a metal structure in rows, the metal strapping is attached to horizontal and vertical surfaces using special dowels. When installed in a channel, the structure can be welded to metal reinforcement.
What you should know about this type of work
Before you begin installation, you need to familiarize yourself with several important nuances that will ensure the highest reliability:
| Properties of wood | Do not forget that this material can expand due to changes in temperature and humidity, so be sure to leave a gap in order to compensate for linear changes in size. This will avoid a lot of troubles in the future and eliminate unpleasant surprises in the form of cracks in the final finish. |
| Adequate structural protection | In order for the structures to last as long as possible, be sure to treat them before installation with a special compound that will protect the material from mold and pests, and also significantly reduce the likelihood of fire. It is better to use hard-to-wash options that penetrate deeply into the structure |
| Use of quality materials | It is not recommended to use wood with high humidity, since after installation the elements may move, which will disrupt the geometry of the structure. In addition, when dried in improper conditions, cracks may form on the surface, which reduces the reliability of structures. |
| Choosing the right mounting method | Different options for carrying out work may be suitable for different situations; there is no universal solution, so you should understand the pros and cons of one or another method. This will allow you to select the optimal fastener |
Important! Sometimes you have to proceed from the existing situation when the walls are erected, but even in such cases you can achieve an excellent result of the work.
You should not skimp on fasteners for wooden structures and choose the most reliable ones.
Nowadays, beams in a wooden house are secured using special high-strength supports.
Installation of heads
Installing pile heads consists of securing them to each support. Before installation, after trimming, the piles are cleaned of paint. You definitely need to check the level of the head. The site must be perfectly level relative to the horizon. Skewed heads can lead to uneven loads, skewed piping and, as a consequence, limit the durability of the entire foundation. If the platform does not fit horizontally, you should either check whether the pipe is cut correctly or the head itself. If there is a small defect, it is recommended to weld strong linings under one or another edge of the connection between the pipe and the head.
Checking the level of the site
Before welding, the edge of the head is processed with a file to remove the paint layer. It is recommended to clean the inner wall of the “glass” of the head with an angle grinder along a pre-designated line about 20 cm wide. To do this, put a cleaning disk or brush on the “grinder”. The paint on the edge of the head is better removed with a cleaning disc.
The welding process is carried out using a standard welding machine using conventional standard 3 mm electrodes. Welding current is used within 90-100A.
Thus, the work procedure includes:
- Installation of the head
- Control of the horizontal plane of the site
- Tack spot welding of the head in two or three places
- Welding around the entire perimeter
- Painting of cleaned areas for anti-corrosion protection.
It should be noted that it is necessary to leave a seam section of 10-15 mm to ensure ventilation of the head. Otherwise (since the body of the pile itself is filled with concrete), moisture will inevitably condense from inside the head due to temperature changes. If there is no ventilation, this area will become a hotbed of increased corrosion.
Welding of heads
After welding all the heads, the foundation plane will be checked again to ensure that it is level. If necessary, it is better to re-install the head or several heads in places where mistakes were made.
The pile field is ready for installation of the strapping
After all work is completed, the strapping bars can be installed on the heads. They are usually attached with bolts - for this purpose, corresponding holes are pre-drilled in the heads.
Concrete and brick
It all depends on what elements need to be installed:
- Fastening a wooden beam to a concrete wall is carried out using quick-installation dowels or special metal anchors. The work is quite simple and is carried out in the following way: holes are drilled in a wooden block at a certain distance, the diameter of which must be equal to the size of the fastener; holes of a certain depth are also drilled in the wall; for reliability, the length of the element in the wall should be twice the thickness of the block.
Dowels are a convenient option that is very easy to use: a plug is inserted into the wall and a nail is driven into it, which expands the shank and securely holds the element.
- It is better to fasten wooden floor beams to the wall with support from a partition or wall, but in extreme cases, you can use special supports that are securely attached to concrete and transfer the load to the wall, which ensures high reliability of the structure. The most important thing in this case is the use of massive anchors, because they will hold the entire system.
Timber supports are used very widely and have proven themselves, like other metal supports for wood.
- The easiest way to attach wooden posts to a concrete base is to use special anchor bases. A hole is drilled under them, and the elements are carefully driven in, after which you receive a ready-made connecting unit that securely fixes the element, preventing it from moving under the influence of loads during operation. For difficult cases, you can use a special adjustable support, which is equipped with a threaded unit.
Adjustable supports allow you to align the structure as accurately as possible; attaching a wooden stand to concrete with their help is a very simple and quick process.
Important! As for the support units, they can be used on different types of bases, the only difference is the configuration of attachment to the surface, it can be a platform (for all types of materials) or a pin (for concrete and brick).
Types of profiles
- CD - ceiling profile 60x27 (PP). It bears the main load and holds the weight of the finished structure. This profile has side partitions of increased rigidity. It is used for finishing walls and ceilings.
- Guide profile 27x28. This auxiliary profile is designed for fastening structural sheets. It sets the planes of future products. It is used both to connect the frame to surfaces and to connect different planes of the structure.
- UW - guide profile 50x40, 75x40, 100x40 (PN) is used to create partitions. The PN is mounted to the ceiling and floor adjacent to the wall.
- CW - rack profile 50x50, 75x50, 100x50 (PS), strengthens the frame of the partitions. It is installed vertically. GCRs are attached to it on both sides.
- Arched profile. These are special curved profiles of convex and concave shapes. This type of profile is used to create complex structures of smooth shapes, with all kinds of bends.
Metal profiles are mounted using additional fasteners:
When installing siding vertically, the installation of panels is carried out in the same way
Metal
Fastening wood to metal has its own characteristics, let’s consider them in more detail:
- Often, when carrying out work with their own hands, developers choose a metal channel as a reinforcing element. This option is very attractive from the point of view of reliability and simplicity of the process, you need to lay channels, and then insert a wooden beam into them; for this, the configuration of the elements must match, so sometimes the ends of the elements need to be cut. It is very important that the beams adhere well to the shelf of the channel
- Special self-tapping screws for fastening wood to metal have a drill tip and thread so that they are securely held in the material. The head can be either a screwdriver or a wrench (most often 8); to carry out the work, purchase a special bit for a screwdriver in advance.
Important! If the thickness of the metal elements is large or they have increased hardness, then it is recommended to first make holes using a drill, the diameter of which should be 2 mm smaller than the self-tapping screws used in the work.
Types of strapping
If we consider the location of the strapping belt relative to the soil surface, the following types of strapping are distinguished:
- recessed - immersed in the ground so that the upper surface is at the same level with the ground;
- elevated – placed on the soil surface;
- high - raised above the surface by fifteen centimeters or more.
The latter option is recommended for use in areas with heaving soil compositions. The buried type is used little and only on low-heaving soils.
Based on the materials used, strappings are divided into four groups:
- channel;
- I-beam;
- reinforced concrete monolith strip;
- lumber.
Metal strapping is more durable, but it is difficult to install. Reinforced concrete grillages are not inferior to their metal counterparts in terms of reliability; they can be built with their own hands, but they require a lot of labor. It should be added that they will increase construction time, because the concrete will need time to reach its final strength.
When building a private house from light building materials, it is recommended to use wooden beams as a frame - a durable, inexpensive and easy-to-install material.
Aerated concrete
This material has its own characteristics, so the following fasteners are used for it:
- Special nylon dowels, which can have different configurations, to use them you need to read the recommendations given in the instructions on the package; it will indicate which drill and how deep you need to make the hole and which screws to use for fixing. This is the simplest and fastest option, and the photo below shows some configurations of products of this type.
- For more massive structures, it is recommended to use metal fasteners; they have teeth, which, when tightened, a self-tapping screw of the required diameter diverges and cuts into aerated concrete, ensuring the highest reliability.
- If a wooden staircase is attached to an aerated concrete floor, then additional reinforcement may be necessary using a threaded rod, which goes through and ensures the highest reliability.
Tying piles with timber or channel
When building a frame, panel, log or timber house, especially if the foundation using screw piles is made on a significant slope, or in very weak soils (peat or quicksand) or with a base of more than 500 mm, it makes sense to give the structure lateral stability , tie the screw foundation piles with metal or timber. In each individual case, a completely different design decision is made depending on various factors.
Features of the harness
To understand whether this type of construction is suitable for you, you need to study some of the features of the harness. This grillage option is chosen by engineers for small buildings. For example, a one- or two-story house often stands on exactly this foundation. The main requirement is low weight loads. The foundation with strapping is suitable for private construction and due to financial benefits. Also, a house with such a foundation is built much faster when compared with other buildings.
Timber tying: tools, process, price
If you want to build a frame, panel or wooden house from a log house, then the best option for the foundation would be a grillage made of timber. For wooden buildings, this type of foundation is the most reliable. The size is chosen depending on the dimensions of the future building, but usually it is 150 - 200 millimeters. The beams are attached to the piles in two ways: with a clamp or threaded fitting.
If you plan to build a foundation on stilts and the house itself, then you will need the following tools:
- metal corners;
- bodice and roofing felt;
- level;
- welding machine;
- connecting elements - studs, screws and clamps;
- hammer and other standard tools.
Before attaching the timber to the piles, it must be impregnated with a special antiseptic so that in the future the wood does not rot or collapse.
Important advice: in all places where the block comes into contact with the pile, there should be a roofing felt gasket soaked in drying oil.
After this, installation begins: a beam is attached from one post to another, and it sits on the heads. The timber should be fastened to the side posts with self-tapping screws, and to the bottom posts - with pins or anchor elements. To give additional strength, the block is knocked down with a hammer. The result is a general design. Metal corners give additional strength to the grillage.
An important point is the choice of bars. The wood should not have dark spots, signs of rotting or various damage. Check that the binding is without unnecessary cuts. To make the structure reliable, you should choose beams whose width is 2 times greater than the width of the posts.
Idea: some craftsmen make a combined strapping, where there is both a profile tube and wooden beams.
The robust structure is supported not only by self-tapping screws, but also by clamps. The process works as follows:
- Long rectangular beams are placed on the tops of the piles.
- If the piles are metal, then the connection is made by welding; in the case of wooden posts, the fastening is carried out with self-tapping screws.
- Carefully monitor the plane of the beam - it should be perfectly level during connection. A building level will help here.
- Next, we will need U-shaped bars, which must be placed on a horizontally installed beam. The U-shaped element that is put on should be pointing downwards.
- The next step is to attach these tips to the piles.
approximate cost
It’s worth building a foundation and a private house with your own hands if you have experience in construction. In other cases, responsible work should be entrusted to professionals. As for the price, a cubic meter of piping costs about 2 thousand rubles, then you need to calculate the area of the future building.
Channel grillage
The process is performed in the same way, only the material differs - metal elements are used for connection. Doing such work with your own hands will be problematic, since the weight of the channel requires the use of special equipment.
When installing the channel, special attention should be paid to the fasteners. In addition to welding, experienced builders recommend using bolted connections; as an alternative, rivets can be used. The tying of screw piles with a channel is chosen if a private house is built of concrete. This also applies to other “heavy” materials, when compared with wood.
Source: https://vinttek.ru/info/3-obvyazka-svaj-brusom-ili-shvellerom
Self-tapping screws (self-tapping) for metal with a metal washer and rubber seal
A self-tapping screw (commonly a self-tapping screw) is made in the form of a rod with a tip resembling a drill, a triangular thread and a head for a wrench or a screwdriver. In addition to screws with a drill tip, screws with a sharp tip are produced.
To fasten the corrugated sheet, complete with a screw, use a press washer and a rubber sealing gasket.
We apply:
- for attaching corrugated sheets to metal surfaces;
- with steel thickness up to 12.5 mm;
- without pre-drilling holes;
- for installation of corrugated sheets on roofs, for cladding facades, pediments, making gates, wickets, etc.
We do not use:
- for fastening sheets to tool and high-carbon steels;
- for binding metal profiled sheets together;
- for fastening to wooden structures;
- for fastening to metal less than 1 mm thick.
How do we determine quality?
When purchasing, we require a quality certificate that reflects the characteristics according to the DIN standard, including:
- material – steel S1022;
- zinc coating with a thickness of 12-12.5 microns for premium self-tapping screws (letter M on the screw head) and 7.7-8.2 in the standard version (letters MC);
- a layer of coloring polymer protection is applied to the head on top of the zinc;
For fastening to a frame with a thickness of 2.32 mm, we use products for drill No. 1, with a diameter of 4.8 mm, pitch 2.12. For metal, 5.5 mm drill No. 3, 8.5 mm - No. 4, 12.5 mm - No. 5. Thread pitch 1.8. Self-tapping screws of large diameters must be coated with zinc with a thickness of at least 12 microns.
We select the length of the self-tapping screws depending on the purpose. To attach the profiled sheet to the lower wave, choose a size larger than the materials being joined by 3mm. When screwed into the upper wave, for example, to attach skates, the length increases by the height of the profile.
The industry produces 3 types of self-tapping screws according to the shape of the head:
- hexagonal;
- cruciform;
- anti-vandal.
For normal installation, it is easier to work with a hexagonal head shape. We use anti-vandal screws for fences and cladding, the removal of which from the outside will provide free access to the room or territory. Installation of products is done with a special tool.
How to attach a metal profile to a fence
Before purchasing a profiled sheet, you must first select the color, type of coating, and material of manufacture. In addition, it is necessary to correctly calculate the amount of metal profile and fasteners.
Only then can construction of the fence begin. Having decided on the installation location of the wicket and gate, having made markings, they install support pillars for the future fence. How the corrugated sheeting will be attached to the frame depends on the material used to make the supports:
Cross members can be attached to supports in several ways:
When installing bars, you need to constantly check the evenness so that all elements are in the same vertical and horizontal planes. Work with wood material should only be carried out in dry weather.
Important nuances when attaching corrugated sheets with self-tapping screws:
- We tighten the screws with a washer and a rubber gasket strictly perpendicular to the plane of the sheet.
- According to the characteristics, the screws are suggested to be screwed in at 2500 rpm, but it is difficult to calculate the force by touch. We tighten the screws so as not to crush the rubber washer. A flattened seal will crack over time and will not create a tight seal.
- We do not use rubber seals where monolithic fastening is required.
- In places where unauthorized access to fasteners is possible, we use anti-vandal screws or use self-tapping screws with a notch that prevents arbitrary unscrewing.
Sources
- https://dom-i-remont.info/posts/obshhie-voprosy/kak-prikrepit-dosku-k-metallicheskoj-trube-populyarnye-sposoby/
- https://domunit.ru/zabor-iz-dosok-na-metallicheskix-stolbax.html
- https://tvertorgles.ru/stroitelstvo/kak-zakrepit-derevyannyj-brus-k-metallicheskoj-trube.html
- https://specgidromir.com/kak-prikrepit-brus-k-metallicheskoy-trube/
- https://stroyido.ru/kak-prikrepit-brus-k-metallicheskoj-trube.html
- https://orpro.ru/sposoby-krepleniya-derevyannogo-brusa-k-metallicheskoi-trube-kak/
- https://stroypodskazka.com/kak-krepit-dosku-k-profilnoy-trube/
[collapse]
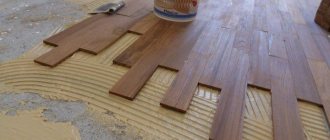
Fastening with liquid nails
Using glue, the timber is laid on a cement screed; such floors are made in production workshops, shopping centers and warehouses for large-sized products. The reliable floor allows the use of electric cars and forklifts. In concert halls and entertainment centers, natural parquet is laid on timber floors - this is the best option for flooring in places with large crowds of people.
The choice of glue depends on the volume of work, the size of the wood and the characteristics of the mating surfaces. The affordable adhesives “Liquid Nails” and “Moment Joiner” are popular; for small volumes of work, polyurethane foam is used. Eco-friendly glue is used in residential and public buildings.
The most important operation is the preparation of the mating surfaces; the concrete screed is pre-primed - this operation will prevent excessive absorption of the glue into the porous structure and ensure a reliable connection with the glue. The surfaces to be bonded are cleaned of dust and degreased. The timing of complete polymerization of the glue is indicated in the instructions for use.
Designers believe that when decorating an interior with natural wood, it is better to choose liquid nails than to use a drilling and slotting tool.
Load-bearing capacity of a screw pile: calculation
The bearing capacity of screw piles is found by multiplying the area of support by the bearing force of the soil. Let's consider this calculation using the example of screw pile 133, immersed in clay soil:
- First we find the area of support. Using tabular data, we find out that the diameter of the screw is 30 cm, so the area of the sole is: 15x15x3.14 = 706.5 cm².
- Now we will use the table to determine the load-bearing capacity of the soil. For clay soils it is 6 kg/cm².
- Now we find the load-bearing capacity of the pile elements: 706.5x6 = 4.2 tons.
Conclusion: one pile element model 133, with a depth of immersion in clay soil of 2-2.5 m, can withstand a load of 4.2 tons.
Screw piles
How to take into account the reliability of a structure in calculations?
However, the calculation described in the middle of the article is approximate. It does not take into account the safety factor of parts. To do this, it is necessary to make a final calculation using the formula: N=F/Y, where N is the required load, F is its approximate value obtained by the calculation method described above, Y is the safety factor. The latter indicator depends on the correctness of the calculations and the number of pile elements. Its selection is carried out according to the following parameters:
- with the number of elements equal to 5-20 pieces, the coefficient is 1.75-1.4 (in this case, a low grillage on suspended supports should be used);
- coefficient 1.25 is used when testing on a reference pile element and is approximate;
- to conduct more accurate tests, a coefficient of 1.2 is used.
Example: in continuation of our calculation for the pile element of model 133, we will find the specified load-bearing capacity: 4.2/1.2 = 3.5 tons. This indicator will be used when conducting accurate geotechnical studies. If average tabular indicators are used, then the desired value is 4.2/1.75 = 2.4t.
Screw piles: dimensions
We determine the maximum load-bearing capacity of one pile element
To find the maximum load-bearing capacity of one pile element, several data will be required at once. For clarity, let’s take the following indicators:
- The installation of piles will be carried out on sandy soils with a bearing capacity of 15 kg/cm².
- The support used is model 219 with a base diameter of 600 mm.
- Since we will use no more than five piles in the field, and the bearing capacity of the soil is precisely determined, we use a coefficient equal to 1.75.
The maximum load-bearing capacity is calculated as follows:
- We find the support area of the screw pile: 30x30x3.14=2826 cm².
- We calculate the approximate load-bearing capacity: 2826x15 = 42.4 tons.
- Now the exact load-bearing capacity of the screw piles is determined: 42.4x1.75 = 24.23 tons.
Conclusion: the bearing capacity of one element of screw piles with a support diameter of 300 mm is slightly more than 24 tons. That is, the permissible loads (weight of walls, ceilings, furniture, etc.) on supports at such a burial depth should not exceed 24 tons. As you can see, a correctly calculated load-bearing capacity of screw piles ensures that our foundation will withstand the weight of floors, walls, wind and snow loads.
Screw piles
Screw piles
Pile adjustment
To give the supporting elements the same height, they are cut or trimmed.
This process is somewhat labor-intensive and requires skill, but it can still be done with your own hands. Stages of work:
- At the beginning, you should select a control support pile. It is its height that will need to be guided when correcting the length of other supporting elements.
- On the remaining supports, a marker is used to draw a line along which the pipe will be cut or trimmed. Horizontal consistency should be checked with a laser or hydraulic level.
- The ends of the support elements are cut off using a heavy jackhammer. The cutting line is first cleaned with a file. The blow is applied horizontally along the top edge of the pipe.
- You can use a grinder or an abrasive saw to cut the base pipes. The cut is made along the line marked with a marker, moving along the diameter of the base or towards the center of the pile.
- Another option for cutting the ends of piles is the use of hydraulic equipment. Renting it, let alone purchasing it, is not cheap. However, this method makes it possible to make a very even cut, without damaging or chipping the entire base.
Installation of ends:
- Prepared piles should be cleaned of paint using grinding equipment.
- The head is placed on the base. Using a level, check that it is horizontal.
- Preliminary welding of the element is carried out in 3-4 places by spot welding.
- Using a welding machine, the head is welded around the entire circumference. A small area of 5-10 cm should be left unwelded. It is necessary for the passage of air and ventilation inside the base pipe.
- The weld seam should be cleaned and paint or primer applied.
Determination of the load-bearing capacity of a screw pile experimentally
In addition to the theoretical justification (calculation of the load for screw piles) of the load-bearing capacity of the aircraft, the screw racks are tested. Testing determines the screw support's ability to withstand the design load. The test program is as follows:
- The aircraft is immersed in the soil foundation to the calculated depth;
- a plate made of metal sheet is welded onto the head;
- a load of a certain weight is placed on the platform;
- the stand is maintained for several days, observing the settlement of the support;
- the maximum load that will not cause the support to settle determines the load-bearing capacity of the aircraft.
Thickness and grade of steel
Screw piles can differ not only in diameter, but also in the thickness of the pipe wall. There are three main types:
- with thin walls – steel thickness up to 3.5 mm;
- with medium walls - thickness ranges from 3.5 to 6 mm;
- thick-walled piles – pipe walls from 6 mm.
Please note: Which foundation is better for a timber house?
You should not ignore this parameter when choosing. It is directly dependent on the composition of the soil (in particular, the degree of soil aggressiveness) and the level of loading of the foundation. Therefore, the thickness can be determined only after all the necessary calculations have been made. It is also advisable to take soil samples and assess how likely it is to provoke corrosion. This information will also be useful when choosing a steel grade.
With the thickness of the blades everything is simpler. It is necessary to take into account, mainly, the severity of the future building - blades up to 5 mm thick. suitable only for light houses and outbuildings; a more impressive structure will require a minimum of 6 mm. thickness.
The steel grade, as already noted, is selected based on the chemical properties of the soil. The main recommendations here are: