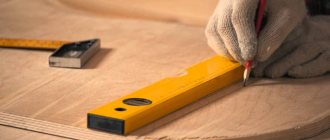
Like any building material, plywood is cut to the required dimensions. Plywood cutting can be done either manually or using special equipment. And here the main thing is to maintain the accuracy of the cut (the absence of curved lines is the key to success).
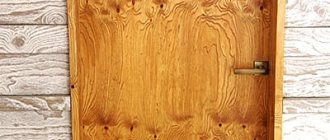
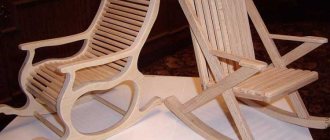
And we shouldn’t forget that working with plywood involves not only using it for construction needs; quite often, plywood products are used as decorative elements. Openwork grilles, boxes, stands and other homemade products look very cool, especially if they are made by a master.
Photo of what can be made from plywood.
How to cut plywood at home
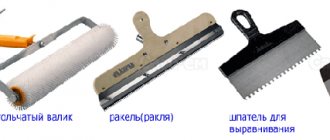
Determining the optimal device for cutting wood panels is not the most difficult task; standard equipment can be used for the process.
Hacksaw
Hand tools are a universal solution.
Slicing is carried out using two main types:
- A standard version with small teeth, which is used for woodworking. To avoid the appearance of burrs and ensure smooth running of the hacksaw, the cutting part is first slightly spread and carefully sharpened.
- Special saw for plywood. Due to the frequent and fine arrangement of the teeth, the cut is the most even.
There are special saws designed for cutting plywood, but with the same success, plywood can be cut with fine-tooth hacksaws designed for working with laminate and plastic.
Cutting with a manual device has the following features:
- Labor intensity. Due to the fact that the veneer and adhesive fibers are multidirectional, cutting a large number of parts will require a lot of time and effort. Particular difficulties arise when working with hard wood species.
- Possibility of curved cutting. With certain skills, elements of the desired shape can be created using a hacksaw. Exceptions include strongly curved fragments.
- The need to comply with the slab placement technology. The sheets must be placed on two stops to prevent the blade from being clamped between the cut fragments. Otherwise, not only damage to the workpiece is possible, but also failure of the hacksaw.
For small internal cuts, a manual jigsaw is used; it allows you to form complex shaped sections.
A hand jigsaw is a specific tool; it is used only for small decorative work and is designed for cutting plywood up to 7 mm thick.
On a note! When working with an old saw, difficulties may arise due to corrosion on the blade. To eliminate the defect, grinding is done using a fine abrasive.
Jigsaw
This device is the optimal solution when it is necessary to cut plywood into parts. When choosing such a tool, you need to consider some nuances:
- It is recommended to abandon cheap models, since they do not achieve the desired result and significantly slow down the cutting process.
- A power switch is required. This allows you to adjust the jigsaw to slabs of different densities.
- The ability to adjust the stop plate ensures leveling for an accurate and straight cut. If the device does not have this function, then the sole should not be curved.
The main factor determining the quality of a cut with a jigsaw is considered to be the pitch and size of the tooth, and only then come the local settings of the tool itself, such as turning off the pendulum stroke and adjusting the frequency
. The correct choice of a file is carried out taking into account the following conditions:
- Preference is given to branded blades designed specifically for sawing plywood. They provide the highest quality results.
- The nozzle may have different tooth directions. Depending on the position of the cutting part, one of the sides of the slab will be completely free of chips.
- An alternative option allows you to use a metal blade. But this solution has disadvantages: the work is carried out very slowly, and small teeth become clogged.
It is with the help of an electric jigsaw that you can quickly and efficiently cut plywood at home. The tool makes it easy to do the process yourself.
Attention! The device is suitable for complex shaped cuts. Difficulties arise when processing thick sheets: the nozzle is quite thin, so it collapses, which requires additional preparation of the fragment.
Hand electric saw
- Saber. It is an alternative to a jigsaw, but is more suitable for quickly cutting off excess without forming an even and precise edge.
- Disk. It is used most often because it allows for large-scale work. The disadvantage of the device is that cutting is only possible in a straight line.
Advantages of this group of equipment
If you are thinking about which machine option to choose, then this section will allow you to get acquainted with both the pros and cons of laser equipment. Let's start with the advantages:
| Accuracy | Laser cutting on wood is a high-precision process, because the thickness of the cut is 0.1-0.2 millimeters. If you need to process small parts and make structures of complex shapes, then this option is perfect for any purpose, because the cutter is able to cope with the most complex contours |
| High performance | The cutting speed is very high, which allows you to complete a large amount of work in a short time. This allows you to save energy resources, in addition, your intervention is not needed during work, you simply observe the process and control it |
| Economical | This applies both to energy consumption (powerful motors in other types of equipment use much more electricity) and to material consumption. High precision allows you to work with a minimum amount of waste and use materials economically |
| Multifunctionality | A wood laser cutting machine can not only cut out elements of any size and shape, but is also great for engraving surfaces and creating relief paintings. Many companies earn a lot of money from this type of service, such as engraving on wooden products. |
Important! When choosing a specific model, it is important to decide what materials you will process, because there are installations for wood, plywood, metal, plastic, and there are also universal options that can cope with different types of raw materials.
The equipment can take up quite a lot of space, especially if the desktop has impressive dimensions, so you must have room for installing the machine
How to cut material without chipping
To avoid such defects, it is advisable to consider the following recommendations:
- Based on the cutting drawing and the dimensions of the selected tool, the thrust rail is set. It will avoid vibrations of the cutting device, which will reduce the amount of damage.
- If the work is carried out with a hand-held circular saw, the tooth output is minimized. As a result of the adjustment, the sawing part should not protrude more than 5 mm.
- To make the edge without chipping, a special tape is glued along the line. This reduces delamination, but does not guarantee complete absence of defects. An alternative option is to wet the upper area, but due to the moisture resistance of the material, it will not be possible to achieve the desired effect.
- The cutting part is brought to the starting point of the process in the switched on state, since when started, the teeth tear the wood fibers directly at the edge.
- The movement of the tool should be uniform; pressing too intensely creates creases and burnt areas. If you move very slowly, tracks will appear as a result of constantly entering the surface.
Ensuring a perfectly clean cut
For most parts, it is enough to reduce the chip size to 0.2–0.5 mm. Such small irregularities in the cut edge are not noticeable; if desired, they can be easily eliminated by chamfering with an emery block or covering them with a wax corrector pencil. It is also possible to grind the end with sandpaper if a sufficient allowance was given during cutting.
However, even at home, it is possible to achieve cut quality comparable to the result of a cutting machine with two high-speed disks. This is only possible when the tool moves along a guide rail, or, in extreme cases, along a temporary stop bar.
First you need to make two cuts about 0.5 mm deep on both sides of the part to indicate the thickness of the cut. Along the edges of the cutting line, you need to scratch two grooves under an even ruler. This is done either with a segmented or oblique shoemaker's knife (for chipboard and uncoated wood), or with a sharply sharpened drill or pobedit cutter (for laminated materials).
The depth of the grooves should be at least half the thickness of the outer layer, which is non-uniform in relation to the main body of material. This method requires high precision in matching the grooves and the cutting line, but this is the only way to ensure a perfectly even cut end that does not require additional processing.
Festool - a tool for professionals
Industrial Equipment LLC is the official dealer of Festool. Buy German quality on individual terms!
Cut plywood with your own hands
- All procedures are carried out according to drawings that are drawn up in advance. This will avoid mistakes.
- The marked slab is laid in the prepared place. It is important to ensure free passage of the disk or saw and rigid, stable placement of the resulting fragments.
- The exposed stop is fixed with clamps.
- Based on the most comfortable position, the largest possible cut is made. It is important to ensure that the parts - especially the part being processed - do not sag or jam the tool. Whenever possible, cutting is carried out without stopping.
- Figure cutting is performed in a single section or fragments, the excess is removed gradually.
Masking tape glued to the cutting line can prevent the appearance of small chips along the edge, but if the disc is selected correctly, then you can do without such manipulations
. For complete safety, it is recommended to work with safety glasses, a mask and a respirator. All processes are carried out carefully; upon completion, the device is disconnected from power.
Source
Using adhesive tapes
Using the same principle, you can protect the back side of the material being cut. Tape should be placed along the cutting line to protect against large fragments being torn out. Pasting surfaces is one of the few ways to ensure the cleanliness of a curved cut with a jigsaw. Unfortunately, masking tape is not the best choice for this due to its low strength.
The best quality cut can be obtained by covering the part with aluminum or fiberglass-reinforced tape. It should be wide enough to cover 15–20 mm on each side of the cutting line. The density of the sticker is also important: the tape must be pressed down well with a dry cloth swab and the formation of folds must be prevented by any means.
You should avoid tapes with very tenacious adhesive. During the tearing process, they can carry along small fibers and fragments of the laminated surface, dissected by microcracks that form during cutting. Also pay attention to how easily traces of glue are removed and whether the adhesive adheres well enough to work with rough materials such as unsanded plywood or OSB.
Why do you need to cut plywood?
Standard sized plywood sheets are rarely used and usually need to be sawed
Plywood is used in many construction and renovation projects. In addition, it is the safest and easiest to handle option for making home furniture, especially children's furniture. Sheets have to be sawed, cut, bent and cut.
The complexity of such work lies in the structure of the material. In regular wood, the wood grains are oriented in one direction, which makes work easier by allowing you to choose the right tool for each direction. In the chip material the fiber has no orientation at all; the user has to deal with a relatively homogeneous composition.
Plywood is a multilayer wood-laminated board in which the wood fibers in each layer are oriented perpendicular to each other. When sawing, the tool simultaneously works with several planes . This makes it very difficult to work, especially manually. You have to put in more effort. The cut often turns out uneven, with chips . This property is especially pronounced during complex cutting, when it is necessary to perform a rounding.
Adviсe
To cut a plywood sheet correctly, you must use the right tool and follow some rules:
- Before cutting, you need to take all measurements and check yourself to avoid annoying mistakes;
- During operation, you must monitor the power cord;
- before using the tool, you need to adjust the cutting depth to an unnecessary amount;
- the saw blade must be suitable for cutting plywood;
- the use of a saw must be accompanied by the use of protective gloves and goggles;
- dull saw blades are more dangerous than sharpened ones;
- When sawing plywood, you must be careful not to bring your hands close to the blade;
- Do not start work without skills in using power tools.
Selecting Tools
To cut plywood without chips and cracks at home, use hand and electric tools . In the first case, physical effort is required, so such work is quite tiring. However, it is not always possible to use the electric option. The power tool causes the material to heat up and heats itself up, which is undesirable for large thicknesses. Not every model is suitable for cutting plywood. A good jigsaw or file is not cheap.
Hand tool
Hacksaw for plywood
Whatever tool is used for manual cutting, the work will have the following features .
- Labor intensive - cutting is difficult due to the multidirectional fibers. Cutting a sheet of plywood will require more effort than cutting an OSB board of the same thickness. This is especially noticeable when working with hardwood sheets.
- to secure the slab correctly . The blade is placed on 2 stops to avoid pinching during cutting.
- Using a hand tool, you can cut a workpiece of any shape from the material . This is the main advantage of this method.
The selection of hand tools is very small. To cut plywood, you need a knife with fine, well-sharpened teeth made of hard metal and with minimal setting. The teeth should not have a clear direction, otherwise the hacksaw will not overcome multidirectional fibers.
Wood hacksaw
Zero gap technique
Carpentry craftsmen most often use the principle of modifying the sole of a cutting tool, which consists in reducing the gap between the working tool and the pressure pad. This is almost guaranteed to eliminate the effect of “breaking” the crust in the top layer of the material.
Zero clearance is achieved by securing the cover plate to the tool base. The pad has only one narrow hole (or slot) that fits tightly to the cutting organ. Because of this, even with a high feed force, the teeth are guaranteed to cut off small chips and not turn out the chips in the upper layer of the part.
When using overlays, it is extremely important that they do not scratch or damage the surface of the part. Therefore, they are most often made from a material that is inferior in hardness to the material being processed, for example MDF or plasterboard. Unfortunately, such an overlay does not last long, which is why it has to be changed every 4–5 meters of the cut.
More durable linings can be made from sheet plastic (PVC, fluoroplastic), fiberglass or metal. In the latter case, the surface of the lining must be carefully polished and soft metals such as aluminum or duralumin must be used to reduce vibration.
Cutting methods for normal use
When working with the material, you won’t be able to get away with adjusting the dimensions, so you still have to cut the plywood. At the household level, these operations are performed either with a knife, a jigsaw, or a circular saw.
It is worth recalling the basic rules for working with this material, especially since cutting plywood to size is far from the last thing in the cycle of construction work.
- Thin plywood is cut with a mounting knife, easily and simply (thin plywood is up to 2 mm);
- Cutting plywood up to 6 mm is done with a jigsaw; (see also: Sawing out of plywood with a jigsaw: drawings and rules for working with the tool)
- Puffs over 6 mm require a circular saw.
You can just cut it.
For your information! Please note that:
- Firstly, coniferous woods used in the production of plywood have a more viscous structure due to natural resins, which dull the cutting edge of the tool very well;
- Secondly, working with plywood involves working along the grain. If it becomes necessary to cut across the fibers of the outer layer, then weakening cuts are first made in it with a knife, and then with the main cutting tool;
- Thirdly, plywood does not tolerate rough mechanical penetration, so before driving a nail or tightening a screw, you need to drill a hole of the required diameter in the plywood.
This concerns the usual straight-line processing of plywood; it’s time to remember about figured cuts.
Shape cutting - various options
The work with plywood ends without just fitting it together. In this case, not the last place is occupied by figured cutting or sawing.
Currently, there are several basic techniques that will allow you to turn a piece of dead material into almost a work of art.
- Do-it-yourself figure cutting of plywood. This is an ordinary jigsaw and a set of files for it;
- Figure cutting of plywood on CNC – milling cutting;
- Shape cutting – plywood is processed using a laser.
Let's look at these options in more detail.
We make crafts ourselves
Once upon a time, plywood cutting was very popular; craftsmen widely advertised their creations, especially since this hobby was, perhaps, one of the cheapest. Judge for yourself, the tool for cutting plywood is a jigsaw.
Well, it was always possible to find a jigsaw, although nail files were periodically in short supply, problems were solved with them too. And that’s it, nothing more was needed. It was later that special tables and devices appeared.
Jigsaw
But, by the way, the principles of working with this tool remain unshakable, here they are:
- Jigsaw files are very fragile, so their movements occur only in one, strictly vertical plane. Any distortions can lead to the canvas simply bursting. The actual operation of the saw occurs when moving downwards; the saws are also positioned with their teeth downwards;
- The workpiece is movable, the file is relatively static. This suggests that when working with workpieces in difficult areas, it is the workpiece that is scrolled, and the blade remains in one place, and the movements become more accurate;
- There are references in various sources to the fact that work begins in the inner contour, and only then moves to the outer perimeter. Our recommendation for this is;
Advice! If the outer perimeter does not have complex patterns that can be damaged when working on internal patterns, then you can start working from the outer perimeter, thereby lightening the weight of the workpiece itself.
By following these simple rules, you can create interesting carved lattices, cutting boards, and who knows what with your own hands. Sawing with a jigsaw is still an interesting and promising hobby.
From household creativity to industrial production
Laser cutting of plywood sheets is what this section is dedicated to. Any instructions for using laser technology will tell you that the main principle used in this case is beam burning.
At the same time, the technique certainly has a number of undeniable advantages that are so in demand today.
- The cutting quality is maximum, the thickness is minimum; this is very difficult to achieve with any other equipment;
- Cost-effective processing; there is no need to deal with burrs, chips and other defects that may arise during machining;
- Precision and versatility. The parts that come out of laser processing have absolutely the same dimensions, and the patterns that this beam draws can be of any complexity.
The story would be incomplete if we did not discuss the possible risks when working on such equipment and, if you like, the negative aspects when using these machines.
- A laser is a laser, and the beam of excess power can cause charring of the material and even fire. The technology provides a special air supply to avoid such consequences, but the risk remains. In this case, you have to rely on the operator’s experience;
- Each type of wood and type of glue requires its own processing mode; the final result also depends on the worker’s ability to determine the type of product by appearance;
- And again the human factor. If the machine operator is inexperienced and the beam hits a knot, then there is a high probability of this knot falling out, and, consequently, a defect in the work.
These are some interesting things that can happen.
As you can see, all risks are associated with the experience and skill of the worker. Although the equipment is programmed to produce drawings of any complexity, lack of experience can lead to dire consequences.
In all other respects, laser equipment provides enormous opportunities for realizing design ideas.