In any park, square or forest you can find many different shaped twigs and twigs, and these are excellent materials for creating children's crafts or home decor. Such gizmos are environmentally friendly material and will fit into any apartment interior, filling it with natural beauty.
In addition, a craft made from branches can be an excellent gift for a loved one. How to make a souvenir from branches?
Benefits of working with branches
Branches are excellent natural raw materials for creativity. You won't have to pay for the material. It is easy to collect components for crafts in any parks, squares, courtyards. Working with wood rods is easy.
The task can be done by both adults and children. In the process of work, creative abilities develop well. Branches help to see beauty in the most ordinary things.
Working with the gifts of nature is pleasant. The raw materials are environmentally friendly and safe. This type of creativity calms and pacifies. You can put your thoughts in order, switch to another type of activity, and fantasize. As a result of the work, a beautiful thing appears that will delight and become a worthy decoration of the interior.
Don't be afraid to start from scratch. It is not difficult to master the principles of working with branches. It is enough to choose a direction of activity, collect and prepare material, and start training.
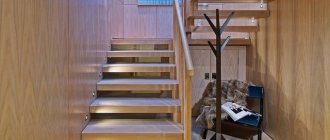
DIY hanging table
Hanging objects can add a feeling of weightlessness and airiness to any interior. A hanging wooden table can make a wonderful bedside table. It is attached to the ceiling with three ropes using a hook. How to make it? Necessary:
- Tablet.
- Grinder machine.
- Drill.
- Hot glue gun.
- Screw.
- S-shaped hook.
- Polyurethane spray.
- Felt strip.
Installation of a hanging table
Step 1:
First you need to choose a suitable board with an unusual texture. Sand all uneven surfaces with a sander.
Step 2:
Next, you need to drill three holes that will match the diameter of the selected rope. The holes should be equidistant from each other, and one of them should be located as close to the wall as possible. You can hang the table using four ropes, then you will need to drill four holes.
Step 3:
The wooden surface should be covered with several layers of polyurethane, allowing each of them to dry. Since the table will be adjacent to the wall, protect its surface from damage. To do this, glue a strip of felt to the part of the table that is adjacent to the wall with hot glue.
Step 4:
Next, pull the ropes through the holes and tie strong knots under the board. After this, you need to drill a small hole in the ceiling and insert a screw with a ring into which you should thread an S-shaped hook.
Step 5:
Then tie all the ropes at the top into a strong knot with a loop and hang the structure on the hook.
The result will be simply mesmerizing. Your hanging table will simply float in the room.
How to make a coffee table from a cut or hemp as in the photo - detailed lesson at the link!
Subtleties of choosing craft components
Making crafts from tree branches with your own hands will not encounter any obstacles if you choose the right material. Regulars of such creativity advise the following:
- It is easier to work with wood that contains a sufficient amount of moisture. Willow, birch, and aspen branches have excellent characteristics.
- Pine and spruce are difficult to process. It is advisable to take on the material only if you have experience.
- It is recommended to choose clean branches without growths or resin. It's easier to work with these. They will not damage surrounding objects.
- Branches for crafts must bend and not break. This will save you from mistakes and the need to replace components.
- Twigs with uniform fibers will be suitable. It is advisable to take specimens with the same direction of scales.
To start creative activity, it is preferable to use thin straight twigs. Working with thick, clumsy, forked specimens is worse.
Eco-friendly clothes hanger in the hallway
By using natural materials, you can save on buying things you need in everyday life. A homemade hanger made from branches will become a functional decoration and will suit any style. Let's consider the options for manufacturing products:
Standard hallway hanger.
- We prepare the wooden base. An ordinary varnished board with dimensions of 80x20 cm.
- We choose branches with a knot; there can be two, three or more.
- We cut the sticks to size 15-20 cm,
- Having retreated a few centimeters from each edge, we fasten the branches to the wooden blank with self-tapping screws.
- The finished product can be hung on the wall.
A piece of driftwood suspended from the ceiling.
- Select a suitable branched driftwood.
- We clean it, dry it, sand it with sandpaper, paint it, varnish it.
- We tie ropes from two edges, fasten them to the ceiling, selecting the desired height.
Branches framed.
- From boards with a cross section of 2.5x10 cm, cut out 2 pieces of 40 cm, 2 pieces of 70 cm.
- From them we knock down a rectangular frame.
- We select branched branches, clean them, and leave 2-3 knots on them on one side.
- We attach them to the rectangular structure, make marks with a pencil, and cut them to the desired size.
- In the frame where each branch will be installed and in the stick itself, holes are drilled on both sides.
- We connect the elements using screws.
- The surface of the frame is puttied and painted.
- The craft is hung on the wall.
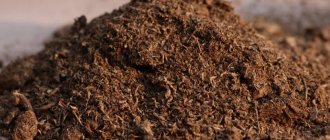
Preparation of material
It is always easier for beginners to make crafts from birch branches. Wood initially has all the necessary qualities:
- softness;
- flexibility;
- ease of processing.
It is permissible to start needlework immediately after collecting the material. No preliminary preparation of wood is required. When using oak and maple branches, any aging of the material is excluded. The breeds are classified as hard varieties. After the raw materials dry, their use becomes more difficult.
It is advisable to collect material for crafts from tree branches in early spring. During this period, the buds had not yet appeared, but the movement of juices inside had already begun. Branches are cut from trees. For some products, fallen specimens, intricate roots, and driftwood are suitable.
If the weaving process is intended, then the branches are soaked in water and dried naturally. Dry material risks crumbling, eliminating the expected creative results.
Candlestick made of tree branches
Stylish candlestick in 5 minutes
In order to make a candlestick from twigs, we need:
- Dry twigs.
- A small glass cup.
- Hot glue gun.
- Candle.
Step 1:
Collect a small amount of twigs, wash them in water and dry them. After drying, cut them with pruning shears into approximately equal lengths.
Step 2:
Take a small glass cup and a hot glue gun. Apply glue to each branch with a glue gun and glue it to the cup. Thus, glue each next branch next to each other.
Step 3:
Take a candle of the required size and insert it inside the glass. The candlestick is ready for use.
50 DIY wooden candlesticks
Another option for making a candle holder is to simply take a thick candle and glue the twigs around the candle with a glue gun. Also, if the branches are painted gold, the effect will be more glamorous.
The branches are painted gold
Golden candlestick
The procedure for storing workpieces
It is recommended to make crafts from branches with your own hands immediately after collecting and pre-processing the raw materials. Long-term storage of the material is contraindicated. The branches dry out and begin to break.
If the work is not carried out during the hot season, then it is permissible to place the container with dried branches outside. Small volumes of raw materials can be placed in the refrigerator. Do-it-yourself driftwood crafts are made from dry material. The blanks can be stored in the house or any outbuilding.
If the wood is too dry to work with, the material is moistened with water. During long-term preliminary storage, this cannot be avoided. In this case, simple irrigation from a spray bottle may not be enough. It is better to pre-soak the raw materials in a container, then dry them in a ventilated area.
Note!
Quilling crafts: features of the working technique, step-by-step instructions and clear diagrams for beginners + ideas for creative crafts (150 photos)- Crafts made from corrugated paper: 100 photos of creative solutions for crafts + step-by-step diagrams and instructions for making your own
- Crafts from foamiran: ideas for creating crafts and interesting patterns for making flowers
Wreath on the door made of twigs
This is the easiest master class that could be shown. Let's make a decorative wreath on the door from twigs. To start and finish our craft we need:
- Twigs.
- Copper wire.
Base blank for a Christmas wreath
Step 1:
Take copper wire and make a circle with a hook out of it (see picture).
make a circle out of wire
Step 2:
You need to make small bunches from the branches, fastening them with wire.
We tie the branches into small bundles
Step 3:
Then we screw bunches of twigs to a pre-prepared circle of copper wire. And so on until the end. Your wreath is ready. You can also decorate it with spray paint, giving it your favorite color.
We attach “bundles” of branches to the base
The wreath can be decorated as you wish. And make it either New Year’s or for another occasion
How to make a Christmas wreath - 5 ways from spruce and pine in this article!
Tools for work
Crafts from tree branches are made using a minimal set of tools. You will need:
- garden pruner;
- tailor's awl;
- sharp knife.
For certain types of processes, a squeezer and punches are needed. As accessories, use a container for soaking, a spray bottle, glass or plastic containers for the base. When making crafts from driftwood, the material is dried. This requires conditions: a ventilated place in the shade.
Decorating a mirror with branches
If you're tired of your old mirror and want to change it, don't rush. Using cuttings of branches, you can decorate your mirror, and it will sparkle with its beauty in a new form.
Mirror decorated with branch cuts
What is needed for this:
- Branches of different diameters.
- Wood file.
- Hot glue gun.
Work process:
- Let's get to work. Take the branches and make cuts with a saw of the same thickness.
- Then take a glue gun and glue each cut around the mirror. It will come out very original.
- In the same way, you can paste over vases and flower pots, or whatever suits your imagination.
You can also use small planks to make a wooden frame like this for a mirror - LESSON here!
Features of children's creativity
For children's creativity, it is better to choose basic ideas for crafts made from twigs. They use materials that are easy to work with. Be sure to limit the use of dangerous tools. Adults certainly help kids.
The principles of operation are first explained to the children. Difficulties rarely arise. The process is usually interesting and captivates the kids. Children can independently come up with a design for a craft and try to bring the idea to life without prompting or help from adults.
Option No. 7. Decorating an old screen with branches
To give a second life to an old screen, follow the simple step-by-step instructions below.
Original screen decor with branches
To work you will need:
- the screen itself;
- white acrylic paint;
- lace fabric;
- varnish;
- stapler;
- tassels;
- branches;
- scissors;
- heat gun.
Photo of the screen before work
Tools and materials
Step 1. First of all, remove the fabric from the screen. Wooden elements are coated with two layers of acrylic paint, after which you need to wait for it to dry completely.
Painting wood
Step 2. Next, apply a layer of matte varnish.
Application of matte varnish
Step 3. A piece of fabric is attached to the screen using a mounting stapler. The fabric should be taut so that it doesn’t end up sagging.
Fixing fabric with a stapler
The fabric is fixed on the screen
Step 4. The branches are attached to the frame using a heat gun.
Attaching branches to the frame
Step 5. If desired, you can additionally use cones of various sizes and thin twigs.
If desired, you can use thinner branches and cones of different sizes
Another photo of the process
Step 6. The finished screen will decorate any room and will definitely attract the attention of your guests!
This screen will decorate any room
Popular ideas for creativity
DIY crafts from branches are very diverse. It all depends on the purpose of further use of the product, the skills of the craftsman, and the materials used. Both children's crafts and interior items or household items are popular.
Note!
Crafts made from polymer clay | Step-by-step master class on creating beautiful crafts- DIY epoxy resin crafts - options for original crafts, step-by-step instructions for pouring and making them yourself
- Lego crafts: step-by-step master class on creating simple DIY crafts + original versions of Lego products (photo + video)
Wreaths
You will need:
- Wire,
- Branches.
Nothing at all and the wreath will hang on your front door or the door of one of the rooms, the choice is yours. By creating unique compositions you can show creative thinking and flights of fancy.
Dry bouquet
To work you will need an armful of twigs and dried flowers. The branches are collected together and a neat bundle is made. You need to take dry specimens. Processing depends on the composition. You can even out the length. The resulting “logs” will become the basis.
It is not necessary to use straight material, as for weaving. The intricately curved tops of the twigs look interesting. You can try to perform a “wave” artificially.
To do this, they work with fresh material, giving the sticks the desired shape by bending. The finished composition is supplemented with dried flowers. Various decors are also used for decoration.
Unusual decor for a nursery
To decorate a children's room, you can make decor from boats. Floating wood is an excellent material for creating original compositions. With the help of such elements you can decorate the interior with a marine style.
Let's consider another option for an ensemble of homemade ships.
This option is also suitable for a child’s room. Sails can be made from multi-colored fabric and from different elements.
Simple vase
Beginners can choose a vase as a DIY craft made from tree branches. The structure is assembled on the basis. The frame of the product will be any plastic container. The length of the branches is equal to the height of the base.
The container is covered with fabric of a neutral color. The branches are secured to the frame using double-sided tape. To strengthen and decorate the composition, you can additionally wrap it with twine.
Note!
Christmas crafts - how to make them yourself? 150 photos of the best themed crafts- Crafts made from stones: creative options for crafts made from stones + step-by-step instructions for making your own, methods and schemes of work
- Crafts from disks: a step-by-step master class on how to create them yourself, creative ideas for crafts of varying complexity + simple patterns for beginners
The product can be painted in the desired color and decorated with various decors. Even a child can easily do this craft. At the same time, the finished product looks interesting and unusual. Such an accessory will become a successful interior decoration.
Stylish bouquet decoration with branches
Beautiful flower arrangements always evoke special admiration. This is not surprising, because each of them is unique. Therefore, today we propose to make a very original decor for flowers with your own hands.
Necessary materials:
- branches;
- flowers and branches with leaves;
- decorative wire;
- wire cutters;
- pruner;
- decorative ribbon.
First, cut the branches so that they are the same length. Cut two pieces of wire equal in length. Fold each of them in half. We put a stick between them and make one turn on each side. This is necessary in order to securely fix it.
Add the rest of the sticks one by one.
We securely fix the ends of the wire. The result is a path of sticks. It can be used several times.
Lay out the track on the work surface. Distribute flowers and twigs with leaves evenly, as shown in the photo. It is very important that there is a small distance between them. We twist the track, but not too tightly.
We secure the ends of the path with a small piece of floral wire.
We decorate the unusual flower arrangement with a beautiful satin ribbon.
Place it in a low glass vase with water. This composition will decorate even the simplest, monochromatic interior and add spring freshness and lightness.
Decorative nest
An excellent option for making crafts from dry tree branches with your own hands would be a bird’s nest. The product can be used to decorate the interior. The little thing will be a suitable table decor for Easter. A nest with birds can be made with children to participate in any thematic exhibition.
To make the base, thin twigs are closed into a circle, and the structure is secured with thread. Other branches are hooked to the base, forming a rounded depression. As the structure “grows,” the product is further strengthened by fixing it with threads. You can plant a bird made from acorns and chestnuts in the resulting nest.
Decoration of photo frames and mirrors
The process of decorating frames for photographs, paintings and mirror elements is similar. To work, you need to use twigs of two sizes: thin, thick. They must be completely dry. It is better not to take willow or willow twigs with slippery bark. Let's look at a step-by-step master class on creating such products.
- If the photo does not have a photo frame, it can be cut out of thick cardboard or plywood.
- The frame should be painted a dark brown color.
- Dry branches are cleared of bark and cut to fit the frame.
- The first layer, consisting of larger parts, is laid and glued along the perimeter.
- Then the next layers are fixed. Elements located perpendicular to each other are intertwined at the ends.
- To increase strength, you can additionally tie the structure with wire. To hide it, the surface is covered with spray paint.
- Moss, pine, fir cones, paper flowers, and beads are used as decoration.
- At the final stage, the craft is coated with non-toxic varnish.
Wicker baskets
A popular craft made from willow is the basket. You can weave a decorative or household product. Various boxes, boats, plates, other utensils or household items are also made using a similar principle.
Weaving the basket begins from the bottom. You need to take 8 twigs of medium thickness. The quantity is divided in half. For specimens of one part, holes are cut out in the middle of the length. The remaining branches are inserted into the resulting holes.
They begin to braid a kind of cross with third-party branches. As each element is completed, a new one is woven in. In this way, walls of the required length and desired shape are formed. If necessary, the product is supplemented with handles. The bottom can be reinforced with a thin wooden plate.
House
The child will be delighted with the craft in the form of a house made of branches. In shape it resembles a log house. Its dimensions can range from a tiny toy with an area of 10x10 cm to a fairly large structure with a wall length of more than 50 cm. The most difficult stage is the preparation of “logs,” i.e., even, straight rods of the required length and approximately the same diameter. To do this, the bark is removed from the branches and all side branches are carefully cut off with a knife without leaving any residue. The workpiece is sanded with sandpaper and cut into pieces of the required length.
The log house is assembled using the “with remainder” system, i.e. the ends of the branches extend beyond the corners of the house. To lay the crowns evenly, the joints are cut out (into “half a log”) using a knife or sharpened with a round file. The branches are fastened together with glue. Door and window openings are formed. The roof is gable, with a fairly steep slope. In this case, the entire frame of the house is first assembled, when the walls rise to the ridge (here they are connected to each other). The roof is laid on top of the frame. A pipe is installed on top. For the New Year, such a house can be additionally decorated with a luminous garland.
Animal figurines
Simple crafts made from driftwood will be animal figurines. To work, you need thin branchy rods, cuts of thick branches, and straight sticks of medium volume. It's easy to assemble a deer from this set. The parts are connected using glue, plasticine or other fasteners.
There is no shame in sending such a craft to an exhibition of children's creativity. The product will be a wonderful interior decoration. Such deer are especially relevant during the Christmas period. In a similar way, it is easy to make dogs, cats, bears, and other representatives of the fauna.
Partitions and screens
Using branches, you can create original partitions and screens, and create unique zoning of the room. They can become the accent of any room and decorate it. The structures can be built in different ways. Let's take a closer look at one of the simplest options:
- We measure the distance from floor to ceiling, the length of the future partition.
- From a 3.5x10 cm board we cut out two segments corresponding to the measured length.
- Next, we select long thick branches that reach the ceiling, cut them at the ends, taking into account the height of the board.
- We carefully assemble the structure on the floor, fixing tree branches on both sides to the guides.
- We lift the finished structure and securely fix it to the floor covering and to the ceiling.
Winter forest
An excellent option for crafts made from branches and driftwood for the interior would be a forest. The product can be made in the form of a panel or installation. Bushy branches are needed for work. Objects are simply glued to a vertical background or placed on a horizontal surface.
The twigs can be pre-painted with white paint to imitate snow. The forest will turn out to be winter. You can make snow on the ground using pieces of cotton wool. The picture can be supplemented with any other suitable objects.
Make a free bouquet for a vase in the same way. Branched rods painted with gold or silver paint look interesting.
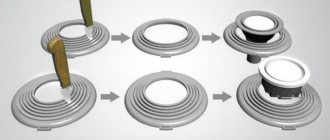
Original stand for pencils and pens
You can cover any glass with branches, as in the example with a vase, and use it for different purposes. There are options for interesting stands for stationery made from driftwood and also from hemp. Let's look at the easiest way to create a convenient element for placing pencils from a saw cut:
- Select a stump of suitable diameter.
- We cut at the ends so that the height of the workpiece is 10 - 12 cm.
- We clear it of bark, you can leave the knot.
- Using a drill, drill holes spaced 1 cm from the edge and between each other.
- Clean the surface with sandpaper.
- We insert pencils into the finished product.
The product does not have to be round in shape. It can be cut in half, cut out into a square, made into a crescent, or given any shape.
Panel of branches
Making a panel out of sticks is easy. The outlines of the necessary objects are drawn against the background. The sticks are applied one by one to the outlines of the picture.
Perform a cut along the boundaries of the object. Each element prepared in this way is glued to the base. The resulting picture can be decorated with decorative details.
In this way it is easy to make animal figures, flowers, and bring other ideas to life. For an Art Deco interior, it is popular to create an image of the sun.
Decorative design of lamps and fixtures
Thanks to their unique contours and sizes, the branches look very impressive in the rays of artificial light from lamps and floor lamps. They acquire fancy patterns, creating the illusion of a fairy tale and magic. You can make both complex ceiling accessories for the living room and small lamps for hallways and bedrooms.
For a chandelier you will need to select durable driftwood, process it, and paint it taking into account the main color of the interior. Using metal hooks, we attach it to the ceiling and lower the electrical wiring, intertwining the wires along the branches. We install sockets and light bulbs.
A floor lamp decorated with branches looks stylish. To do this, you need to select sticks of the same length, remove the dust and bark, and rub both ends with sandpaper. We lean them against the base of the lamp and secure them with twine. You can organize the fastening in the center of the rack, or in several places. Use small branches to cover the lampshade.
From an ordinary branch you can get a real work of art - a designer wall lamp. The more intricate and tortuous the wood configuration, the brighter and more spectacular it will look. We attach the branch to the wall and wrap it with wire with a simple lampshade.
Interior decor from roots and driftwood
You can make interesting crafts from tree roots with your own hands. It is enough to find an interesting piece of natural material. Roots or any driftwood are suitable for work. The element can be cut to the desired size.
The object can be sanded, painted or varnished. The product can serve as an art object for decorating a room. If a thing is endowed with functional significance, then additional interventions are necessary.
Candle holders are attached to the candlestick. The vase needs a hole to place flowers. Similarly, crafts made from tree roots are made in the form of photo frames, paintings, and mirrors.
Shade
You can make beautiful designs for lampshades from natural materials. Individual wood elements are attached to a metal base. The wood can be pre-coated with a special varnish.
You can hang light bulbs on the branches. And hang the base from the ceiling. You will get a chandelier of a non-standard configuration.
The photo shows another colorful option. Individual elements of wood are attached to each other, and round lamps are suspended from them.
Trifles for the home made from driftwood
You can make crafts from driftwood with your own hands not only for interior decoration. It is possible to make useful things for the home. Various kitchen utensils are made from unusual materials: trays, plates, cutting boards.
Unusual driftwood will be an excellent base for a floor lamp or lamp. The holder is made from a single element or assembled in parts. Clothes hangers are made in the same way.
From simple driftwood it is easy to make various unusual things for everyday life. Such products look colorful, unusual, and always attract attention.
Original ideas for the home
Natural materials fit organically into any interior. Simple decorative elements made from branches, made by yourself, will help create an atmosphere of comfort in your home.
Knot hanger
An interesting clothes hanger with knot hooks can decorate your hallway. Knots shaped like hooks must be selected in advance. It is important that they are strong, and the size of the branches allows you to hang clothes on them.
To attach the knots, you need to select a base. This can be one or several boards connected vertically.
It is better to attach knots to the base using self-tapping screws. The finished hanger can be painted.
In this way you can make a convenient and practical hanger for children's clothes without extra financial costs.
Decorative tree
Such a craft can not only decorate the interior, but also be a good gift idea for friends.
To bring your idea to life, you need to prepare:
- twigs,
- decorative elements (beads, colored pebbles, small flowers, glass balls, Christmas tree beads),
- a flower pot,
- pebbles,
- Styrofoam,
- glue gun,
- moss.
How to make a decorative tree.
- The flower pot is filled with stones to about halfway. Stones are needed to give stability to the product.
- Carefully make a hole in the foam for the branches.
- The branches are painted, flowers, balls or beads are glued on them (depending on the idea).
- The branches are secured in a piece of polystyrene foam, and everything is secured together in a pot.
- The foam is covered with pebbles on top. Pebbles are masked with moss.
The original craft is ready.
You can decorate the lamp stand with twigs or use them in making a lampshade. It is not difficult to make an interesting house from such material for decorative or play purposes.
From straight branches you can make stands for hot dishes and napkins, unusual wall panels and containers for storing small items. You can make an interesting candlestick if you paste twigs over a transparent glass glass.
Using twigs and branches, you can make unique designer items to decorate your home. Ideas for creativity can be found on the Internet, in interior design magazines, and in the surrounding nature.
Natural materials are safe for health, practical and durable. Crafts made from them will serve as an excellent addition to the interior, allowing you to create your own unique style and comfort.
Branches and twigs are free materials for creating simple crafts and unique designer products. Starting with the manufacture of the most primitive products, you can gradually move on to complex and interesting designer items that will add a special charm to any interior.
Furniture made from twigs and driftwood
Not only small objects and decor can serve as objects for DIY crafts made from roots and driftwood. Even furniture is made from similar raw materials.
It is enough to take a close look at this “garbage”. The components of objects can be slightly adjusted and processed. The parts are carefully selected and connected. Driftwood can form part of an object.
Small things can be completed in one piece. In this way, amazing tables, chairs, shelves, and racks are obtained. It’s easy to assemble a unique garden bench or gazebo from the roots of fallen trees.
Not only large pieces of trees can be used as material: roots, branches, but also twigs. Excellent light furniture is woven from wicker.
There are many examples of crafts made from twigs, unusual roots, and driftwood. You can come up with an idea yourself or get it from the Internet. All things in this manner look stylish, unusual, colorful. This option will be a good solution for decorating any interior.
Decoration for mirrors
An interesting decor can be made from a round mirror. Instead of a frame, elements made from pieces of wood are attached. This option looks great in a loft interior. You can complement the mirror with themed accessories.
The frame of long branches looks unusual.
Photos of crafts made from branches
How to decorate an interior space with wood?
Natural solid wood can take on different shapes and colors. This material retains home warmth, has good sound insulation and has a positive effect on human consciousness.
Wooden decorative elements add a unique zest to the interior space. Thanks to them, the design seems more comfortable and cozy. Textured lines on the surface of the wood add sophistication to the surrounding environment.
Such details can be present in any stylistic direction. In a classic design, carved wooden decor is used to add luxury to the room.
High-quality textiles and small decorative items help complement the composition. The array is used to decorate walls and ceilings. As a result, the plane acquires a beautiful appearance that fascinates.
Wooden crafts of unusual shapes are very often found in the minimalist or modern style. Thanks to them, the interior looks stylish and modern. In addition, in the space of the room you can find wooden vases, wall panels or figurines.
To decorate the kitchen area, a cutting board made of high-quality solid wood, fruit vases or wooden shelves for various small items are suitable.
Creating an exclusive design is quite simple. The main thing in this matter is to have a good imagination and a clear idea of the desired result.
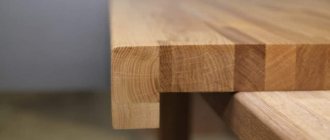
Wooden furniture
You can use not only wooden decor for furniture in the interior, but also make the furniture itself from solid wood yourself. Even an ordinary stump can easily turn into a table if you add a glass tabletop to it.
Tree trunks can be cleared of bark and soaked in a protective solution, then they can easily turn into shelf holders. You can also make chairs or stylish stools from tree cuts. It would be good to make a base for a floor lamp from willow twigs.
Moreover, even bathroom furniture is made from solid wood in an almost untouched form, for example, the base for installing a sink.
Solid wood furniture can be created using the following principles:
- Modular furniture, which will consist of several elements. The figure can be any, but the surface must be smooth;
- Furniture, the basis of which will be a solid element. Such furniture will be easier to work with, but you will have to try to find the right size.
- Because a dining table, for example, must be large and of a certain size, but finding wood of the required diameter will be difficult.
- In addition, sawing will cost several times more than small ones. But there is one big plus - you don’t need decor for a wooden table; it will look very impressive even without it.
Advantages of wooden decor
Elements of wooden decor can be incorporated into any interior, the main thing is that it is in moderation. Such things will have certain advantages:
- Things made of wood are practically durable, so this decor will last a very long time. This will help save money and time on constant repairs, especially if the decor affects a large area, for example, an entire wall;
- Wood accumulates heat very well, so this decor will also act as thermal insulation. You can put it on the floor or decorate the walls with it;
- Each cut of wood has its own unique pattern, so using an array, you get an individual decoration for your room.
Creating a designer wall
For decoration, it is advisable to choose one side of the room. The design of all planes is a sign of bad taste, and the room will look overloaded. Any room needs to be given air, and it’s not about the windows. It should breathe space, and light empty planes give this effect. Only one “woody” edge of the room will become a kind of accent, which will become its mood. You can lay out the “wood puzzle” yourself, and now we’ll talk about how it’s done.
Everyone has a dead tree in their yard that needs to be removed. Now it's time to chop it down. We take a branch and cut it into bars of medium thickness. You can remove the bark from the resulting “pancakes” and then sand it. Thanks to this, you will not drive a thorn when touching the wall. The resulting wood layers should be treated with a special insect repellent, and then placed on glue. It is advisable to varnish the resulting relief - varnished wood can last a long time.
On a note! Create a composition from branches of different sizes, starting from a massive trunk and ending with the thinnest branches. The composition breathes due to the voids formed between the cuts of different sizes.
Difficulties in laying out a modular floor
This type is quite complex, so it is better to be patient and get to work. Choose thick trunks to avoid the formation of large voids when laying out circles. Hardwood logs are selected to make the floor, because the floor is exposed to impact every day.
There are two reasons that will make you sweat:
- Solution. If you put all the parts on glue, then the floor will not last long, even if you cover it all with varnish. Modules will begin to fall off due to constant pressure. You will have to use a solution, possibly cement-based.
- Leveling the surface. If the thickness of each element does not play a big role in the design of the vertical plane, then for the floor this is the main condition. It is necessary to adjust all the modules to the overall thickness, and start grinding after installation. The procedure will take quite a long time, because achieving a smooth surface is not easy.
Next, start covering the finished surface with varnish. It will protect it from pests and external influences. The floor is easier to clean, and it will last longer in a “protected” state. An unprotected surface can be attacked by pests or it will simply begin to rot due to excessive moisture.
Kitchen ideas based on semicircular cuts
This figure is an unusual piece of decor and a reliable assistant in the kitchen. The material can withstand high temperatures and does not heat up as much. From saw cuts you can create simple one-piece stands and modular ones, the material of which is easier to find. Everyone has seen such stands in a store and thought “No, you can’t do this yourself” - a wrong opinion. Why pay more if you do it yourself?
The kitchen will be complemented by fancy semi-circular shelves, which can be put together from solid cuts of wood, dividing them into two parts. The illusion is created that the “round block” is in the process of sinking into the wall. An interesting technique is if the shelf is round, this creates visual movement. The effect is achieved due to the dynamic relief on the bark. Cookbooks or personal collections of the housewife's recipes will harmoniously be placed on the shelves. And the product will withstand quite a lot of weight, even if its dimensions may not inspire confidence.
Remember! If this is a stand specifically for dishes, then it is better to make it one piece. Joining small parts involves gluing, and glue is not compatible with high temperatures. The stand will simply fall apart into several parts.